Video Part 7 - DVD2Xvid
by Paul Arnote (parnote)
Can I copy my DVDs?
Before I get into talking about the DVD2Xvid program, it’s only fitting
that we discuss this hot topic, one that has spawned many heated debates
and arguments. The law is quite ambiguous. In the U.S., there appears
to be significant conflict between the “old” copyright law and the DMCA
(Digital Millennium Copyright Act) amendment to that copyright law
regarding fair use by consumers and circumventing access controls.
According to the writers of the amendment, the DMCA does not trump
traditional use of copyrighted materials, as has been previously
established by law and the courts.
Although the Hollywood movie studios and the MPAA would love for you to
believe otherwise, it IS perfectly legal (in the U.S., anyways; check
the laws for your region of the world) for you to make a backup or
archival copy of your legally purchased DVD movies for archival
purposes. But that’s only if you are a U.S. citizen, and if you go by
the U.S. courts rulings regarding copyrights and your rights to make a
personal, private archival copy. That archival purpose could include
creating a copy on your home media server’s hard drive, eliminating the
disc-swap-dance involved with watching the movie as it is presented on
the DVD drive.
The DVD disc producers even go to great lengths to prevent you from
making that legal archival copy, with copy protection schemes that have
become quite elaborate and tricky. Presumably, the movie studios claim
that the copy protection schemes are needed to prevent piracy, which can
be quite troublesome to the bottom line when it comes to home video
sales of a title. For many movies, the revenue from home video sales can
provide huge relief for a movie that had lackluster performance at the
box office. It’s also the reason why so many recent box office releases
find their way to home video within a few months of the film’s original
release.
I doubt that there will ever be any way to eliminate piracy, and it
seems that more money is spent on trying to eradicate piracy than the
piracy itself costs the movie studios overall. While those committing
piracy should be prosecuted, going after and prosecuting/persecuting the
average home consumer who makes an archival copy of copyrighted media
for their own personal use is NOT the answer. Nor is going after the
authors of software to circumvent access controls the answer, since it
tends to do more to stifle innovation and competition.
Whatever the case, we won’t settle the issue here, in the pages of The
PCLinuxOS Magazine. At least you have some idea of the ground this
debate covers.
DVD2Xvid
The whole idea behind DVD2Xvid is actually pretty simple: take a DVD,
and rip that DVD to an *.avi file, encoded with the Xvid video codec.
The choice of Xvid is an outstanding one, since the Xvid codec offers
really good compression and very good quality, as well as the ability to
vary the quality from passable to excellent. Many Xvid encoded files
will also play back on set top Divx-capable players, so you can rip your
archived DVD movie, burn it to a blank CD, and play your copy. This
will allow you to leave the original in a safe place, so it doesn’t get
damaged. DVD2Xvid is available in the PCLinuxOS repository.
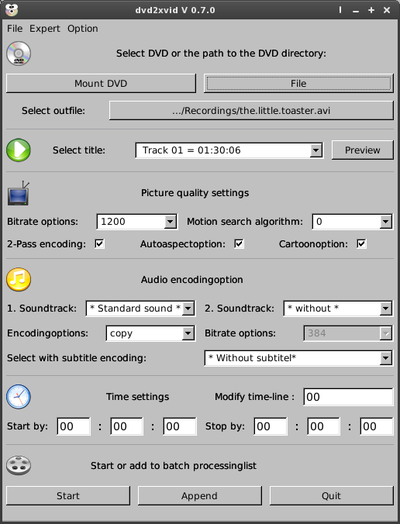
When you first start up DVD2Xvid, you will see the screen above. For
my “test run,” I chose the animated feature “The Brave Little Toaster”
as the DVD title that I was going to rip.
If DVD2Xvid does not immediately find your DVD title, click on the
“File” button at the very top of the window and point DVD2Xvid to the
directory that contains your DVD’s VIDEO_TS directory. You will also
need to select the output file name and directory. Here, I chose to name
my file the.little.toaster.avi, and to store it in my
/home/parnote-xfce/Recordings directory. Clicking the button next to
“Select Outfile” will open a “File Save As...” dialog box.

Next, select the title on the DVD that you want to make into an Xvid
endoded AVI file. All of the titles on the DVD will appear in the drop
down listbox. Typically, the longest title on the disc is the feature
film. To be sure you have selected the correct title, select the
“Preview” button on the right to play the selection in a pop up MPlayer
window.
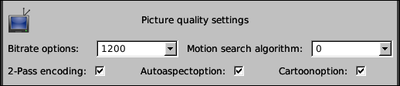
Under “Picture quality settings,” select the options you want to use
when transcoding your DVD title to an Xvid AVI file. Select the video
bitrate you want to use. The default value is 1000 kbps. Here, I
selected 1200 kbps, from the drop down listbox. Select the level of
“Motion search algorithm” you want to use. While “0” is the default
value, selecting a higher value will make motion search between frames
much more sensitive, although higher values will slow the transcoding
process. I have found the default setting to work just fine, for my
needs.
I have also selected “2-Pass encoding,” which will give me a much higher
quality image, despite taking twice as long to encode, since the movie
is scanned twice—once to study the video and learn how to optimize the
video, and a second time to record the video using the optimizations
learned on the first pass. I’ve also selected the “Autoaspectoption,” so
that the aspect ratio of my video matches the movie’s aspect ratio as
it is on the DVD. Finally, I’ve also selected the “Cartoonoption,” since
the title I am converting is an animated feature.
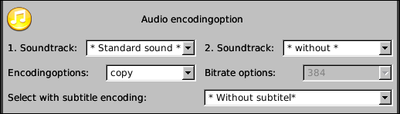
In the next section, “Audio encodingoption,” you can select the
options for the audio portion of your transcoded video file. You can
select two soundtracks for your video file. For the first one, I simply
selected “Standard sound.” I opted to have no second soundtrack, hence
the “without” as my selection in the second soundtrack list.
For “Encodingoptions,” I’ve simply selected to “copy” the sound from the
DVD to my AVI file, and it is the default setting in DVD2Xvid. You can
also choose AC3 or faac as the audio codec. If you select one of the
alternate audio codecs, you can also select the audio bitrate to use to
re-encode your audio. Since I have elected to copy the audio, I cannot
change the audio bitrate.
Finally, you can select subtitles to include in your AVI file. I have
chosen to not use subtitles. “Without subtitle” is the default value.
However, should you want to include them, you can select the subtitles
from the DVD in the drop down listbox.

Under the “Time settings” section, you can select to advance or delay
the audio-video sync, if you are having problems with the audio syncing
properly with your video images. Enter either a positive or negative
number into the “Modify time-line” box, and the audio will be either
advanced of delayed by that number of milliseconds.
You can also record portions of a DVD title. Enter the start time where
you want to start recording in the “Start by” fields, followed by the
end time in the “Stop by” fields. The three entry fields represent
hours, minutes and seconds.

Once you have all of your settings as you want them, click on one of
the buttons at the bottom of the window. The buttons at the far left and
far right of the screen should be quite obvious. Selecting the “Append”
button will add more “jobs” to the batch processng list.
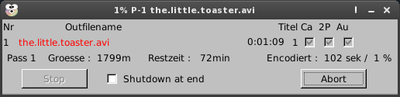
After you select the “Start” button, the main DVD2Xvid window will
disappear, and the above window will take its place. This window will
show you the progress of the transcoding process. Since most of the
information in the window has German labels, you will probably be most
interested in the “Groesse” (Size), “Restzeit” (Remaining) and
“Encodiert” (Encoded) information. The Remaining label will display an
approximation of how much time is remaining for the current phase of the
encoding process to complete. The Size label will display an
approximation of the final file size, which really isn’t accurate until
you get into the second pass of a two pass encoding. The Encoded label
will tell you how many sectors have been encoded, along with the
percentage of the current phase of encoding is completed.
Summary
DVD2Xvid is a handy tool to have, especially if you have a home media
center. For example, my transcoding of “The Brave Little Toaster” from a
DVD to an Xvid encoded AVI file, stored on my hard drive, ended up
weighing in right at 900 MB in size. This saves a LOT of space, when you
consider that copying a DVD to your hard drive will often take up
anywhere from five to ten GiB of space.
Certainly, I could have made the transcoded video’s file size even
smaller, by selecting a lower video bitrate, along with re-encoding the
audio to another codec at a lower bitrate. I have (and have seen) other
videos encoded at video bitrates as low as 500 kbps, and even they were
quite watchable—although the quality loss does start to become quite
noticeable once you select video bitrates under 800 kbps.
The use of DVD2Xvid is easy and straight forward, and makes the job of creating digital backup copies quite simple.