Secure your Notebook PCLinuxOS Installation by Encrypting
Partitions
by
as
DISCLAIMER: Always backup your data before partitioning, re-partitioning or moving data, whether it's encrypted or not. The operating system can be re-installed. But, once your personal data is gone, it cannot be recovered. The steps presented in this article should only be applied to a fully updated PCLinuxOS system which is running a 2.6.38.8 kernel, or newer.
If you travel with your notebook, sometimes you may be worried that your notebook will be stolen. More than the cost for hardware replacement, I was always worried about my personal data. My emails, my photos, my work projects, which include years of work, my bank data, and much other information that I surely don't want to become public. This article will explain how to setup your notebook using encrypted partitions.
You may say there are passwords for each account, there can be an additional password for the bootloader, there can be even a password to protect the BIOS settings. Unfortunately, the password system is effective only when the system is powered on. Once you turn off your system, someone could access the disk from another system, and your passwords would be completely ineffective. The only real solution is to encrypt all data stored on the disk. This way, only someone who knows the password (or pass phrase) will be allowed to access the storage content.
Encryption is based on 'keys', and those key(s) are used to encrypt/decrypt the storage data. There exist several solutions to achieve storage encryption, whether hardware based or software based. The hardware solution is generally based on hard disks that provide built-in encryption, sometimes associated with some biometric peripheral like a fingerprint reader. Depending on the hardware, the 'key' actually used could be a hardware key, such as a dongle. The main defect of this system is that the storage content may become inaccessible because of a hardware failure external to the hard disk, depending on where the hardware key is stored.
The software based solution it is a bit more flexible, but may introduce some weakness, depending on how you setup your system and how you protect your encryption key(s). Setting up an encrypted system will require some additional work and some additional care. You should carefully evaluate all the pro and cons before making use of the storage encryption.
Backing up your data is a MUST. The backup might be plain backup or encrypted backup. PCLinuxOS is ready to use encrypted partitions, “out of the box”, and it is using a technologically advanced crypto subsystem:
LUKS – Linux Unified Key Setup (despite the name it's multi-platform: Linux, Windows, BSD)
cryptsetup
DeviceMapper – a framework to map one block device (plain partition) to another (encrypted partition)
dm-crypt – a disk encryption subsystem, part of device mapper framework.
You don't need to know all underlying details to setup your system, but understanding how the system works will help you to avoid macroscopic errors and/or to eventually solve any related issues.
Planning your custom partition setup
This is the most important phase of the whole process, so take your time doing it. During installation, PCLinuxOS offers several choices on how to setup your partitions. Your disk can be automatically partitioned using all disks or all available free space, or can be manually partitioned. In our case, we must use the “custom partitioning” option. PCLinuxOS filesystem structure consists of several logical parts. Shown below are the logical partitions relevant to successfully setting up an encrypted system:
/boot - subsystem (bootloader, kernel, initrd)
/home – contains all user data and settings (excluding root account)
/tmp – a system wide temporary storage
swap – a temporary storage used as a RAM extensions and/or for hybernations
/ - the root filesystem
There can be other logical partitions. If you don't specify a separate partition, they will be stored in the root filesystem.
/boot can't be encrypted, for the simple reason that its content is responsible for booting the system and starting the encryption/decryption subsystems. So, it needs to be a plain partition. Suggested type ext2, size 300 Mb
Swap: when the system is running, and your applications have used all the available RAM, the Linux kernel will use the swap area (physically resident on the hard disk) to swap out (and later to swap in) some amount of memory pages. Which part of the RAM will be swapped depends on some kernel algorithms, but it's completely outside of the user’s control. For this reason, if you absolutely never want unencrypted info left on your system, you should use an encrypted swap. Similar constraints apply for hibernation, where all your system RAM will be temporarily transferred to the hard disk swap partition. Suggested swap size = (RAM amount + 0.5 Gb, or 1.5 times the size of physical RAM), type = Linux swap.
/tmp is an area that might be used for applications to store temporary information. (i.e., when processing an image, a copy of the image before or after some processing might be stored on /tmp.) Here the same restrictions as for swap should be applied.
/home will be encrypted. This is the area where your personal data will be stored. It will include all accounts created on your system, excluding the root account.
All other data and software is stored on the '/' partition (root partition). If you are careful to always work using an unprivileged user account, no personal data will be stored in the root partition. Therefore, you could avoid the encryption here. But... root partition will contain your password files and your password(s) for wireless access, if you are using wifi networks, in the /etc directory. So you may want to encrypt even the root partition.
A note about secure system setup: a secure system may be defined as secure only as long as you perform a secure installation. Which means that you can't make an unknown or potentially insecure one, already installed, into a secure one. The reason is very simple. Suppose your system is infected from a keylogger (a program that can log what you type on your keyboard). Once you type in your sensitive data (passwords, keys, id, …), they will be logged and sent to some place … And your whole security related process will be already compromised. Think about that.
Finally, but no less important, if you are going to reinstall, you must be aware that the disk formatting process and the encryption added layer will not delete the data already stored on your disk. You may want to manually delete the existing data on all disks before starting the new installation. If not done, utilities like testdisk and photorec (and many others) could be used to retrieve sensitive content from your disk(s). Even special care should be taken when deleting content of new SSD storage units The process to securely delete the disk might be different from traditional hard disks, but will not be discussed here.
What partition types should be used on top of encrypted partitions? The encryption layer is completely transparent, therefore you can use whatever filesystem you prefer. Personally, I use an ext3 journaled filesystem, with few exceptions:
/boot It's very small and normally used as read-only. ext2 is my choice here.
/tmp As a temporary space, its content may be lost at any time without compromising anything. ext2 performs a little better than ext3/ext4 here. That's my choice when /tmp is a separate partition.
/home Should use a journaled filesystem, such as ext3 or ext4.
/ (root partition) will be ext3 or ext4
Personally, I use a separate additional partition for virtual machines storage, trying to achieve better performance. I prefer to avoid journaling filesystems in this particular case, because I use virtual machines for testing purposes and do not store any personal or sensitive data there.
Confused from too much info? Let's see some suggested layouts for the average notebook:
if your system provides lots of storage and a powerful CPU:
/dev/sda1 /boot ext2 300 Mb plain
/dev/sda5 swap RAM + .5Gb encrypted (swap size = 1.5 time the amount of physical RAM)
/dev/sda6 / ext3/4 30 Gb encrypted
/dev/sda7 /tmp ext2 5 Gb encrypted
/dev/sda8 /home ext3/4 ... encrypted
optionally:
/dev/sda9 /vbox ext2 … plain/encrypted
If your system has a small disk and a less powerful CPU:
/dev/sda1 /boot ext2 300 Mb plain
/dev/sda5 / ext3/4 20 Gb encrypted
/dev/sda6 swap RAM x 3 encrypted (swap size = 3 times the amount of physical RAM)
/dev/sda7 /home ext3/4 ... encrypted
on a very old system: (*)
/dev/sda1 / ext3/4 < 20 Gb plain
/dev/sda6 swap RAM x 3 plain
/dev/sda7 /home ext3/4 ... encrypted
On a very old system, we choose a plain journaling root filesystem to avoid the small performance loss due to the encryption, at the price of not encrypting the /tmp and /etc storage areas. It's a reasonable trade-off between security and performance. We do the same with the swap partition.
HOW TO DELETE A WHOLE DISK OR A WHOLE PARTITION
This step can be easily accomplished using a liveCD. Boot your live system, then open a root Konsole (PCLinuxOS Control Center, System, Open a console as administrator).
deleting an entire disk: dd if=/dev/urandom of=/dev/sda bs=1M
deleting an entire partition: dd if=/dev/urandom of=/dev/sda1 bs=1M
Substitute /dev/sda or /dev/sda1 as appropriate for your target disk/partition.
Note: it will take a long time, approximately 20 Gb per hour! You have been warned.
Let’s see the installation/configuration steps:
STARTING THE
INSTALLATION
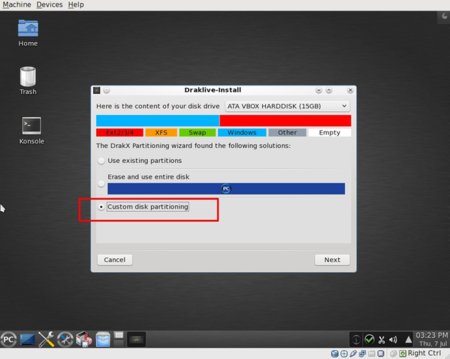
Boot your media (liveCD or liveUSB). Start the installation as usual, and at some point you will be required to partition your disk. You need to choose “Custom partitioning”
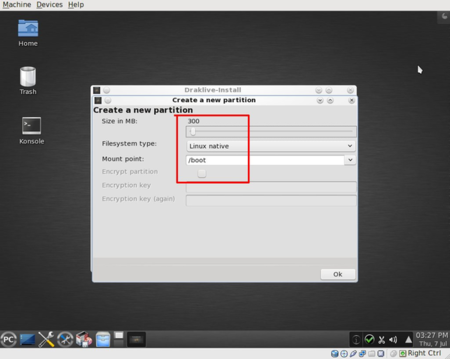
The first partition will be /boot, a plain partition and unencrypted.
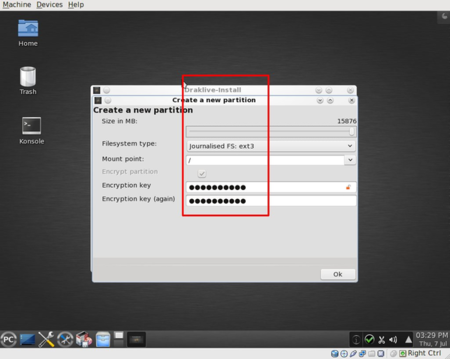
The second partition will be '/'. Here you need to be a bit careful:
- select the partition size
- select the partition type
- mark the check box “Encrypt partition”
- type in your password (2 times)
- Finally and only after the above steps, add the filesystem name: /
When you choose “OK” the program will show you a message saying that it's going to write the partition table immediately. (This is different from an unencrypted installation). Here the system is preparing the crypto infrastructure.
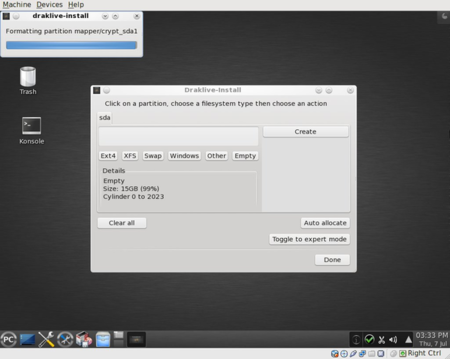
When the partition is encrypted you will see a green padlock beside the partition name:
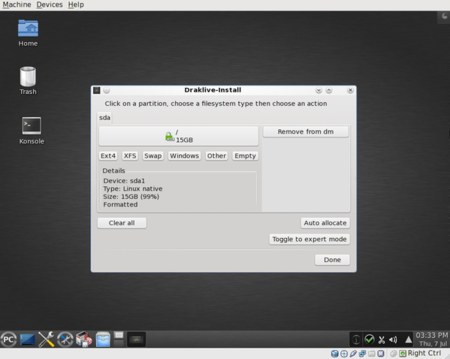
If necessary, add any other plain or encrypted partition(s), repeating the steps related to adding a partition. If creating an encrypted partition, you can use the same or a different password for each partition.
From here, the installation proceeds as usual, first formatting the partitions:
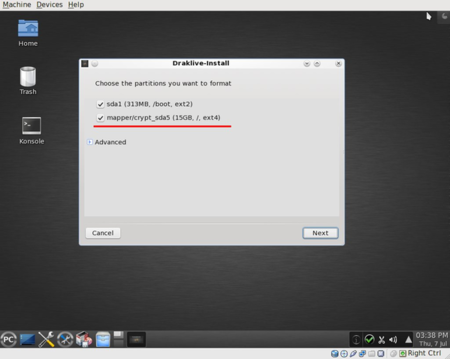
and then continuing until the installation is completed.
REBOOTING
Reboot your newly encrypted system: A password will be required: it's the password required to decrypt your partition(s) . It's strongly suggested to use only one password for all partitions.
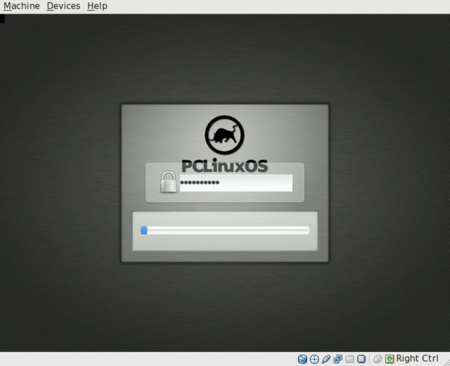
As you can see, the installation of an encrypted system is not difficult at all.


