Creating Your Own Web Site
By Rodney A. Adkins
Review: In the last issue of PCLinuxOS Magazine we created a very basic web page. As stated before in the tutorial, the opening tags always have a closing tag. In the page below the main code tags that make the page are:
<html></html>, <head></head>, <title></title>, and <body></body>.
<!DOCTYPE HTML PUBLIC "-//W3C//DTD HTML 4.01 Transitional//EN">
<html>
<head>
<title>Jerry-Lee The Dog</title>
</head>
<body>
<h2>Welcome to Jerry-Lee's Web Site</h2>
<br>
<p><img src="jerry.jpg" height="200" width="150" alt="my dog" align="left" hspace="5" vspace="5" border="3"></p>
<p>I am a twelve year old German Shepard that does not bark. I have big brown eyes and really know how to beg.<br>I have a good life, sleep on the sofa in the play room. Have lots to eat and I am happy. It really is a dogs life!<br>I know you will come back soon</p>
<p>Jerry-Lee.</p>
</body>
</html>
In between the body tags is the content and the html code that is going to make the page display the way we desire. So far we have a heading tag, paragraph tag and img tag. The only real formatting that we have done at this point in the creation of this page is to break the lines, tell the paragraphs where to start and end, as well as telling the image where to display and how far to keep the text away from the image. As you see in the image source code there are quotations around the numbers, they must be there. If you happen to forget a quotation it can cause the page to render incorrectly.
To achieve a higher level of formatting on this Web page we are now going to specify the font size, color, and type as well as body margins and paragraph margins.

Do not specify the font-size in pt, or other absolute length units. They render inconsistently across platforms and can't be resized by a Web browser. Use sizes such as x-small, small, medium, large.
Before we go any further we need to create the web page as seen from above. Open a plain text editor such as Kate, and copy the code as seen above. Next open your home directory and create a folder and call it website. Save the Web page you just coded into Kate into the directory. To do that click on File-Save As, a window will open. In Location type Index.html, In the Filter make sure it is set as All Files. Open your Firefox Web browser, go to the folder and click on index.html you will see the Web page you created. Your Web page should look like the figure below.
Welcome to Jerry-Lee's Web Site

I am a twelve year old German Shepard that does not bark. I have big brown eyes and really know how to beg.
I have a good life, sleep on the sofa in the play room. I have lots to eat and I am happy. It really is a dogs life!
I know you will come back soon.
Jerry-Lee.
HTML previously specified the font size, color and other attributes in the font tag. The font tag used to look like this:
<font size"2" color="#000000" face="verdana">
Now coding a web page has changed. Today most sites use CSS, (Cascading Style Sheets). There are two types of style sheets and they are Internal and External. The Internal style sheet works the best if you are only going to use that style on the one page. The External style sheet gives more flexibility when you are going to apply the style across the whole web site. This allows a person to change the look and feel of the Web site by changing one style sheet.
This is what an Internal style sheet looks like:
<html>
<head>
<title>Internal Style Sheet Example</title>
<style>
<!--
body {
   background:#C9F1C5;
   }
h1 {
   color:#54B24B; font:bold 14px Verdana, Arial, Helvetica;
   }
p {
   font:12px Verdana, Arial, Helvetica;
   }
-->
</style>
</head>
<body>
<h2>Welcome to Jerry-Lee's Web Site</h2>
<br>
<p><img src="jerry.jpg" height="100" width="75" alt="my dog" align="left" hspace="5" vspace="5" border="3"></p>
<p>I am a twelve year old German Shepard that does not bark. I have big brown eyes and really know how to beg.<br>I have a good life. I sleep on the sofa in the play room. I have lots to eat and I am happy. It really is a dog life!<br>I know you will come back soon</p>
<p>Jerry-Lee.</p>
</body>
</html>
For our document we are going to link an External style sheet. The style sheet is linked to the Web page by coding a link between the two header tags. The style sheet for this Web page is called jerry.css. Remember to put the link between the two header tags in the document. The link is:
<link rel="stylesheet" type="text/css" href="jerry.css" />
To create a style sheet all you need is a text editor. Open the editor and save an empty document as jerry.css. As I plan to put a background down the left side of the Web page I will add the image to the background in the style sheet. The code will look like this:
/* Created by Rodney Adkins  */
body{
   background-image:url(bone.jpg);
   background-repeat:repeat-y;
   margin-bottom:15px;
   margin-left:100px;
   margin-right:80px;
   margin-top;2px;
   font-family:Verdana, Geneva, Arial, sans-serif;
   font-size:90%;
   color:#000000;
   }
p {
   margin-left:100px;
   margin-right:80px;
   font-family:Verdana, Geneva, Arial, sans-serif;
   font-size:medium;
   color:#000000;
   line-height:150%;
   }
h2 {
   text-align:middle;
   font-family:Verdana, Geneva, Arial, sans-serif;
   font-size:medium;
   color:#740000;
   line-height:150%;
   }
img {
   margin-left:1px;
   }
Announcement
EduPCLOS is a PCLOS community project which will create a customized PCLinuxOS distribution focused on classroom use.
According to Patred, the project lead of EduPCLOS, the LiveCD/DVD will include two parts - the desktop and the server.
The project is in need of volunteers with experience in script writing, mostly PHP, and database knowledge, most likely MySQL and PostgreSQL. EduPCLOS also needs designers with skills to give "the look and feel" of the desktop and server.
For more information, please visit
http://www.mypclinuxos.com/forumdisplay.php:fid=34 and help in any ways that you can.
You can also send the project lead an email addressed to:
edupclos@gmail.com.
Our children are the future. Let's bring them up to the spirit of PCLinuxOS. Let's give them freedom.
Notice in the coding for the background, the coding has repeat y. If I wanted the image over the whole page I could have coded repeat x as well or just repeat. Also, the margins are where I choose to put them. I have margins for the left, right, top and bottom of the page. Also I stipulated the text size for the page to be 90% of the size the person usually views Web pages at. If they want to increase the size of the font they still can. Font sizes to choose from are, xxsmall, xsmall, small, medium, large, xlarge. You can also do the size in percentage. Try different sizes, font styles and colors in the CSS and see the changes you can make to the Web page. Alter the margins too.

Browsers work very simply, if they do not recognize a tag they will ignore it. If this happens make sure the tag is spelled correctly, make sure there are no extra characters in the tag. Like the tag <p align="right">. A browser may have difficulty in recognizingv<p align="right>. You must remember all the "" (quotation marks) in tags.
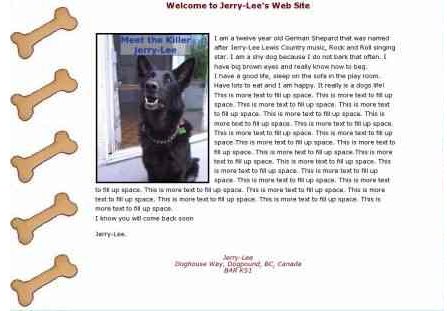
Style sheets are like HTML in coding. You have an opening ({) tag and a (}) closing tag. Note the punctuation in the style sheet, if anything is wrong the browser will ignore it. Study the style sheet and see how it is constructed. The Web site at this point looks like the figure below.
Adding a footer to a document is a nice addition. Unlike the body and header, the footer is not a marked element in HTML. This does not mean that the document does not need one. It can include the contact information, authors name, company name and copyright. Add the following:
Add this code to the HTML document.
<address>Jerry-Lee<br>Doghouse Way, Dogpound, BC, Canada<br>BAR KS1</address>
Add this code to the CSS document.
address {
   text-align:middle;
   font-family:Verdana, Geneva, Arial, sans-serif;
   font-size:medium;
   color:#740000;
   line-height:100%;
   font-style:italic;
   }
With the addition to the CSS and HTML document your Web page should look like the one in the figure.


Headings should get smaller as the topic becomes broken down and more specific.
In the next issue we will discuss linking documents, linking internal documents and moving around a document using jumps.
So far the document has used heading tag, paragraph tag and img tag. The formatting that has been done at this point in the creation of this page is to break the lines, tell the paragraphs where to start and end, as well as telling the image where to display and how far to keep the text away from the image. The document now has specified font sizes and margins for the documents. The document has also had a background and a footer added to it.
To be continued next issue.