Packet Writing in PCLinuxOS
or
How to use a DVD-RW as a very large Floppy
By ClareOldie
Packet writing has been available in Windows operating systems for a long time through the use of third party software. My experience with this was problematic, as over the years the formats changed a little and there was no backward compatibility. I guess that is what happens with proprietary formats.
Packet writing can be implemented in PCLinuxOS and is not at all difficult to achieve. There is as yet no 'overall' application which would hide the workings from a user. Maybe soon that will change. Meanwhile the same result can easily be achieved by doing the steps separately yourself. This document will help you do this. The procedure is laid out in three main categories:
- Operating System setup
- Hardware setup
- Media setup
Operating System
To begin, you must install udftools from the repository. Next you need to make sure that the required modules are loaded at startup. These are not yet built into the kernel, so the file /etc/modprobe.preload needs to be edited. Go to Kmenu -> Applications -> FileTools -> FileManager super user mode and launch it. Navigate to the /etc directory and, using right click with the mouse, select to open the file modprobe.preload with an editor like Kwrite. Add udf and pktcdvd, each on its own separate line, to the file, and ensure there is an empty line at the end of the file (the order is not important). Don't change anything else in the file while you are editing it. Your file might look something like this:
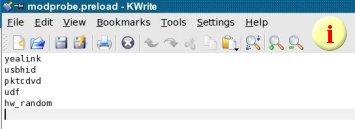
Save the file to ensure the changes you have made are permanent. Reboot the computer to ensure the modules are loaded. PCLinux Operating System is now set up to use Packet Writing.
The next stage is to set up the hardware.
Hardware Setup
You will need a DVD drive capable of burning RW media. My burner, a Pioneer 107D, uses +RW media, so I have not checked this out on -RW media. You will also need a DVD RW media of 4.7 GB capacity.
First, the optical drive needs to be set up for packet writing so the fstab file needs to be edited. As described above, using File Manager super user mode, navigate to the /etc directory and open fstab for editing with Kwrite. Add this line to the fstab file:
/dev/pktcdvd/0 /media/packetcd0 udf noauto,noatime,rw,users 0 0
(If you are viewing the online version of the PCLinuxOS Magazine, you can copy and paste the above into the file to prevent typing errors.)
Save the fstab file. It might then look something like this (see line 12):
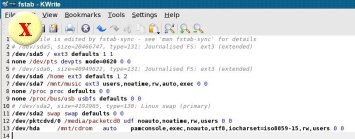
Note: Your /mnt/cdrom line should be something like line 13. If you have problems with fstab entries help is available on the forum. Here is another example of an entry for an optical drive:
/dev/hdd /mnt/cdrom auto pamconsole,exec,noauto,utf8,codepage=850,iocharset=iso8859-1 0 0
Warning
It is vital that you select the correct optical drive for burning and take note of its details, e.g., /dev/hda /mnt/cdrom above (line 13). If you have more than one optical device make sure you select the correct one. You will need to know the location of your device for later.
Next you need to use a terminal, so open it and get root permissions by typing su <enter> and then type in the root password. The password will not appear on the screen for security reasons so just press <enter> after you have typed it in. You should now have something similar to this in the terminal:
[myname@Pentium ~]$ su
Password:
[root@Pentium myname]#
The '#' sign indicates that you have root permissions. Next type in (or copy and paste):
pktsetup 0 /dev/hd? <enter>
Please make sure that you change the 'hd?' to the correct location for your burner which you took note of earlier. Your hardware should now be set up for Packet Writing. That brings us to the third stage of the process.
Media Setup
Place a DVD+RW 4.7GB media in the burner and format it using K3b or whatever burner you normally use. Leave the media in the drive. Open a terminal and get root permissions as above, or use the existing terminal if you haven't closed it. Type or copy & paste the following line into the terminal and press enter:
mkudffs /dev/hd?
Again, change the entry to suit the location of your burner (hda, hdb, hdc, etc.). This makes the media capable of packet writing. You can expect to see an output something like this:
[root@localhost ~]# mkudffs /dev/hda
start=0, blocks=16, type=RESERVED
start=16, blocks=3, type=VRS
start=19, blocks=237, type=USPACE
start=256, blocks=1, type=ANCHOR
start=257, blocks=16, type=PVDS
start=273, blocks=1, type=LVID
start=274, blocks=2294573, type=PSPACE
start=2294847, blocks=1, type=ANCHOR
start=2294848, blocks=239, type=USPACE
start=2295087, blocks=16, type=RVDS
start=2295103, blocks=1, type=ANCHOR
<pause>
[root@localhost ~]#
Note: There can be a quite delay at the <pause> above. Give it time to finish.
Eject the media and re-insert it again. If you have your desktop set to display icons then an icon should appear with a name like LinuxUDF. At this point the only thing on the disk will be the directory Lost and Found.
One thing remains to be done. As the media was formatted by root it has permissions which only allow root to write to it. You must now change this. This is a one time operation as the permissions are written to the disk. There are many ways of changing permissions on the media. (If you are comfortable with the command line then it can be done there using the chown command.) For a new user it is probably easier to briefly log in as root user and right click on the icon, go to properties, and select the permissions tab. You will be presented with a screen like this:
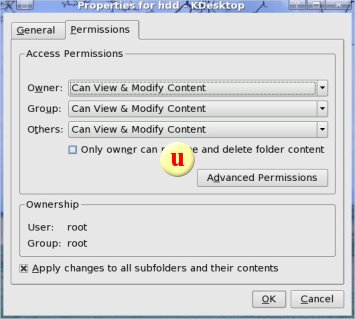
Change the permissions to allow 'Group' and 'Others' to read & write to the media. Also tick the box to 'Apply changes to all subfolders and their contents.' Click 'OK' to save the changes. Log out of root immediately and go back to your user account.
That is it. You now have a DVD that you can treat like a floppy except much larger and faster. If, when deleting files from the disk, you send them to the Waste Bin then it may be necessary to empty the Waste Bin before you can eject the disk. As with all removable media it is good practise to 'unmount' and 'eject' the media by right clicking on the desktop icon and selecting the preferred option. This ensures that all write actions have been finalised before the media is ejected. To do otherwise could result in corrupted/incomplete data on the media.
Please note that I found a size limitation of 1GB for any file. I could easily copy large ISO files to the disk but when I tried an ISO greater than 1GB (1.2GB) it only wrote the first 1GB and then popped up an error.
Happy saving!