A simple backup method using Grsync
by Iain Jackson (iainrj on PCLOS and MYPCLOS forums)
This article is a simple tutorial on using Grsync as a backup utility, There have been a lot of threads on the main forum from users asking for advice on backup and I have found Grsync to be the simplest and quickest method around.
Grysnc is a GUI-front-end for the command line application rsync. Rsync has many powerful applications, not least for synchronising data to web servers. In fact rsync scripts are used by Texstar for synchronising the repositories as new applications are added.
This short tutorial will show you how you can use Grsync to back up your /home directory to either another hard drive, partition or removable drive.
Your /home directory is where all your e-mails and bookmarks are stored in hidden folders. To view them open home in Konqueror and click on View -> Show hidden files. Depending upon which applications you are using you might see a .mozilla folder containing your Firefox bookmarks and extensions; a .thunderbird containing your e-mails and a .kde folder containing your desktop settings and settings from KDE applications such as kmail.

- Install Grysnc from Synaptic. Once installed, you will see the application under "k-menu -> Internet -> File Transfer". It might be a good idea to create a desktop icon for easy access. To do so, right-click the icon in the k-menu and then choose Add Item to Desktop:
-
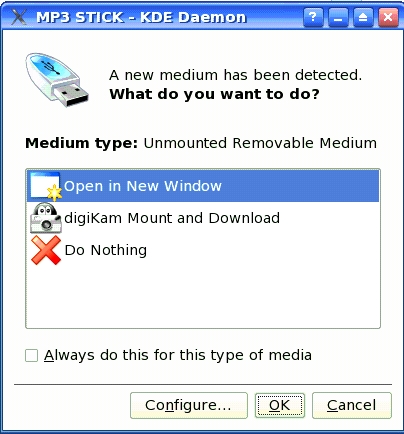
- If you want to backup to a removable medium such as a USB flash drive or external USB drive, insert it now. When PCLOS detects the drive, click on Open in New Window to mount the drive:
- It is a good idea to create a new directory on your removable disk to store the backup files. In your new window create a new folder. As an example, home.backup is the directory name I use. To create a folder, click on "Edit -> Create New -> Folder".
Use the panel icon to go back to Grsync once your media is mounted.
- Create a backup session.
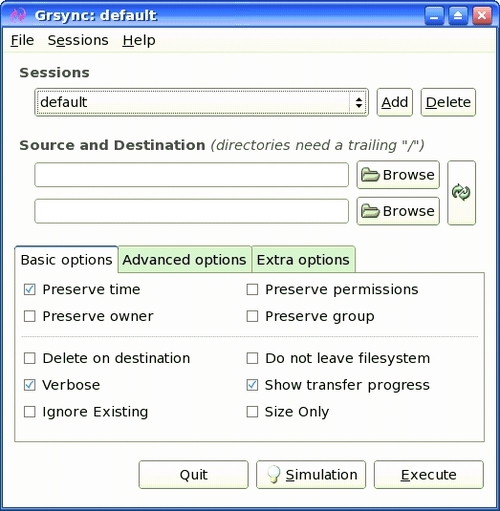
- When you launch Grsync you will see this screen:
Click on Add in the Sessions section and enter a session name. This is just so that once configured, you can quickly run the same backup routine by choosing the session. Type something like "Home Backup" and then click OK: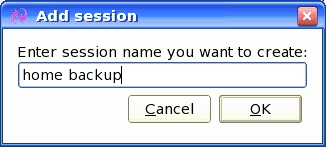
- You now need to add your source and destination directories. There are 2 blank boxes in the middle of the Grsync window. The top box is the source - this is where your files currently are. The bottom box is the destination - where you want your files backed up to.
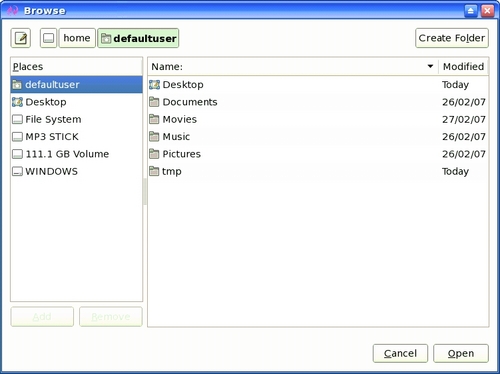
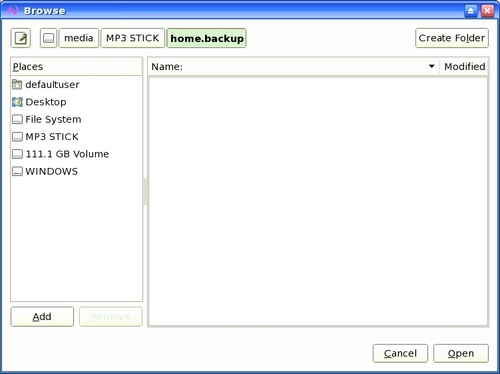
- Click on Browse next to the source box. This should take you straight to your home directory. Just click on Open to select it:
- Click on Browse next to the destination box. Your removable drive should have appeared as a link on the left hand side of the file dialog for easy access. Double-click it, then double-click on your backup folder before choosing Open:
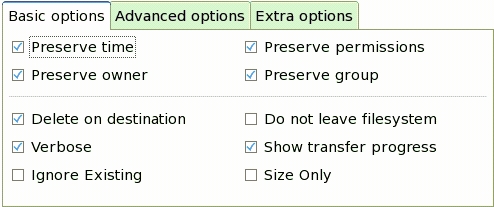
- Change the Basic Options.
- It's probably a good idea to select Preserve Owner, Groups and Permissions so that if you need to reinstate from the backup, you won't get into any ownership problems.
- Select Delete on Destination to ensure that you don't end up with any old files in your backup that don't exist in your home directory.
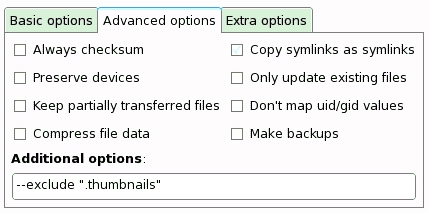
- Advanced options.
- Check the Copy symlinks as symlinks box. This means that if there are any links to files, only the link, rather than the file itself is copied over.
- Additional options are useful if you want to add other rsync or console commands. The one I use is the exclude command. The example below excludes the .thumbnails directory from the backup:
- To find out all available rsync commands type man rsync into a terminal.
- Do a "dry run". Click on Simulation and you'll get a quick run through of what is going to be copied over.
- When you are satisfied all the correct files are being either deleted or copied, click on Execute. The first time you run the sync it may take a while as it has to transfer all your data. The exact time will depend upon the amount of data you are copying and the speed of your computer. It might take 5-10 minutes to transfer your /home the first time out, longer if you have a lot of large files such as audio or movie files.
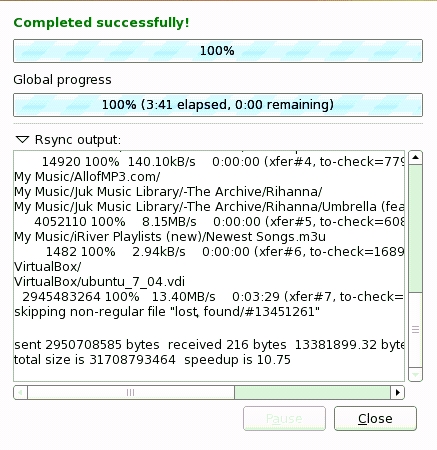
Subsequent syncs will be much quicker, perhaps 30 seconds, as it only sends new or updated files for backup:
Grsync makes using rsync easy but doesn't give you the full functionality. If you want to have a go at creating scheduled backups, you can write rsync scripts and use cron or Kcron to schedule the tasks. Here's a good website that takes you through that process:
For me, Grsync works a treat. About once a week, I switch on my external hard drive, and run my 2 Grsync sessions - one for /home and one for my data partition. The whole process takes about 5 minutes and I am safe in the knowledge if I need a clean reinstall of PCLOS I have all my application settings, e-mails, bookmarks and more importantly my music and photos backed up.