KDE Desktop on PCLinuxOS
Published by the United Nations Development Programme's Asia-Pacific Development Information Programme (UNDP-APDIP)
Kuala Lumpur, Malaysia
Web: http://www.apdip.net/
Email: info@apdip.net
© UNDP-APDIP 2004
The material in this guide may be reproduced, republished and incorporated into further works provided acknowledgment is given to UNDP-APDIP.
This work is licensed under the Creative Commons Attribution License. To view a copy of this license, visit: http://creativecommons.org/licenses/by/2.0/ or send a letter to Creative Commons, 559 Nathan Abbott Way, Stanford, California 94305, USA.
This guide has been modified by Papawoob to reflect the Linux distribution of PCLinuxOS 2007.
Chapter 3: Files and Folders
The File System
One of the most powerful features of a modern computer system is the ability to store data in a form which can be easily retrieved and transported or copied across to other computer systems or media. Data created and accessed by a user in the computer is stored in what is called a file. This concept of an electronic file to store electronic data mimics the physical world usage of a file to store data written on paper. This mimicry is carried further by the organization of these electronic files into electronic folders or directories. Like a physical folder, an electronic folder can contain many files. A folder may also have sub-folders or sub-directories.
Note: We shall be using the terms folder and directory interchangeably, unless stated otherwise.
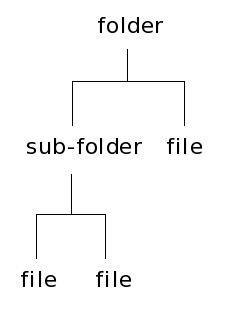
Fig. The Hierarchical File System
Files and folders can be created, copied, moved (i.e. transferred) and deleted. The folders themselves are organized in a hierarchical manner starting at the root of the file system. Each user is given a home directory and upon logging in, the user is placed in his home directory.
Ownerships and Permissions
As the system is set up to handle multiple users concurrently, it needs to have in place mechanisms with which it can control the security and privacy of the file system. It needs to be able to control access to the file system resources for each individual user. In addition, it also has to be able to control access at a group level (i.e. users who belong to the same group can be given certain privileges) with respect to the file system operations. To be able to perform these features, associated with each file or folder are the categories:
- owner
- group
- others
and the file permissions:
- read (r)
- write (w)
- execute (x)
and the directory permissions:
- read (r)
- write (w)
- access (x)
Associated with a file are the categories owner, group and others and the permissions which each one of these have on the file. The user id of the user who creates a file by default becomes the owner of the file. User ids on the system are assigned to one or more groups. When a user id is created on the system, a group which has the same name as the user id is also created and the new user id belongs to this group. By default this group (which has the same name as the file owner) is associated with the file. All of the other user ids on the system which are not the owner of the file or do not belong to the group associated with the file, are placed in the category others.
By default the owner has read and write permission for a non-executable file and read, write and execute permission for an executable file. The group associated with the file has read permission for a non-executable file and read, and execute rights for an executable file. The others group has read only permission for a non-executable file and read, and execute rights for an executable file.
The rights and ownership concepts described above apply to directories too. However, since a directory cannot be executed, access rights are substituted for execution rights. Access to a directory means that the user id with the appropriate permission can descend into the directory (i.e. change directory to it).
The File Manager application described below may be used to view and modify the ownership and permissions of a file or folder. Only the owner of a file/folder can change its permissions and only the superuser or root can change the ownership of a file/folder.
Viewing and Modifying the Permissions of a File or Folder
To view the owner and group of a file/folder and/or to modify its permission settings, right click on the file and choose Properties or select the file/folder and select from the menu bar at the top or:
"File -> Properties"
Click on the Permissions tab. The owner and group of the file/folder are displayed as well as the associated permissions. The "Others" tab shows the permissions for users who are not the owner of the file or a member of the owners group. A screenshot is provided below:
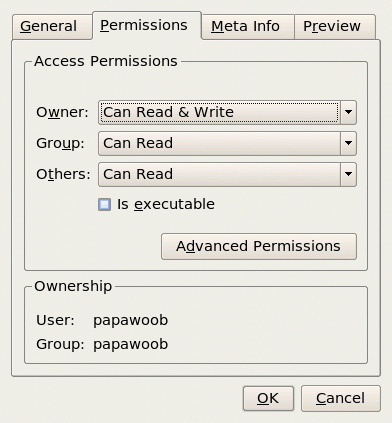
Fig. Ownership and Permission Properties of a File
To change the permissions, click on the arrow next to the boxes and choose the new permissions desired. Click on OK to apply the changes.
Note: It is recommended that you do not modify the default file/folder permission settings unless you know what you are doing. This is to minimize the risk of compromising the security of the files and folders.
Using the File Manager
As it is possible for a user to create and store hundreds and thousands of files and folders, a File Manager is needed to assist the user to manage and manipulate these files and the file system on which it resides.
In this section, a brief description of the File Manager and how to use it is given. More details can be obtained by clicking on the Main Menu and then on More Applications, Documentation, and then KDE Help Center. After the KDE Help Center opens, choose KDE User Manual and scroll down to "II. The File Manager."
"KDE User Manual -> The File Manager"
To start using the File Manager (Konqueror), double-click on the home directory icon on the desktop or in the panel. (This should be named "Home" and look like this:

Fig. Home
When you click on the "Home" icon seen above the File Manager will open a window that looks like this:
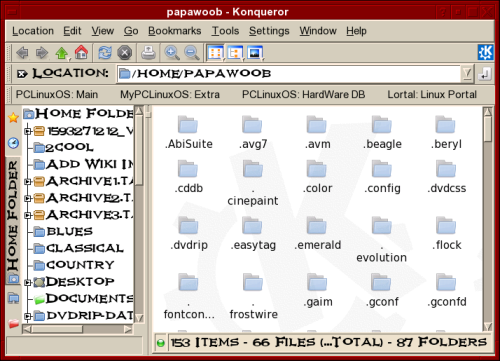
Fig. The File Manager
By default, the File Manager window consists of a side pane and a main view pane. At the top of the window just under the window title bar, are the menu bar and the location bar.
The view pane displays the files and folders contained in the current directory that the user is in. These can be displayed as icons (default) or changed to display them as a listing of filenames.
The side pane contains an icon that represents the current file or current folder. The side pane also contains information about the current file or current folder. A hierarchical (tree) view of the file system on the computer can be obtained from the side pane. By navigating through this, you can access files and folders outside your home directory (provided of course that you have the permission to do so).
Fig. The Side Pane with a Tree View of Folders
Accessing Files and Programs
From the view pane of the File Manager, you can open files as well as run (launch) executable programs by double-clicking on the icon representing them.
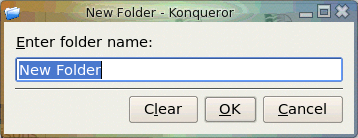
Creating New Folders
To create a new folder under the folder you are currently in, move the mouse to the menu bar at the top (just beneath the title bar of the window) and click on Edit and then click on Create New. A submenu will pop out to the right, and then click on Folder. A new folder will appear (as seen below) on the view pane and you will have to type in the name of the new folder.
Copy Files and Folders
If you want to make a copy of a file you will have to place the copy in another folder as you cannot have two files with the same name, in the same folder. To copy a file, right click on the file in the view pane to select it. Then select "Copy To" from the drop down menu as seen below:
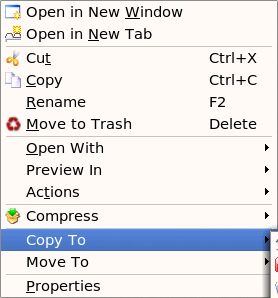
Fig. Copy To
After selecting "Copy To" you will see another drop down menu that lists your entire file system. Choose where you want the file to be copied to and select "Copy Here."

Fig. File System drop down menu

Fig. Copy Here
Another method is to right click the file which will bring up the same drop down menu seen above. You can also click on the file in the view pane to select it and then select from the menu bar at the top.
"Edit -> Copy File"
This will open a dialog box where you can type in the path to the folder to where you want to move the file to or click on the browse folder and navigate to it, as seen below:

Fig. Copy File
The procedures above can be done with folders also.
To copy more than one file or folder at a time, select multiple files/folders by holding down the CTRL key while clicking on the files or folders. Then repeat the steps shown above.
Moving Files and Folders
Moving a file or folder is different from copying in that a copy of the file/folder is not made, (i.e. only one copy of the file/folder exists), and the file/folder is transferred from one folder to another.
To move a file, right click on the file in the view pane to select it. Then select "Move To" from the drop down menu as seen below:
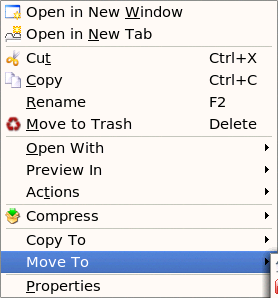
Fig. Move To
After selecting "Move To" you will see another drop down menu that lists your entire file system. Choose where you want the file to be copied to and select "Move Here."
Another way of moving a file is to drag and drop the file into the destination folder.
You can also click on the file in the view pane to select it and then select from the menu bar at the top:
"Edit -> Move Files"
This will open a dialog box where you can type in the path to the folder to where you want to move the file to or click on the browse folder and navigate to it, as seen below:

The procedures above can be done with folders too.
To move more than one file or folder at a time, select multiple files/folders by holding down the CTRL key while clicking on the files or folders.
Renaming Files and Folders
To rename a file, right click on the file in the view pane to select it. Then select "Rename" from the drop down menu as seen below:
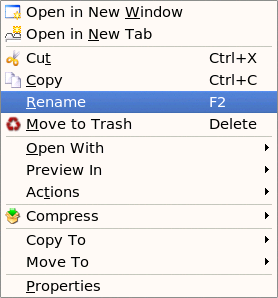
Fig. Rename
and then type in the new name. You can also click on the file in the view pane to select it and then select from the menu bar at the top:
"Edit -> Rename"
The procedures above can be done with folders also.
Deleting Files and Folders
To delete a file, click on the file in the view pane to select it. Then select from the menu bar at the top,
"Edit -> Move to Trash"
You can also right click on the file and select "Move to Trash" or “Delete” from the drop menu.
Alternately, you can select the file and then use the DELETE key on the keyboard to delete the file. This has the same effect as above of moving the file to the Trash folder.
It is still possible to salvage a deleted file from the Trash. To do this double-click on the Trash icon on the desktop to open up the Trash folder. Then you can move the file you want to salvage to the desired folder.
Note: if you delete the file from the Trash then it cannot be recovered anymore.
The procedures above can be done with folders also.
To delete more than one file or folder at a time, select multiple files/folders by holding down the CTRL key while clicking on the files or folders.
The Trash Can
The trash can icon on the desktop contains files and folders which you have deleted using the File Manager or an application run from the desktop. As noted above, it is a special folder in which it is still possible to recover the deleted items to another folder so as to "undelete" them. However, over time, the trash folder will be filled up, as many files and folders get deleted through usage. So it is a good idea to periodically empty or delete the items found in the trash.

Fig. Empty Trash Can

Fig. Full Trash Can
To empty the trash, right-click on the trash icon and select "Empty Trash Bin." Otherwise, you can open the trash by double-clicking on it and then select:
"Edit -> Selection -> Select All"
and then:
"Edit -> Delete"
Using A Text Editor
Very often it is necessary to use the computer to input some text or to modify the data in a text file. While a full-fledged word processor like OpenOffice.org's Writer may be used, it can be an overkill since the sophisticated features and formatting available with a word processor are not needed in many cases. A text editor can be used instead. The PCLinuxOS system comes installed with many text editors. In this section we shall be looking at how to use a text editor which comes with the KDE Desktop - KWrite.
Note: A text file here refers to a file which contains pure text printing characters only. Some types of files (e.g. those created by a word processor), while appearing to be text-only actually contain other non-printing characters and hence are not pure-text files.
Starting KWrite
KWrite may be started from the Main Menu:
"Main Menu -> More Applications -> Editors -> KWrite"

Fig. The KWrite Text Editor
After KWrite has started, you can immediately type in text into the main edit window. The mouse is also used extensively in KWrite, to move around the document as well as to perform editing functions.
Inputing Text
Text can be entered by simply typing into the main KWrite window. By default, the text will wrap to the next line when it reaches the border of the editing window.
Marking Text
The mouse may be used to mark (highlight) a block of text by clicking on the beginning of the block and dragging the mouse to the end of the block before releasing it.
Deleting Text
Text can be deleted one character at a time by moving the mouse to the character in question and using the DELETE or BACKSPACE keys in the normal fashion.
If there is a lot of text to be deleted, a more efficient way to delete text is to mark it first and then press the DELETE key on the keyboard.
Copy, Cut, and Paste
Text can be edited by marking it first and then selecting Cut, or Copy from the buttons at the top. "Cutting" will result in the marked text being copied into a storage buffer and then deleted from the editing window, while "Copying" will result in just a copy of the text being copied into the storage buffer without the deletion of the original text. The text cut/copied in this way can then be pasted into another part of the document by moving the mouse to the desired location and selecting the Paste button at the top.
Another way of invoking these functions is to click on the Edit option on the top menu bar and selecting the desired function, e.g.
"Edit -> Cut"
"Edit -> Copy"
"Edit -> Paste"
Undo
After performing an editing function, (e.g. deleting a block of text), you can undo the action by clicking on the Undo button at the top. The Undo function can also be invoked using the Edit menu selection at the top.
Saving Text
The text typed in can be saved by clicking on the File option on the main menu bar at the top and selecting,
"File -> Save As"
Move to the folder you want to save the file in and enter the name of the file to save.
Find and Replace
The Find button can be used to locate a text string. By default this search is not case sensitive and will also locate the text if it is part of a word. These default options can be changed from the Find dialog.
The Replace button can be used to locate a text string and replacing it with another. Again the default options of non-case sensitive and matching part of a word can be changed.
The Find and Replace functions can also be performed using the Search menu selection at the top.
Opening A File
You can edit a text document already saved on the system by opening it. From the main menu at the top choose,
"File -> Open"
and select the file to open.
Preferences
Preferences can be set from the Preferences menu selection,
"Edit -> Preferences"
The Preferences you can set include the font, color and point size to be used, tab spacing, autowrapping, and autoindenting.
Help
More information on how to use KWrite can be obtained by selecting Help from the menu at the top.
