KDE Desktop on PCLinuxOS
Published by the United Nations Development Programme's Asia-Pacific Development Information Programme (UNDP-APDIP)
Kuala Lumpur, Malaysia
Web: http://www.apdip.net/
Email: info@apdip.net
© UNDP-APDIP 2004
The material in this guide may be reproduced, republished and incorporated into further works provided acknowledgment is given to UNDP-APDIP.
This work is licensed under the Creative Commons Attribution License. To view a copy of this license, visit http://creativecommons.org/licenses/by/2.0/ or send a letter to Creative Commons, 559 Nathan Abbott Way, Stanford, California 94305, USA.
This guide has been modified by Papawoob to reflect the Linux distribution of PCLinuxOS 2007.
Chapter 6: Accessing the Internet
The Internet has revolutionized information usage and dissemination. It has made the global village a reality whereby almost anyone, anywhere in the world, is reachable if the person has an Internet connection. The most common way to get Internet connectivity is by using the PC, be it at home, in the place of work, the community hall, or even a cybercafe.
In this chapter we shall examine some of the more common methods by which a PC can gain access to the Internet.
The Internet Service Provider (ISP)
For a personal or home user, before you can access the Internet you will need to sign up with an Internet Service Provider (ISP). The ISP usually has a network which is connected to the Internet by a permanent telecommunication link, i.e., one can view the ISP's network as part of the Internet. The ISP provides the necessary networking infrastructure to enable you to connect to its network. Thus, once your PC successfully connects to the ISP's network, it can then access the resources and services provided by other computers on the Internet.
The Internet can be accessed from your system using a variety of methods, depending on the type of access methods supported by the ISP you sign up with and the type of networking devices you have installed in your system. Currently the most common methods of connectivity by a home or personal user to an ISP are:
Dial-up
DSL or Cable Internet
Dial-up Connectivity
The simplest way to access the Internet is to use a dial-up telephone line connection. Almost all ISPs provide dial-up access connectivity to the Internet using the existing telephone line in the home, or office. To do this you will need a telecommunication device called a "modem". Most modern PCs come with a built-in dial-up modem card or, if it does not, you can purchase one and install it or purchase an external dial-up modem and use the serial port available on your PC for connection.
Before you can dial up to your ISP and access the Internet, you have to configure your system to recognize the modem and then dial the correct number to your ISP. You will need to have at hand the following information needed for the modem configuration:
Telephone number to dial to the ISP for the Internet access
Internet access login name and password provided by the ISP
Modem Configuration
To configure your modem for Internet access, start KPPP from the Main Menu:
Main Menu > Internet > Remote Access > KPPP
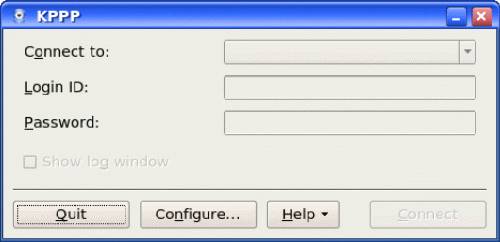
Fig. KPPP Internet Dial-up Tool
Select the Configure button. Click on the New button.
You'll be prompted to Create a New Account. You could try the Wizard to set up your system, but if you live in the United States, the wizard will not find any ISP's. You'll need to use Manual Setup, but that's not difficult.
The Add button will prompt you to enter the phone number of the ISP (Internet Service Provider). If you need to use an area code and/or a dialing prefix to reach the ISP, you should enter them in the box provided, otherwise just enter the telephone number.
Enter the name you want this connection to be known by, usually the name of the ISP is used (this is is just a nickname provided by you so that you can recognize this connection). Enter the login name and the password in the boxes provided.
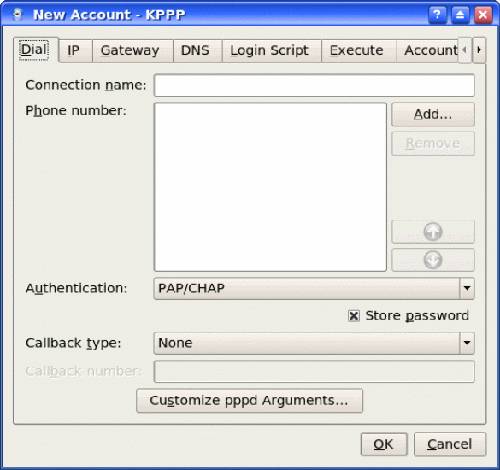
Fig. Filling in the ISP Provider Information
Don't worry about the IP Settings tab. Most ISPs assign IP addresses automatically (Dynamic IP). If not, you'll need to contact your ISP and get the information from them. Then, just enter your IP address and related information by selecting the Static IP address button.
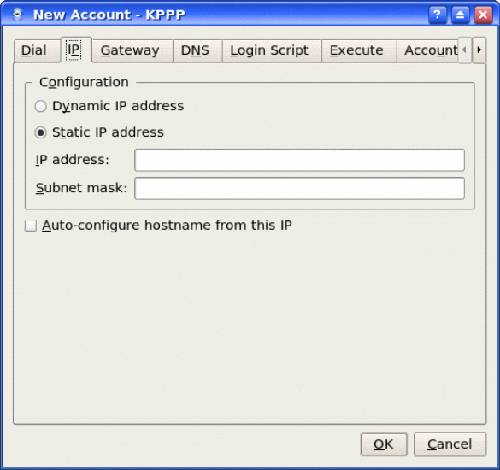
Fig. Filling in the IP Settings
Click on OK to accept and end the set up.
The KPPP Configuration window will pop up; click on OK to exit from it.
Activating the Modem
To test your modem and Internet connectivity, select the KPPP tool from the Main Menu:
Main Menu > Internet > Remote Access > KPPP
Select the profile you have set up (remember the ISP nickname you used in the set up above?) by clicking on it and then click on the "Connect" button. The modem will start to dial and connect to the ISP and after awhile, upon successful login, the KPPP window will tell you that you are now connected to the Internet. You can now perform the web browsing and other services discussed in the Next few chapters.
To disconnect from the Internet bring up the Network Devices Control window and select the profile which was activated above and click on the "Disconnect" button. You will be disconnected from the Internet. You can then quit the KPPP program.
Troubleshooting
If, for some reason, you do not hear any connection noises, then perhaps your modem was not detected and set up. You'll need to use the Modem tab, and click the New button to make some changes.
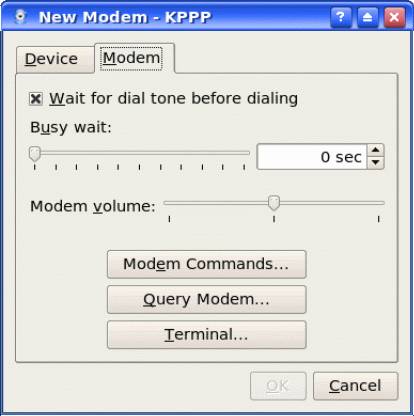
Fig. Adding a New Modem
To find out if your modem is automatically detected, click on the Query Modem button, and look for a series of little bars and indications that something is happening. If you don't see them, then your modem is probably not detected. That probably means that your modem is actually a Winmodem, which doesn't always work well with Linux (they are designed to work only with MS Windows).
If your modem is a Winmodem, then your best option is to purchase an external serial modem and attach it to an open serial port on the back of your computer. After you have done this repeat the Troubleshooting steps above.
Exercises
Perform an Internet dial-up connection using the modem on the system.
Determine that you have Internet connectivity by accessing some well known websites.
Disconnect from the Internet.
xDSL / Cable Internet Connectivity
The dial-up Internet connection discussed above provides ready and easy access for places which have telephone infrastructure in place. However, it has the disadvantage that the maximum data transmission speed which normal dial-up technology can provide is about 56 Kbits per second. While this speed may be adequate for email text transmission and web browsing of non-multimedia intensive web content, it is not practical for multimedia access. For heavy multimedia content access using the Internet, a high speed link in required. For the personal or home user, broadband xDSL technologies make this possible.
DSL is an abbreviation used for the family of DSL (Digital Subscriber Line) technologies which enable high speed data transmission through telephone lines. There are different types of DSL and they include, ADSL, SDSL, IDSL. Collectively these are known as DSL. ADSL (Asynchronous Digital Subscriber Line) is commonly used for the home.
xDSL / Cable Internet Configuration
There are two main types of DSL configuration in use and most ISPs use either one of these:
DHCP over Ethernet
PPoE over Ethernet
Usually if you have to use a login id and password for your broadband DSL connection then you should be using the PPoE configuration, except in those parts of the World where PPoA is used.
DHCP over Ethernet
Linux has been called "The Broadband OS" because it is very good at detecting and using Ethernet as its main networking capability. The Quick Start way to set up both DSL and Cable Internet is to plug the Ethernet cable (which looks like a phone cable, but with 5 strands of wire instead of 3) into your modem's Ethernet port, and the other end of the cable into your computer's Ethernet port.
Most modern day flavors of Linux will autodetect an active Ethernet connection, and assign it to the device name eth0, eth1, and so on. If there is more than one Ethernet interface for your computer, the "ethX" numbers will increase.
For this configuration, what is needed is just to obtain the IP configuration parameters using DHCP (Dynamic Host Configuration Protocol). To set up your DSL connection click on your PCLinuxOS Control Center (PCC) icon in your panel and enter your Root password. Next, choose the Network & Internet tab and then choose "Setup a new network interface (LAN, ISDN, ADSL,...)". You will then see a screen like the one below:
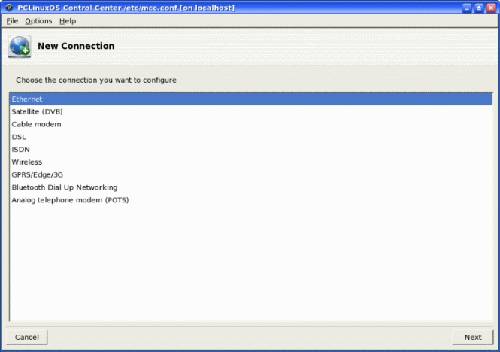
Fig. New Connection
Select Ethernet connection in the select device type screen and click on the Forward button. A screen showing the detected Ethernet card(s) on your system is displayed as seen below:
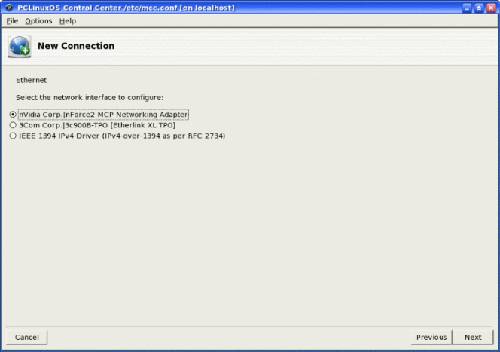
Fig. Select Ethernet Device Screen
Select the correct Ethernet network interface. (You usually have only one Ethernet card installed on the system.) Click on the Next button.
The default is to select your IP automatically. You should accept this and all the defaults on the next few pages.
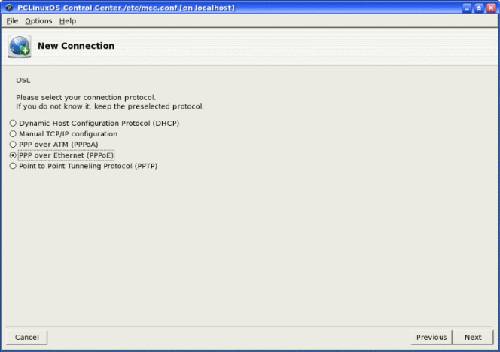
Fig. connection protocol
Clicking next will bring up a window where you can enter the login name and password provided to you by the ISP. Click on the Next button.
On the next window check the box next both "Allow users to manage the connection" and "Start the connection at boot" and click Next.
Click next and you will see a window that will ask if you want to start the connection now. Choose yes, click next, and you will see a congratulations window. Click on Finish to accept and end the set up. Log out and back in to avoid any hostnames conflicts.
Activating the ADSL Link
To test your ADSL link and Internet connectivity, click on your PCLinuxOS Control Center (PCC) icon in your panel and enter your Root password. Next, choose the Network & Internet tab and then choose Monitor network connections from the screen below:
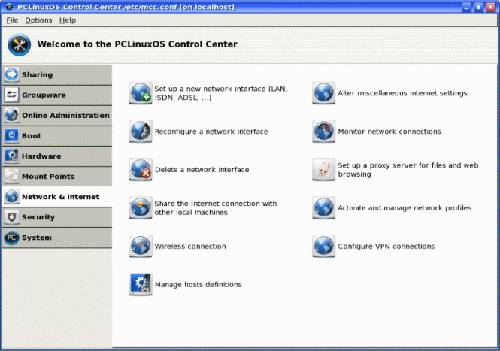
Fig. Network and Internet
If you are using DHCP over Ethernet, select the Ethernet device name (usually this is eth0) you have used in the configuration set up by clicking on it and then click on the "Connect" button.
If you are using PPoE over Ethernet, select the ISP name you used in the configuration set up by clicking on it and then click on the "Connect" button.
The link will be established after a few seconds and the status of the profile in the Monitor network connections screen will change from "Not Connected" to "Connected." You are now connected to the Internet.
Exercises
Perform the same Internet connectivity tests as done previously with the dial-up modem connection.
