VirtualBox: Easier Than You Think!
By Paul Arnote
I had been looking at VirtualBox (in the PCLinuxOS repositories) with great interest for quite a while. However, I was somewhat intimidated about giving it a try, due to all the reports from folks in the forums who reported some difficulties in getting it properly set up, coupled with how difficult the directions seemed. Boy, was I wrong on both accounts!
I run one of my many laptops as a dual boot system, dual-booting PCLinuxOS and Windows XP. Yet, the longer I use PCLinuxOS, I find myself logging in to Windows XP less and less frequently. Currently, I only log into Windows XP to 1) do the required periodic updates, and 2) to do some occasional photo editing. (I'm not fully comfortable with GIMP or any other Linux graphics editing package … but I'm working on it!)
So I finally decided to "take the dive" and give VirtualBox a try. The following is a step-by-step method of how I was able to get VirtualBox up and running with a full installation of Windows XP. This should work relatively well with Windows 98, Windows ME, Windows 2000, or possibly even Vista.
- STEP ONE:
You will need the following items:
- A Windows XP installation CD (or other version of Windows; this guide is centered around Windows XP, but should be similar to other Windows versions.)
- The nLite application from the Web (freeware download)
- Windows XP SP3 (if using Windows XP and a free download from the Windows web site. Download and save to your computer. Look for the file for IT/Network Professionals.)
- A blank CD-R (or DVD-R) and CD-Burning software (K3B works well) [Optional]
- STEP TWO:
From within Windows XP, install nLite.
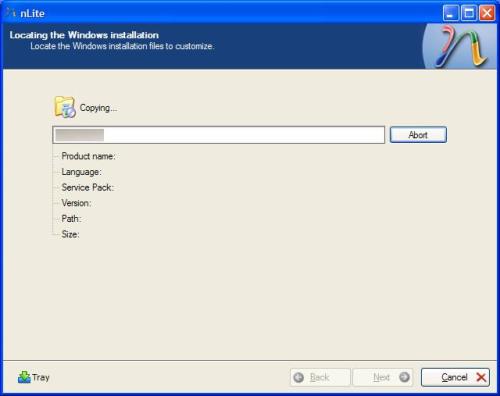
- STEP THREE:
Insert your Windows XP installation disk. Allow nLite to copy the CD contents to your hard drive. You will also need your Windows XP Product Key later on, so be sure to have that handy.
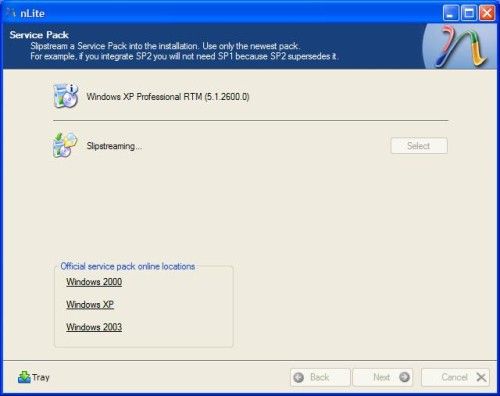
- STEP FOUR:
Select ALL the options, including "Slipstreaming" your Windows XP installation to include the Windows XP Service Pack 3 update in your nLite install disk. "Slipstreaming" the latest service pack into your installation will prevent you from having to spend your time downloading it again, and you will create an installation disk with the latest version of Windows on it. Also, you will only need the latest service pack (SP3), since it contains all the updates that were included in the previous service packs.
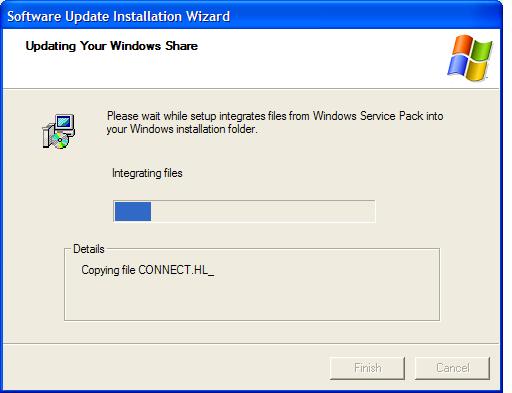
- STEP FIVE:
Now, sit back and wait while nLite performs the slipstreaming procedure, and while Windows updates your "Windows Share," integrating the SP3 update into your Windows installation folder.
- STEP SIX:
Unless you have them downloaded as EXE files, you can skip by the next step of including Hotfixes, Add-ons, and Update Packs by hitting NEXT.
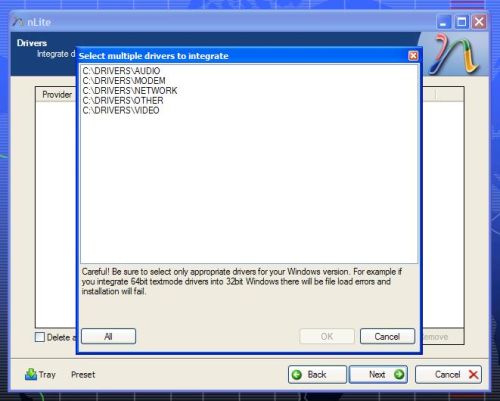
- STEP SEVEN:
Locate your drivers and add them from your Windows installation. Usually, selecting Multiple Driver folder will load all your drivers in. Select ALL, then OK, then NEXT.
- STEP EIGHT:
In the Compatibility dialog, select the components you want to prevent being removed accidentally.

- STEP NINE:
Select components to remove but DO NOT include your new Windows installation CD. You can be somewhat ruthless here. For me, this was rather easy. Things I never use, such as Bluetooth connectivity, and WordPad, I chose to leave out. You may also want to leave out the games and any other programs that you don't routinely use while working in Windows. The more you leave out, the smaller your installation files will be, the faster Windows may run, and the less room it will take in your VirtualBox installation. Just be careful when it comes to system services, since exclusion of some items will break certain features of Windows XP. Fortunately, nLite is pretty good at letting you know which features may be broken should you choose to leave out or disable features. Just tread cautiously here, but be honest and ruthless.
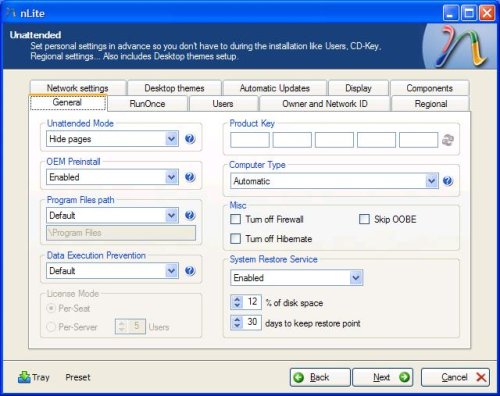
- STEP TEN:
Set the Unattended Installation options. Here is where you will need your Windows XP CD Key, User names, passwords, etc. Be sure to check for options you want on ALL the tabs. Taking your time here will save you the hassle of having to enter all sorts of things during the Windows XP installation on your future virtual machine, and having to sit there and wait to be prompted to enter each and every little thing.
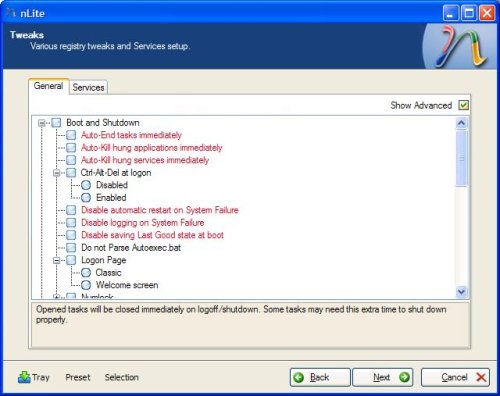
- STEP ELEVEN:
Set Tweaks for your new Windows installation. Windows has all kinds of hidden tweaks and settings, and nLite allows you to make many of them so they are set up from the start. Some of the various "hidden" settings in Windows XP include Windows Explorer behavior, viewing of hidden or system files, viewing of file extensions, etc. Spend the time at this point to carefully select your options to minimize the "customization" you will have to do when you install Windows XP into VirtualBox. You can leave the items in the Services tab as they are (set to Default). Click on NEXT.
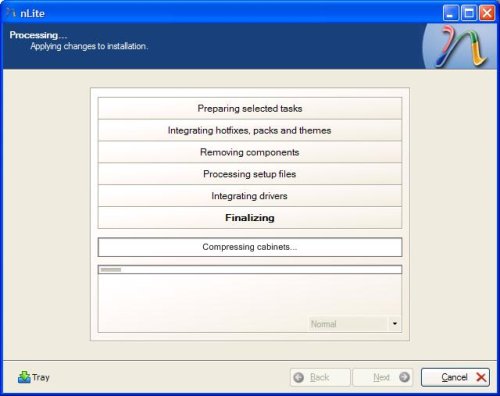
- STEP TWELVE:
Now sit back and wait while nLite processes all the changes you have made to your Windows installation. Depending on the speed of your processor, this may take a little while.
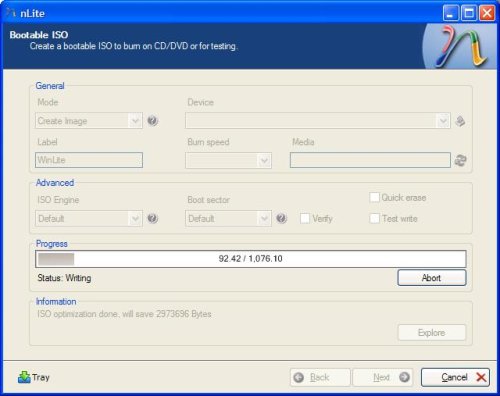
- STEP THIRTEEN:
Now it's time to make the ISO file of your new Windows XP installation! You're almost there! This process, like the last one, may take a little while, so go grab a snack from the fridge or a glass of cold iced-tea.
- STEP FOURTEEN (Optional):
Reboot your computer into PCLinuxOS and burn a copy of your ISO to a CD (or DVD if your ISO file size exceeds the capacity of a CD-R). K3B works exceptionally well for this. This step is listed as optional, since VirtualBox can install directly from an ISO. However, I wanted to save a copy for future use, should I decide to repeat this at a later date, saving me from having to repeat the process spent making the ISO file in nLite.
- STEP FIFTEEN:
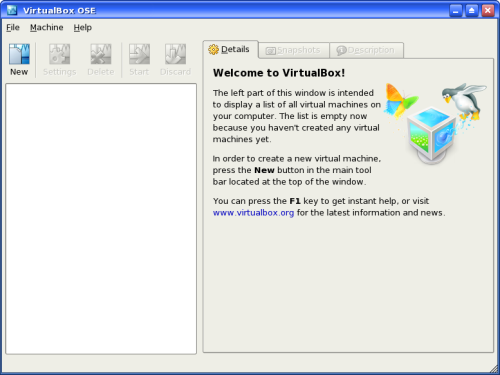
Install a copy of VirtualBox from the PCLinuxOS repositories. It is also a good idea, at this time, to go ahead and install the VirtualBox Guest Additions as well. Start VirtualBox and select a NEW virtual machine.
- STEP SIXTEEN:
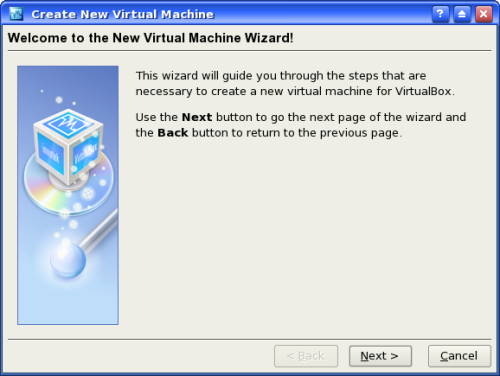
When you select a NEW virtual machine, you will be greeted with the "Welcome to the New Virtual Machine Wizard" window. Click on NEXT.
- STEP SEVENTEEN:
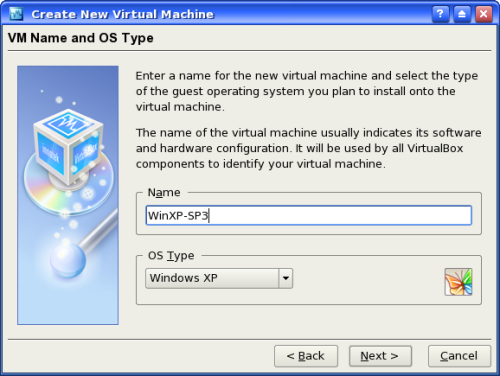
Now you are greeted with the VM Name and OS Type window. Give your guest OS a recognizable name, and specify the type of OS it is. In my case, I named it WinXP-SP3, and selected Windows XP as the OS type.
- STEP EIGHTEEN:
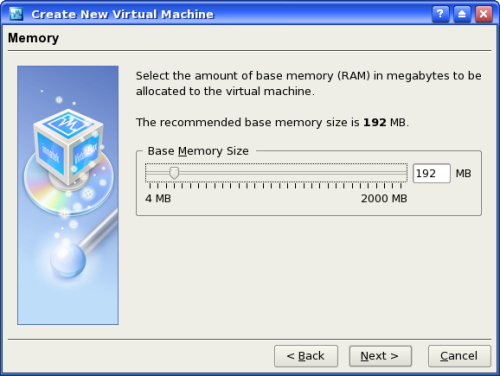
Now you'll be asked how much of your computer memory you want to devote to running the guest OS. In my case, I chose only 192 MB. Windows XP will run OK with even less. One reason I chose only 192 MB (besides it being what was recommended by VirtualBox), is that this particular computer only has 512 MB of total memory installed. My other laptop, which also has a copy of Windows XP running in VirtualBox, has 512 MB of memory assigned to running the guest OS, since that computer has 1 GB of memory installed.
- STEP NINETEEN:
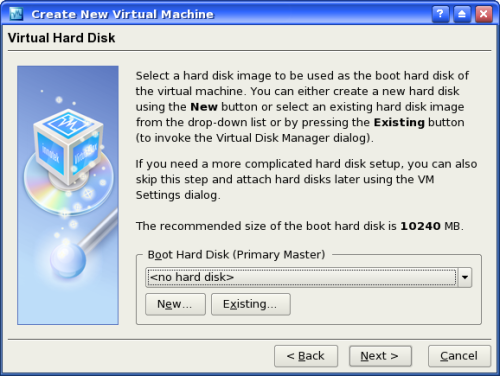
Now is where you specify how much of your hard drive you want to assign the guest OS in your virtual machine. Since you have not yet created any virtual machines, you will not have any virtual hard drives set up. So you need to select NEW at the bottom of the window.
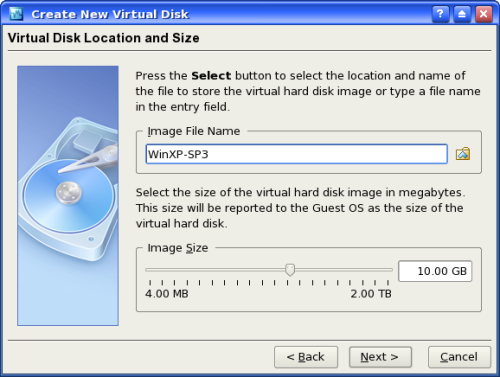
- STEP TWENTY:
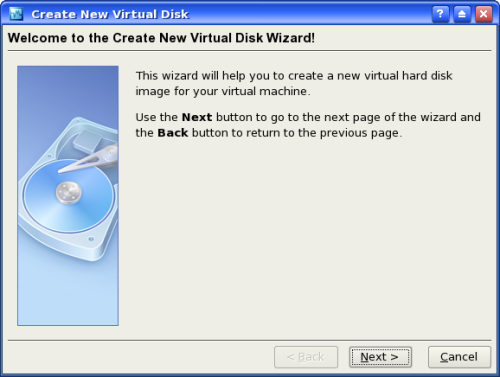
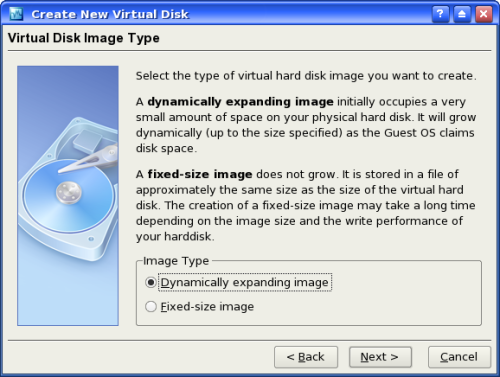
This will bring up the Create Virtual Disk Wizard. First, click on Next, then select Dynamically Expanding Image.
Selecting the "Dynamically Expanding Image" ensures that the virtual machine will only use as much hard drive space as is necessary, and will allow it to "grow" up to the specified size on an "as-needed" basis.
- STEP TWENTY-ONE:
Now you need to set the size of the virtual hard drive you want to allocate to the guest OS. I chose only 10 GB, the minimum recommended size, since I rarely have a need to use Windows these days and prefer to stick with PCLinuxOS for most of my computing needs.
- STEP TWENTY-TWO:
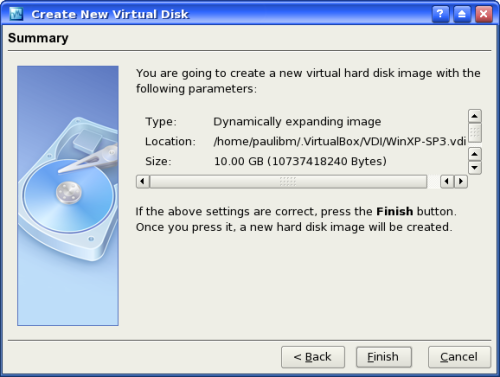
You will now see a summary of the previous few steps to set up the Virtual Hard Drive. Click on NEXT.
- STEP TWENTY-THREE:
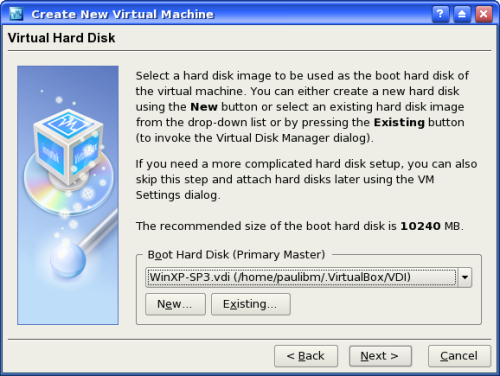
You are now returned to the Virtual Hard Disk window. Select the new virtual hard disk you just created, and click on NEXT.
- STEP TWENTY-FOUR:
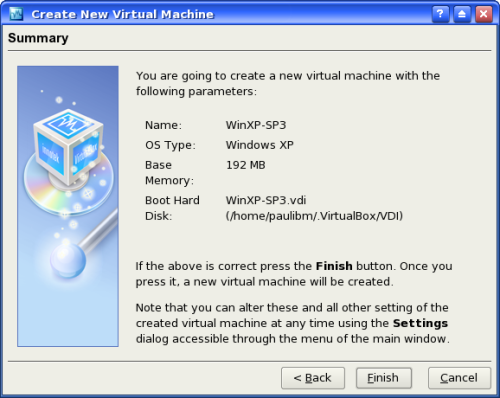
Now you will see the Virtual Machine Summary. Select the FINISH button to proceed.
- STEP TWENTY-FIVE:
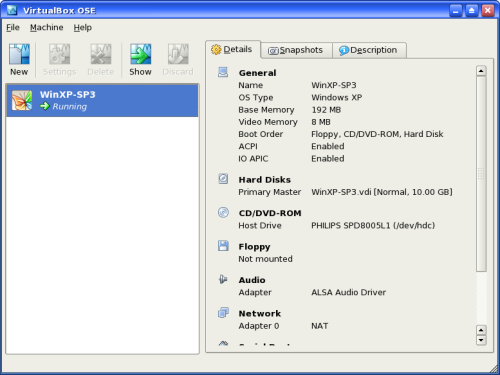
Once that is all done, your new virtual machine will be listed in the VirtualBox OSE main window.
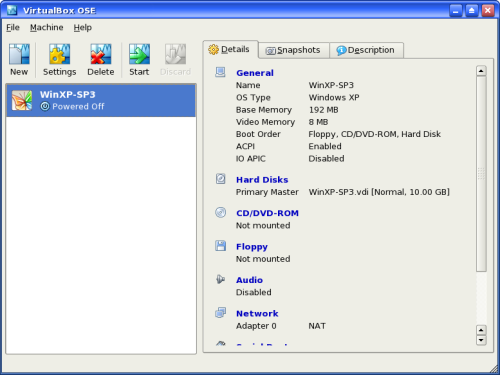
- STEP TWENTY-SIX:
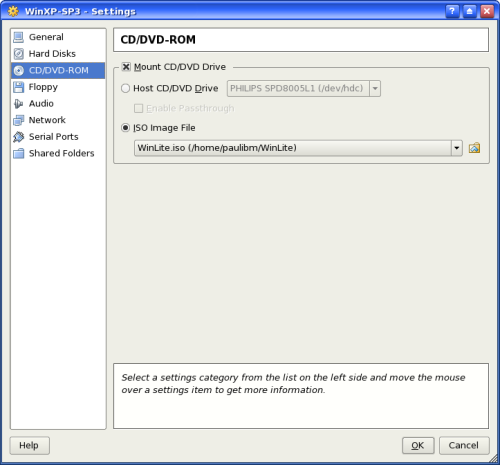
Now it's time to install your guest OS (in this case, Windows XP) into your newly created virtual machine. To start, you will need to tell VirtualBox where to find the guest OS. Click onCD/DVD-ROM and you can tell VirtualBox to either boot from the ISO file you created with nLite, or from the CD/DVD you burned from your ISO file. In my case, I chose to simply boot from the ISO file, and pointed VirtualBox to it's location.
At this point you might want to make any other changes in the different categories listed on the left. This includes enabling audio in your guest OS by setting it to be parsed by the Linux ALSA driver.
- STEP TWENTY-SEVEN:
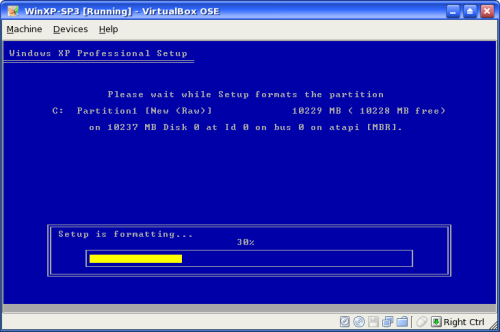
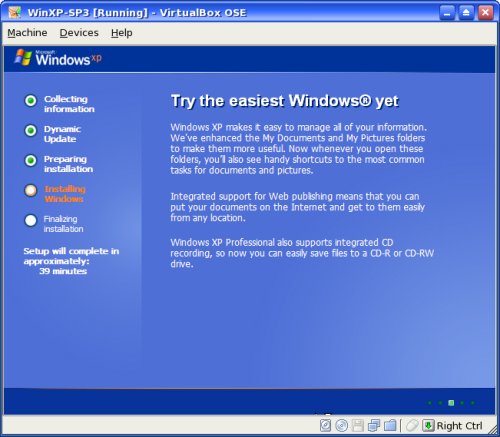
Now it's time to start your new virtual machine. When you do, the ISO (or CD/DVD) will boot and your guest OS will be installed. It's time to take another short break while Windows XP installs. Typically, this takes about 40 minutes or so.

- STEP TWENTY-EIGHT:
When Windows XP has finished installing, you will have a fully capable installation of Windows XP running in a window on PCLinuxOS! However, you are NOT finished yet. At the top of the Windows XP window, you need to click on the "Devices" menu and select "Install Guest Additions."
- STEP TWENTY-NINE:
You need to now close your Windows XP window, and return to the VirtualBox OSE main window. We need to change the CD/DVD-ROM from the ISO file to the computer's built-in CD/DVD drive. To do this, simply click on CD/DVD-ROM and make the change in the settings window. Note that this is ONLY possible when the virtual machine is NOT running, and the heading is BLUE in color.
- STEP THIRTY:
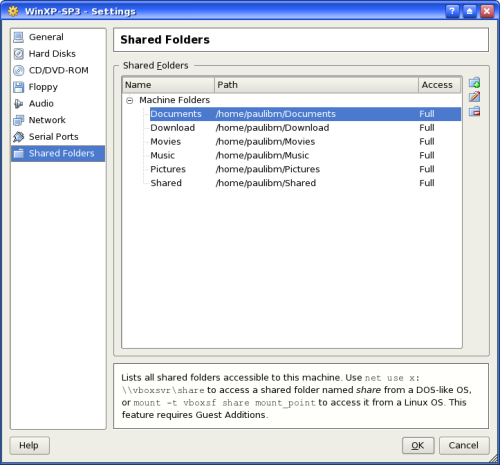
This might also be a good time to (optionally) set up any folders on your host computer that you want to share with the guest OS. Doing so, will give your guest OS access to files on the host computer. In the "Details" tab of the VirtualBox OSE window, scroll down to "Shared Folders" and add the folders you would like to have access to while working in your guest OS in a virtual machine.
- STEP THIRTY-ONE:
You will be faced with a few additional updates to your Windows XP installation. Now is as good of a time as any to go ahead and allow them to complete. Windows XP will use the PCLinuxOS wireless or ethernet connection to connect to the Internet to complete this task.
SUMMARY:
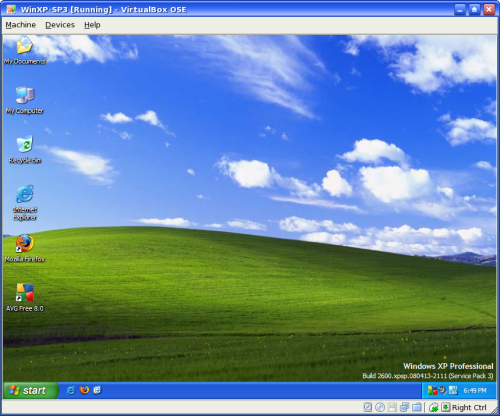
Now you are running Windows XP in a virtual machine in PCLinuxOS! Imagine ... Windows XP in a PCLinuxOS window! From within your VirtualBox installation of Windows XP, you can install any programs you want to have available from within Windows XP.
I have to say, Windows XP literally FLIES inside VirtualBox! My previous installation of Windows never ran so good when it was natively installed on my hard drive. My Windows XP startup, which typically used to take from 1 minute, 30 seconds to a full two minutes, now takes LESS than 45 seconds to boot. And it's very fast and responsive, almost as if it were created especially for VirtualBox.
Another nice attraction is that I can choose to run Windows XP within a virtual machine window on top of PCLinuxOS, or I can choose to run Windows XP full screen by pressing the Right CTRL key in combination with the 'F' key. A simple toggle of that key combination allows me to switch back and forth, at will, between a full screen display and a windowed display of Windows XP.
Had I known it was this easy to set up VirtualBox, I'd have done it a LONG time ago! Now, with the success I've had in setting up Windows XP running in VirtualBox, I'm very seriously considering the removal of my Windows XP partition from my hard drive and reclaiming it's use for PCLinuxOS! Who couldn't use another 50 GB of hard drive space (the amount I have reserved for Windows XP in my dual boot configuration)!
I have done this on two of my laptops running PCLinuxOS! It's literally THAT easy to do! So if you've ever thought about running or using VirtualBox, don't shy away! Plus, the added benefit (providing you have the hard drive space to allow it), you can also run or try out other Linux distro's in VirtualBox, running straight from the downloaded LiveCD ISO files!
If you would like some more information, you can check out the following internet links:
The VirtualBox links will give you access to the documentation files for VirtualBox. The LifeHacker link will give you some good information on using nLite to create your "slipstreamed" Windows XP installation disk.