Through the Lens
Patrick G Horneker
Photo Management Software
If you are like me and have a large collection of photographs, you will need software to organize your collections. PCLinuxOS has several pieces of software to accomplish this task. The two most popular packages in this category are DigiKam for KDE, and F-Spot for GNOME. There are more software packages that can be installed from Synpatic such as Google Picasa, flphoto, and feh. In addition, if you have Wine installed, you can install some photo management software packages for Windows provided by various photofinishers on CD-Rs that you get with film photofinishing orders.
DigiKam
This is my absolute favorite photo management application, and it is a part of PCLinuxOS 2009.1 KDE edition. (If you are not running the KDE edition of PCLinuxOS, you will need to launch Synaptic, then download and install the digikam package. The package is found in the Graphics section.)
If you have upgraded to KDE4 by installing the task-kde4 package, you will need to reinstall DigiKam as the older KDE3 application was removed at the time of upgrading. The KDE4 version of DigiKam is now in the Graphics Desktop/KDE4 section.
Note: Though DigiKam was designed to be used with KDE, it can run under any window manager. If you choose to run DigiKam outside of KDE, keep in mind that the basic KDE libraries will need to load before DigiKam is launched, hence increasing the time needed for DigiKam to load.
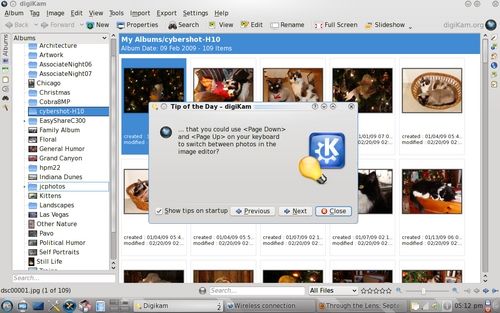
When you launch DigiKam the first time, you will be asked for a directory where your photograph collection is stored. By default, it is the Pictures directory in your home directory, for example /home/patrick/Pictures on my laptop. DigiKam will then build a database of thumbnails for each photograph you have in that directory, and any subdirectories contained within that directory. Next, a set of plugins will load providing the many great features of this photo management application. Finally, the main application window opens up as shown here.
What you see here is toolbars at each edge of the application window, then a layout similar to what you would find in Nautilus or Konqueror (running as a file manager rather than a web browser). In fact, DigiKam is really a the Konqueror browser adapted for photo management.
The version I am running is Version 1.0.0 of DigiKam for KDE4. The Tip of the Day window appears on the screen, and the home directory appears in the sidebar instead of the Pictures directory as in the KDE3 version.
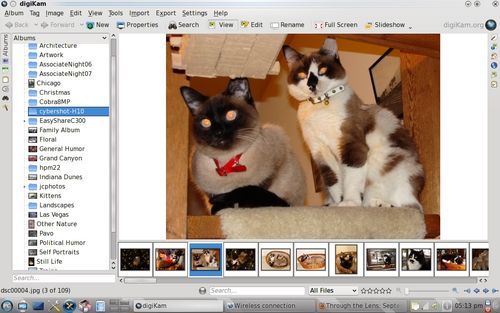
When you click on a folder, a dynamically generated HTML page containing the thumbnails of photographs in that folder appears in the window.
This example shows images taken with my Cybershot DSC-H10 camera. (The EasyShare C300, hpm22 and Cobra8MP refers to the Kodak EasyShare C300, Hewlett-Packard PhotoSmart M22, and the Cobra 8 Megapixel cameras.)
Note: In the case of the Cobra, this was known as the Black Friday special, as it was typically available as a big bargain on Black Friday, the largest sales day of any retail business in the US, and is always the day after Thanksgiving. Black Friday is the official beginning of the holiday season in the retail business, and massive crowds build up at stores nationwide as early as two in the morning on that day to get the best bargains at the start of the holiday shopping season.
Cameras like these are typical bargains at that time of the year.
What's New with the KDE4 version of DigiKam
Version 1.0.0 now shows a filmstrip inside the application window below the image that you wish to see a larger view. This allows you to scroll through your photographs without having to return to the multiple thumbnail view first to look at the next photograph. This feature was first implemented with F-Spot, which will be discussed next.
You can put on a slideshow this way, and there is a new toolbar under the application menu that allows for this to happen.
In the last issue, I discussed the Kooka scanning application. From the Import menu, you can launch Kooka to scan images directly to DigiKam. The menu also allows you to import images from any camera supported by the gphoto suite. If your camera communicates with your PCLinuxOS machine as a USB Mass Storage device, that device will automatically appear in the Import menu.
The Export menu allows you to create CD or DVD archives of your photograph collection, create web galleries of your photographs, export to Flickr or PicasaWeb, or simply copy images to another directory on your hard drive for further processing.
F-Spot
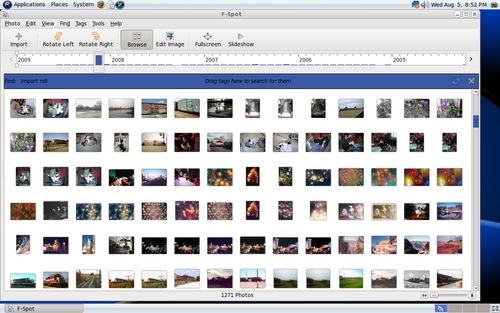
This is the other major photo management application for PCLinuxOS. This application is included with PCLinuxOS GNOME edition. If you are running any other edition of PCLinuxOS, you will need to launch Synpatic and download f-spot from the Graphics section. Since this application was written in C#, the Mono project and its dependencies will also be installed, and hence this will be a lengthy download (unless you have a really fast broadband connection to the Internet).
F-Spot was written for the GNOME desktop and runs best under GNOME. When you first run F-Spot, you will be prompted to select a directory where your photographs are stored.
F-Spot stores its database in Photos on your home directory. If you store your collection in the Pictures directory as I do, you would want to click on Select Folder, then choose Pictures, click on OK, and your pictures will be imported to F-Spot.
When F-Spot is finished, you will see thumbnails of the images that have been imported. Click on Import to build the database.
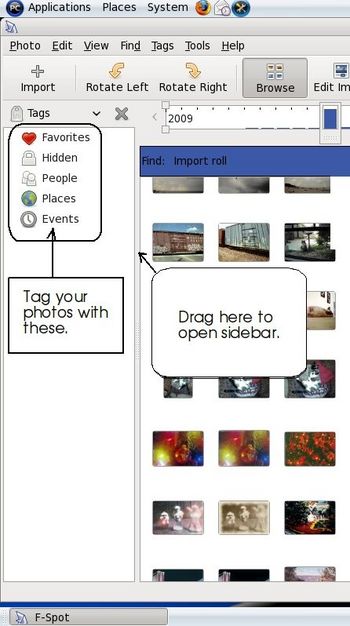
There is a sidebar in the application. To access this, move the mouse to the left side of the application window, with the mouse pointer inside the window, wait for the cursor to change to horizontal arrows, then drag out the sidebar.
F-Spot provides a timeline and a search bar. The sidebar works after your photographs have been tagged. The sidebar provides the tags you can use, or you can create your own tags.
The easiest way to tag photographs is to select images, right click on the selection, then select the tags you want from the popup menu.
Once images have been tagged, you can then drag the tags from the sidebar to the search bar to display only images that have been tagged with the tag you have dragged to the search bar.
Like DigiKam, F-Spot has export options that allow you to create web galleries and post to Flickr. Unlike DigiKam, the tagging system is more suitable to photograph organization. F-Spot also has version tracking, where if you modify the image in any way with F-Spot, you can save and recall multiple versions of the same image.
Google Picasa
This is Google's software package for organizing of photographs, and was designed to be used with PicasaWeb, Google's photo sharing service. You can install this package from Synaptic. It can be found under the Applications/Graphics section.
When you first run Picasa, it will start scanning the entire contents of your home directory. This means all of your documents, music files, downloads, and everything else will be scanned for graphic files. To ensure that only the directories where your photographs are scanned, select Folder Manager from the Tools menu.
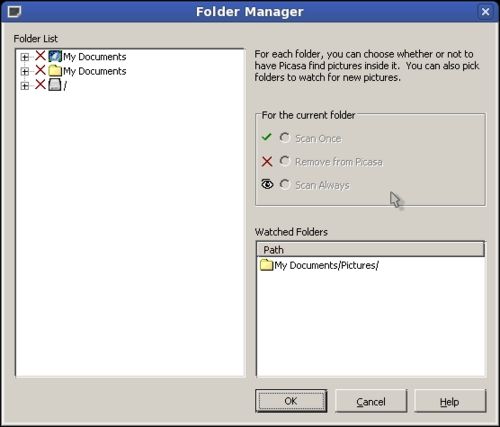
It is here where you select all folders containing your photograph collection. I suggest first, select your home directory (for example /home/patrick on my laptop), then click on Remove from Picasa. You will be asked if you really want to remove the contents of that directory from Picasa's repository. Click on Yes to confirm because we want to include only the images that are in our directories that contain photographs.
At this point, we have cleared out the Picasa repository. Now we are ready to select folders that contain only photographs.
On my laptop, I have my collection stored in /home/patrick/Pictures. This is the same folder I use for DigiKam (which happens to be the default folder used by DigiKam). So I them expand the folder listing and select Pictures. Then I click on Scan Always to tell Picasa to only look in this folder and to traverse all folders contained within Pictures.
Now click on OK and Picasa will scan only the folders we want.
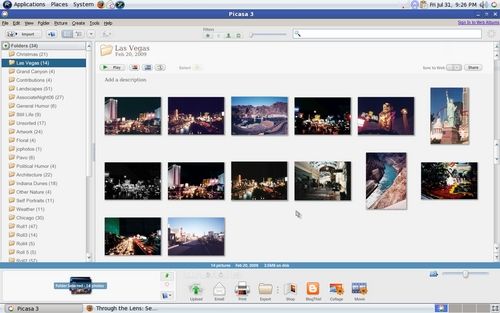
Like DigiKam, you get a listing of folders on the left sidebar, and the thumbnails of all the images your collection. As you scroll up and down the thumbnail, the header changes showing which folder you are now viewing.
In this example, the folder containing my scanned images taken in Las Vegas has been selected. At the bottom of the application window, you will see a number of icons representing what you can do with the selected images.
Here you can upload these to PicasaWeb, e-mail them, print them, export them to another folder, order gift items made from these images, blog about them at Blogger.com, make a collage, or create a slideshow (in MPEG format).
PicasaWeb
You can use this application by itself, as with DigiKam and F-Spot. However, to get the real power of the application, you will need to login to PicasaWeb. (You can use your existing Google account to do this, or sign up at any Google website to get an account.)
Once you have a Google account, you will then need to upload images to PicasaWeb. Simply select which images you want to upload, then click on Upload at the bottom of the application window. I suggest selecting folders on the lest sidebar as the names of the folders will be used to create new folders at PicasaWeb. Once you click on Upload, you will be prompted to login with your Google account before the uploading process begins.
Once you start uploading your images, a window will open showing the progress of your uploads. You will want to click on the checkbox labelled Don't eat all my bandwidth, especially if you want to do other things while your photographs are being uploaded.
Once you have your photographs uploaded to PicasaWeb, you will be able to share them and order prints and gifts made from them.
Note: You can also use DigiKam with PicasaWeb. While running DigiKam, select Export to Picasaweb from the Export menu.
Setup Picasa to Enable Ordering
There is a bug in the current version of Picasa that prevents you from accessing the online shop. The solution to this problem can be found at the support forum for the Picasa package. To fix this, you will need to login as root (to be able to make changes to the file not in the user account), open a text editor and load this file:
/opt/google/picasa/3.0/wine/drive_c/Program\ Files/Google/Picasa3/runtime/defaults.ini
(You may or may not need to include the backslash depending on which editor you use to open this file.)
Then you will need to change the line containing printerURL, which is showing an incorrect URL, resulting in a blank window opening up instead of the photo ordering page. The corrected defaults.ini should read as follows:
[LifeScapeUpdater]
versionFileURL=http://updates.picasasoftware.com/picasa2/wine/currentversion.ini
readmeURL=http://readme.picasa.com/wine/
printerURL=https://client4.google.com/providers/printers.html
[Track]
name=wine
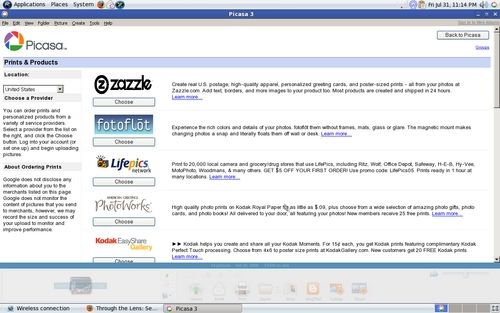
The highlighted line shows the correct URL for ordering of prints from your photographs. Once this is fixed, clicking on Shop will yield the following:
Note that you really have freedom of choice here. There are sixteen different vendors for which you can submit print orders. Walgreens and CVS are two of those choices, and they provide their own ordering software in addition to what you can order from Picasa.
Note on Photofinishing Retailers
Walgreens, CVS, and Wal-Mart allow you to order online and then pick up your prints at a nearby store in one hour. This of course, brings out the utmost convenience when it comes to digital photography, provided that you have a store nearby where you live.
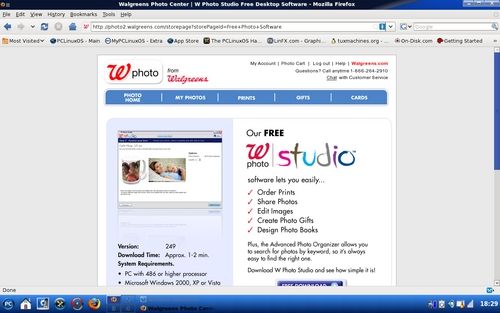
W Photo Studio (Walgreens)
This photo management is a Windows application that runs on PCLinuxOS with Wine installed, and was designed to be used with the WPhoto.com photofinishing services. (WPhoto.com is a microsite for the Walgreens drug store chain providing digital photofinishing services.)
There are two ways to get this software. The first is to order a CD-R for a nominal fee added to your film photofinishing order. The second is to download the software from Wphoto.com.
I recommend downloading from Wphoto.com to be sure you get the latest version of W Photo Studio.
This is a 84.7MB download, so a fast internet connection is recommended.
If you do not have Wine installed, you will need to launch Synaptic and download wine-dev (and its dependencies) from the Emulators section. The wine-dev package contains the latest version of Wine.
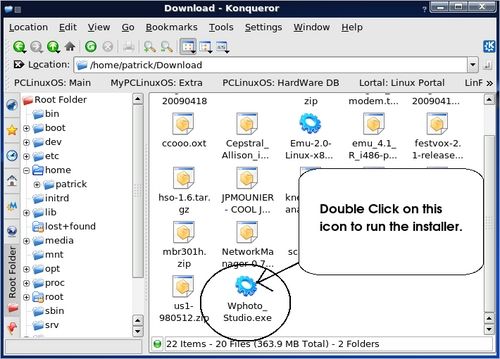
If you downloaded the package, create an empty directory (or use a directory you allocated for downloads) and drag the downloaded file to that directory, then double click on Wphoto_Studio.exe to lanch the installer.
If you are installing from a CD-R you received with your film photofinishing order, you will need to double click on photoappsetup.exe to install W Photo Studio.
Just follow the instructions on the installer, agree to the license agreement (this is not free software), and let the installer do the work. An icon will appear on your desktop (if you are running KDE or GNOME), and you will be able to launch W Photo Studio from PCLinuxOS.
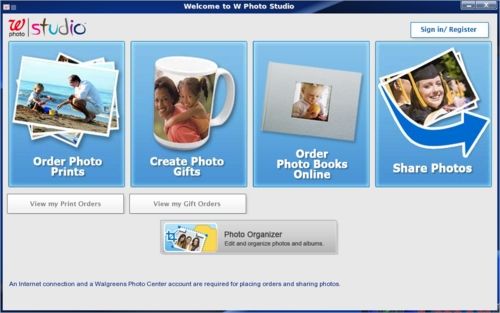
When you launch W Photo Studio, the screen here is what you will see. As this is a Windows application not all functionality is guaranteed under PCLinuxOS. This depends upon the current functionality of the Wine package. On my PCLinuxOS machine, I have the latest version of Wine installed.
W Photo Studio comes with some specialized DLL files (Windows libraries) that launch Internet Explorer and take you to WPhoto.com. Since we are running this on PCLinuxOS, the four options that are shown on the screen may not work as the Internet Explorer functionality implemented with Wine does not support the specialized DLL files.
However, the Photo Organizer near the bottom of this window does function as expected. This button launches the actual photograph organizing application.
When you launch Photo Organizer for the first time, it will attempt to search your hard drive for photographs. The drive letter used depends upon how you configured Wine. On my PCLinuxOS system, Photo Organizer uses drive E, which is configured to use my home directory.
Since Windows applications were designed to work with the NTFS, FAT16 and FAT32 file systems, of course it will crash when it comes across the ext3, ext4 or other non-Microsoft file system. To prevent this, click on Stop Search to close the window.
The screen you see here is what you get upon first launch.
Click on Switch to Folders View to access your home directory. The gallery you see will update to display all images found in the current directory.
If you have ever been in a Walgreens drug store in the US, this software has the same functionality as the WPhoto kiosks in their photofinishing department.
Now the bad news.The online functionality relies on specialized DLL files, which may or may not work with the current version of WINE that comes with PCLinuxOS. To this date, I have not tested this functionality.
To get around this, you can launch any web browser, and log in to WPhoto.com. There you can upload your photographs, select your images to order and place your order there.
In short, W Photo Studio is a rudimentary program for organization of photographs, but not much else. You would be better off using a native Linux package such as DigiKam or F-Spot, then launching a web browser to upload and order printed photographs from your favorite photofinisher.
Walgreens provides an online version of the software where you can organize your photographs, and you can use Firefox, Opera, or other compatible browser from PCLinuxOS.

CVS/Caremark
Rival chain CVS Pharmacy provides a online storage and photo organzation tool on their photofinishing microsite. Their software package is a branded version of Corel Photo Album, with functionality for uploading to their microsite.
Corel Photo Album 6
I got a copy of Corel Photo Album 6 when I purchased a Lexar memory card for my Cybershot. I decided to give this package a try. The installer launches, but I was unable to get past the License Agreement as that part of the installer would not let me click on the Next button after I scrolled down to the bottom of the License Agreement. I am not sure if this is a bug in Wine or a bug in the installer. Since I was not able to get past this screen, I cannot say whether this application will work on PCLinuxOS or not.
Meijer Photo/Snapfish
Meijer has been one of my favorite places to shop offline for most anything. Their digital photofinishing services utilizes Snapfish, the digital photofinishing division of Hewlett-Packard. Their stores feature kiosks equipped with Hewlett-Packard hardware, including a ScanJet scanner. Snapfish has online photograph storage and organization. Fortunately, for us PCLinuxOS users, according to Snapfish, you can use Firefox to upload photographs to the Snapfish site, despite the fact that only Internet Explorer is mentioned in their FAQ list.