Through the Lens
GIMP Basics
Patrick G Horneker
This month, I shall cover the basics of the premier photo editing tool for PCLinuxOS, the GIMP. GIMP stands for GNU Image Maniuplation Program, and is a Free and Open Source equivalent to Adobe's Photoshop. I consider the GIMP to be the essential software package for digital photography as well as for other graphic work. As the GIMP is a large software package with many features, I shall cover the basics this month.
If you do not have the GIMP on your PCLinuxOS installation...
Some versions of PCLinuxOS, unfortunately, do not have the GIMP installed by default. The good news is that you can install the GIMP from Synaptic. Then GIMP can be found in the Graphics section. There are several addon packages to the GIMP, but you only need to select gimp and click on Apply to install the GIMP and its dependencies.
Note: I recommend a fast Internet connection to download this as this is a large download (accounting for the total size of all dependencies).
I shall discuss the addon packages in later articles as there are many aspects of the GIMP that need to be covered.
Launching the GIMP
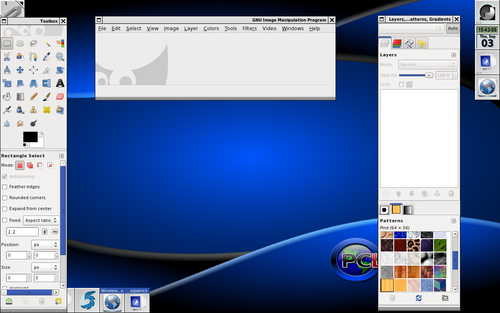
In PCLinuxOS, the GIMP can be launched from the Multimedia -> Graphics menu of your PCLinuxOS installation. (This works from KDE, KDE4, GNOME, WindowMaker, LXDE, and other window managers and desktop environments that support the PCLinuxOS menu structure). In this example, I have launched the GIMP from WindowMaker (one of my favorite desktop environments).
This is the 2.6.x version of the GIMP. Previous 2.x versions had the menu on the Toolbox window (the left application window), and hence only two windows were needed to display the GIMP.
Note that the GIMP is not Adobe Photoshop, though the look and feel may be similar, and the differences between the two are more than just that one is a commercial product.
There is a product called GimpShop that provides the Adobe Photoshop interface that allows those of you who are familiar with Photoshop to use the GIMP with the look and feel you are already familiar with. This is a different software package that is based on the GIMP, but adapted for Photoshop users.
GIMP supports many file formats
As the GIMP is a fully featured program, we would expect it to support all common graphic image formats.
XCF: This is the GIMP's native file format. It is here where the image, and all of its layers, modifications, and any other modifications made to your image are stored. Think of XCF as a complete snapshot of a photograph's state when you are saving it to work on later. Use this format if you want to save the image later, but you are not yet finished with the work. Note: Because XCF saves everything about the image, it tends to take up a lot of space on your disk.
JPEG: (.jpg and .jpeg extensions) This is the standard format for photographs, bar none. When saving photographs in JPEG format, you will need to specify the compression factor (85 being the default, which I highly recommend for most images). Of course, the lower the number, the lower the filesize. On the flip side, higher numbers will result in larger image sizes, but the quality of the image improves.
TIFF: This is the other standard format for photograph storage. TIFF files tend to be larger than JPEG files, but the quality, especially uncompressed, making TIFF files suitable for printing, especially in high-resolution. TIFF can be compressed, and like JPEG, the larger the compression, the smaller the file size. However, the quality of the image degrades with higher compression.
BMP: This is the Windows Bitmap format intended to store graphics intended for computer screens and computer games, and is one of the oldest file formats in existence. This format was intended to be a 8-bit per pixel format, and was not intended to be used for photographs. Yes you can store photographs in this format, but I do not recommend it because of the extremely large file sizes. (In fact, this is one reason why the JPEG format came about.)
GIF: This graphic format uses a patented compression algorithm to implement smaller graphic file sizes, and was originally used to exchange graphics on CompuServe (now a part of AOL) back in the 1980s and 1990s. This format was intended for 8-bit per pixel graphics, and can be used for 24-bit per pixel graphics, though the file sizes tend here to be large, but not as large as TIFF or BMP.
PNG: This format was developed as a patent-free alternative to the GIF format. PNG has many of the same characteristics as GIF, but is better suited for 24-bit per pixel graphics, and takes up slightly less space then the TIFF format.
TARGA: This format was developed by AT&T (now Agere/Lucent Technologies) as a way of storage and transmission of high-resolution images without compromise to the quality of the image. I like TARGA because of the preservation of image data. However, that preservation comes at a price, in terms of disk storage.
ICO: This format allows you to create icons for Windows desktops and anywhere else Windows icons are used.
EPS, PS: This format allows importing and exporting of images stored in Encapsulated PostScript format. In fact, the GIMP imports PostScript files as well as output to PostScript. When importing PostScript files, you will need to specify the resolution (in dpi) for the rendering of the PostScript file as a bitmap.
WMF: This is another old graphics format. WMF stands for Windows Metafile Format. This was a common graphics format back in the 1990s intended for pre-Internet graphics and productivity applications such as Lotus 1-2-3, and Cosmi Draw. (How many of you remember using those commercial packages?) If you have CD-ROMs containing clip art, chances are they are stored in the WMF format and are ready to use.
The GIMP also imports and exports images stored in the native formats for Photoshop, Paint Shop Pro, and some other commercial applications, making it easier to transition to the GIMP from these commercial packages. There are many other file formats that are supported by the GIMP, but these are the most common in use today.
The Toolbox
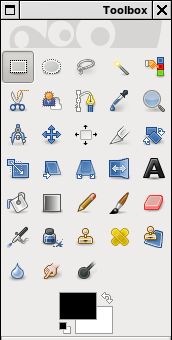
In versions 2.0 through 2.4 of the GIMP, the application menu was integrated into the Toolbox. Starting with Version 2.6, the Toolbox is now separated from the application menu, and for good reason. The Toolbox contains a palette of buttons linked to frequently used functions. We will be using these buttons frequently when we edit images (not just photographs, but images that will be used in publications of all types.
Selecting Within The Image
In order, the buttons represent selection of rectangle areas, selection of elliptical areas, freehand selection, fuzzy selection based on pixels of similar color, selection by color, selection of recognized shapes, and finally selection of foreground objects.
If you wish to select based on shapes found in the image, the Scissors icon allows the GIMP to find shapes within the image, then select whatever shape the GIMP finds based on where you clicked on the image. The icon to the right of the scissors is used to select foreground objects in an image. Most of the time, we will be using the rectangular selection tool when selecting large areas.
If you have a Wacom graphics tablet installed, the freehand selection will be most useful to you as it allows the graphics tablet to control the image selection. (Of course, the graphics tablet is also good for other graphic functions for touching up, masking in layers, etc. where precise control of the pointer is needed.)
When selecting portions of an image with the mouse, pressing and holding down the Control key will constrain the mouse movement to multiples of 45 degrees (that is 45, 90, 135, 180, 225, 270, 315 and 360 degree movements).
The icon with the quill allows you to create and edit paths for selection, and some other functions within the GIMP.
Color Selection
At the bottom of the toolbox, there is a foreground and background color selector. By default, black is the foreground color and white is the background color. Clicking on the small black and white icon resets the selector to the default black and white.
Double clicking on either of these boxes allows you to manually select a color to use as either a foreground or background color.
More to Come... This is the first of a series of articles on the GIMP itself. As there are many features for digital photographers, it is necessary to divide coverage of the GIMP into a series of articles.
Next time, I shall cover the basics of image layers, masks, and color manipulation.