Command Line Interface Intro: Part 3
by Peter Kelly (critter)
In the first two installments of this introduction, we learned how to get around the file system, create and edit files, how to use some of the more common commands in Linux, and how to cut down on some of that tedious typing. Hopefully, the command line environment is not so intimidating now. There is a bit more theory to cover but it is nothing too difficult, and it really doesn't matter if you don't understand it all. When you come to a point where you need that information, you can recall “hey! I read about that,” and then come back to look it up, or search the internet for it. Importantly, you will have been introduced to the fact that it exists, which gives you a way forward. If you have followed so far and get through this episode, then you will have a good grasp of what Linux is about. Then we can start using the real power of the Linux command line that you can never fully achieve by using only the GUI.
A New Name
When Jane got her computer, she chose to name it 'home.' It is, after all, the computer that she uses at home. This has a couple of disadvantages. What if the computer is to be networked, and her brother, John, has also named his computer home? There would be two computers on the network, both named home, and obviously this is not good. Also, when Jane looks at her prompt, she sometimes mistakes home in the prompt to be telling her that she is in the home directory. Let's change things.
Jane decides that she wants her computer to be known as 'daisy'.
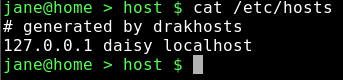
The name of a computer on the network is known as the 'hostname'. If no name has been assigned, then the name 'localhost' (meaning 'this computer' ) will be shown. Any change needs to be done in two places in PCLinuxOS, and it needs to be done with root privileges. The name localhost is how the computer refers to itself internally, a bit like saying 'me'. In order for the computer to recognize that the new hostname daisy refers to this computer, we have to create an alias. This is like saying daisy, a.k.a. localhost.
The first file that needs to be edited is named hosts, and can be found in the /etc directory. This can be done in two ways: by editing the file directly with an editor, or by using the PCLinuxOS Control Center. The PCLinuxOS Control Center, also known as PCC, is a front end for several smaller, graphical utilities whose names usually contain the word 'drak' and do a little bit of command line work for you. To prove a point:.
cat /etc/hosts
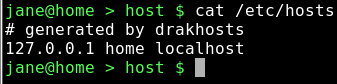
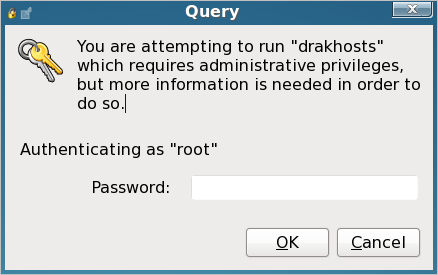
If you have never changed it, your hosts file will look slightly different.Type drak and press Tab to see the available commands. The command we want is drakhosts (the Control Center 'front page' is drakconf). Type 'ho' and press Tab to complete the command and press enter. If you did this as a normal user, then you will be prompted for the root password.
Then you will get this screen.
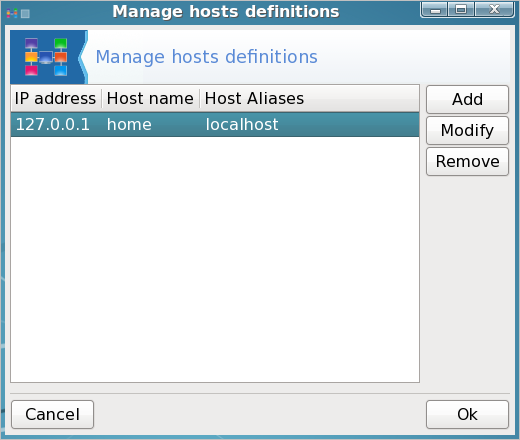
Notice that there are three columns:. IP address, hostname and host aliases. Select localhost and then click modify.
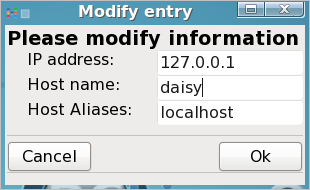
in the host name box, enter the name you want for your computer (jane has chosen the name daisy), and in the host aliases box enter localhost (lower case no spaces), Then click OK in the modify dialog box, and click on OK in the drakhosts box to get back to the command line.
cat /etc/hosts
Notice that the contents have changed. Most of the PCC utilities are just fancy-pants ways of editing system configuration files.
Now that this computer knows that we are referring to itself when we use the name daisy, we need to make sure that all other computers on the network also know.
Notice the IP address. That's the sequence of four numbers at the beginning. Localhost always has this sequence 127.0.0.1 — it's how the computer spells 'me.' Computers speak in numbers. An IP address is how computers refer to each other. On a network, a computer is known by the IP address assigned to its network adapter, usually something like 192.168.0.1, which is not easy for humans to remember, so we give the computer a 'proper' name, like daisy, so that it is more easily recognized and referred to on the network.
The second file that needs to be changed is called network, and is in the sysconfig directory, a sub-directory of /etc.
We'll use the terminal to change this file.
su (enter).
Enter the root password.
nano /etc/sysconfig/network will open the file for editing. Add or change the line HOSTNAME=daisy (or whatever name you chose). Notice uppercase and no spaces.
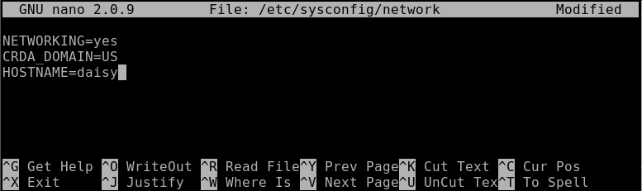
Press enter and then ctrl-x to save the file and exit. Job done! — command line style.
That's it, but you will need to reboot the apply the changes.

Finding Things
To be able to work with files, we have to know where they are or how to find them. There many ways in Linux to get this information, so let's run through some of them.
locate — this command uses a database of files known on the system to look up their whereabouts. This database is updated on a daily basis automatically by the system using the cron utility, which we will look at in due course. The database may be updated manually at any time using the command updatedb. The updatedb command needs root privileges, while locate doesn't.
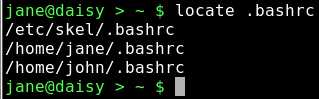
.bashrc is the file that we edited to change the color of our prompt. Locate has found 3 instances of the file: Jane's, John's, and the one that is used when a new user account is created. Locate has the advantage of being extremely fast, but the disadvantage of only knowing about the files that it has been told to store in it's database.
whereis — this command looks only for Linux commands and their associated source and documentation files.

Here, the binary file that is the actual ls command, and its compressed manual documentation file, has been reported.
find — an extremely powerful command with a slightly more complex syntax than most other Linux commands. Most people (that's us) will only need a very small amount of the power available in this command, so we shan't look too deeply at all the bells and whistles — yet.
By default, find uses the current directory for its input, STDOUT (the screen) for its output and 'all files' as the option, which results in the output from using find being the same as from the command ls -aR, albeit in a slightly different format. Try it. All that output is because find, unchecked, looks at all files, including hidden ones, in its start directory, and then recursively in all sub-directories, outputting all those files that match its search criteria, in this case 'all files'.
To make use of the find command, we have to control it. The most common way of using find to locate a particular file or set of files looks like this.
Find {where to start looking} {search criteria} {filename(s)}
There are lots of things that could go in the {search criteria} position, but usually we want to search for a file by name. So, to find a file named 'network' that is believed to be somewhere in the /etc directory structure, we would format our command thus:.
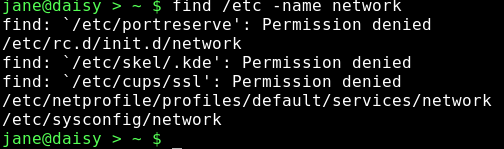
This has found three files named network and given us their locations. Unfortunately, it has also thrown out some errors. The /etc directory is a system directory, and as such is not owned by Jane. Jane can only see the files in those directories to which the system has granted her permission to read the contents. When we covered redirection, I talked about STDIN and STDOUT, and mentioned a third data stream named STDERR. These three data streams may also be referred to by numbers, 0,1 and 2 respectively. STDERR, number 2, is to where programs write their error messages. Depending on the program, this may be a file such as a log file or to STDOUT, as was the case here. To hide these messages, we can redirect STDERR to somewhere else. Linux treats devices as files, and lets us read and write to them just as we would to a file. Devices have names like /dev/cdrom or /dev/hda1, but there is a special device known as /dev/null. /dev/null is like a black hole, swallowing anything written to it never to be seen again. Similarly, reading from /dev/null you get nothing, or a stream of nothings. Not the number 0, but the character that has the value 0 and is known as null. To redirect the error messages but keep the data output, we leave data stream 1 (STDOUT) alone and intercept number 2 (STDERR) with the directive 2>/dev/null
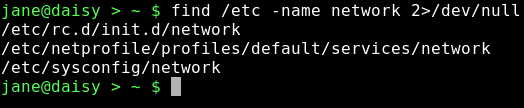
Nice clean output.
When you don't know the exact name of the file that you are looking for, then you can use 'wild cards.' These are special characters that the shell interprets differently. The most common ones are:.
- '*' means 'substitute here zero or more unknown characters',
- '?' means 'substitute exactly one unknown character'
There are a lot more but we will cover these later when we get to 'regular expressions', These two suffice for most of our present needs.
Linux — The Basics
Linux really only understands two things: files and processes. If that seems to be a rather bold and sweeping statement, then consider this: Whatever we do on a computer involves manipulating files. We create, delete, edit and rename them. We cut them up, join them together and search them for a particular piece of information. In short, we do all manner of things to files to get our desired result. We do this using processes.
There are several types of files.
- Regular files. These can be split into-
- Data files such as text files, pictures, or music files
- Executable scripts — lists of instructions, in human-readable language, to be executed sequentially (but often with some clever route planning that makes it difficult to follow).
- Binaries — executable files in computer-readable form. These are the applications that we run and libraries of functions that the applications refer to. Their contents are mostly unintelligible to humans.
- Directories. Really just lists of files that may be scattered over one or more hard drives grouped together for human convenience.
- Links. Pointers to actual files. There may be many links to any one file.
- Special Files. These are used by Linux to communicate information to the system, and to interact with the hardware. These are mostly found in the /dev directory. In Linux, even your mouse is treated as a file.
- Sockets. We can ignore these for now.
- Named pipes. As above. These will also keep until later.
When we click on an executable file, or type its name on the command line, the kernel starts a process which will hopefully run until terminated, either on completion, or prematurely by the user. Each process is given an identity in the form of a number, known as the 'process id'. The process may, in turn, start any number of sub-processes. When the initial process is terminated, then any unused processes associated with that process are also terminated, and any system resources such as allocated memory and the process id, are released, and any open files are closed. Occasionally, things don't quite go according to plan and the system resources start to be in short supply, having the effect of slowing down the system, unless somebody intervenes. A system reboot would fix things, but that is not always convenient. This was designed as a multi-user system, and shutting down a large system would cause too much disruption. There are other ways to do things.
This is why we need to understand about files and processes.
Links
Perhaps now is a good time to discuss links. There are two kinds of links: soft links, also known as symlinks (symbolic links), and hard links. A soft link is similar to a shortcut in Windows and is a pointer to a filename that may be in the same directory or, more commonly, buried deep in some other directory structure. This is a convenient way to access files without having to enter (or even know) the entire fully qualified address of the file. For example, suppose that we have a file named contacts that resides several directories deep in your home directory, but you need to be able to access it easily from your home directory.
Let's set this up.
cd ~
mkdir -p mydir/personal/mycontacts
Here the -p option tells the mkdir command to make any parent directories as required.
mv contacts mydir/personal/mycontacts moves the contacts file we created previously into the new directory.

The file cannot be read because we moved it to our new directory.
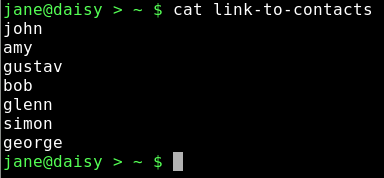
ln -s mydir/personal/mycontacts/contacts link-to-contacts will create a soft (-s) link to that file and then it can be accessed through link-to-contacts.
cat link-to-contacts will display the contents of /home/jane/mydir1/personal/mycontacts/contacts.
The syntax for the command ln is ln {-s if a soft link} {what you want to link to} {name of the link}
The system makes extensive use of symlinks, and any file may be linked to many times. If the original file is deleted from the directory mycontacts, then the link remains in my /home directory, but cat contacts now gives the message 'No such file or directory.' This is known as a broken link, and if we issue the command ls -l, we will see the output for that link listed in flashing red/white text (other distributions may use different colors).
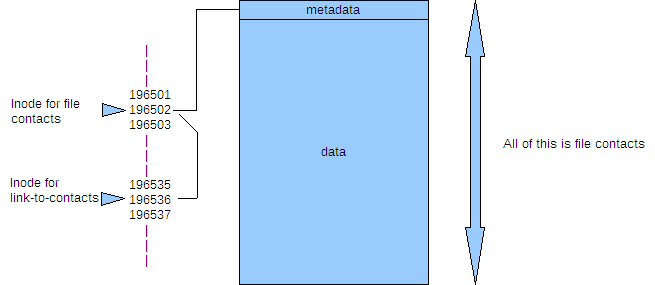
Hard links don't point to the file name, but rather contain a reference to something known as an 'inode'. When a file is created, the file system allocates a number to it, an inode. This number points the file system to a set of meta data, or information about the file, it's permissions, it's name, and where the data is stored on the disk etc. Every inode on a partition is unique and knows only about one file, but the same inode number on a different partition or drive will reference a different set of meta data, and hence file. Think of a file as having two sections: the meta data part that is referenced by the inode and the data part that is referenced by the meta data. Normally, you don't need to know about inodes, as the filesystem does all that for you.
You can see these numbers if you issue the command.
ls -i

cd mydir/personal/mycontacts

A hard link is a bit like another name for the file, but it inherits the files DNA, as it were. Creating a hard link is the same as for a soft link, but without the -s. When a file is created, the number of links to the inode is set to one, and when a hard link is created, the count for the number of links to the inode is increased by one. When a hard link or 'the original file' is deleted, then the count is decreased by one. When, and only when, the link count reaches zero, the inode and storage for the meta data and data parts are released i.e. the file is deleted.
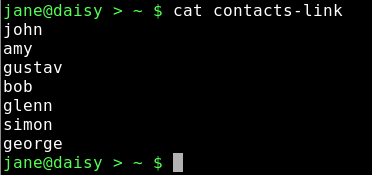
ln ~/mydir/personal/mycontacts/contacts contacts-link creates a hard link named contacts-link.
ls -i
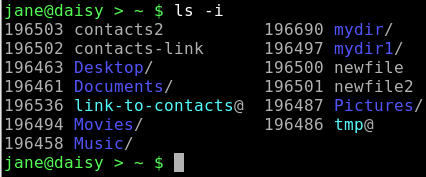
Note that the inodes are the same for both the link and the file i.e. 965021
cat contacts-link
rm mydir/personal/mycontacts/contacts delete the original file.

cat contacts-link

Although the file has been deleted, the link still points to the inode, and can thus access the data which has not yet been deleted. Now while this may be seen as a security nightmare, it does have the advantage of allowing important files to be accessed by unsafe hands, while being comforted by the knowledge that the link to the file data can be easily reconstructed and no actual data loss need occur.
Permissions & Groups
Unix, from which Linux was developed, was designed as a multi-user system, and a method was needed to determine who had access to which files. There are some files that are private, some that other users need access to, and some that may be made public. Also, the level of access needs to be considered: are users allowed to modify or delete the file, or if the file is executable, who may execute it?
By default, when a user creates a file, they are known as the 'owner' of that file. It belongs to the users primary group, but this can be changed. Some users create files that they need to allow a group of other users to access, but deny that access to others. Permissions were defined in three levels:
- Read permission
- Write permission
- Execute permission (In the case of a directory you may change to it.)
Each of these permissions are applied or removed for:
- The owner
- The group
- Everybody else
For regular files, the permissions are fairly obvious. For a directory, read permission means that you may list the contents (file or directory names), write permission means that you may create, delete or rename files in the directory, and execute permission means that you may 'cd' — change to that directory.
If we look at a directory listing using the command ls -l:
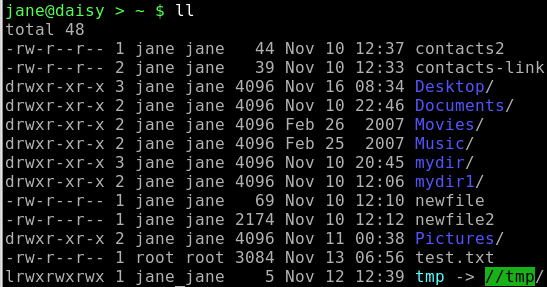
The first position on the left indicates the file type and this can be any of the following:
    —    regular file or hard link
    d    directory
    l    symbolic link
    p    named pipe
    s    socket
    c    character device
    b    block device
The next nine positions indicate the files permissions. The first three are the user permissions, the second three the group permissions, and the last three are the other, or world, permissions. The read, write and execute permissions are displayed like this:
    user    group   other
    r w x   r- -    r - -
Here the user may read, modify and execute the file while others may look at the contents only. The read and write permissions are represented by 'r' and 'w', but the execute permission may be 'x', 's' or 't'.
    x    the normal execute permission
    s    suid — set user id
    t    The 'sticky' bit
The last two are rarely needed by regular users so we can skip them for now. Permissions may be changed by root or by the owner of the file and the command to do this is:
chmod {option} {permissions} {file or directory name}
What you put in the permissions part of the above statement may be done in two ways.
You can use 'u', 'g' 'o' and 'a' (all) to specify which set of permissions to change, 'r', 'w' and 'x' for the permission and '+', '-' or '=' to set or unset the permissions. Additionally, you may combine these to change more than one. Omitting u, g or o sets or unsets the specified permission in all positions.
Examples: If myfile has permissions rw- r-- r--.
- chmod g+w adds write permission for the group, i.e. rw- rw- r--
- chmod o+w adds write permission for others, i.e. rw- rw- rw-
- chmod +x adds execute permission for everybody, i.e. rwx rwx r-x
- chmod ug-w removes write permission for the user and group, i.e. r-x r-x r-x
- chmod ugo=rw sets permission to read write for everyone, i.e. rw-rw-rw-
The other way to specify permissions is with numbers. Numerically permissions are set like this:
read=4, write=2 and execute=1
This is expressed in something known as 'octal' (counting in eights instead of tens), but we don't need to understand that here to use it. Instead of 'r', 'w', 'x' we use '4', '2' and '1'. To combine them, we add them up so that rw = 4 + 2 = 6.
To apply this to the three groups, we use three of the sums so that 'rwx rw- r--' becomes (4+2+1) (4+2+0) (4+0+0) = 764.
This is also sometimes expressed as 0764 — don't worry about the leading zero, it's an 'octal' thing and, for our purposes, can be included or not.
So to set permissions to rw- rw- r-- we would use the command chmod 664 myfile1.
Looking again at the directory listing, after the permissions, is a number that is the number of links or references to that file. After that, we have the name of the owner of the file, and then the name of the group that the file belongs to.
To get a list of all groups, look at /etc/group.
cat /etc/group
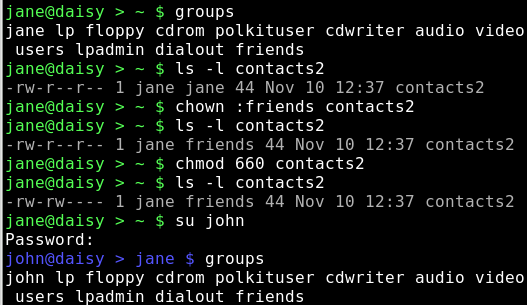
To find out which groups somebody belongs to, use the command:
groups username

To add a new group, you need root privileges and the command 'groupadd'.
su (enter root password)
groupadd friends
This adds the new group 'friends' to the /etc/group file.
To add users to groups use the command usermod the -a option means append.
usermod -aG friends jane (Note uppercase G)
usermod -aG friends john
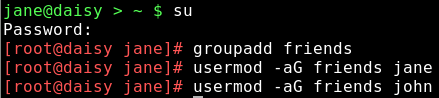
Adds jane and john to the group friends. Becomes effective at the next login.
To make a file accessible to members of a group we can use the command 'chown' — change ownerships.
chown jane:friends contacts2
This keeps jane as the owner of the file but changes group membership.
As we wanted to change only the group could have also done.
chown :friends contacts2
Groups are deleted with the command:
groupdel groupname
This leaves all files that belonged to the deleted group 'orphaned'. Cleaning up this mess is up to you.

The group has been deleted from the /etc/group file, and now the file shows as belonging to the indeterminate group 502. This known as the group id or guid and we can use this to tidy things up. Use the find command to locate all files that have a guid of 502.
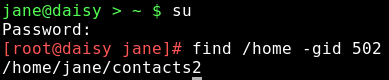
We found, as expected, only the one file that we changed. but even if there were many files it would be a simple matter to
chown :jane filename
If however, there were hundreds of files, then it would be rather daunting to manually change them all. To do this we might use a loop. We'll discuss this shortly.