Command Line Interface Intro: Part 4
by Peter Kelly (critter)
Processes
When you start an executable file, either by clicking on its icon or by entering its name in a terminal, you are actually starting what Linux knows as a process. This may, in turn, start other processes, or series of processes. Other processes are started during the boot up sequence, or automatically as required by the system.
A process is what acts on files and the data that those files contain. As Linux is a multitasking, multi-user operating system, you and other users on the system may start many applications that have their own sets of processes. Obviously, Linux has to have a method of controlling and keeping track of all these processes.
Each process is given a unique identity when it is started, known as the process id number, or PID, is allocated space in memory and assigned certain other system resources that needn't concern us here. When booting the system, the first process to be started is always init, and is given the PID number 1. To get a graphical representation of the processes currently active on your system type in a console:
pstree -p
The -p option shows the PIDs.
The initial process started by an application is known as the parent, and any processes spawned from that process are known as child processes. Modern systems use threads, or Light Weight Processes (LWP), as child processes where practical, which share some of the resources of the parent. Communication between the system and processes is done by signals, and the whole show is orchestrated by the scheduler.
Usually all this happens under the hood, and we don't have to bother about it. But just occasionally, something goes wrong, the system starts to misbehave, and user intervention is required. This is where familiarity with the command line comes in.

Open a terminal and type:
glxgears > /dev/null &
This a fairly resource intensive application (usually used for benchmarking systems) that we don't want to see the output from in this case, so we dump it to nowhere. The & character puts this process running in the background so that we get control of our terminal back. More about background tasks in a moment.
Now type:
top
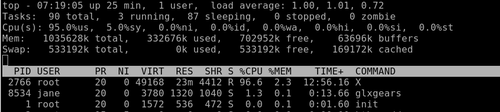
That's a lot of information! Don't worry, you don't need all of this. Look at the line representing the glxgears application (the next to last line in the screen shot). The first column is labeled PID and has a value of 8534, that's what we need.
Suppose this application refused to respond and you couldn't close it. In top type k and you will be prompted "PID to kill:". Enter 8534. This gives the prompt Kill PID 8534 with signal [15]:
If you enter n here, the command is canceled. Enter y, and and the application is sent the default signal 15. Signal 15 is known as SIGTERM, and is the normal termination signal. On receipt of this signal, the application will close gracefully, handing back any resources to the system, kind of like asking somebody to 'please leave'. Occasionally, you meet a troublemaker of a process that just will not go. Then, you can use the strongest signal of all, signal 9, known as SIGKILL. This is more of a bullet in the head approach — sure it works, but it might just make more trouble in the long run, and is best avoided if possible.
There are lots of signals available, but those are the only two that you are likely to have to issue manually. Top is a very comprehensive program that uses single letter commands. h brings up the help screen, A for the alternate display using field groups, z toggles the color of the current group, and W saves your settings. There is so much more to this utility that you really do need to use the 'h' (help) command to get the most out of it. Remember that Linux is very literal, and uppercase or lowercase commands give very different results.
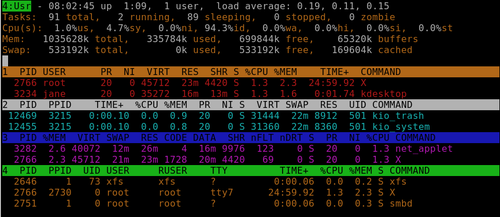
Another useful tool for manipulating processes is ps (process status). To see a list of all processes owned by the user issuing the command ps ux (this will be you if used as a normal user, root or maybe someone else if you have used the su command).
Note that the leading hyphen usually required when supplying options to a command, is optional for this command.
Even when you think that you aren't doing anything, you will get a fairly long list. Scroll up to the top of the list and you will see a header line describing the various columns of information. The second column here is the PID, and the last column is the command that was used to start the process. If, as in the previous example, we were trying to find the pid of glxgears we would use the command
ps ux | grep glxgears

This gives us two results. The first one, with the PID of 11730, is the one that we are looking for. The second one is the grep command we used to filter the results. Why grep ---color? Where did that come from? PCLinuxOS provides an alias for the grep command so that matches are highlighted in color (or, if you live in the UK, they will be in full glorious colour). Type alias | grep grep on the command line to see it.

The grep command has also filtered out the header line, as that did not contain the expression 'glxgears'.
To get rid of the errant process, we use the kill command:
kill 11730
We could specify a signal, as in kill -s 9 11730, but I think that the default, unstated signal 15 is powerful enough magic.
A signal may be sent by name or by number. If you want the complete list of signal names and numbers type
kill -l
You may only terminate any process that you own, so be especially careful when working with root privileges.
When working in a GUI, if you want to start another application, then clicking on its icon will open it in a new window. For command line work, you can open another terminal emulator. But what if you are locked into a single terminal, as you may be if the system has crashed? You may occasionally start a process which takes a long time to complete and need to execute another command.
One way around this is to follow the command with an ampersand (&), as we did with the glxgears application. This puts the process into the background and returns control of the terminal to the user. If the process is already running, it can be put into the background using the command control + z, which suspends the process running in the foreground, and then use the command bg, which causes the process to resume execution in the background.
To list the processes running in the current shell, use the command jobs.

Each job started in the shell is given a number, which is displayed in square brackets, along with the PID. Here, job 1 has PID 8319. The jobs command displays the job number, its status (running, Stopped or Terminated), and the command that initiated the process. To kill a job, we use the kill command, like this:
kill %N && fg where N is the job number.
The && part is used to tell the shell to wait until the kill command has finished, and then to move to the foreground. If we don't add that bit, the the job will be terminated, but not removed from the job list. Just a bit of tidying up.
I know this all sounds rather complicated but it can all be summarized like this.
- Command &: Start a job in the background
- Control + z: Suspend the job currently running in the background
- bg N: Continue suspended job N in the background
- fg N: Move suspended job N to the foreground
- jobs: List all jobs
- kill %N && fg: Kill job N
For the glxgears example, we dumped the output to /dev/null. When a job is running in the background, it will still produce output, which it will happily spew out to the screen as you are trying to work on another command. So, it is usually a good idea to redirect the output of a back-grounded job to a log file, or similar, and to dump any error messages.
e.g., find /usr -iname *.ogg > musicfiles 2>/dev/null &
This will put the names of any files found into the file 'musicfiles', ignoring the case of the file name, and discard any error messages, such as trying to enter directories for which you don't have access. If you don't want to keep any output at all from the application, then there is a special construct that will grab everything, and send it to where ever you like, usually /dev/null.
command 2>&1 /dev/null
All this means is append STDERR to STDOUT, and send them both to the same place. Don't worry if this doesn't seem very intuitive. It is a very commonly used expression, but you would be amazed at how many experienced users who use it don't understand it!
Backing up and Archiving
The problem with data backup is that most people don't do it. They may mean to, they may forget, they may find it too complicated, or they may not do it regularly enough. Even those who doggedly back up their data regularly, rarely bother to check that the data can actually be restored, which rather defeats the object. If you are one of the very small majority who don't fall into this category, then you can skip this next part.
For the rest of us, there is some good news. There is some software available that will do all our backups for us, will never forget, and will check the integrity of the backup automatically. And best of all, it is free! It's called Linux.
Before starting a backup strategy, you should consider what you want to backup, how often, and to where. There are various types of backup.
- Full — What it says
- Differential — backup only what has changed since the last full backup
- Incremental — backup only what has changed since the last backup of any type
- Clone — Usually used for the backup of entire file systems, mindlessly copying everything block by block
- Synchronized — An exact copy of all data in a location, optionally deleting data in the target destination that no longer exists in the source location.
Each has it's pros and cons, and there are many dedicated applications that will do backups in any way that you want. The Linux/Unix ethos is to use multiple small applications to perform more complex tasks, and using this, we can produce a tailor made backup system and automate it. First off then, let's take a look at some of the applications that are available. All of the following are either installed by default, or available in the PCLinuxOS repositories.
cp: Yes, the simple copy command, when used with the -a (archive) option, is a simple (but not very efficient) backup utility.
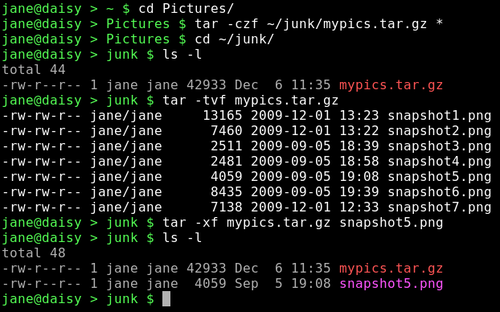
tar: One of the oldest utilities, its name means 'tape archive', and it simply takes a list of files and lumps them all together. For this reason, the resulting file is often referred to as a 'tarball'. It is often used in conjunction with a compression utility, like gzip or bzip2, and it can do this automatically. To create a compressed archive of all files in the current directory (here I assume that jane is in her Pictures directory) and write it to a folder in janes home directory named junk, I might use the command
tar -czf ~/junk/mypics.tar.gz *
- -c create an archive
- -z filter the output through gzip to compress it
- -f use the following file name for the archive
Although Linux doesn't need dos-like file name extentions such as .exe or .zip to determine the file type (the information is in the meta data pointed to by the files inode), it is helpful and traditional to do so with the tar command. If I had substituted -j for -z, then tar would have used the bzip2 utility. Then, the extension .tar.bz is usually used.
To list the files in an archive use:
tar -tvf mypics.tar.gz
To extract the files use:
tar -xf mypics.tar.gz {list of file names}
If no file names are given, then all files are extracted. Tar is really only suitable for backing up a small number of files at a time. For large or full backups, there are better tools available. When using compression utilities, be aware that they are not very fault tolerant, and the loss of even one byte can render the entire archive unreadable. This is a very real danger when using media such as floppies or CDs.
dd falls into the 'clone' category, and is an extremely useful command to know how to use.
There are lots of options for this command, but most of the time you can get by with just these four:
- if={name of the input file}
- of={name of the output file}
- bs=(block size}
- count={number of blocks to transfer}
Notice the = sign in the options. This is mandatory. The important thing to remember when using dd is not to mix up the input file and the output file, as you will get no prompt from dd — just blind obedience. So, if you wanted to copy a partition to an empty partition and you mixed them up, then you would overwrite the first partition with blank data from the empty partition losing all data, no questions asked.
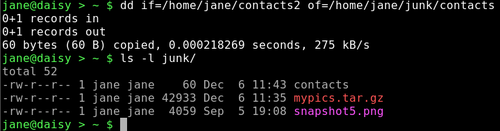
To copy a single file:
dd if=/home/jane/contacts2 of=/home/jane/junk/contacts
To copy an entire partition (make sure that the destination is large enough):
dd if=/dev/hda1 of=/dev/hdf1 to do a partition to partition copy
or
dd if=/dev/hda1 of=/backup/hda1.img will make an image file of the partition.
This way, entire file systems can be cloned and then restored with
dd if=/backup/hda1.img of=/dev/hda1
Here, /dev/hda1 should not be mounted, and not be part of the currently running operating system. If you have a 1TB drive, then be prepared for a long wait.
The first 512 bytes of a hard disk contains the MBR, or Master Boot Record, and the Partition table. If this gets corrupted, then your system may not know how to boot up, or how your drive is partitioned. This can be fixed, if you are patient and have some in depth knowledge of file systems (or some understanding friends), but life can be so much easier if you have a backup of that data. Here dd is ideal. su to root, and type:
dd if=/dev/hda of=/backup/hda_mbr.img bs=512 count=1
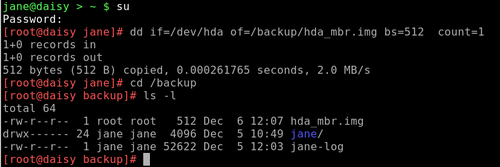
This means copy one block of 512 bytes from /dev/hda to the image file /backup/hda_mbr.img. (Note: no partition number is entered as the MBR relates to the whole drive, not to any particular partition).
Now if you do have problems, you can simply restore those 512 bytes. To restore the MBR, the drive should not be running the current operating system.
- Boot up from the Live CD.
- In a terminal, su to get root privileges.
- Make a directory, e.g mkdir /mnt/hda,
- Mount the drive there, mount /dev/hda /mnt/hda
- Make sure that the image file is where you think that it is, i.e /backup/hda_mbr.img, as running from the Live CD, the
- directory /backup may not exist.
- dd if=/backup/hda_mbr.img of=/mnt/hda bs=512 count=1

Stop and re-read this command at least twice before pressing enter.
You should now be able to reboot the original system.
If you want to see what a MBR looks like, (it won't mean much) type:
cat /backup/hda_mbr.img
Then you will get a load of gibberish on the terminal, and the chances are that your prompt and anything you type on the command line are now gibberish. If that is the case then don't panic. Just type:
reset
and all will be well.
Mondo archive is an excellent and extremely reliable full system backup tool which is run from the command line, and includes a graphical interface in the terminal. There is an excellent step by step tutorial in the PCLinuxOS forums by catlord17 (http://www.pclinuxos.com/forum/index.php/topic,59705.0.html).
Rsync is one of my all time favorites. It is used to synchronize two sets of files, either locally or between remote machines, even if they are thousands of miles apart. It includes options for compression, can delete files on the destination that no longer exist in the source location, and can be used over ssh (secure shell). Best of all, it only transfers the differences between files on the source and destination, and if interrupted, will resume from the break point when restarted. To give you an idea of the power of this command, I maintain a copy of the PCLinuxOS repositories on a local hard drive, and automatically update it in the early hours, when network traffic is lightest. The full repository is currently around 17GB, but I download only what has changed and delete obsolete packages. The command to do this is quite long, but as it is automated, I don't have to remember it. If you're interested it looks like this:
rsync -aPvz --stats --delete --log-file=/home/pete/update.log --exclude=SRPM* ftp.heanet.ie::pub/pclinuxos/apt/pclinuxos/2007/ /data/repo/2007/
partimage is another command line utility that includes a graphical interface and is quite easy to use. It will make an image of an unmounted partition, using compression if required, and will only copy used blocks. It allows you to include comments that can be useful when restoring. For example, you could include the size and type of file system of the original partition. It will also allow you to split up the image so that it may be saved to multiple CDs or DVDs.
Creating a backup
Now that we have a few tools to play with, it is time to decide what to back up and where to save it. The size of the backup may determine where to back up to, but ideally, you want to back up to a different device than the one that holds the original data. If a hard drive dies, then you will be relieved that your back up didn't go with it. If you are doing a full system backup for disaster recovery, then mondo archive or partimage are probably the way to go. If you want to incrementally backup the files from a particular location that have changed over a set time period, then first you have to get a list of those files. The find utility includes an option to locate files based on the time they were last modified. To find all files in a directory that have changed in the last week
find /home/jane/ -mtime -7 \! -type d
-mtime looks for the file modification time.
Here I have excluded files of type directory with \! type d.
The ! means 'not', and must be preceded with a back slash to prevent the shell from interpreting it as a special character. This is known as 'escaping' the character.
For files changed in the last week use:
find /home/jane/ -mtime -1 \! -type d
If we redirect the output of this command to a file, then we can use that file to feed tar:
find /home/jane/ -mtime -1 \! -type d > /tmp/newfiles
tar -cv -T /tmp/newfiles -f /backup/newfiles.tar
The -T option tells the utility to get its list of file names from the following file.
Reinstalling a Linux system these days is a relatively quick and trivial task, but getting everything back exactly as you like it can be more of a headache. All of your personal settings are stored in your /home/{user_name} folder. This is convenient, but has the disadvantage that as you own those files, then you can do whatever you like (or dislike) to them, and this is what new users usually do and experienced users, who should know better, still often do. This directory then is a prime candidate to have a backed up copy somewhere safe that is fully updated automatically and regularly. Sounds like a job for rsync.
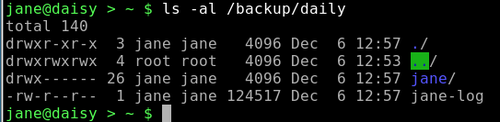
First, we need to collect a bit of information. It is necessary to preserve ownership, groups, links and modification times. We want to back up /home/jane but not all of it. We don't want to copy the contents of junk/, a folder jane uses to store temporary stuff. There is a second hard drive mounted at /backup, and this is where we want our backup.
As this is going to be an automatic process, we should save the output of the program to a log. No compression — data integrity is paramount, and the destination has several hundred GB free. Obsolete files should be deleted.
The backup should be run daily, 1:30 AM, and also weekly at 3:00AM Sunday under a different name. This gives a week to have a change of mind about some settings. The odd times are chosen to be when the system is likely to be under a low load, and to avoid any conflicts due to daylight saving time changes.
Recovery should be a trivial task.
The command then should look like this:
rsync --archive --exclude=junk/* --delete --log-file=/backup/daily/jane-log /home/jane /backup/daily/
This must be all on one line. If your command includes more options and your editor can't cope then you will need to use the line continuation sequence
\enter.
It works like this. When you reach the end of a line and press the enter key bash inserts an invisible character known as a 'newline'. If we type \ before pressing the enter key, then this newline character is 'escaped' or in effect ignored. The effect of this is that you can continue typing extremely long commands and bash will see it as one long line. I think the limit is 2048 characters, but I have never reached it, and I have typed in some pretty long commands!
Here, I have used the long version for all the options, as this is going to be saved to run automatically, and this format makes the command easier to follow in the future.
The trailing slash on directory names is important.
/home/jane backs up the directory jane and all the files and directories under it into the directory /backup/daily.
/home/jane/ would not create the directory jane but would copy all of its contents into /backup/daily.
Similarly we want the directory junk/ to be created so that it is still available if we do a restore, but we don't want its contents. So, we exclude only the contents with junk/*.
When you have built a long command, you don't want to have to retype it every time. You could create an alias but a better, and much more powerful method, is to include it in a script. Scripts can be very long and complicated, or short and to the point like this one.
Make two directories in the destination — here the destination is /backup:
mkdir /backup/{daily,weekly}
The curly braces include a comma separated list if directories to create.
Open your text editor of choice, and type in the following (copy and paste from the magazine doesn't always work as it carries over some of those 'invisible' characters that are used to typeset the article).
#!/bin/bash
#Script to back up my home directory
rsync --archive --exclude=junk/* --delete --log-file=/backup/daily/jane-log /home/jane /backup/daily/
Don't forget that the long rsync command must all be on one line.
I'll explain all the weird stuff at the beginning when we get to more involved scripts.
Save it to your home directory under whatever file name takes your fancy (e.g. home-bkup). Having it in your home directory has the advantage that it also gets backed up — self preservation.
Change the files permissions to make it executable.

Type ./home-bkup and the script should execute — check it out. ./ is needed to tell bash to look first here for the file, which is not where it would normally look for commands.
ls -al /backup/daily
Make a copy of the file with a new name for the weekly backup.
cp home-bkup home-bkup-weekly
Open this new file in an editor, and change the destinations in the command to read:
rsync --archive --exclude=junk/* --delete --log-file=/backup/weekly/jane-log /home/jane /backup/weekly/
Save the file.
Check that this one also worked. You should have a copy of your home directory and a log in each of the two new directories that we created in /backup/ — daily/ and weekly/.
Now, to backup your home directory, all you need to do is to run that script. This, however, is where a lot of backup strategies fail, as you have to remember to run it. So let's automate It. To do this, we use a utility called cron. This utility is used by the system to run certain things at a particular time, like updating the database that is used by the locate command.
To set up cron, su to root. We need to use:
crontab -e
The -e puts us in edit mode in the vi editor.
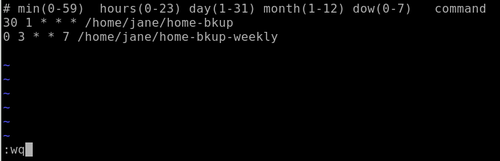
The top line of the file shows the required format for the file. The first five columns are for when we want the command executed. An asterisk in any column means 'from the first to the last'. In the day of week column, 0 and 7 both represent Sunday.
So to execute our two scripts at 1:30AM every morning and 3AM Sunday respectively we add lines as shown.
Type o to open a new line below the top one and type in these two lines.
30 1 * * * /home/jane/home-bkup
0 3 * * 7 /home/jane/home-bkup-weekly
Press the escape key, followed by a colon, and you will get a prompt at the bottom of the screen. Type wq (write then quit) to save the file and then quit.
Type crontab -l to see a listing of the file and check your typing.
Tomorrow you can check to see if it worked!