Command Line Interface Intro: Part 8
by Peter Kelly (critter)
Shell Scripting Part 2
One of the reasons for writing a script is because we need to perform the same operation on many objects. To do this, we take the first object and subject it to a sequence of commands which examine, transform, copy, delete or otherwise act upon the object. When we have finished with that object, then we loop back to where we started, take another object and repeat the exercise. We do this until all the objects have been dealt with. We use a flow control statement known as a loop to achieve this.
Loops
By far the most commonly used loop construct in scripts is the For loop, which I used to rename a batch of files when discussing shell expansion. Now I can explain how it works.
The syntax of a for loop is:
for {variable} in {set}
do
command 1
:
:
command N
done
variable can be any unused variable name and a single character.i or x is often used.
set is the set of values that you want to assign to variable at each iteration.
An example will explain this better.

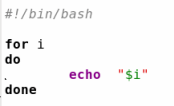
You can type in these constructs at the command line and the shell will keep prompting for more input until the closing keyword of the construct is entered, the word "done" in this example.
Each of the values in the set of values after the word in are successively assigned to the variable i and then all of the commands between do and done are executed. There is only one command here, and the $i is expanded to its current value when the loop runs. While this example is of no practical use, other than to demonstrate the use of the for loop, a more common practical use is to loop through a list of file names, performing tests or actions on each file.
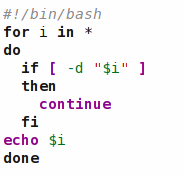
The following code loops through the contents of a directory and checks at each iteration if the current object is a regular file. If so, it echoes the file name to screen.

The if — then loop is needed to exclude objects, such as directories. The basename command is used to strip away any leading directory names that make up the path to the file. Used in this way, it is possible to run through large lists of objects and to then select only the ones that you want to work with.
We can put almost anything in the list of objects to loop through. When using numbers we can use a range.
{5..10} will give the integer set (5 6 7 8 9 10), and we can include a step value.
{5..20..3} gives the set of integers (5 8 11 14 17 20)
You may occasionally come across an older script that uses the external command seq to handle sequences of numbers like this:
for i in $(seq start end step)
rather than the bash notation {start..end..step}. Both work, but the bash way is faster.
The bash variable $@ contains a list of the arguments passed to the script on the command line, and this can be put to good use to loop through those arguments. However this is not necessary, as simply omitting the list completely has the same effect.

The next two looping constructs, while & until, are very much alike.
while [test condition]
do
commands
done
and
until [test condition]
do
commands
done
The difference is that while loops as long as the test is successful and until carries on until the test is unsuccessful.
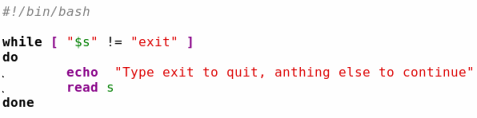
This keeps looping as long as the statement "string s does not have the value 'exit'" is true whereas,
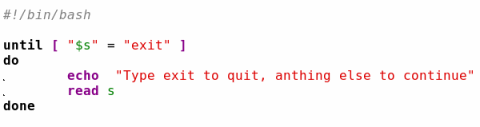
keeps looping as long as the statement "string s has the value 'exit'" is false.
You will find that while loops are used more than until loops, and are often used to repeat an operation a fixed number of times.

All of the bash looping constructs can be nested and may contain other constructs.
Occasionally, you may find that during the execution of a loop a condition arises that requires the loop be exited, and execution of the rest of the script be resumed. For those occasions, bash provides the break command. In this example, we use another method of indexing the loop, using a three-parameter loop control expression.
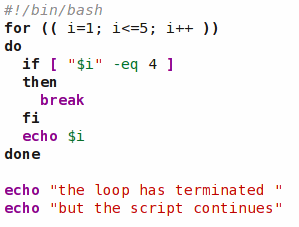
The first expression, i=1, initializes the count, i<=5 sets the maximal count and i++ increases the count by one for each iteration. The second expression can be any valid test, and the third expression could be i-- for a decreasing count or something like i+=3 to increase the count by three for each iteration. In this script only, the values 1, 2 and 3 are printed to the screen.
If you want only to stop the current iteration of the loop before the end of the loop body, and then to continue the next iteration of the loop, then the command continue will do just that. This example loops through the contents of a directory, discarding all sub-directories.
Both of these commands take an optional numeric argument that allows you to specify the number of levels of enclosing loops to get out of, e.g.break 2, to back out of two nested loops.
In the previous examples, all output to the screen has been done using the echo command, which is easy to use but rather limited. A more useful tool is the bash builtin printf, which provides us with the means to format the text.
Printf {format-string} {arguments}
The format-string part of the syntax is a mixture of ordinary text to be printed literally, escape sequences (such as \n to print a newline character) and format specifications like %s to denote a character string, or %d for a decimal integer. The arguments are what you actually want to print.
The most useful escape sequences are:
\b backspace
\f formfeed
\n newline
\t tab
\v vertical tab
The format specifiers cater for character strings, signed and unsigned decimal integers and floating point numbers, with or without the exponent, as well as octal and hexadecimal numbers. If you don't know what some of these are, don't worry. Chances are that you won't need them.
You can, of course, just supply text to the command without any of the fancy escape sequences, or format specifications. But if, at a command prompt, you type:
printf "Hello World"
You will find that your command prompt is placed at the end of the text. Unlike the echo command, the printf command does not automatically supply a newline character, and so the text insertion point remains immediately after the printed text.
printf "Hello World\n"
behaves as is normally expected.
While this may at first seem a burden, it actually enhances the usability of the function, allowing more precise control over the output.
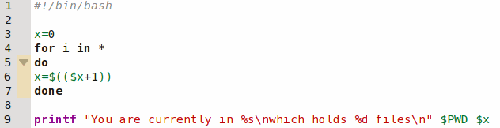
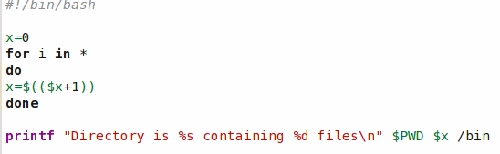
Line 3 initializes a variable, named x, to zero. This is not really necessary but it is good practice to precisely control variables.
The loop in lines 4 to 7 simply counts the number of entries in the directory.
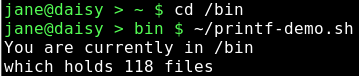
Finally line 9 does the business starting with some literal text and then adding the first of the supplied arguments, the environment variable $ PWD, which holds your current directory. The %s tells the command to treat the argument as a character string. Next is a newline character, followed by some literal text. The newline ensures that the following text is put on the next line down. Note that there is no space between the newline and the text. Had there been a space it would have been the first character at the beginning of the line, indenting the text.%d gets the next argument, $x, the file count, and treats it as an integer number when printing it. The format string is ended with another newline and the whole of the format string is enclosed in double quotes.
Treating the variable $x as an integer had no effect in the previous example. I could have achieved the same result if I had used $s and output it as a string.
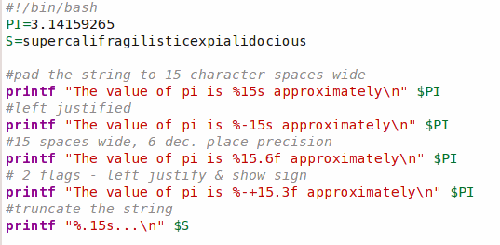
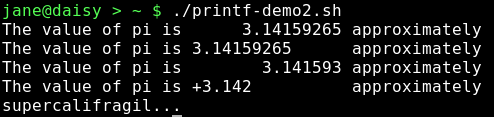
The format specifiers are able to accept optional modifying flags, which are inserted between the % and the format specifier % flags width.precision.
width is the total number of spaces that the inserted value will occupy. If the value is smaller than the specified width then it is padded out from the left (right justified)
precision is the number of digits or characters to output. This varies depending on the format specifier. For a string it is the maximum number of characters. For integers it is the minimum number of digits, default 1. For floating point numbers it is the number of decimal places.
Flags can be one or more of the following:
space prefix positive numbers with a space and negative ones with a minus sign
- left justify the inserted value
+ prefix numbers with a + or — sign
0 pad out numbers with zeroes instead of spaces
# change the form of the output
If you need to use the last one, then you certainly don't need me to tell you how to use it.
A few examples to get you started:
If there are more arguments than format specifiers, then the format string is reused, treating missing arguments as zero or an empty string. For example, if we modify the first script:
The first time around, all is fine, but there is still the unused "/bin" argument, so the format string is reused. However, it expects a string and an integer, so it inserts a zero for the missing argument.

If the second line of output was true we would have a major problem.
Functions
You can think of a function as a sub-script. It is a block of code that is executed by calling its name, along with any arguments that you want the function to process, and the function must be defined before it is called. For this reason, it is usual to define functions at the beginning of the script, but they may also be called from a separate file. When the same code is used in several places in a script, then you should consider using a function definition.
As the shell moves through the script, it recognizes function definitions and stores the commands in memory for later use. This makes the use of functions in a script an extremely efficient way of coding. A function can be called from within a function.
This example script exits if the user is root, but a user who has used the su command to get temporary root privileges will not be detected. You need to also check the environment variable $USERNAME to catch those users.
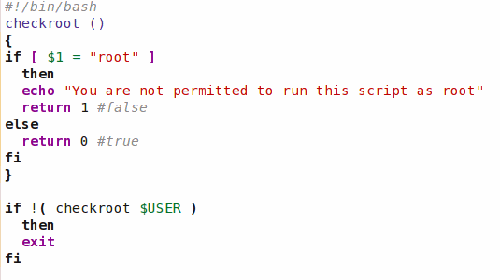
The arguments passed to the function use the same notation as arguments passed to the script on the command line, known as positional parameters. The command line arguments are temporarily stored in memory during the execution of the function. Here the first (and only) argument passed to the function is $USER, and is referenced by the function as $1. The return value can be examined to determine the outcome of the function. Zero is always considered to be true, and any positive integer is taken to be false. A function may be as simple or as complex as you like, but it may not be empty.
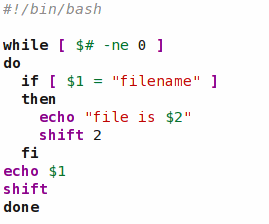
When processing the arguments passed to a script or a function, it is often useful to use the shift command. What this does is to shift all the arguments one or more places to the left, so that the contents of $1 are replaced by the contents of $2, $3 goes into $2 and so on. We can use this to hand down arguments, one at a time, to a loop, process it and then get the next argument. If the argument $1 has its own qualifying argument, say a file name to be used with that argument, then this will be found in $2, Then after processing, this argument pair can use an extra shift command or supply the shift command with an optional count parameter shift 2 to move the arguments the required places to the left.

Useful as this command is for passing consecutive arguments in $1 to a portion of code in a script or function for processing, the need to scan a set of options and arguments passed to a script has resulted in the getopts command. This command greatly simplifies the parsing of command lines. The getopts command accepts a list of options valid in the script or function, and recognizes that any options followed by a colon require an additional argument, which is placed in the variable $OPTARG, each supplied option being stripped of a leading — before being placed in a variable supplied to the command getopts {options} {var} {arguments}.
If we were to write a script with the syntax
myscript -cnh
-c [destination] copy a file to directory destination
-n print a count of files processed
-h print a help message and exit
which we might use to count or backup a set of files provided in the arguments section of the command line. To process the command, we could use code similar to the following:
COUNTING=0
while getopts c:nh options
do
case $options in
  100. DEST=$OPTARG
;;
  n)COUNTING=1
;;
  h)echo "For usage please see the accompanying documentation."
  exit 0
;;
esac
done
This sets up the script functionality so that testing the contents of the variable $COUNTING tells us if we need to provide a count of the files, and if the -c option was specified, then the variable $DEST, if it is defined, tells us to perform the copy operation on the files in the argument list and contains the path to where we wish to copy the files.
The command getopt does not remove the options from the command line, but maintains an index to the next option in the variable $OPTIND. If we use the shift command after the while loop, as
shift $(( OPTIND — 1 ))
then all the options and their required options are removed, leaving only the arguments (file list to be processed) in the positional parameters $1, $2 ...
If you are using the getopt command to process arguments to both the script and to functions within that script, then you should be aware that the variable OPTIND is not automatically reset and should therefore be reset at the beginning of the function, to ensure that the first argument retrieved is, in fact, the first argument passed to the function.
Zenity
We now have a nice set of tools to start building our scripts, and these few routines are sufficient to get started on the coding of some fairly sophisticated utilities. You just need to provide logic, intuition and patience. What we have in our toolbox so far is fine when we are writing scripts that only we shall be using, but if we want to provide a solution for more general use, then we need to make the scripts a little more user friendly. Some of the potential users may not be as command line savvy as you now are.
Fortunately, there are some excellent utilities in the repositories to help here, and more than likely, one or more will already be installed if you are using PCLinuxOS. The command dialog can be used to provide simple pop up boxes in the terminal:
dialog --msgbox 'Hello World!' 8 20
displays a simple message box 8 lines high by 20 characters wide, with a mouse click-able OK button and the message "Hello World!"
KDE provides kdialog to provide a similar capability using dialog boxes directly on the KDE desktop and returning results to the running script.
There are others, and they all have their virtues and vices, but a very popular one that is extremely simple to use is called Zenity. PCLinuxOS users can see this in action if they run the excellent Repo Speed Test utility by travisn000. Reading the text of the script is highly recommended to better understand how a lot of the topics we have recently covered fit together to produce a useful utility, and you'll learn a few more tricks as well. The script can be found as /usr/bin/apt-sources-update.sh.
All of these dialog utilities are quite comprehensive, but easy to implement and a good overview of the capabilities can be had by typing the command name followed by --help. I shall demonstrate some of the ways that zenity can be used to spice up you scripts and provide a professional look.
The syntax of the zenity command is simple
zenity options
The options determine the type of dialog to display, along with any options relative to that particular dialog. The types of dialog available and the option to call them include:
--calendar   calendar dialog
--entry      text entry dialog
--error      error dialog
--file-selection  file selection dialog
--info       info dialog
--list       list dialog
--notification   notification icon
--progress   progress indication dialog
--question   question dialog
--text-info  text information dialog
--warning    warning dialog
--scale      sliding scale dialog
Calendar
The calendar dialog displays a nice monthly calendar in a window, from which you can select a date. You may specify some text and a title to be displayed on the dialog, as well as the the day, month and year to be shown when the dialog is shown. The width and height of the dialog may also be specified. The command can get to be quite long, so I have used the line continuation character \ to save space, but it is all treated as a single line by the shell.
zenity --calendar --title="Janes Calendar" \
--text="pick a date" \
--day=15 \
--month=6 \
--year=2020 \
--width=300
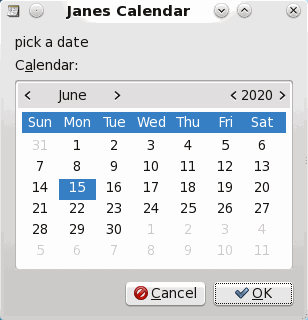
The selected date is returned by default in the format 06/15/2020, but there is another option that allows you to completely control what you get.
--date-option=STRING
where STRING conforms to the specification of the strftime function. There is far too much to cover here (Google is your friend) but briefly:
"%A %d/%m/%Y" produces Monday 15/06/2020 and
"%a %d %B %Y" changes it to Mon 15 June 2020. Get the idea?
The returned date can be simply captured in a variable by enclosing the entire command in backticks:
MYDATE=`zenity --calendar`
Clicking the cancel button returns an empty string.
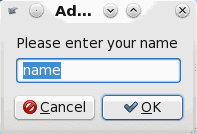
Text Entry
The text entry dialog provides a simple way to read data into a script. The --entry-text option provides the default text when the dialog is shown.
zenity --entry --text="Please enter your name" --entry-text="name"
A rather useful feature is the --hide-text option. This is useful for entering passwords.
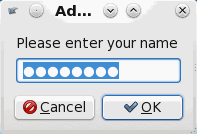
Beware though that this returns an unencrypted plain text string.
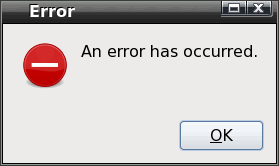
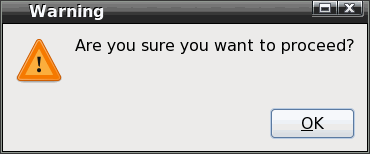
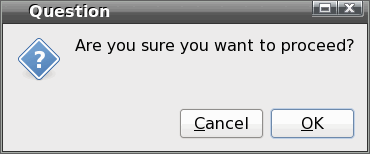
Error, Warning, Question and Information
These four dialog boxes are very simple text boxes and are shown below with their default text and icons.
Of course the text, width and height can be changed with the corresponding --text. --width & --height options to suit the application.

File Selection
The file selection dialog sets up file reading and writing through a nice interface. It doesn't actually do the read or write operation, as that must be done in the script, but it does make things easier for both the user and the script writer.
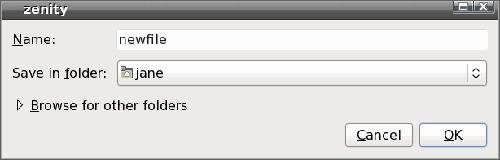
The dialog defaults to read mode and returns the selected file name and its full path. If the --multiple option is specified, then multiple files may be selected and are returned separated by a vertical bar character |. This separator character can be changed with the --separator=SEPARATOR_CHARACTER option. The --directory option restricts the selection to directories only. The --save option adds a text entry bog which prompts for the file name, which may be preset with the --filename=FILENAME option. This allows you to select the name and directory to save the file through a graphical method, and this file name and path are returned by the command. If the --confirm-overwrite option is used then a warning dialog prompt will pop up if the file already exists.
zenity --file-selection --save --confirm-overwrite brings up this dialog:
And typing in the name of an existing file warns the user with this.
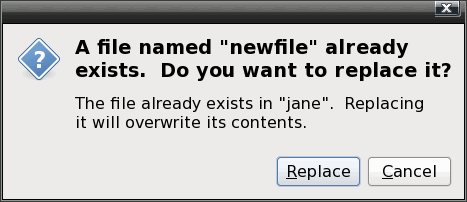
Clicking on "Browse for other folders" or opening the dialog in the default read mode by not issuing the --save option brings up a fully search-able file dialog that most GUI users would be comfortable with.

Notification
The --notification option puts a tiny icon in the system tray which will display a tooltip when the mouse hovers over it. The text of the tooltip you can specify with the --text=TEXT option.

This command takes one more option, --listen, which listens for data on stdin. Using this option is a little more difficult. stdin usually uses file descriptor 0, but we can send data through another file descriptor, using echo. The listen option expects one of three option-commands — tooltip, icon and visible — allowing us to dynamically control the displayed text, the icon in the system tray and the visibility of the icon, which is a useful way of getting feedback from the script to the user.
zenity --notification --text="PCLinuxOS"
will place the triangular warning icon in the system tray, as in the graphic above, with a tooltip announcing "PCLinuxOS."
When we use the --listen option, we can write:
exec 3> >(zenity --notification --text="PCLinuxOS" --listen)
which sends all data using file descriptor 3 to the zenity command. File descriptor 3 has been used, as 0, 1 & 2 are already used by stdin, stdout and stderr, but I could have used, for example, 7 or even 27, with the same effect.
To change the icon to the "info-icon," we can echo that information through file descriptor 3:
echo "icon: info" >&3
which changes the icon like this:

To change the tooltip we would issue:
echo "tooltip: Radically Simple" >&3
and we can keep on sending new information to the command in this way.
To end the notification command we simply need to close the file descriptor:
exec 3>&-
Text Information
The text information dialog allows you to display text from a file to the user. The text can also be piped to the command from another command.
zenity --text-info --filename=FILENAME
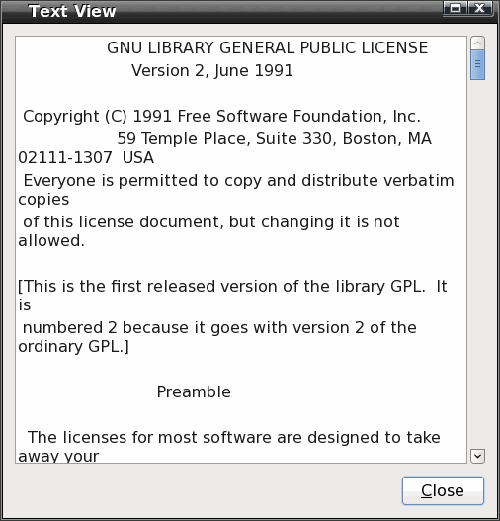
You may make the displayed text editable with the --editable option. The edited text is returned by the command as text which must be captured, as it is not written to the source file.
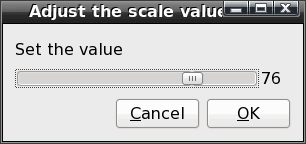
Scale
The scale dialog displays a sliding scale for which you can specify the maximum, minimum and starting value, the step by which it increases and whether or not to display the current value. With the --print-partial option, you can echo the current value back to the calling program as to move the slider. Clicking the OK button closes the dialog and returns the current value. The slider may be moved by the keyboard arrow keys or by the mouse, although in the latter case the step value is ignored.
zenity --scale --min-value=0 --max-value=100 --value=76 --text="Set The Value"
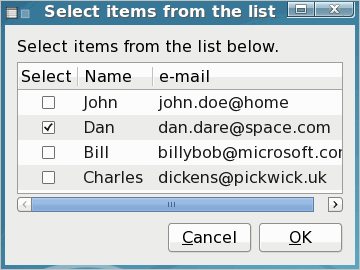
List
The list dialog has lots of options. You can set up a number of named columns, and supply data to be displayed under them, in rows. The user can select one or more rows and click the OK button to return the selected data to the script. By using the --checklist option, the first column of each row will contain a check box, which the user can click to select the row. All checked boxes return data to the script. The first item of data sent to each row should the be either TRUE or FALSE to set the initial state of the box. The — -radiolist option works in the same way and provides radio buttons.
By default, the command returns data from the first data column, but this can be changed with the --print-column option, since a value here of ALL returns the entire row. Returned data is separated by the vertical bar character | but this can be changed with the --separator option. The --editable option enables the user to edit the data before returning it to the script with a click of the OK button.
I think an example is in order.
zenity --list --column="Select" \
--column="Name" --column="e-mail" \
FALSE "John" "john.doe@home" \
TRUE "Dan" "dan.dare@space.com" \
FALSE "Bill" "billybob@microsoft.com" \
FALSE "Charles" "dickens@pickwick.uk" \
--print-column=ALL \
--separator=" "\
--checklist \
--height=240 \
--width=350
Progress
You can see a very good example of a progress dialog when you you run the Synaptic package manager. At first glance the available options don't seem to offer a very wide choice but this little dialog can be quite impressive.
These are the options:
--text=STRING     Set the dialog text
--percentage=INT  Set initial percentage
--auto-close      Close dialog when 100% has been reached
--auto-kill       Kill parent process if cancel button is pressed
--pulsate         Pulsate progress bar
And of course, all of the general options like width, height are also available. The data to the command is probably most easily piped in through a previous command, but you may also wish to feed it in through a file descriptor, as in the previous notification example.
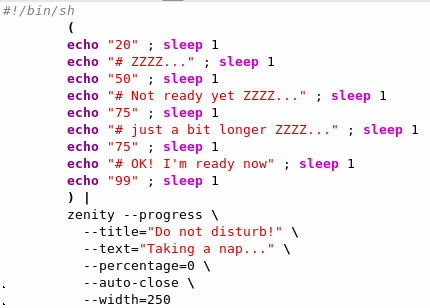
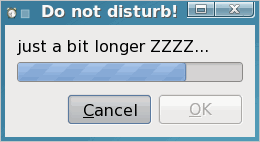
This echoes text into the command, updating the progress bar as new data is sent in. Text prefixed with a # updates the --title option while the numbers update the --progress option. The sleep n command does nothing for n seconds so that you can see whats going on, but normally you would actually do something useful here. Another option is --pulsate, which causes the progress bar to slide back and forth for the duration of the command or an end of file character is received. The --auto-close option is used to automatically close the dialog when progress reaches 100% without requiring any user interaction.
When you use redirection to feed information to a dialog with a command like:
ls /bin | (zenity –text-info)
then that information is absorbed by the zenity command. To overcome this, we can use the tee command. tee duplicates the data, sending it to multiple pipes.
ls /bin | tee >(zenity –text-info) >bin.txt
This will put the output of the ls command into the dialog, and also send it to the file bin.txt.
Answers to Mark Szorady's Double Take: (1) Shirt stripes different; (2) Word balloon different; (3) Table moved; (4) Stars missing from hat; (5) Computer screen wider; (6) Woman's hair different; (7) Seat back missing