OpenOffice 2: Writer
by Meemaw & djohnston
In the overview article last month, I compared OpenOffice with Microsoft Office, giving you the matching OpenOffice programs for the popular MS Office ones. I will add that OpenOffice can be downloaded and installed for free, rather than having to fork over your hard earned money every two years or so for an upgrade. In addition, OpenOffice will open not only MS Office files, but also files from Word Perfect and other programs (even the brand new MS docx files.)
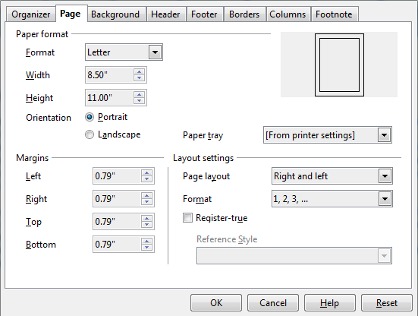
Now that you have configured the basic options for the whole suite, you may want to get busy with a word processing document. OpenOffice Writer is, of course, the one you want to use. When you open it, there will be a blank 'page' waiting for you to type. Before you start, however, you may want to set the margins on your page. In the menu bar, choose Format > Page. You will see this window, where you can designate paper size, orientation and margins. The default is 0.79". I usually change it to 0.50" or 0.25" depending on what kind of document I'm creating, whether it's a business letter, or just saving data for future reference.
Many of the changes you can make to your text can be accessed from the toolbars as well as the menus. The toolbars can be configured to include the items you use most often, so yours may look different from mine here. If you have tooltips turned on, you can see what each button is by just hovering the mouse over it. If you don't use that particular one, remove it and replace it with whatever you use most.

On my toolbar, I have the following (top row, l to r) - New, Open, Save, Email, Edit File, Export as PDF, Print, Print Preview; Spelling & Grammar and Auto Spellcheck; Cut, Copy & Paste; Format Paintbrush, Undo and Redo; Hyperlink, Insert Table, Show Draw Functions (which toggles on or off the OODraw toolbar on the bottom of the window), Find & Replace, Navigator, Gallery, Data sources, Zoom and Help and then (bottom row, l to r) - Apply Style, Font, Font size; Bold, Italic & Underline; Align Left, Center, Align Right and Justified; Numbering On/Off, Bullets On/Off; Decrease Indent and Increase Indent; Text Color, Highlight Color and Background Color. The little down arrow at the end of the toolbar, when clicked, gives you a drop-down where you can see a list of visible buttons, and a menu item that allows you to customize that toolbar, lock its position, or even close it. If you close one by mistake, you can go to View > Toolbars, and click on the one you need to open up again. Notice there are over 20 different toolbars!!! However, most people use the 'Standard' and the 'Formatting' toolbars in Writer most of the time, and only pull others up if they are working on something specialized (tables, form design, etc) in other OO programs.
One thing that I had to adjust to was the absence of the 'Page Layout' button that I had on the toolbar in the other suite. However, it took almost no time at all to find the menu 'Format' > 'Page' (shown above) which is the exact same thing.
Another of the buttons on the toolbar is called 'Gallery', which is a thumbnail collection of the clipart available in the suite (the Gallery button is on the toolbar in each program because you just never know when you want to insert a little clipart!) Your window changes to show the gallery when you click the button;

When you first install this office suite you have a basic set of clipart, but many more can be downloaded and installed from OO.org. (The buildings in the shot above are one of the extra sets… another good set is found here). When you want to insert one of the pictures from the gallery, simply click and drag it from the gallery to your document. In addition, you can always insert graphics you have stored on your computer by clicking Insert > Picture > from file and navigating to your graphic.
You may have noticed that one of the toolbar buttons is 'Export as PDF'. Open Office does export documents as Adobe pdf files. This has come in handy - I never know what type of office program anyone else has, so instead of saving it as several different Office docs, just in case someone's version is really old, I export it as a pdf, and most everyone can open it. The other upside is that it most likely won't get altered by someone else if it is in pdf form. At work I do a newsletter, and the company that prints it prefers a pdf file, so having it already in that form when he gets it speeds up the process.
One of the things I like about this suite is that no matter what you have open, you can go to File > New or File > Open and open up any other type of document, like opening a spreadsheet from a text document window. I never could do that in the other office suite (but I always thought I should be able to.)
Earlier in the article I talked about margins and how the default is 0.79 inches. While that may not bother you, I always thought it was a pretty strange number for default, but if your unit of measurement is centimeters, it makes perfect sense. It's 2 cm. You can change it, though, to whatever you want. Simply change the margins and whatever else you want to what you use most, then save it as a template (File > Template > Save) with whatever name you want to give it. (Mine is called WriterTemplate.) It will be saved to 'My Templates' and then you can go to File > Templates > Organize, click on your template in the list, and then when you click on the Commands button at right, one of the choices is 'Set as Default Template'. Not too hard.
On the subject of templates, OpenOffice has a few that are included in your installation, and also many templates you can download and use. From OO's main page you can select 'I want to do more with my OpenOffice' and you will be taken to the template and extension section of the site. At the top of the page, click Templates. There are templates for business letters or invoices, calendars, resumes and much more. The section includes templates for all parts of OpenOffice, so if you are looking specifically for Writer Templates, click Writer in the left margin and your list will be sorted out to list the templates for Writer. At the second gallery link above, there are also links listed for available template sets that can be added.
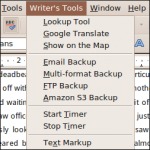
Extensions are another thing. Extensions are add-ons which enhance the way that OO works.You can get different language dictionaries or even 'Writer's Tools.' The site says,
"Writer's Tools is a set of utilities designed to help OpenOffice.org users perform a wide range of tasks. Using Writer's Tools, you can back up documents, look up and translate words and phrases, manage text snippets, and keep tabs on document statistics."
It puts another menu in your menu bar (see below) which has many useful chores listed. Galleries are also added to the extension lists, as are template packages.
Something else you can do in your document is insert a comment. This can be a side note to yourself that you don't want in the main document, or, if you are sharing the document with others, it can be a reference to something else you need to tell them. Comments can be inserted in the body of the document. You can insert a comment by placing your cursor where you want the comment field to be, then either click Insert > Comment from the topmost menu, or pressing the key combination Ctrl+Alt+N. As shown in the help menu:
(The) key combination inserts a comment anchor at the current cursor position. A comment box is shown at the page margin, where you can enter the text of your comment. A line connects anchor and comment box.

Not shown in the help menu is how to exit the comments box back to the document page. Pressing the Esc key will do that.
Also from the Writer help menu:
Editing comments
Every user with write permission to the document can edit and delete comments of all authors. The comment box contains an icon with a down arrow. Click the icon to open a menu with some commands to delete comments.
Choose a command to delete the current comment, or all comments from the same author as the current comment, or all comments in the document.
If the comment in a text document was written by another author, there is a Reply command in the context menu. This command inserts a new comment adjacent to the comment to which you want to reply. The comment anchor is the same for both comments. Type your reply text in the new comment. Save and send your document to other authors, then those authors can add replies, too.
Use View - Comments to show or hide all comments (not available in Calc). In the Find & Replace dialog of text documents, you can select to include the comments texts in your searches.
Navigating from comment to comment in text documents
When the cursor is inside a comment, you can press Ctrl+Alt+Page Down to jump to the next comment, or press Ctrl+Alt+Page Up to jump to the previous comment.
When the cursor is inside the normal text, press the above mentioned keys to jump to the next or previous comment anchor. You can also use the small Navigation window below the vertical scrollbar to jump from one comment anchor to the next comment anchor.
You can also open the Navigator to see a list of all comments. Right-click a comment name in the Navigator to edit or delete the comment.
Printing comments
To set the printing options for comments in your text document, choose File - Print, then click Options. To change the printing option for comments for all your text documents, choose Tools - Options - OpenOffice.org Writer - Print.
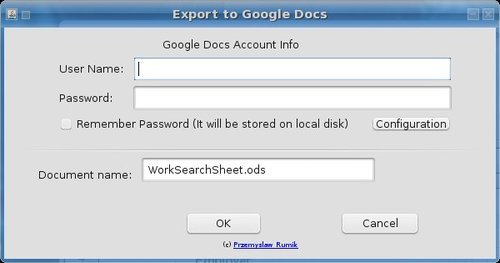
You can export to pdf as covered previously, but what if you aren't finished with your document and want someone else to look it over first? You can File > Google Docs & Zoho > Export to Google Docs and share it with the person who needs to review it.

When you click on Export to Google Docs, a window will come up asking for your user name and password, so the file can be placed in the right location.
Hopefully we've gotten you started on whatever you need to do in Writer. The next article will be an overview of OpenOffice Calc, the spreadsheet program.
Enjoy yourself!!!