Xfce 4.6.2: Customize Your Xfwm Theme
by Paul Arnote (parnote)
It may sound difficult, but creating your own custom Xfce Window Manager (xfwm) theme is probably one of the easiest customizations you can do on your Xfce installation.
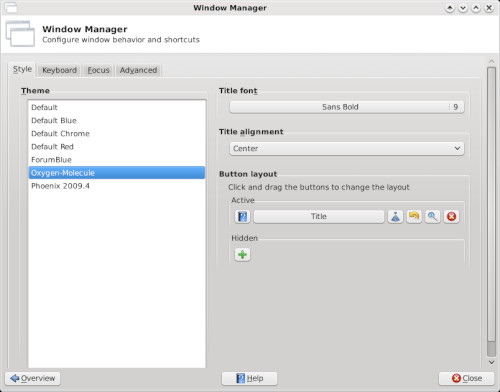
From the Xfce Settings Manager, going in to the Window Manager applet allows you to choose the xfwm theme to use on your desktop. This xfwm theme controls the appearance of your window decorations, including the titlebar, the window borders, and the shade, minimize, maximize, close, sticky, and system menu buttons. Here's what you will see when you open the Window Manager applet:
Since we've already covered the Window Manager applet in the Xfce 4.6.2: Xfce Settings Manager Article elsewhere in this issue, we won't rehash it here. Of the seven included xfwm themes included in the default installation of Phoenix 2010, I created four of them. And you can make them as simple or complex as you like.
Here are six xfwm themes I've created, and they will serve as the basis for our discussion on creating your own custom xfwm theme:
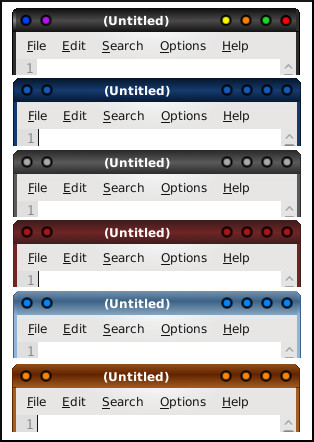
From top to bottom, the xfwm themes are called: AgualemonBlack, Default Blue, Default Chrome, Default Red, Forum Blue (based on the blue colors of the default SMF theme in the PCLinuxOS forum), and Phoenix09 (based on the colors of the default wallpaper of the Phoenix 2009.4 release).
The Basics: Getting Started
Your xfwm themes are stored in the /usr/share/themes directory. Each xfwm theme has its own directory there, bearing the name of the xfwm theme, and the graphic files for the theme are stored in the xfwm4 sub-directory. You will need root access to this folder to make any changes to the themes that are there, or for storing your custom theme there. I suggest you store your custom themes in their own folder somewhere in your /home directory (mine is just called "themes"), then copying the entire directory there when you are ready to test your custom theme. This way, you are not working as root and not taking the risk of messing up the other xfwm themes already stored on your computer. For our discussion, we'll use AgualemonBlack as our example.
What's Needed
You will need to create a minimum of 42 graphic files to have a full xfwm theme. These files are small, and quite easy to make. The files, typically stored as *.xpm files, are easily created in Gimp. As such, all the tools available in Gimp are at your disposal for creating your custom xfwm theme.
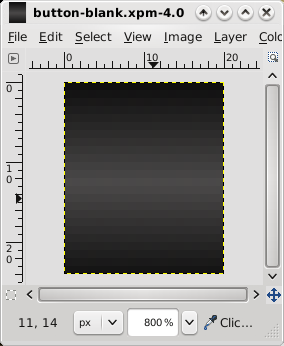
Because of the small size of the graphics, you will find it advantageous to use Gimp's zoom tool. I find that zooming in to the maximum of 800% allows me to work comfortably with the minuscule graphic files included in the xfwm themes. Below is an example of my Gimp window when I'm working on a xfwm theme graphic. I used the gradient tool, set to provide a bilinear gradient, using dark gray and black as my foreground and background colors.
Remember those 42 individual graphic files I told you that you need? Here's a list of them, along with the sizes I used for my six themes, with the width followed by height, in pixels:
| File Name | W | H | File Name | W | H | File Name | W | H | ||
| bottom-active.xpm | 11 | 4 | maximize-active.xpm | 20 | 24 | title-1-active.xpm | 5 | 24 | ||
| bottom-inactive.xpm | 11 | 4 | maximize-inactive.xpm | 20 | 24 | title-1-inactive.xpm | 5 | 24 | ||
| bottom-left-active.xpm | 11 | 11 | maximized-pressed.xpm | 20 | 24 | title-2-active.xpm | 5 | 24 | ||
| bottom-left-inactive.xpm | 11 | 11 | menu-active.xpm | 20 | 24 | title-2-inactive.xpm | 5 | 24 | ||
| bottom-right-active.xpm | 11 | 11 | menu-inactive.xpm | 20 | 24 | title-3-active.xpm | 5 | 24 | ||
| bottom-right-inactive.xpm | 11 | 11 | menu-pressed.xpm | 20 | 24 | title-3-inactive.xpm | 5 | 24 | ||
| close-active.xpm | 20 | 24 | right-active.xpm | 4 | 11 | title-4-active.xpm | 5 | 24 | ||
| close-inactive.xpm | 20 | 24 | right-inactive.xpm | 4 | 11 | title-4-inactive.xpm | 5 | 24 | ||
| close-pressed.xpm | 20 | 24 | shade-active.xpm | 20 | 24 | title-5-active.xpm | 5 | 24 | ||
| hide-active.xpm | 20 | 24 | shade-inactive.xpm | 20 | 24 | title-5-inactive.xpm | 5 | 24 | ||
| hide-inactive.xpm | 20 | 24 | shade-pressed.xpm | 20 | 24 | top-left-active.xpm | 5 | 24 | ||
| hide-pressed.xpm | 20 | 24 | stick-active.xpm | 20 | 24 | top-left-inactive.xpm | 5 | 24 | ||
| left-active.xpm | 4 | 11 | stick-inactive.xpm | 20 | 24 | top-right-active.xpm | 5 | 24 | ||
| left-inactive.xpm | 4 | 11 | stick-pressed.xpm | 20 | 24 | top-right-inactive.xpm | 5 | 24 |
You can also add optional graphics to this list for buttons that have a "toggled" state. Such buttons would be the "stick" and "shade" buttons. As such, you can add the following to the above list, bringing the total number to 48 graphic files for a full xfwm theme:
- shade-toggled-active.xpm
- shade-toggled-inactive.xpm
- shade-toggled-pressed.xpm
- stick-toggled-active.xpm
- stick-toggled-inactive.xpm
- stick-toggled-pressed.xpm
The best way to get a handle on what the toggled state of a button does is to see it in action. Switch you xfwm theme to the Oxygen-Molecule theme, and select the "shade" button. You can also go to the /usr/share/themes/Oxygen-Molecule/xfwm4 folder and take a look at how the graphics files appear. Also, in keeping with the sizing scheme of the rest of our xfwm theme, all the buttons will be the same size. In our case, that will be 20x24.
I have also found it makes your life much easier — at least while creating the xfwm theme — to create and save a blank button. You can use this blank button as the basis for all your other buttons, title bar graphics, and the top left and right corner graphics. In fact, the image loaded into the previous Gimp screen shot is of the blank button I used to create the AgualemonBlack xfwm theme. Just keep reloading the blank button, make the alterations you need for each graphic, and resave it with the proper file name. This also helps keep your graphics consistent, giving your xfwm theme a much cleaner, more professional appearance. The only graphics you will need to create manually are the left, right, bottom, and bottom left and right window borders, but those are perhaps the easiest graphics to create.
Here is a collection of all the graphic files combined into one image, and blown up to 400% in Gimp:
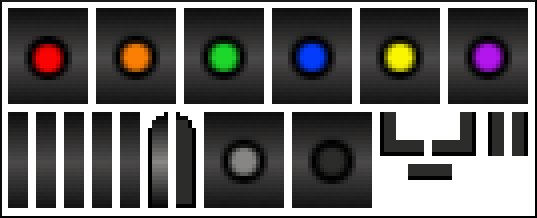
In the top row are, from left to right, the following active buttons: close, hide, maximize, menu, shade and stick. In the bottom row, from left to right, are: title-1, title-2, title-3, title-4, title-5, top-left, top right, inactive, pressed, bottom left, bottom, bottom right, left and right.
Since I decided on not changing the window border colors or titlebar for the inactive windows, the active window border and titlebar graphics are also repeated for those items. Also, all the inactive buttons are the same, as are all the pressed buttons. This prevented me from having to draw additional button graphics and window border graphics for each individual button and window border. Rather, I just kept renaming the inactive and pressed button in Gimp (File > Save As...), until I had all of the required buttons saved. I did the same thing for the window border graphics.
More Options: themerc
Once you have all of your graphic files created, it's time to set the "other" options for your xfwm theme. We do this by including a themerc file in the /usr/share/themes/name-of-theme/xfwm4 folder of the xfwm theme, right along with all of your graphic files. The themerc file is simply a text file that defines other aspects of the xfwm theme, such as the color of the active and inactive titlebar text, button spacing, and other items that we'll cover more thoroughly here in just a little bit.
First though, here is a sample themerc file, from the AgualemonBlack xfwm theme:
full_width_title=false
title_alignment=center
button_spacing=0
button_offset=0
title_vertical_offset_active=1
title_horizontal_offset_active=0
title_vertical_offset_inactive=1
title_horizontal_offset_active=0
title_shadow_active=false
title_shadow_inactive=false
active_text_color=#ffffff
inactive_text_color=#b6b6b6
show_app_icon=false
full_width_title: this option is either "true" or "false" (called boolean) and defines how the titlebar graphics are arranged. If it is set to "true," the center titlebar graphic is repeated as many times as necessary to cover the full width of the titlebar. If you set it to "false," the center titlebar graphic is repeated only enough times to appear behind the actual titlebar text.
title_alignment: specifies the alignment of the titlebar text. The options are left, right and center.
button spacing: defines the number of pixels between buttons.
button_offset: allows you to specify how many pixels to shift the buttons, relative to the corresponding window border (and not the frame border). For example, a setting of "10" would move the buttons at the upper left corner away from the left window border 10 pixels, and move the buttons at the upper right corner away from the right window border 10 pixels.
title_vertical_offset_active, title_horizontal_offset_active, title_vertical_offset_inactive, title_horizontal_offset_inactive: these values allow you to shift the titlebar text on the specified window titlebar (active or inactive) the specified number of pixels. Except in special cases, the value is usually "0" or "1" pixel.
title_shadow_active, title_shadow_inactive: set to either "true" or "false," this value determines whether or not the text on the titlebar is drawn with or without a shadow.
active_text_color, inactive_text_color: using a six-digit hex color code (the same as used in HTML), it specifies the color for the titlebar text on the active and inactive window titlebars. If you need to know a specific color code, open up Gimp, select the color you want from the Gimp palette color selection box, and pay attention to what Gimp specifies as the HTML color code. You must always precede the six-digit hex color code with the "#" symbol. And, for what it's worth, black is #000000, light gray is #cccccc, and white is #ffffff.
show_app_icon: another boolean setting. If you set it to "true," the application's defined icon will replace the menu button. Likewise, if you set it to "false," the application's icon will not be displayed, and the menu button will be displayed in its place.
There is another setting that we have not employed. It's called button_layout. It defines the order of button layout on the titlebar of the window. Use caution with this, as defining the button layout will eliminate any choice the end user will have, and should be avoided unless absolutely necessary. With that in mind, here is how the button_layout settings go:
# button_layout :
  #    O = Option menu
  #    T = Stick
  #    H = hide
  #    S = shade
  #    M = maximize
  #    C = close
  #    | = title
  button_layout=OT|SHMC
There are additional things you can do, like make your xfwm theme "pick up" the colors from the Gtk+ theme. We won't be going into all of that here, as it's a quite involved (albeit relatively easy). If you are interested in exploring how to do this, you can check out the xfwm theme how-to page from the Xfce Wiki.
Conclusion
As you can see, creating your own xfwm themes is actually quite easy. Also, there are enough options available to allow you virtually unlimited creativity. So unleash that creativity, and get started creating and tweaking your own custom xfwm theme. You have the opportunity to make your Xfce desktop experience uniquely yours, without too much trouble at all.