Command Line Interface Intro: Part 11
sby Peter Kelly (critter)
A handful of the more useful commands
So far in this series, we have looked at most of the important aspects of working on the command line. This time I want to spend a little time looking at some of the more useful utilities available in a Linux distribution.
This is not meant to be an exhaustive list. There are far too many such commands available for that, but is a look at those utilities that you should find in almost any distribution, either installed by default or available from their repositories.
These are commands that you may not use every day, but you will find invaluable when you do need them. They are commands that I have not already covered, or that are deserving of a little more explanation. I am not going to cover every possible feature of the commands. The manuals are there for that, but I hope to cover them in enough detail to give a good understanding of what the command is capable of.
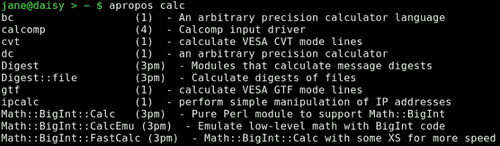
apropos {string}
Ever been stuck at the command line, knowing what you want to do, but can't for the life of you remember the name of the command? Of course, we all have, and this is where this command saves the day. It searches a database of manual page descriptions for things that match the string that follows:
at {options}{time}{date}
This enables you to have commands executed at a particular time. Where cron is used for running repetitive tasks at a particular time or frequency, the at command is useful for one-off tasks. To use it, the atd service must be running. This can be determined by issuing, as root, the command
/sbin/service atd status
It may be started, if necessary, with the command
/sbin/service atd start
You start the command by typing at followed, by a time, and optionally, a date. If the -f option is specified with a file name, then the list of commands to be executed are read from that file. Otherwise, you a prompted to enter them at the terminal. Entry is terminated with Ctrl-d.
The way time is specified is rather unusual. It may be entered in the format 15:30 for a 24 hour clock, or 3:30pm for a 12 hour clock. You may also specify time as midnight, noon, teatime (4:00pm) or now + 2 hours, and you can add today or tomorrow. Date takes the format March 15 or Mar 15. The year is 4 digits, e.g. 2010. You can simply specify a day, Sat or Saturday. An increment can be added to any part of the time date string.
When commands are executed any output or error messages are mailed to the user, but you must have the sendmail service installed and configured to make use of this. Instead, most users will want to re-direct the output to a file.
Each set of commands is given a unique job number, and pending jobs can be listed with the command atq. Jobs can be removed from the queue with the command atrm job-number.
basename {name}{suffix}
This command is used to remove all leading directory names and, optionally, the suffix from a fully qualified file name. So,
basename /home/jane/scripts/myscript1.sh
would return myscript1.sh, and
basename /home/jane/scripts/myscript1.sh .sh
would return myscript1. You will find this command invaluable in scripts.
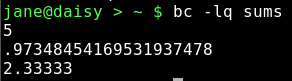
bc
bc is a command line calculator. That much is basically true, but it is also a gross understatement. It is a complete, compilable language, similar to C, which is capable of unlimited precision arithmetic. It has an extensive library of mathematical functions, which you can include with the -l option, and you may define your own functions. Most people however, will use it interactively on the command line, or use it in a script to do a quick calculation or conversion.
To use bc on the command line, you may simply type bc and you will be greeted with a banner declaring version and licensing information, (this can be suppressed by using the -q option ), and a prompt.

You can then simply type in expressions, such as 2+3 or 3.1416*6, and the result will be echoed to the screen (stdout). To end the session, type quit or ctrl-d.
If you don't use the -l option, which will use long floating point numbers, then integer arithmetic is used. In the bc language, the scale of precision is zero, which means that zero decimal places are displayed. This can be changed by setting the variable scale. Using the -l option sets this value to 20 by default, which displays 20 decimal places. Note that if you use a value in an expression with more decimal places than the current value of scale, then that number of decimal places is used to display the result.
If you intend using bc then, as you don't need to know the version stuff every time, and bash can handle integers just fine, then you may want to put an alias in your .bashrc file.
alias bc="bc -lq"
The bc command is often used in pipelines and redirection, as in the following examples:
echo 3.1416*2.5 | bc -l
bc <<< 2^32
Or, the expressions can be read from a text file:
cat > sums
2+3
s(1.34) #sine 1.34 radians
scale=5
7/3
quit
Comments are allowed, and are preceded by a hash #. Without the quit statement, bc would wait for more input from stdin.
The bc command can work in any base from 2 to 16, but defaults to base 10. To change this use the variables ibase and obase for the input and output bases. This is extremely useful if you need to convert between binary, hexadecimal, octal and decimal. The following bash script converts decimal to hexadecimal:
#!/bin/bash
#d2h.sh convert decimal to hexadecimal

if [ $# != 1 ]; then
    echo "Usage: d2h decimal-value"
    exit 1
fi
echo “ibase=10; obase=16; $1" | bc

Should you want to edit this script to reverse the operation, hex to decimal, be aware that obase must be in ibase format:
ibase=16; obase=A
And hexadecimal letters must be in uppercase, since lowercase characters are reserved for bc variables. You could pipe the value through the awk toupper function, or use the tr command before passing it to bc to ensure that this is so.
cksum {files}
If you are transferring or compressing files, you may find this command useful. It calculates a cyclic redundancy (CRC) value for all files specified on the command line. This value can later be used to check the integrity of the file.

clear
Clears the terminal screen, nothing else. Simple, but essential.
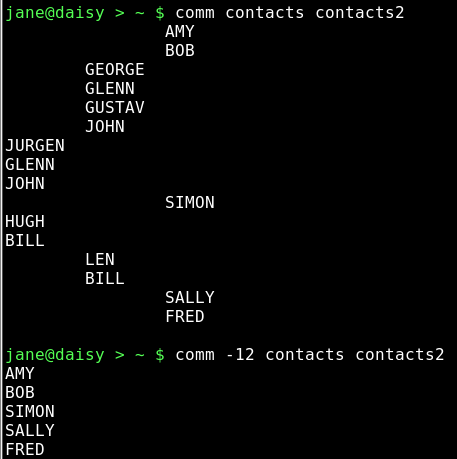
comm {option}{file_a}{file_b}
When you need to know how similar two files are, use this command. The output is is in three columns: lines only in file_a, lines only in file_b and lines common to both files. There is an option to suppress certain columns by listing their numbers with no spaces. -12 would suppress columns 1 and 2, listing out only lines common to both files.
cut {options}{files}
You can use this to chop out fields of data from files specified, or from stdin. The options allow you to specify a list of bytes -b, columns -c or fields -f to cut. If -f is specified, the default delimiter is the tab character, but this can be changed with the -d option. -s with -f suppresses lines with no delimiters.
If the file contains multi-byte characters, you have the -n option to avoid splitting them. The list of fields can be comma separated values, or ranges 2-5.
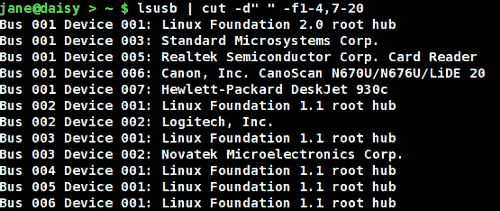
Here, we have asked for a list of usb devices available on the system. The delimiter is a space character, and we are not interested in fields 5 & 6. As the delimiter is a space and the name contains spaces the final range, 7-20, has been made wide enough to catch all words.
df {options}{device_name}
This is a handy little utility to report disk free space. If name is omitted, then all mounted file systems are reported. Name can be a device name, such as /dev/sdb1, or a mount point, such as /home. If a directory name is used, then the report is of the entire file system on which that directory is mounted.
Options include:
- -a
- shows all file systems including 'dummy' files systems such as /proc.
- -i
- to show inode usage rather than byte usage.
- -h
- reports in human readable form, e.g. 15G.
- -t
- only include type file systems, -t ext4.
- -T
- include the file system type in the report.
- -x
- exclude listed file system types.
If you are using PCLinuxOS you will find that you have an alias to the command:
alias df='df -h -x supermount
This makes the report human readable, and doesn't probe supermount file systems. Supermount is a fake file system used to handle removable media, such as CDs and floppy disks.
It is important to monitor drive usage as a full drive can cause strange problems, particularly if an application or script has not been crafted in such a manner as to trap this.
dirname {name}
The opposite of basename, this strips away the file name in it's entirety, by searching for the last /. dirname /home/jane/scripts/myscript1.sh would return /home/jane/scripts.
If there are no leading directories, as in myscript1.sh, then . (a period specifying current directory) is returned.
du
Reports the disk usage or the space used by a directory, the default is the current directory.
This is one of the 'core utilities.' You should find it on any Linux system, as it is considered essential, although most people will use few of its twenty or so command line options. If you are using PCLinuxOS, then you will have an alias to du that adds the -h option automatically, to make the output 'human readable'. Other options that are often used include:
- -c
- Print a grand total at the end of the output.
- -s
- Summarize only. Outputs just a total.
- -x
- Limit the count to files on one file system only.
- --max-depth=n
Restrict the report to directories n levels deep. note that this is a 'long-option' and is preceded by two hyphens not one.
file {file name}
When you want to know what type of data is in a particular file, use this command.

fmt
If you have a plain text file that you need to fit in a restricted screen or paper space, then this command does a nice job of it. It endeavors to retain as much of the original files formatting as possible. Spacing and indentation are kept intact wherever possible, and line breaks are done at the ends of sentences. The most useful option here is -w to set the width. fmt -w 36 a-text-file will output the file in a single 36 character wide formatted column.
free
When your system seems particularly slow or sluggish, you should you should use this command to check your memory usage. The options -b -k -m & -g display the output in bytes, kilobytes megabytes or gigabytes respectively. The default is kilobytes.

Normally, you have two types of memory: physical, and virtual or swap space. When an application is started, the kernel allocates it some memory to work in. Additionally, the application may request more memory as demand from the user increases. Data can be stored in a cache, in readiness to be operated on by the application, and temporary data and results are stored in buffers. For example, when a CD burning application is writing data, then that data is read from the hard drive much more quickly than it can be burned to the CD, and so the data is stored in a buffer where it can be accessed as required.
When the kernel has exhausted its supply of physical memory, it begins to 'swap out' some of the allocated memory contents to virtual memory to relieve the situation. Swap is much slower than physical memory, and so the result is that the machine slows down.
If you experience high swap memory usage, then something needs to be done.
You can shut down some applications, which will help, or you may have a rogue process hogging resources, remember orphans and zombies from when we discussed processes? If you need to track down which processes are using the most memory, use a tool like the command top. It may even be that you need to fit more memory to the machine if you regularly get this situation.
In the screen dump above, the top line is the physical memory, the bottom line swap and the middle line is the amount of memory used or free, without that which is promised to buffers and cache storage.
fuser {file or file-system}
Have you ever tried to umount a usb or other type of external drive, only to be told that it is busy with some process or other? Although you thought that you closed down all of the files on the device, the system thinks otherwise, and it refuses to let you safely remove it.
This command is what you need at times like this. It lists the process ID (PID) of all active files on the specified path. Now, path here can be a path name, a mounted directory, a block device such as /dev/sdb1 or even a remote system such as an ftp server.
For our usb drive example, we need to specify the -m option to tell the command that what follows is a mount point or block device. The PID is not very informative, so we specify the -v option to get verbose output that tells us what the file(s) actually is (are). As we want to remove the device, we need to kill the process(es), so we add the -k option. This however, is potentially dangerous, as we have forgotten what the file is. How can we be certain that we have finished with it and saved any changes? To be safe, rather than sorry, we can add the -i option that interactively asks for confirmation before killing each process.
fuser -mvki /media/usb/
This will list any files open on the device and prompt you to delete them or not. Once we have closed all the open files, we can resume the umount command.
gzip & gunzip
There are many file compression tools around, and gzip is one of the best of them. This one is so tightly integrated into so many Unix/Linux practices and processes that knowing how to use it is a must if you are going to spend any time on the command line. Using it is easy anyways, so why not? Compressed files save on storage space, not such an issue these days, and transfer much more quickly over slow transmission lines and networks.
The easiest way to use this is simply gzip file name. Unusually, this changes the original file and does not create a new one. The file is compressed and .gz appended to its name. Among the options you can pass to it are:
- -d
- decompress -- this is exactly the same as gunzip.
- -s suffix
- to change the default gz to something that you prefer.
- -n
- where n is not the letter n but a number from 1 to 9 that will determine the amount of compression to be applied. 9 is the maximum compression. You may also use -fast or –best in place of -1 and -9. The default here is 6, which is fine for most uses.
- -r
- if you pass a directory to the command, then this will recursively work on the files it contains.
Multiple files may be passed on the command line as arguments.
head
head is useful for displaying just the first few lines of a file. By default, 10 lines are shown, but this can be changed by passing the number of lines required as an option, e.g. head -15 logfile. See also tail.
kill
When you find that a process is misbehaving and you want to end it, then use this command. Obviously, you must be the owner of the process or have superuser privileges to do this.
To use it, you send it a signal as an option, and provide the PID of the process(es) to be dealt with. If no signal is specified, then the default signal TERM is used. The signal can be specified as a number or as a name. The TERM signal is number 15 and is named SIGTERM. Some processes can trap the signal being sent to them as a sort of survival tactic, and stubbornly refuse to die. In these cases, use signal number 9 , SIGKILL this cannot be caught, but it is rather drastic and a more graceful closure is to be preferred.
Kill -9 1729 will stop process number 1729 in its tracks. To get a list of all signal numbers and their names, use the -l option.
less
To display text files on a terminal screen in Unix, a command named more was created (pressing the space bar showed more text). It was quite limited and fairly clumsy to use, with most of its commands being based on the vi editor.
Soon, a much more capable alternative came on the scene and, perversely, was named less. This is one of those commands that has far too many options for me; I like to keep things as simple as possible. If there is something that you want to do with a text file, then less is probably capable of doing it. Usually, I just want to look at the text and scroll back and forth. For this, it is excellent.
Type less textfile and the beginning of the file will be displayed on screen. Press f or the space bar to go forward, b to go backward or use the arrow keys to navigate around. Press q to quit. What could be simpler?
To search within the file, type a forward slash, followed by the word or pattern that you want to find and press return. Use ? In place of the slash to search backwards.
For me, this suffices. If I want to do more, I use an editor.
namei
Trace a path name to its conclusion.
This rather unusual command is actually quite useful. On my system, I have the 'all bells and whistles' version of vi installed — vim. When I type /bin/vi on the command line I am given an editor that happens to be vim. If I use the which command to find out what will be executed by typing vi, I get this:
which vi
/usr/bin/vi
So what's going on here?
namei will follow the path name, through any links, and display a character to describe the type of each file found. These characters are:
- -
- regular file
- b
- block device
- c
- character device
- d
- directory
- f:
- the path name currently being worked on
- l
- link
- s
- socket
- ?
- an error
Typing namei /bin/vi gives the following output:
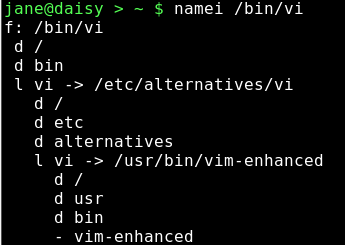
This shows the links that the command /bin/vi has gone through, and that I am really executing /usr/bin/vim-enhanced.
ps
Display information about processes running on the system. This is how you can find out which processes are using system resources, who owns them and their PID's.
Armed with this information, you can deal with any processes that step out of line or that are just taking up space. The output can be quite long, and you will find that this command is often used with grep to filter the information, and then piped to less to give time to read it.
The command comes with enough options to satisfy even the most enthusiastic systems administrator, but us mortals can mostly get the results with just four.
- a
- list all processes
- u
- include the username of the owner of the process
- x
- include processes that are not associated with a terminal
- f
- display a tree like structure to show parent/child process relationships
A leading hyphen is not required with these options and should not be used, as it can change the meaning of some options. The output is a series of fields displayed in columns, and what is output is dependent upon which options are used.
The first line of output contains the column headers, which describe what follows below. The interesting ones for us are:
- USER
- process owners user name
- PID
- process ID number
- %CPU
- amount of processor time used
- %MEM
- percentage of physical memory used by the process
- VSZ
- virtual memory size in KB
- TTY
- the terminal on which it is running, if any.
- STAT
- process status which can be one of the following:
- D
- in a deep, uninterruptable sleep
- S
- sleeping or waiting
- R
- running or in the queue to be run
- T
- stopped
- X
- dead, you should never see this as it should have been removed from the process queue
- Z
- zombie — you should remove these
Additionally, you may also see alongside these codes one or more of the following:
- N
- nice, low priority
- <
- high priority
- l
- multi-threaded
- L
- locked pages in memory
- s
- session leader
- +
- foreground process
- COMMAND
- The name of the process
reset
Occasionally, you may find that your terminal gets corrupted. This is quite rare these days, but it can still happen, and you get nothing but garbage on screen. Just type reset, even if you can't see what you are typing, and things should soon be back to normal.
rm
This is one of the most basic file handling commands, and potentially one of the most destructive. It removes files, or rather it removes the directory entry for the file, although the data is still on the disk until over-written. You do not need write permissions on the file to remove it, only write permissions on the directory that contains it. When used with the -r option, it will remove files recursively from directories, which is obviously dangerous, and for that reason, most systems have an alias that reads alias rm='rm -i'. This makes the command interactively prompt for a y or n before removing the file.
script textfile
After typing this command, everything you do at the terminal is copied to the file 'textfile' (or whatever you called it). This can be helpful if you need to show somebody how to do something at the terminal, and it has the added advantage that once you have it right, you can edit out all your failed attempts.
stat
Prints out information about a file gathered from the inode that holds the files metadata.
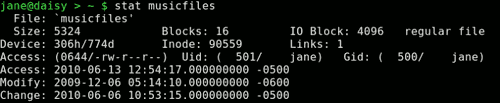
If you ever see the error message "can't stat file ************", it usually means that the file doesn't exist (in the directory that you instructed the command to look for it).
tac
Where cat prints out files first line to last line, tac prints last line to first line, reversing the order. This behavior can be modified by changing the separator using option -s. The default is a newline.
tail
Tail is useful for displaying just the last few lines of a file. By default, 10 lines are shown, but this can be changed by passing the number of lines required as an option e.g. tail -15 logfile. See also head.
tee
Use this when you want the output from a command to go to more than one place. You might want to view the output of the command and to also save it to a file:
cat /etc/fstab | tee ~/myfstab
This would display the file on screen, and also write it to a file in my home directory. Multiple destinations may be specified. The -a option appends the information to a file.
uname
You can display information about the machine and its operating system, and this information can help when troubleshooting.

The options are:
- -a
- all information
- -m
- system hardware
- -n
- network host name
- -r
- kernel release
- -s
- operating system
- -p
- processor type
- -v
- kernel build info.
uniq
This command finds duplicate lines in a sorted file. The lines must be next to one another, so the file must first be sorted. This is usually done on the fly with the sort command. Suppose that you had a file containing a list of objects, and you believed that some of them may be duplicated. Jane has a list of American states in no particular order. To show only those states that are duplicated, you can use the -d option.

To find out how many times each duplicated entry appears, use the -c to add a count. This would be useful to make an inventory if the list was a stock list.

To get the list that Jane wants, a sorted list with no duplicated entries, the output of the command with no options is sent to a new file.

The file size shows that the duplicated entries have been removed.
wc
Use this command to count the number of characters, words or lines in a file, with the corresponding options -c, -w or-l.

Of course, the input doesn't need to be a file. You can pipe the output from another command to count the number of results returned.
whatis
Have you wondered, "what does that command do?" This command may help by printing a one line description from the man pages. If nothing is found, then it politely replies "Nothing appropriate".
whereis
This command will search for, and output, the full path to the executable file, the man pages and the source of any command.
The -b, -m and -s options will limit the search to the binary (executable), manual or source files only.
who
Although originally intended for multi-user systems to find out who was logged on, this command has a few useful options on a stand-alone system.
- who -b
- will tell you the last time the system was booted
- who -d
- gives a list of dead processes
- who -r
- displays the current run level
Adding -H will add a row of column headings to the output.
You may also type who am i, which seems pretty pointless, and there is also a stand alone command called whoami. These return different results depending upon your situation. Consider this:
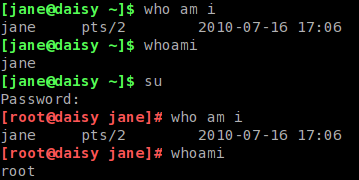
Here, both commands return your usual user name when you are operating as a normal user. However, when you switch users with the su command, the who am i command tells you who you really are logged in as, and the whoami command tells you who you are being seen as when issuing commands.
This is particularly useful in scripts to check the user integrity before issuing a potentially disastrous command.
xargs
This is one that you really should have a good idea about. It allows you to pass as many arguments as you like to a command. This can be difficult on a command line, but this command is a boon in scripts, and that is where it is often found.
With the xargs command, you can re-direct the output from a command as a series of arguments to another command.
find . -iname "c*.sh" | xargs lpr
This will print out the contents of all the files in the current directory that begin with c and end with .sh (shell scripts?) to your printer — even if there are thousands of them that couldn't possibly be listed on the command line.
In a shell script, you will rarely know how many results you will receive from a command, but this command will pass them all to your destination command sequence, and you may filter the stream to pass over only the results that you are interested in.
And the rest?
Well yes, there are many, many more commands at your disposal when you are using the command line interface to a Linux or Unix system. The few that I have described above are the ones that I find most useful, and all of them have a great deal more functionality than I have described here.
Linux has almost all of the commands readily available to do whatever you wish, and you can create your own, personally tailored commands to perform the functions that you cannot readily find available.
You can then offer them to others who may find them useful. This is the way that Linux/Unix developed, and sharing and developing is the basis of the open source community, which has provided us with a superb, free operating system.