LXDE: The Control Center
by Paul Arnote (parnote)
Probably one of the first places you will want to go, once you have installed PCLinuxOS-LXDE, is the LXDE Control Center. Among LXDE users, it's more commonly referred to simply as lxdecc. It is here that you will make or change some of the basic settings for LXDE, allowing you to tailor your LXDE desktop to work the way you want it to, and to better suit your tastes. After all, Linux is all about choice.
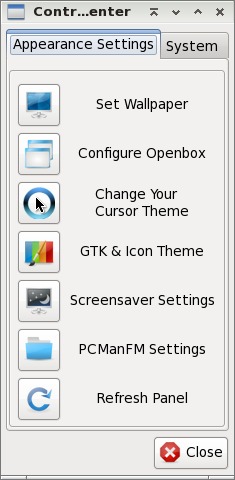
When you first open the LXDE Control Center, you will see the above window appear on your desktop, divided into the various categories of settings. Let's explore those categories, and what can be accomplished there.
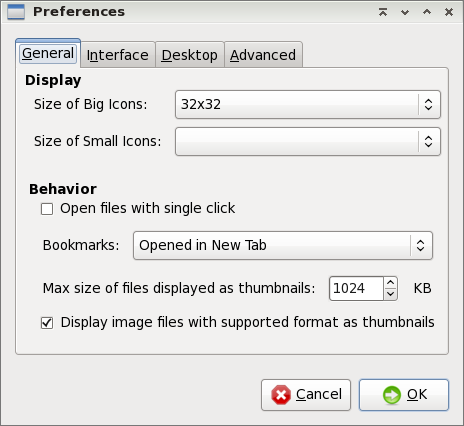
Under the first category, Set Wallpaper, you will be directed to this configuration dialog box, which is the actually the PCManFM Settings dialog box. Under LXDE, the wallpaper and the desktop are under the control of PCManFM by default. So our discussion of these settings will also apply to the PCManFM Settings section of the LXDE Control Center.
The first section of the first tab, General, allows you to set options for "Display." These include the size of "big icons" and "small icons" on your system. Under "Behavior," you can choose to open files with a single click. By default, this setting is checked. Click on the check box (clearing the check mark) if you are more accustomed to opening files with a double click of the mouse or pointing device. You can also select if you want bookmarks opened in a new tab, in the current tab, or in a new window.
The next setting allows you to set the maximum file size of files to display as thumbnail images. The default setting is 1 MB (1024 KB), meaning files larger than 1 MB will not display as a thumbnail image. Finally, you can turn on or off the display of supported image file formats as thumbnails. Simply click on the check box to check or uncheck the setting.
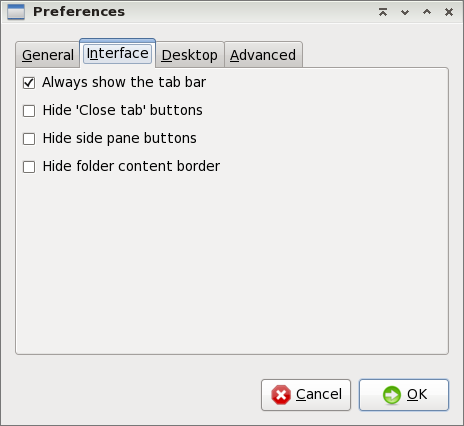
Under the second tab, Interface, you can change some settings that dictate a few aspects of the LXDE interface. By default in PCLinuxOS-LXDE, all of these settings are unchecked. "Always show the tab bar" allows for the tab bar in PCManFM to always be displayed, even when you have only one tab open. Personally, I set this to be "on," since, for me, it serves as a reminder that I can have multiple tabs opened. The other options should be fairly self-explanatory, and will do no permanent harm if you wish to play with them. You can, after all, reverse the setting simply by opening up this tab and clicking on the setting again and revert it back to the way it was. So, feel free to play with the settings here.
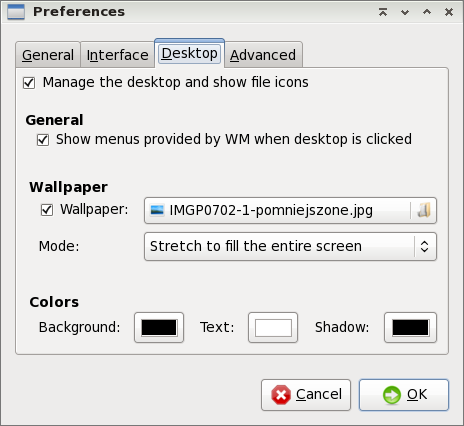
Under the third tab, Desktop, you can control various aspect of your LXDE desktop. At the top is the "Manage the desktop and show file icons" setting. This is selected by default, to allow PCManFM to control the desktop. This means that PCManFM will control the display of your wallpaper. Under this scheme, there is a "My Documents" folder placed on your desktop. When selected, it automatically opens up PCManFM, with your /home directory displayed. If you dislike having icons on your desktop, you may not be a fan of this. Due to a "glitch" in the PCManFM code, this icon cannot be removed without taking away PCManFM's ability to manage the desktop.
In the "General" section, you can have the menu provided by the window manager displayed when you right click on the desktop. With PCLinuxOS-LXDE, as well as most LXDE desktops, OpenBox is the window manager employed. This option is selected by default, allowing you easy access to the OpenBox settings simply by right-clicking on the desktop.
In the "Wallpaper" section, you can select the graphic file to use as the wallpaper for your desktop. You can also choose the "mode" by which to display your graphic file. First, you can select to stretch the graphic file to fill the entire screen, which is probably the most common setting. Your other choices are stretch to fit the screen, center on the screen, or tile the image to fill the screen.
Finally, under the "Colors" section, you can select the colors to use for the background, text, and shadow colors.
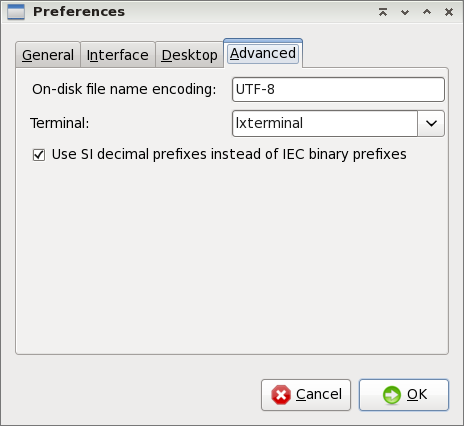
Under the fourth tab, Advanced, you can set the character set to use for file names. UTF-8 is the default setting. You can also select which terminal program you want to be used by default.
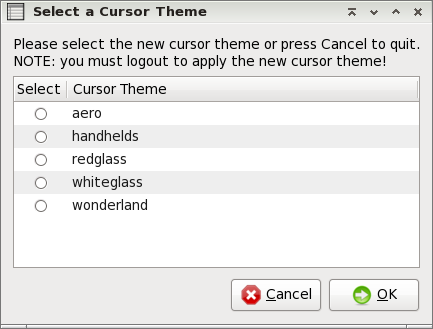
For the next section of Control Center, Change Your Cursor Theme, you can select which cursor theme you want to use as your default setting. After you click OK, LXDE logout will open. It is necessary to log out and back in for the new cursor theme to be applied.
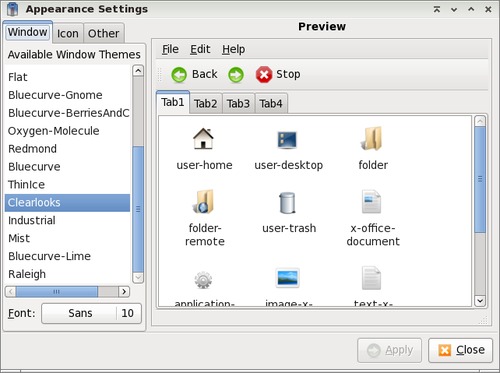
For LXDE Control Center's next section, GTK & Icon Theme, you can use the first tab, "Window," to select the theme to use to display your windows. Similarly, the second tab, "Icons," allows you to select the icon theme to use with PCLXDE.
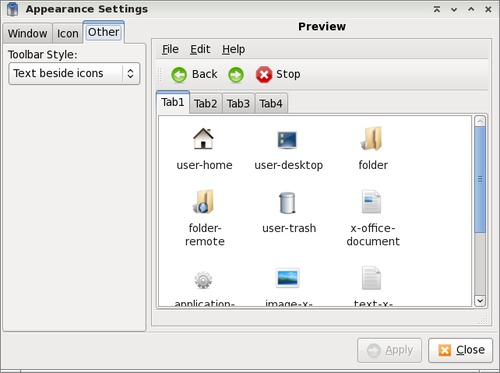
Under the third tab, "Other," you can select which toolbar style you want to use. The default setting is to display "text besides icons." Your other choices are icons only, text only and text below icons.
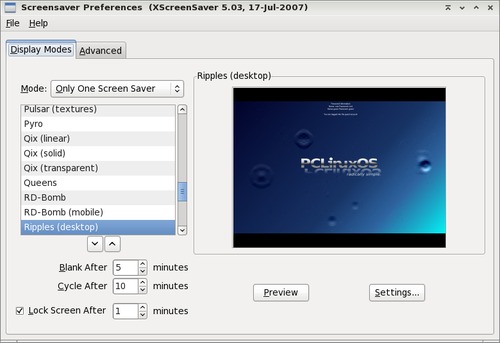
Under the Screensaver Settings section of the LXDE Control Center, you can make all of the settings for your screen saver. XScreenSaver is the default program for controlling your screen saver's behavior under LXDE.
The next selection under the LXDE Control Center is the PCManFM Settings, which we already covered when we talked about Set Wallpaper. The last selection under the Appearance Settings tab of the LXDE Control Center is to Refresh Panel. You may need to do this manually after changing some of the appearance settings.
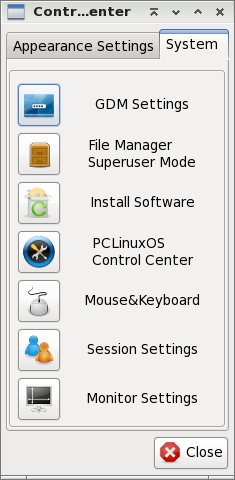
The System tab of the LXDE Control Center contains some settings that require root access. In fact, the first four categories require you to acquire root access.
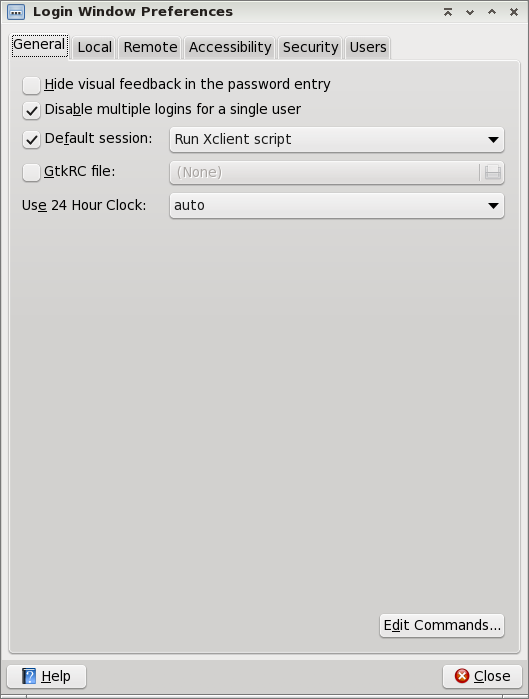
Under the first tab of GDM Settings, "General," you can choose to hide visual feedback for entry of the GDM login password. You can also disable multiple logins for the same user (the default setting), select the default session for the GDM (default is "Run XClient Script), specify a default GtkRC file to use (default is none) or to specify whether or not to use a 24 hour clock (default is set to "auto").
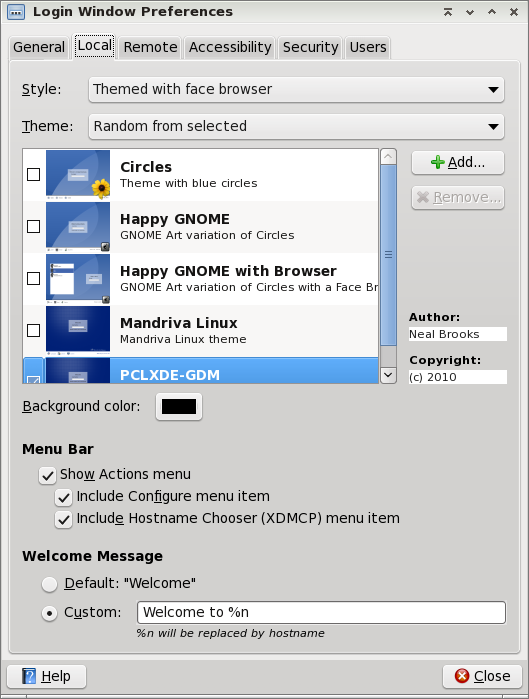
The second tab, "Local", allows you to set several options for the display of the GDM (Gnome Display Manager). First, you can set the "style." The default is "themed with face browser." Your other choices are plain, plain with face browser and themed. Under the "theme" option, you can select whether to display random, selected GDM themes, or only one selected GDM theme. The default is "random from selected." Since only one is selected, PCLXDE-GDM, only that one will be displayed with either option.
The background color tells GDM what color to use for the background of the GDM theme. Under "Menu Bar," you can choose whether or not to display the actions menu, or if you choose to include a "configure menu item" or the "hostname chooser menu item." In the last section of the "Local" tab, you can choose the welcome message to display.
Under the "Remote" tab (not shown), you can choose whether to disable remote login (the default), or to inherit the setting from the local user, or to use a plain interface with face browser.
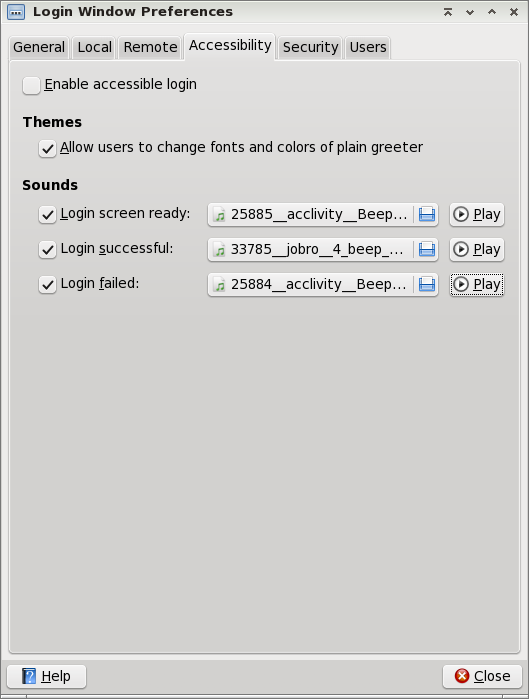
The fourth tab, "Accessibility," allows you to set accessibility options for your GDM theme. First, you can choose whether or not to enable accessible login. The default is for this setting to be turned off. Under the "themes" section, you can choose whether or not to allow users to change the font and colors used in the plain greeter. By default, this setting is checked and activated. Under "sounds," you can specify sound files to be played when the login screen is ready, when the login is successful, or when the login is unsuccessful. By default, only the first option is activated. In the above screen shot, I've customized the sound file to be played, and activated all three options.
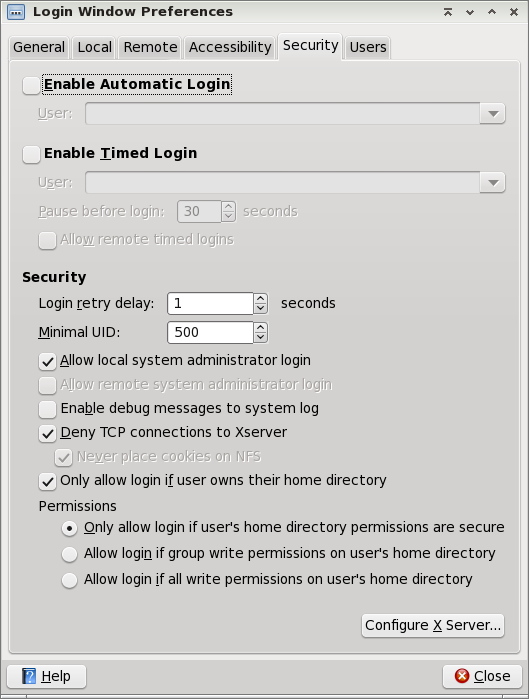
At the top of the "Security" tab, you can determine if you want automatic login for a specified user. While this may be alright for a computer that only has one user, you will be sacrificing some security of your files. Alternatively, the second choice allows for automatic login for the specified user after a set time delay (default is 30 seconds). This gives any other user a chance to login, but if no other user is chosen after 30 seconds, then the specified user is automatically logged in. Again, you will be sacrificing the security of the specified user's files. The rest of the options under the "Security" tab should be fairly evident.
Under the "User" tab (not shown), you can set options for which users to display in the GDM login screen, the picture to use for that user, and the directory where the user "face" graphics are contained.
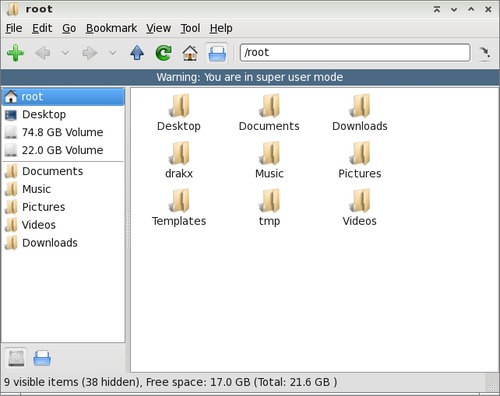
The next three buttons under the "System" tab of the LXDE Control Center offer short cuts to "File Manager Superuser Mode," Synaptic for installing software and system settings under PCLinuxOS Control Center, or PCC. When you select the "File Manager Superuser Mode" button, you will first be prompted for the root password, and if properly supplied, PCManFM will open (as above). Notice that when you open PCManFM with root privileges, there will be a blue banner at the top of the PCManFM window, just below the toolbar, serving as a reminder of the elevated privilege. Synaptic and PCC behave normally when selected.
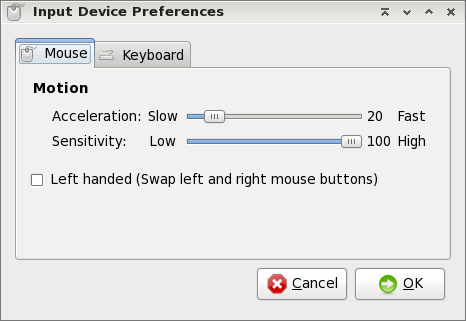
When you select the "Mouse & Keyboard" button in LXDE Control Center, you will first have access to the "Mouse" tab. Here, you can control the acceleration of your mouse, as well as the sensitivity. If you are a left handed user, you can swap the mouse buttons by checking the box.

Switching to the "Keyboard" tab gives you options to set the repeat delay, as well as the repeat interval for your keyboard. A test area is included in the middle of the window, where you can test your settings before committing to using them. Near the bottom of the window, you can select whether or not there is a "beep" produced when there is a keyboard input error. The default is to have the beep turned on.
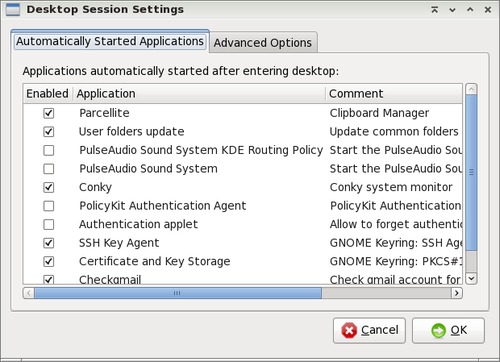
For the next LXDE Control Center button, "Session Settings," you can select which applications are automatically started when LXDE is started. We will cover this aspect of LXDE's behavior more in-depth in a separate article, but you can choose which available applications you want to be started automatically at LXDE's boot by checking or clearing the check box next to each item.
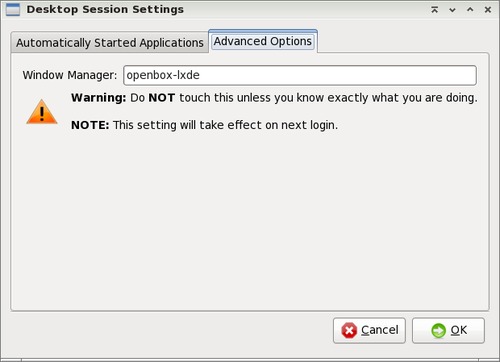
Under the "Advanced Options" tab, you are best advised to heed the warning about NOT touching or altering this setting, unless you know exactly what you are doing. Any changes you do make here will take effect on the next login to LXDE.

The last selection in the LXDE Control Center's "System" tab is "Monitor Settings." Here, you can change the resolution of your monitor, as well as the refresh rate.
Conclusion
Despite its relative youth, the LXDE Control Center provides quite a few configuration options. Some more advanced configurations options will be covered in more depth in separate articles. But, via the LXDE Control Center, you can make significant inroads to tailoring LXDE to your liking.