E17: Beginner Desktop Tweaks
by Paul Arnote (parnote)
As we've mentioned before, one of the things that is most appealing about e17 is the ability to tweak and tune the desktop to your heart's content. With just the addition of a few modules and a few gadgets, you can have the desktop of your dreams.**
What may not be apparent is that you can tweak and tune your e17 down to how each individual desktop appears. You can even pick a different wallpaper for each of your virtual desktops, a KDE 3.5.10 feature that has been lost (or become more difficult) under KDE 4. Plus, each and every shelf and gadget you add to your screen can also be displayed on every desktop, or only one desktop that you select. Try doing that with KDE 4's widgets.
Applying Different Themes
Probably one of the things you will want to eventually do is apply a different theme. Under e17, it's very easy to apply new themes to your desktop.
First, you will want to install the themes by Agust from Synaptic. Simply search for "agust" in Synaptic, and you will find two packages in the PCLinuxOS repository containing the e17 themes for PCLinuxOS.
Next, from the e17 main menu, select Settings > Theme. You will see the dialog below.

Select the theme you want to use, then select Apply, then Close. The settings under the "Advanced" button will be covered in more detail later, in a separate article on how to make your own e17 themes.
Different Desktop Wallpapers
It's actually quite easy to define a different wallpaper for each one of your virtual desktops.
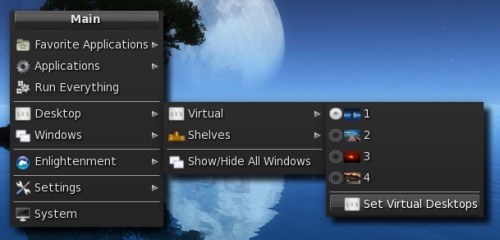
First, from the main e17 menu, select Desktops > Virtual > Set Virtual Desktops.
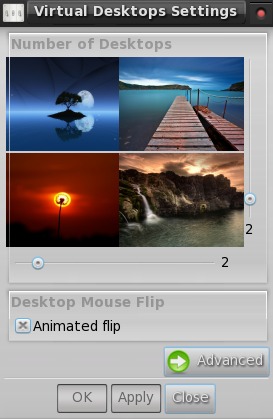
Next, you will get the Virtual Desktops Settings dialog window. First, the sliders below and to the right of the desktops display will allow you to configure how many virtual desktops you want, along with the configuration you want to display them in.
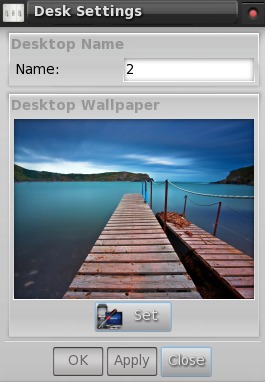
Initially, you will see the same wallpaper displayed on all of your desktops. If you click on each of the images displayed, you will be presented with the dialog box shown above. In the "Name" field, you can give that virtual desktop a name. By selecting the "Set" button below the image, you can select the wallpaper to display on that particular virtual desktop. Repeat this procedure for each of your virtual desktops that you want to have a custom wallpaper displayed on. On my computer, I elected to retain the wallpaper of the e17 theme that I installed, and to change the wallpaper on the other three desktop backgrounds.
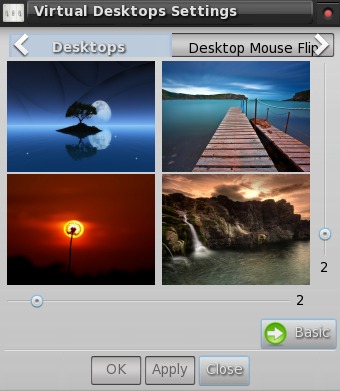
By selecting the "Advanced" button in the first dialog, you will be presented with the dialog box above. Notice that there is now a button, labeled "Basic," in the place previously occupied by the "Advanced" button, to easily allow you to switch back and forth between the basic and advanced settings.
Also notice the presence of tabs across the upper portion of the dialog box. Besides the first tab, "Desktops," the other tabs are labeled "Desktop Mouse Flip," and "Flip Animation." The "Desktop Mouse Flip" allows you to set if you want any animation when you drag a window to the desktop edge and if you can drag that window to another virtual desktop. The "Flip Animation" allows you to set what type of animation you want to use when you activate the animation by dragging a window to the virtual desktop screen edge.
Stick a launcher up on a shelf!
We'll talk more in depth about setting up shelves in a separate article, but this is also a desktop tweak that you may want to employ now. Specifically, I set up a new shelf to act primarily as a separate application launcher, and to monitor CPU speed.

At the top of the shelf, I placed the CPU Speed gadget. Immediately below that, I placed a second instance of the IBar gadget. There is already one IBar gadget in my bottom shelf. But I wanted another instance of it to hold other applications I commonly use. In my case, those applications are, from top to bottom Gimp, DeaDBeeF, File Roller, Gcalctool Calculator and Leafpad.
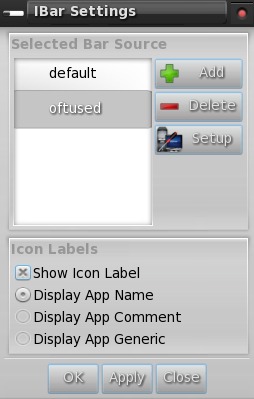
When you first add a second instance of IBar, the settings for the other IBar will automatically be displayed. But you can easily set up the second IBar to display a completely different set of applications to launch. Right click on the second IBar, select "Gadget IBar," then "Settings." You will then see the window above displayed. Select the "Add" button, and provide the name of the new source file you want to use for the second IBar. In my case, I called it "oftused."
Towards the bottom half of the window, you can determine what information is displayed. Select "Apply," then "Close." You may have to do a bit of cleanup of the second IBar, deleting items you don't want and inserting items you do want.
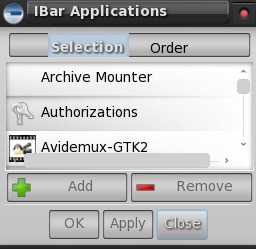
To delete unwanted items from the second IBar, right click the individual icons you want to remove from the IBar, then select the "Icon <Program Name>" entry, then "Remove." To add items to the second IBar, simply right click the IBar, and select "Gadget IBar," then "Contents." By default, the "Selection" tab is highlighted. Listed below that are all the applications installed on your system that have corresponding .desktop files. Choose the one that you want, select the "Add" button, then select "Apply." Repeat the procedure for each application you want to add to your second IBar.
After you are finished selecting the applications you want to display in your second IBar, switch to the "Order" tab, and set the order you want your applications to appear in. Select the "Apply" button, then the "Close" button. Your second (new) IBar should now be filled up with the applications you selected.
Trust me. It's a lot easier than it sounds.
Placing Icons On The Desktop
I'm not a huge fan of having a lot of icons on my desktop. It's too reminiscent of the desktop icon mess I used to have in Windows, where EVERY application wanted to install itself to your Windows desktop. But then, I also know that there are probably just as many PCLinuxOS users who like having icons on their desktop as there are those who do not.
Of course, one way is to follow the steps above to create a launcher using IBar, as outlined above. But if you really want icons directly on your desktop, there is a way to do that as well.
Open your file manager (Dolphin in the full version, PCManFM in the light version), and travel over to /usr/share/applications. There, you will find all the .desktop files for the applications installed on your computer. Go down the list until you find the application listed that you want to add. Right click on the file, and select copy. Go back to your /home directory, and paste the .desktop file you just copied into your /Desktop folder.
Voila! Now the icon to the application you selected should immediately appear on your e17 desktop.
More to come
Like I mentioned before, there are more tweaks for e17 coming. We have articles in the pipeline covering how to make your own custom e17 themes, how to customize your bottom shelf, how to set up and use a custom shelf, and a rundown of the available modules and gadgets. All of these articles will help you further tweak and tune your Linux desktop in many ways that you never could before. That is one of the beautiful things about e17, and one you should exploit.