Game Zone: DOD:S & Steam Tips For Dual Booters
by glamdring
When I first started using Wine, I tried to get Valve games running, because Valve made some of my favorite games. Valve started out with the game Half-Life, which spawned many mods. One of my favorite mods was Day of Defeat, and after the release of Source came Day of Defeat: Source.
About Valve
Valve is an entertainment software and technology company founded in 1996. In addition to creating several of the world’s most award-winning games, Valve is also a developer of leading-edge technologies, including the Source® game engine and Steam®, the premiere online gaming platform.
About DOD:S
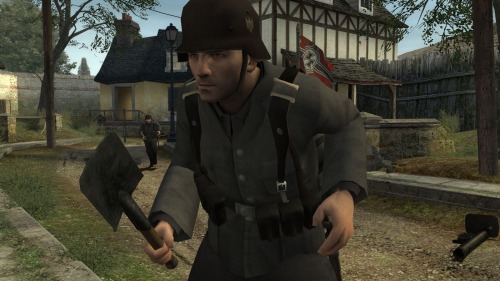
Day of Defeat: Source features multiplayer, team-based gameplay set in the WWII European theatre of operations. Players choose a role and tackle goal-oriented missions based on historical operations.
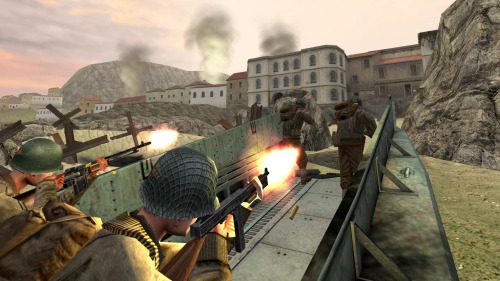
Day of Defeat: Source takes the classic game play of the original Day of Defeat, and improves the experience with Source, the advanced engine technology Valve created for Half-Life 2. With this technology, DoD: Source offers state of the art graphics (including support for HDR lighting) in optimized versions of popular maps, plus redesigned sound and all new player, weapon, and world models.
Getting The Game
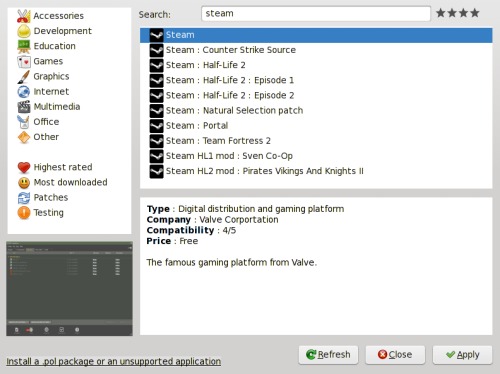
For setting up the game, I use Play On Linux. PCLinuxOS users can find this in Synaptic. Launch Play On Linux, click "Install" and search for "Steam." Select the option that only includes Steam and no other game. When the install is done, launch Steam and install Day of Defeat Source. You should be able play this game using the default settings. If you do not own the game you can buy it digitally in the Steam store. It costs only $10 U.S.
The Game

When you first launch the game, you will be given a list of options. I recommend you first go to your controls and make sure you are comfortable with the settings. I suggest you then go to the customize section and change your name from player to what ever you want. Most games use this to allow a user to enter their screen name and gamer tags. You should also spend some time exploring the options. You will find some useful things like mouse sensitivity, volume, and mic controls in the options.
When searching for a server, you can either use the simple search or the advanced version. I suggest you get used to the advanced version, because it allows you to see more servers and the ability to sort them easily. Some important things to look for in a server are the ping, VAC, and number of players. The ping measures the amount of time it takes for a packet to go from your computer to the host and back. The lower the value, the better. VAC stands for Valve Anti-Cheat, which attempts to detect modifications made to a game to help someone play a game better. VAC bans will completely remove your ability to play on VAC secure servers, rendering the game almost useless. One thing to keep in mind when looking at servers is not only how many players are playing, but also the maximum number of players. If you have a bad Internet connection, playing on a server with fewer players can help.
After connecting to a server, you will be prompted with a choice between two teams, Axis and Allies. Most of the time, it is best to hit auto team select. This will automatically put you on the team with fewer players or currently losing. When you select a team you will get the option to choose your class. This determines what guns you get, plus some additional items. It is a good idea to read what each class gets, but it’s probably best to give them all a try.
The guns have very high kick, and you may find this very frustrating at first. As you get used to the game, you will find the accuracy to be much closer to real life than most WWII games. Also, this high kick helps keep someone from learning exactly where to aim to get that perfect shot every time. This game has a steep learning curve for new users, but once you get the hang of the basics, you will find yourself killing some experts.
System Requirements
(From valve rated for Windows)
- Minimum: 1.7 GHz Processor, 512MB RAM, DirectX® 8.1 level Graphics Card (Requires support for SSE), Mouse, Keyboard, Internet Connection
- Recommended: Pentium 4 processor (3.0GHz, or better), 1GB RAM, DirectX® 9 level Graphics Card, Mouse, Keyboard, Internet Connection
- My system i5 M520 2.4Ghz Processor, 4Gb 1066 DDR3 RAM, 1GB NVS 3100 Graphics Card, 2.5 MB/s Internet Connection, PCLinuxOS: KDE
Tips for dual-booters (Windows)
WARNING: When a file/folder is linked changing it will change your source file/folder (This can change settings to games etc on your Windows side)
The first tip will save you a lot of space and time. Instead of re-downloading all your games and filling up your hard drive, you can link your steam folders. In this instance I will be linking the steamapps folder, rather then the whole steam folder. First, make sure you know the location of your Linux and Windows steam files. If you installed with Play On Linux, go to your home folder "/home/youruser." If you do not have hidden files set to be viewable, you will need to do so. You can do this by clicking on "View" and make sure "Show Hidden Files" is checked. By default, steam should be installed in your ".PlayOnLinux/wineprefix/Steam/drive_c/Program Files/Steam" folder.
To find your Windows Steam file, go to root and look for "media." Inside will be a list of mounted media. In some cases you will need to mount your Windows media, but with PCLinuxOS, it is typically already mounted. The name of your Windows media will most likely be something like "disk." If you want your media to auto-mount and it does not already, go to Configure your Desktop in KDE 4, go to the Hardware section, and click on "Removable Devices." Here, you can edit what devices will auto mount. Now browse to your steamapps folder on Windows. It should look like "Program File (x86)/Steam/steamapps" (the (x86) is for those running 64-bit Windows).
To link your steamapps folders, we will use a symbolic link. First, you will need to rename the steamapps folder in steam to something like o_steamapps. I like to keep the old version in case something goes wrong. Now that you know both locations of steam, open the terminal and cd to the steam folder on Linux. The command should look like this:
cd /home/youruser/.PlayOnLinux/wineprefix/Steam/drive_c/"Program Files"/Steam
Now we will create a symbolic link using the ln -s command. To use the ln -s command, you have to cd to the location of the folder you want to link (like we just did earlier) and begin by typing ln (for link) and -s (for a symbolic link), followed by the location of the folder you want to link to (in this case, the Windows destination of Steam), followed by the name of the folder you want to link (in this case, steamapps).
If you used ln -s correctly, your command should look like this:
ln -s /media/disk/"Program Files (x86)"/Steam/steamapps steamapps
Now if you check your steamapps folder in Play On Linux, you should see a folder with an arrow on it.

WARNING: Linking your Windows folder can cause damage to Windows and may even make it unusable if your not careful. It is HIGHLY advised you make a copy of your Windows folder and link the copy instead of linking the original!
Using your Windows folder in place of the current Windows folder in PlayOnLinux can sometimes improve overall game quality. You can use a symbolic link, like we did with the steamapps directory, but this can damage your Windows folder, so I will step you through copying it instead. Browse to your Windows mount like earlier by going to /media/disk and find your Windows folder. Right click on it and select copy (make sure you don’t click cut!). You can now paste this folder wherever you want. I prefer to put it in my home directory for convenience. Now, any time you want to use those files, you can use a symbolic link to use those files instead. Your symbolic link should look like this:
ln -s /home/Windows Windows