Video: Part 2 – Editing Your Recorded Video
by Paul Arnote (parnote)
Once you have finished recording your new video from your TV tuner card, you will most likely want to edit it. I'm not too sure about you, but I can barely stand to sit through all of the commercials one time, much less multiple times. Do you remember how, in Part 1, I talked about some Linux applications that have well-hidden, and often well disguised, features? Well, I found one, that once you figure out how to unleash its capabilities, works as well as (if not better than) anything offered in Windows.
In fact, one of the Windows programs that I still relied on was a video editor called Video Redo. Up until very recently, I didn't find anything in Linux that performed in a similar manner. Video Redo focused mostly on being able to edit MPEG1 and MPEG2 video files, without re-encoding the output video. This is a huge consideration, since re-encoding the video can result in a loss of quality. Each time a video is re-encoded, more and more details are lost, since the compression algorithm is applied with each re-encoding. It's just like if you keep saving the same JPG image over and over again, recompressing it with each pass. After only a few passes, the quality of the JPG image starts to noticeably deteriorate, due to recompression artifacts becoming more and more visible.
A large number of users have been asking the makers of Video Redo for a Linux version of the program for over five years. Despite one of the developers moving to Linux during that time, and another moving to the use of OS-X as his primary OS, Video Redo remains firmly entrenched as a Windows-only application. Unfortunately, there are mixed reports of being able to run it under Wine.
This is where Avidemux comes to the rescue. If you set it up properly, Avidemux will perform the exact same task as Video Redo. In fact, I've found it easier to use than Video Redo for clipping out the commercial advertisements from recorded TV programs. As an added benefit, Avidemux will open and edit almost any video file that you are able to view on your desktop, and not just MPEG1 and MPEG2 files, as Video Redo restricts itself to. Sure, there are other video editors for Linux, like Cinelerra, but the complexity of Cinelerra makes it overkill for what we want to do. The number of Linux users who have taken a look at Cinelerra and ran the other direction screaming with horror, are legendary. I'm firm in my belief of the K.I.S.S. principle (Keep It Super Simple), and Avidemux fits within those beliefs quite nicely.
Some background
Under Windows, video editing applications came in two basic flavors: time-based editors and frame-based editors. For editing the commercial advertisements from time shifted recordings, time-based editors just don't work well. What you really need is a frame-based editor. These are a lot harder to find and tend to cost more than the time-based editors (remember, you have to buy software for Windows). To understand why frame-based editors outperform time-based editors, you have to have a basic understanding of how video is stored in a video file. There are some subtle differences between the various formats, but the general principle applies to all. The explanation that follows is only a general overview. Realize that this information is much more detailed than what I provide below. If you want to learn more about the structure of various video files, visitVideoHelp.com orDoom9.net.
The video image is created as a GOP, or Group Of Pictures. Within that GOP, there is the GOP Header, followed by the I-frames, B-frames, and P-frames. I-frames are basically "index" frames. That means that the I-frame is encoded as a single image, with no reference to any other frame, past or future. B-frames, on the other hand, are bidirectionally predicted from the preceding and subsequent frames. Basically, only the bits that change are recorded, resulting in B-frames saving the least amount of data, helping to reduce file size. Meanwhile, a P-frame is a video frame that is encoded relative to the past reference frame, which can be either another P-frame or an I-frame, depending on which frame is the closest preceding reference frame.

With time-based editors, video is typically cut at the closest reference frame to the time that you choose, either the I-frame or P-frame. You might not think that this would make a huge difference, since there are typically a set number of frames per second within a video file, depending on the broadcast standard used in your area of the world. However, programming content that is recorded from over the air (or cable) broadcasts has the commercial advertisements inserted without regard to the video reference frames. Thus, more often than not, you either get the last small bit of an advertisement or you chop off the first part of the video you are attempting to save. You can liken it to trying to stop an hour glass's flow on a particular grain of sand. Trust me. It doesn't result in "clean" edits.

Now, with frame-based editors, you can make your edits on any frame of the video. Thus, if the broadcast image fades to a commercial that does not occur at a reference frame, you can still make precise cuts, eliminating the "flash" of the last fraction of a second of an advertisement that precedes your cut point. With frame-based editors, you can make much cleaner edits. Video Redo and Avidemux fall into this latter category of video editors.
Chop, Chop! Editing With Avidemux
Avidemux is an open source, cross-platform, multi-format video editing application, with versions available for Linux, Windows, Mac OS-X and BSD. Almost without exception, if you can play a video file on your computer, Avidemux can edit it. It is available in the PCLinuxOS repository as a command line tool, with a Gtk+ interface, and with a Qt4 interface. Since I'm using Phoenix Mini (Xfce), my screen shots will feature the Gtk+ version. The Qt4 version is identical in functionality to the Gtk+ version.
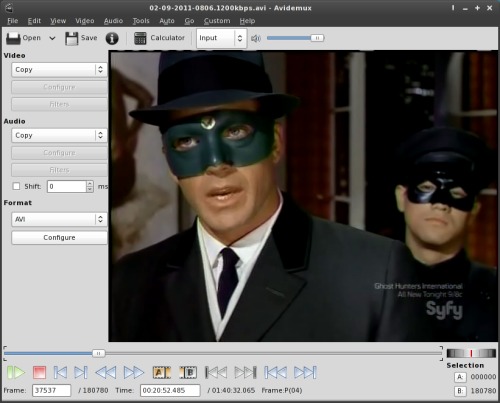
Keep in mind that this is not going to be a full-blown Avidemux tutorial. Rather, for now I'm only going to focus on the use of Avidemux to edit the video that you might have recorded from your TV tuner card.
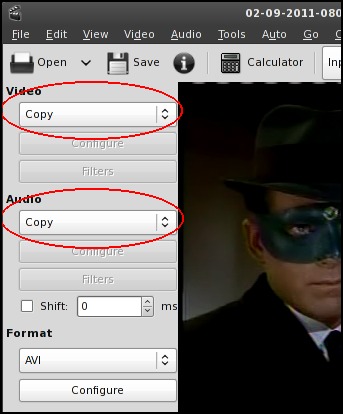
The key to preserving the video quality is displayed in the screen shot above. Set both Video and Audio to "Copy" (circled with the red ovals). This prevents both the audio and video from being re-encoded when you save the file, and simply copies the audio and video data to the new video file, without recompressing the output. Re-encoding will cause the video to be recompressed, which is something we do not want to happen, since it will most likely result in a loss of quality from compression artifacts. You can always choose to recompress the video later, after you've made your edits. In this way, it's similar to doing all of your edits on your graphics files in the PNG format (which uses lossless compression), and then saving your final version as JPG (which uses lossy compression) to achieve the smaller file size that JPG graphics provide. The goal is to minimize the introduction of those compression artifacts, which become increasingly visible with each pass through a lossy compression algorithm. For what it's worth, virtually all video compression algorithms use lossy compression. Otherwise, the file sizes would be many, many times larger than they currently are.
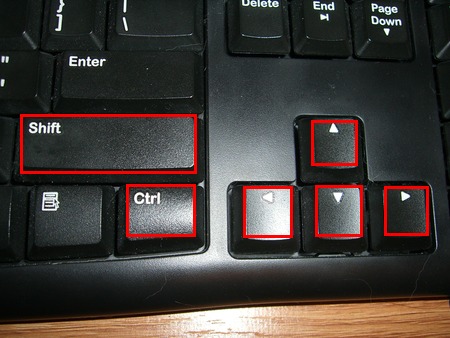
The six keys highlighted with red are all you need to successfully navigate through a video file with Avidemux. Of those, there are only four that I use the majority of the time: Shift, Control, Left Arrow and Right Arrow. I find that I have much more precise control of my positioning within a video file by using the keyboard over the mouse. Pressing the left or right arrow keys steps backwards or forwards (respectively) through a video one frame at a time. Shift + Left arrow moves backwards in the video file 25 frames, while Shift + Right arrow moves forwards in the video file 25 frames. Ctrl + Left arrow moves backwards in the video file 50 frames, and Ctrl + Right arrow moves forward in the video file 50 frames. Pressing the Up arrow key moves to the next key frame in the video file (Shift and Ctrl have no apparent affect on this action), while pressing the Down arrow key moves to the previous key frame in the video.
I tend to use a combination of the key presses I described to get me close to the edit point in a video. Once I get close, I then use the Left arrow and Right arrow keys to make the fine adjustments, and to bring the video right to the frame that I want to start my cut.

There are similar controls on the Avidemux control bar. From left to right, the buttons are: Play/Pause, Stop, Previous frame, Next frame, Previous key frame, Next key frame, Start selection, End selection, Previous black screen, Next black screen, Beginning of file, End of file. You could use the mouse and navigate through the file using repeating mouse clicks on the appropriate buttons, but it is much easier to use the keyboard to navigate through a file. For what it's worth, I find that the "Previous black screen" and "Next black screen" buttons don't really work all that well. It is slow to search through a large video file for the black screens, and Avidemux only seems to find them when the black screen that precedes a commercial advertisement falls on a reference frame within the video. The majority of the time, that does not occur.
When you come to a section of the video that you want to cut out (such as the start of commercial advertisements in the middle of a video), use the Left or Right arrow keys to navigate to a black screen right before the advertisement, and select the "A" button to mark the beginning of the selection.

Now, navigate to the end of the advertisements, to the black screen that immediately precedes the resumption of the video you want to keep, and select the "B" button to mark the end of the selection. Once you have the start and end of the commercial block marked (indicated by the brackets superimposed on the video position slider), simply press the "Delete" key on your keyboard. Voila! The commercial block is gone. Repeat this process throughout the rest of your video file for each of the commercial blocks that you want to edit from your finished video. When you are finished, you'll have your own copy of the movie or television show, free of commercial advertisements.
Don't worry if you make a mistake, since none of your edits are committed to the file until you specifically tell Avidemux to save your file. Simply reload your video and start over. The entire process is very easy, and you'll have the hang of it quite quickly.
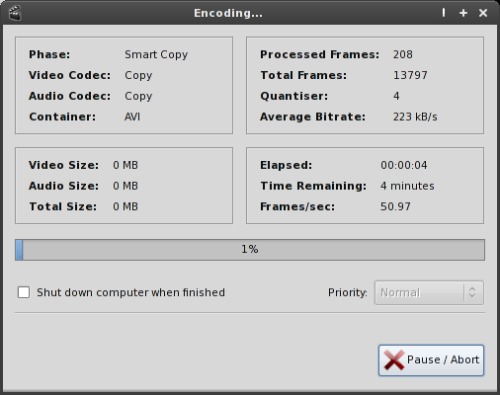
Once you reach the end of the file, then save your video with a new name. You will want to do this, just in case something gets messed up during the save file process, or you later discover that your edits weren't exactly correct. If you use a new file name, you can always go back to the original and repeat the process to make things "right." You can always delete the original file at a later time, after you are sure that your edits are correct and as you like them. Sit back and wait while Avidemux saves your new, commercial free video file. While you are waiting, you can watch the progress in the dialog box (above) that appears. Remember that video files are quite large, so it does require a bit of time to work with them and to save them. Also remember that the longer the video file (say a two hour movie, versus a 30 minute sitcom), the longer it will take to process, since we're talking about 4x as much data in the two hour movie, compared to the 30 minute sitcom.
Summary
Avidemux is one of those Linux gems with hidden talents. As you can see, it's relatively easy to perform frame based edits on a video file, without having to re-encode (and potentially degrade) the video. Now that I have discovered Avidemux's hidden abilities (well, they were hidden to me until I starting digging into it), I have finally found a very capable replacement for the last Windows application that I relied upon, Video Redo. With a free, open source solution available, I couldn't care less if the Video Redo developers ever make a Linux version of their commercial application. Avidemux suits my needs perfectly, as I'm sure you will find it able to perfectly meet your video editing needs.