Video: Part 3 – Converting Files With MyMencoder
by Paul Arnote (parnote)
Once you have recorded and edited your video file, you may want to convert the video file to a format that is better suited to sharing or posting to video sharing sites. Fortunately, Leiche has created MyMencoder, which allows you to save your video file as an Xvid or DivX AVI file, an MP4 file, or an FLV file. MyMencoder is an "in-house" PCLinuxOS application, available for installation through Synaptic. It provides a GUI front end to working with the command line tool, mencoder.
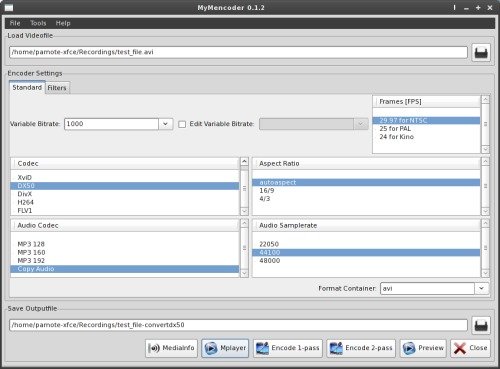
The top text entry box allows you to specify the input file that you want to convert. To be certain that you have the path correct, it's probably best to click on the "File Open" button at the far right of the text entry box, find and select your input file, then click OK.
Under the "Encoder Settings" portion of the MyMencoder window, you can make all of the settings for your converted video. None of these settings will affect your original file. In fact, your original file remains untouched. These settings are for your converted output file. The first setting allows you to specify the video bitrate of your converted file. You may have recorded your video at 2000 kbps, but for sharing (and to keep the file size down), you may only want a video bitrate of 800 kbps, for example. Just keep in mind that larger video bitrates offer better quality at the expense of a larger file size, while smaller video bitrates offer a smaller file size at the expense of quality. It is a personal determination that you will have to choose, depending on your needs.
At the far top right of the "Encoder Settings" portion of the window, choose the frames per second that is appropriate for video in your area of the world. Remember, North America and Japan use NTSC as the broadcast standard, which uses 29.97 fps as the frame rate. Europe and most of the rest of the world use PAL, which uses a 25.0 fps frame rate. Kino is for film, which is shot at a 24 fps frame rate.
Next, choose the codec you want to use to re-encode your video with. Mostly, this sets the ffourcc flag of the video file, which tells some video players which format to use when playing back the video. I am unsure of exactly what is going on here, but it appears that H264 and FLV1 do not work as intended, so restrict your use to either XviD, DivX or DX50. When I was working with MyMencoder, I kept getting error messages whenever I chose either the H264 or FLV1 ffourcc flag.
The next thing you will want to choose is the "Aspect Ratio." It is best to choose "autoaspect" for this setting. I've not found either the 16/9 or 4/3 settings to work. In fact, I'm not so sure that this setting even has any bearing on the video image recorded by mencoder. Typically, mencoder will use the aspect ratio of the recorded video as the default. If your source has an aspect ratio of 4:3, then mencoder will record the video using a 4:3 aspect ratio. Rather, I get the impression from looking at the mplayer/mencoder documentation that the aspect ratio setting is used for playback by mplayer.
Under "Audio Codec", choose the MP3 bitrate that you want to use for the audio portion of you file, or simply choose to copy the audio portion of the file without reprocessing. Just as with the video portion of your file, choosing a larger MP3 bitrate will result in a larger file, albeit a small increase. The audio portion of a video file adds very little to the overall size of a video file, so this may be one area where you might want to "splurge" with higher sound fidelity.
Select an "Audio Samplerate" to match your needs. Typical MP3 audio is at 44100 bps. Reducing that to 22050 will, effectively, cut the size of the audio portion of the video file in half, but at the same time sacrifice audio quality. If you intend to later record your video to a DVD for viewing on a home DVD player, then you may want to upsample the audio samplerate to 48000 bps, which is required under the DVD standard.
Next, choose the "Format Container" for your file. Your choices here are AVI, MP4 or FLV. Your chosen format container will become the format that mencoder uses to record your video, and it will become the default file extension for your video.
Finally, under the "Save Outputfile" section, enter the path and filename you want to use to save your converted video as. There's no need to worry about adding on the file extension, since MyMencoder will automatically append the appropriate file extension onto your chosen file name.

Once you have made all of your settings for the conversion, you can use the buttons at the bottom to perform the tasks you want on the video.
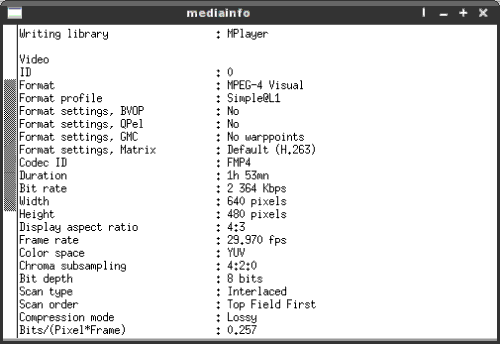
Pressing the "MediaInfo" button launches an Xterm window with every bit of information you could possibly want about the input video file. Listed will be such things as the aspect ratio, the video and audio bitrates, the codecs used for encoding the audio and video portions of the file, and a whole host of other important data. Meanwhile, the "Mplayer" button will play the input file in a popup window.
MyMencoder gives you two options for encoding your video files: a 1-Pass Encoding, and a 2-Pass Encoding. While 1-Pass Encoding will get the job done, 2-pass encoding will give you MUCH greater quality, for any given video bitrate. With 2-pass encoding, mencoder essentially goes through the input video the first time, taking a look at the job ahead of it and making notes along the way on how to optimize the video. On the second pass, mencoder uses the "notes" that it took on the first pass to apply those optimizations to the output file. Thus, while 2-pass encoding takes twice as long to produce the output file, the improvement in quality of the output file is worth it.
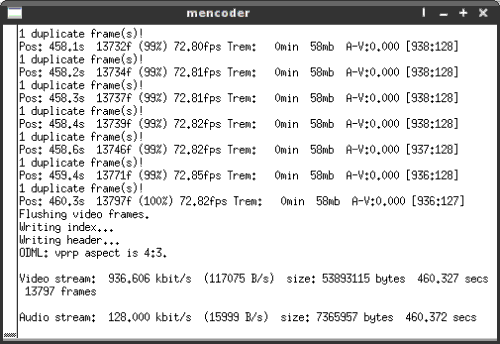
Once you select either the "Encode 1-pass" or "Encode 2-pass" buttons, an Xterm window will open to update the status of the conversion.
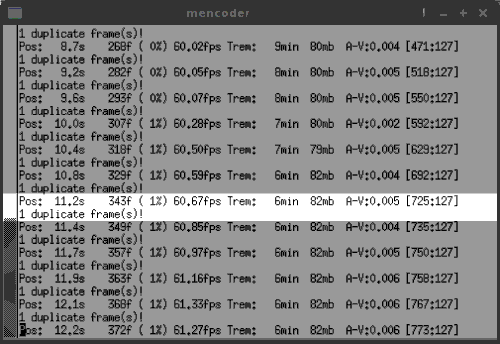
There's a lot of information that flies past in the Xterm window, but it's not hard to decipher. Using the screen capture above, the "Pos:" data lists the current position in the input video that is being converted. In the case of the our screen capture, that is 11.2 seconds into the input file. The "343f" indicates the precise frame number of the input file that is being converted. The "( 1%)" indicates, percentage-wise, how far into the conversion process of the input file you currently are. The "60.57fps" entry tells us how many frames per second are being processed. This number may go down when converting to a video format that uses complex compression algorithms. With the "Trem:" entry, mencoder gives us an approximation of how much longer the conversion process will take. The "82mb" is the estimation of the file size of the output file. The "A-V:" gives us an indication of the audio-video synchronization. With "[725:127]," we get an indication of the video bitrate and the audio bitrate in the output file. Finally, the "1 duplicate frame(s)!" statement always appears, and can be ignored without concern.
Pressing the "Preview" button in MyMencoder will open an MPlayer preview window, showing the output file. The "Preview" button will not work, however, until after the file has been converted. Of course, the "Close" button exits MyMencoder when you are finished working with your video files.
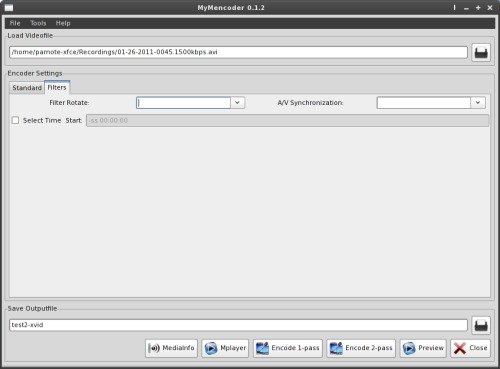
Under the "Filters" tab, there are a few additional settings that may interest you. First, "Filter Rotate" does exactly as it's name states: it rotates the video. The options are rotate 0, rotate 1, rotate 2, and rotate 3. Rotate 0 is normal, while rotate 1 is 90 degrees clockwise, rotate 2 is 180 degrees clockwise, and rotate 3 is 270 degrees clockwise. A/V Synchronization may help improve synchronization between the video and the sound. Perhaps the most useful of these built in filters is the "Select Time" setting. This will begin the conversion of the video at a particular time in the input file. The format is hh:mm:ss. So, if you want to start converting the video at the 10 second mark, you would check the check box and set the time to 00:00:10.
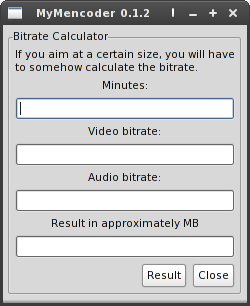
Under the "Tools" menu (top left of the window), you can apply a ffourcc flag to an input video file. There is also a bitrate calculator, to assist with determining which audio and video bitrates to use to make a video fit onto the optical media that you want to burn it to (or to keep it under a specific size limit).
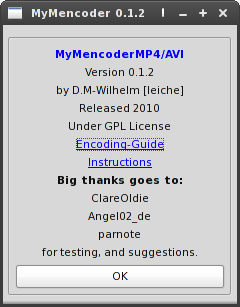
Selecting "About" from the "Help" menu will display the About dialog box, as shown above.
Summary
Leiche has done a very good job with MyMencoder. I did experience a small problem when I installed both MyMencoder and MyMencoderDVD. Due to the similarities in the names of the programs (I presume), MyMencoder did not show up in my Phoenix Xfce Menu. I edited the MyMencoder .desktop file to make the "Name=" field to become "MyMencoder Convertor". Once I did that, both MyMencoder (now renamed as MyMencoder Converter) and MyMencoderDVD showed up properly in the menu.
As you can see, Leiche's MyMencoder is a great starting point for those looking for an easy way to convert between different video formats. Since it's a bash script that uses gtkdialog to provide a GUI, it would be relatively easy to extend the functionality of MyMencoder to encompass even more video settings. Certainly, there are other applications that also perform similar tasks, but Leiche's application makes the entire process simple and uncomplicated. I plan to take a look at some of the other applications later on, in a separate article. Plus, it was Leiche's work on MyMencoder that inspired me to create PCLinuxOS PVR, which I wrote about in the March 2011 issue of The PCLinuxOS Magazine.