Video: Part 4 — MyMencoderDVD
by Paul Arnote (parnote)
Somewhere along the way, while creating MyMencoder, Leiche realized he needed to take a slightly different approach to convert videos to a format that can be used to create a video DVD that can be played on a typical consumer set-top DVD player attached to a television set. As a result, MyMencoderDVD was born.
In the process, MyMencoderDVD was set up to allow you to create not only video DVDs, but also VCDs (Video Compact Discs) and SVCDs (Super Video Compact Discs). VCDs and SVCDs are excellent choices when you want to present shorter videos, with SVCDs having a potentially higher quality video output and providing greater flexibility to create non-standard, yet playable, optical discs. (Note: contrary to popular belief, DVD does NOT stand for "Digital Video Disc." Rather, it stands for "Digital Versatile Disc," to reflect the many different formats that it can be used for.)
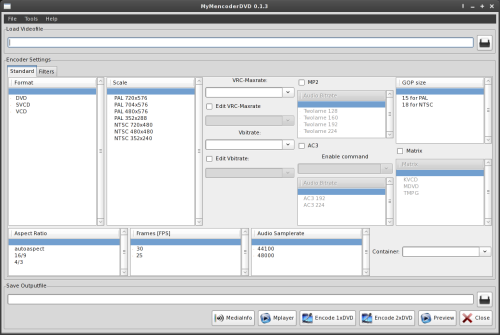
At the top of the MyMencoderDVD window, select the video that you want to convert. Either enter the full path to the video, or click on the "File Open" icon to the right of the entry box to select the file from the typical file selection dialog.
Next, select the "Format" that you want to use to store your video on. You can select from DVD, SVCD or VCD. Depending on what you select here will dictate your selection under the "Scale" section. Be careful here to select the appropriate broadcast standard for your area. Computers really don't care much about this setting, and will play either standard without difficulty. Unless you have one of the relatively rare set-top DVD players that is capable of reading discs made for either broadcast standard, you may find yourself unable to watch the disc on your set-top DVD player. If you select DVD, you can choose between two pre-defined PAL sizes and one NTSC size. These would be the 720 x 576, 704 x 576 for PAL, and 720 x 480 for NTSC. If you select SVCD, you will need to select either PAL 480 x 576 or NTSC 480 x 480. For VCD, you will need to select either PAL 352 x 288 or NTSC 352 x 240.
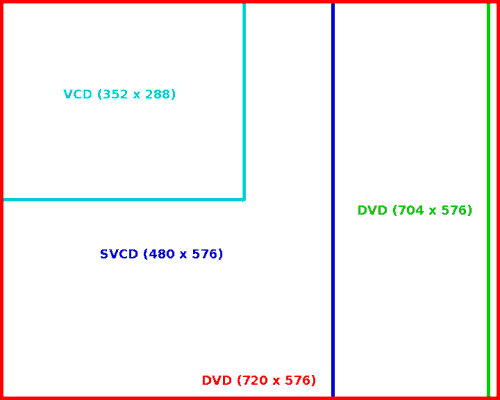
PAL video image sizes.
To be able to choose the appropriate format (besides which optical media you choose to use), it's a good idea to have a basic understanding of the different formats. Click on the links for the formats that follow for a complete discussion of the format specifications.VCDs hold to a very rigid set of specifications. The video must be 1,152 kbps and in MPEG 1 format at a video size of 352 x 240 NTSC (352 x 288 for PAL), and audio is MP2 at 224 kbps with a 44,100 Hz sample rate. VCDs should be playable on the vast majority of set-top DVD players. VCDs can typically hold up to 80 minutes of video on a 700 MiB compact disc.
SVCDs came about to address some shortcomings of the VCD 2.0 specifications, namely image quality. SVCDs can provide much greater image quality, thanks to its ability to support higher video bitrates (up to 2,600 kbps). Video is encoded as MPEG 2, at a size of 480 x 480 for NTSC (480 x 576 for PAL). Don't worry — the image will be "un-squashed" on playback. SVCDs will also support audio bitrates from 32 kbps to 384 kbps at a 44,100 Hz sample rate. You can record up to 60 minutes of higher quality video on a SVCD, depending on a combination of the video bitrate and audio bitrate you select.
SVCDs are not, as you can see, held to "as rigid" of standards as VCDs. As a result, you can create custom SVCDs that use a lower video bitrate, to squeeze more data onto a CD than you normally would be able to otherwise record. I have personally created custom SVCDs that hold over 90 minutes of video. The video quality isn't perfect, but then I used this "trick" when maintaining video quality wasn't necessarily my primary objective.
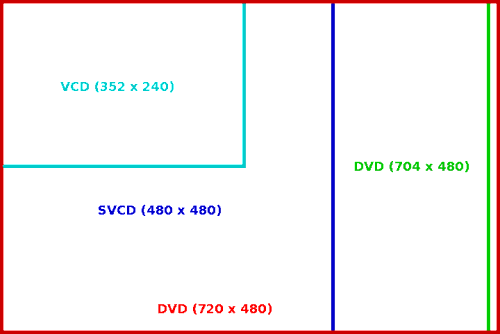
NTSC video image sizes.
DVDs offer even better image quality, again mostly due to the ability to support higher video bitrates (up to 9,800 kbps) and larger video image size, coupled with their massively larger storage capacity. DVDs also support AC3 audio (Dolby Digital, etc.), along with MP2 audio, from 32 kbps to 1536 kbps, but that audio must be at a 48,000 Hz sampling rate to be DVD compliant. How much you can fit onto a DVD depends on several factors. First, it depends on the capacity of the DVD disc you have. Most blank DVDs that you purchase at your local retailer are commonly referred to as DVD5, and they hold approximately 4.7 GiB of data. A dual sided version of that disc is known as a DVD10. The dual layer DVDs are known as DVD9, and are what you most commonly get when you purchase a prerecorded DVD at the store. A dual sided version of a DVD9 is known as a DVD18, and they are not all that common.
Secondly, it depends on the video size and resolution you use to make your DVD. A video made with a video size of 720 x 480 is going to take up approximately four times the space of video that is sized at 352 x 240 (the same size used to record MPEG 1 video for VCDs). Similarly, video with a resolution of 5,000 kbps will take up roughly twice as much storage room as the same video recorded at 2,500 kbps.
DVDs support all the video sizes we've mentioned, except SVCD. The SVCD sizes are not part of the DVD specification, although many set-top DVD players will play them back appropriately. Thus, you can put 450 minutes of video (or 5.5 hours of video) onto a DVD5, using MPEG 1 VCD video. Or, if you use high video bitrates, you could limit yourself to only one hour of video on a DVD5 disc.
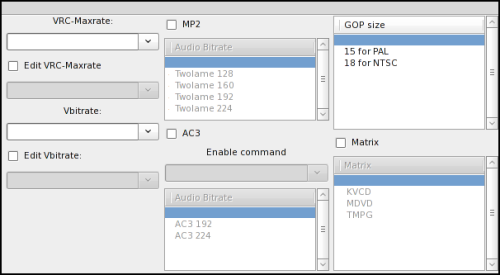
The next setting you need to make in MyMencoderDVD is the maximum video bitrate. Leiche has provided the defaults of 1152 kbps for VCD, 2500 kbps for SVCD and 9800 kbps for DVD. Place a check mark in the "Edit VRC-Maxrate" box if you want to provide a different maximum video bitrate, and enter the value in the entry box below.
Under the "Vbitrate" entry, select the video bitrate that you want MyMencoderDVD to use to encode your video. Again, Leiche has provided defaults of 1152 kbps for VCD, 1800 kbps for SVCD and 5000 kbps for DVD. If you want to use a different video bitrate, check the box labeled "Edit Vbitrate:" and enter your video bitrate in the entry box below.
Next, select the MP2 check box, followed by the audio bitrate that you want to use. You can also select to include an AC3 soundtrack, if you want. Simply select the AC3 check box, select the command from the "Enable command" drop down list, and select the audio bitrate you want to use.
For GOP size, select the setting that is appropriate for your broadcast standard. If you want to apply a matrix (commonly used to help give better image results), select the "Matrix" check box, and then one of the three matrix settings below. Feel free to play with these to find which one gives you the best results for your videos. I find this to be a rather subjective topic, so I won't make any recommendations here.
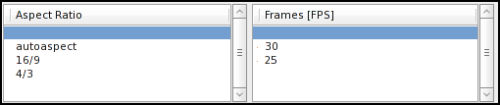
For the next setting, "Aspect Ratio," I recommend simply selecting the "autoaspect" setting. From what I can tell by reading the mplayer/mencoder documentation, the aspect ratio setting is for mplayer to use on playback, and has no use when using mencoder to record or transcode video. Under the next setting, "Frames [FPS]," select 25 fps for PAL recordings and 30 fps for NTSC recordings.
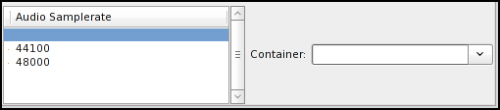
The next section, "Audio Samplerate," allows you to select either a 44,100 Hz sample rate for VCDs and SVCDs, or a 48,000 Hz sample rate for DVDs. In the "Container" section, select either MPG or VOB as the container for your transcoded video. I recommend selecting MPG for a few reasons. First, most DVD authoring applications (such as DeVeDe) will automatically create appropriate VOB files, along with the proper DVD file system, for your DVDs. Secondly, some set-top boxes are quite picky about the size of the VOB files. Typically, VOB files are designed to be no more than 1 GiB in size, to insure maximum compatibility among set-top players and the various file systems that have to read them. Third, since you will be working with MPG files for both VCDs and SVCDs, and since your DVD authoring program will create your DVD file system for you, it only makes sense to simplify things and work only with MPG files.
In the bottom entry box, enter the path and filename you want to save your transcoded video as. You do not need to specify a file extension, since it will automatically be appended to your filename, depending on which container you choose.

The button bar at the bottom of the MyMencoderDVD window functions pretty much exactly like the one we talked about for MyMencoder. Pressing the "MediaInfo" button will display all the data you will ever want or need to know about the source video in a Xterm window. The "Mplayer" button will display a pop up Mplayer window, playing the input file. "Encode 1xDVD" will transcode your video in one pass, while the "Encode 2xDVD" button will transcode your video in two passes, giving you a higher quality image. The "Preview" button will show you the finished results of your transcoded video, and will only work after you have completed the transcoding of your video. The "Close" button will exit MyMencoderDVD.
Tools & Menus
Under the "Tools" menu on the menu bar, you have some additional tools for working with your video files.
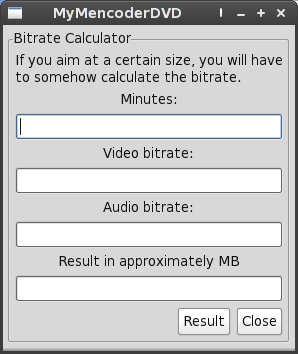
Selecting "Calculator" from the Tools menu will bring up the bitrate calculator. If you don't immediately see the benefit of this, let me explain it to you. Let's say you have 2.5 hours (or 150 minutes) of old home movies that you just converted to digital video, and you would like to place all of them on one DVD. Or, let's say that you have recorded a miniseries from your TV tuner card, and would like to place all 177 minutes of edited video on one DVD. Enter the length of the video, in minutes, on the top line. On the second line, enter the video bitrate you want to use to transcode your video to. On the third line, enter the audio bitrate you want to use to encode your audio track as. Then select the "Result" button. The approximate file size, in MB, will appear on the bottom line.
If you are planning on burning your videos to a DVD5 disc, you will want to insure that the resulting size is less than the capacity of that DVD5 disc, or 4.7 GiB. Since the bitrate calculator is only an estimate, I would strongly recommend that you leave yourself some "breathing room," and use 4 GiB as your upper limit — just in case the estimate is a bit on the low side of what is actually produced.
By using the bitrate calculator, you can get maximum image quality for the videos that you do put onto your optical discs. Just remember that if you are burning an SVCD, most CDs are 700 MiB. Also, remember that VCDs have a very strict set of specifications for audio and video bitrates and video size, so you cannot deviate from those specifications (otherwise, you risk not being able to play the disc on anything but a computer, which really doesn't care all that much about whether you meet the "standard" or not).
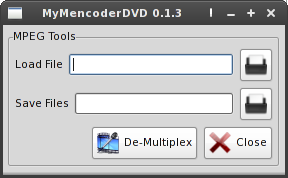
Selecting "MPEG Tools" from the Tools menu will allow you to demultiplex any MPEG video file (sorry, but it won't work with AVI files) into a separate *.m2v video stream and *.mp2 audio stream. These two streams can subsequently be re-multiplexed back into one contiguous MPEG file. You may want to do this if you find the need to work exclusively with only the video or audio portions of a video file, or if you want to completely replace the audio stream. For example, you may want to eliminate the uninspiring, monotonous background noise in your vacation video of you driving through the Donner Pass, replacing it with a musical soundtrack or a narration that you prepare after you return home. Selecting the "De-Multiplex" button will open a Xterm window, so you can follow the progress.
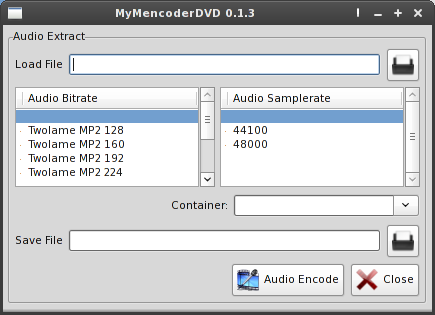
The last option under the Tool menu is "Audio Extract". It does exactly as its name says it does: it extracts the audio from a video file. Most any video file that you can play with MPlayer is fair game for audio extraction. Specify the video file that contains the audio you want to extract on the top line. Then, select the audio bitrate and sample rate that you want to use. Next, select the "Container" for the audio, either MP2 or MP3. Then, in the "Save File" entry box, specify the path and filename that you want to save the file as. You do not need to specify a file extension, since either MP2 or MP3 will automatically be appended to the filename, depending on which file container you select. Finally, click the "Audio Encode" button. A Xterm window will open up to show the progress of the audio extraction. The audio extraction feature is very fast, since the audio portion of a video file actually makes up only a very small part of the overall video file.
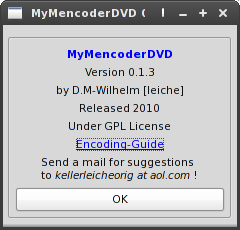
Selecting "About" from the Help menu will display the dialog box pictured above.
Summary
Once again, Leiche has created a simple and effective tool for preparing your videos for recording to various optical media formats that can be played back on your set-top DVD players attached to your television.
Next month, we'll take a look at some other video tools in the PCLinuxOS repository, along with a few other techniques that you may find useful when dealing with video files.