Video: Part 6 - DeVeDe
by Paul Arnote (parnote)After all of this talk about video files, there reaches a point where you may wish to burn a copy to optical disc, most likely to a DVD. To be sure that you can watch it any time you want, wherever you want, you will want to make sure that you can play that DVD on a set-top DVD player. Fortunately, one tool in the PCLinuxOS repository makes this job very easy to complete. It is called DeVeDe. Released January 14, 2006 by Sergio Costas Rodríguez under the RasterSoft name, DeVeDe is available for Linux and Microsoft Windows. It has only a handful of dependencies, namely mencoder, MPlayer, Mkisofs, DVDAuthor, VCDImager, Python, PyGTK and PyGlade.
Basic usage
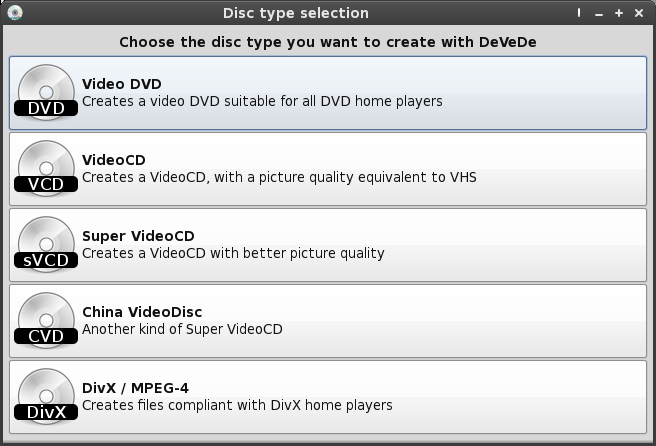
When you first launch DeVeDe, you need to first select which type of optical disc you wish to create. DeVeDe gives you five choices.
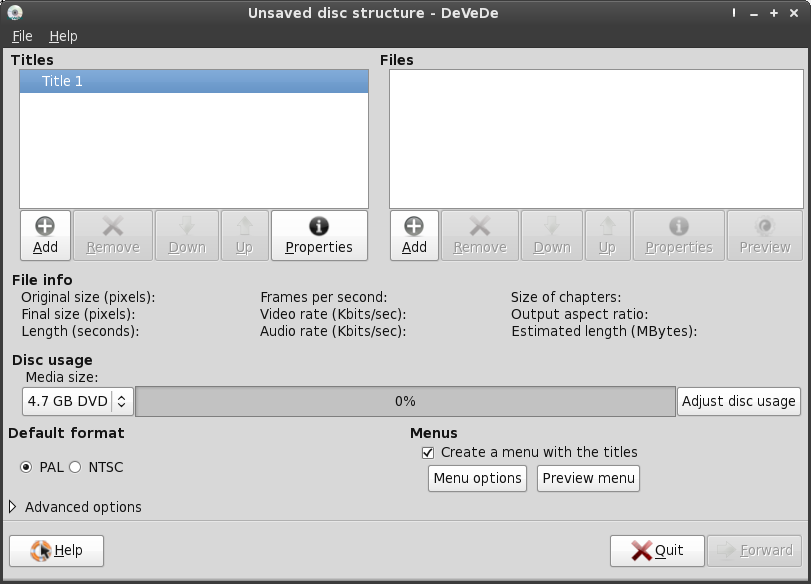
After selecting which type of optical disc you wish to create, the main window of DeVeDe will appear, as pictured above. I have chosen to burn my video files to a single layer DVD5 disc.
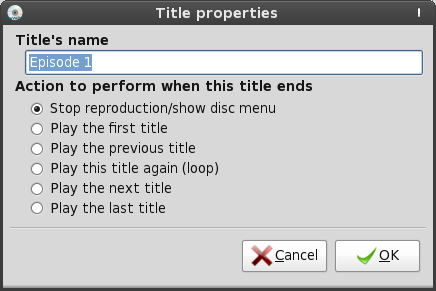
At the top left of the DeVeDe window, adjust the properties of Title 1 by highlighting it, then selecting the Properties button immediately below the list box. The dialog box above will appear, and you can give a more proper title to disc content. In fact, the entry in the Title name text entry box is used by DeVeDe when it creates your DVD Menu. We'll talk more about that a little bit later. You can also select the Action to perform when this title ends.
The default value is to return to and show the disc menu, but you can also choose from the remaining five options. For example, if this were a DVD that you were playing at a kiosk, you might want to choose Play this title again (loop) so that the DVD would just loop over and over again, until you specifically stop playback.
The options, I think, are fairly self explanatory, so I won't belabor you with explaining them here. After you've got the first title's properties set as you want, then you need to move over to the Files list box at the top right of the DeVeDe window. Click on the Add button and add the file or first file you want to use to make your DVD. Continue adding content to your DVD by alternating the addition of a title, then the file. Each time you add a title, you need to add a file to associate with that title, basically creating a link to each file.

As you can see in the screen shot above, I've added all six episodes of the first season of The Walking Dead to a single DVD. Each entry in the Titles box link to a file in the Files box. In the middle part of the DeVeDe window is a progress bar that displays how full your optical media is. Note that this may not read correctly, until you set the properties of each of the files on your disc, and which is something we'll discuss a little later when covering how to tweak the settings for your disc.
If it says that your disc capacity is at 200% or more, don't panic. We'll make adjustments to that when we tweak the disc settings. Immediately below that is the Default format selector. Select the format (PAL or NTSC) that is appropriate for your region of the world. To the left of that is the Menu settings.
Check the box (the default is already checked) for DeVeDe to make a basic menu for your optical disc. Clicking on the Menu options button will allow you to customize the menu that DeVeDe produces. We'll discuss this further a little bit later, also. Click the Preview menu button to see a sample image of the menu that is created. Click the marker next to Advanced options to display additional settings. Choose the Action you want DeVeDe to perform when creating your disc content. The default value is to create an ISO or BIN/CUE image, which can readily be burned to an optical disc with your favorite CD/DVD burning software.
You can also have DeVeDe create the disc structure of your optical disc on your hard drive, or you can have DeVeDe only convert your video file to compliant MPEG files. Under the Options section of Advanced options you can select for DeVeDe to erase temporary files, which will save some hard drive space. If you have a multicore CPU, you can select the box that will allow DeVeDe to make use of all the cores. Using DeVeDe on a computer with a multicore CPU will significantly speed up the process.
Tweaking your disc You will want to customize and tweak your disc to not only make your viewing experience more pleasurable, but also so that you can optimize the disc so that you can fit all the content you wish on it. We'll start with the menu, which we access with the Menu options button in the main DeVeDe window.
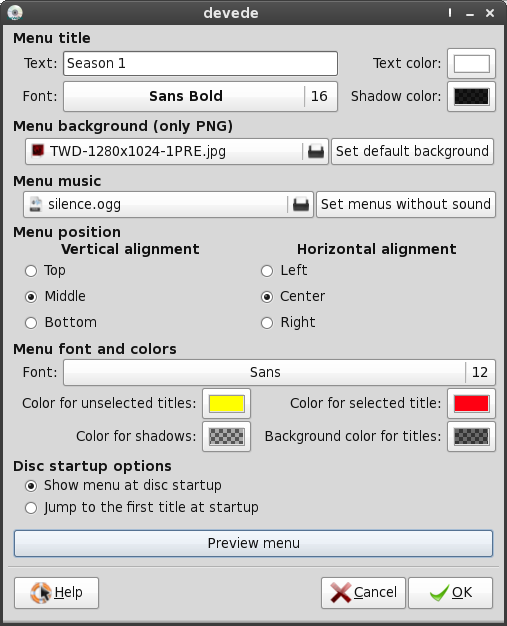
At the top of the window that appears, you can set the Menu title for your disc, as well as the text color and the shadow color of the menu title text. Next, you can set the Menu background. Although it states that you can use only PNG files, I've found high resolution JPG images work just fine. Still, it might be best to heed the advice, avoiding the lossy compression of JPG images, opting instead for the lossless compression of the PNG files, and thus preserving quality.
You can then select any music that you might want to play while your menu is being displayed. For example, you may want to take or make a short sample of the theme music from a television show you've recorded and loop it over and over as the background music for your menu.
The default is silence.ogg, which as you might surmise, is silent. Next, you can select the Menu position, choosing if your menu text is centered horizontally and vertically, or left or right aligned, or top or bottom aligned. Menu font and colors does exactly as you think it does: it allows you to set the menu font and the color of your menus. You can select the font and size to use by simply clicking on the font name, displaying a traditional font selection dialog box. Below that, you can select the color of the text for unselected and selected menu items, as well as the text shadow color and the background color for the menu text.
You can also select the opacity of the background color for the text, making it totally transparent, semi-transparent or opaque, depending on your needs. The Disc startup options allows you to decide if you want the disc menu to be shown when the disc is first inserted into a player, or if you want to immediately start playing the first title on the disc. Clicking on the “Preview menu” button at the bottom displays a sample image of what your menu will look like. I suggest using this option often. It will help avoid any surprises. The more you check it, the greater the chance you will catch any errors you might inadvertently have (like misspellings).
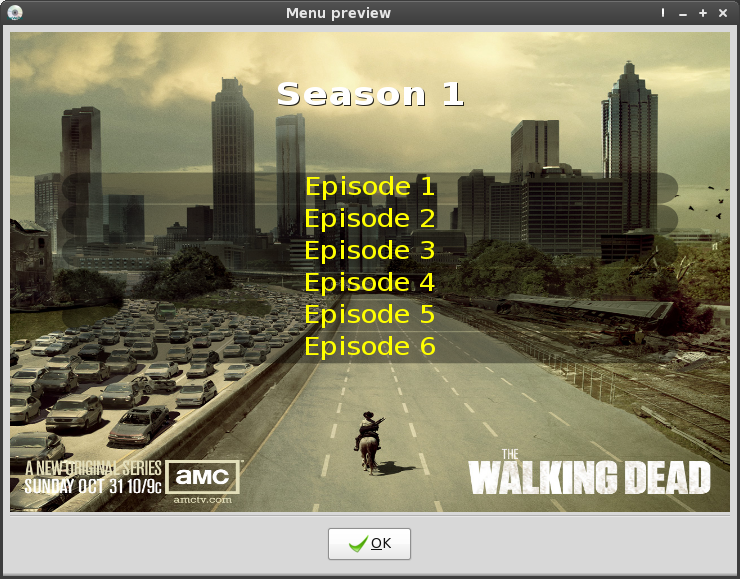
The above screen shot is the sample of my DVD menu, created in DeVeDe. At the top of the image is my menu title, followed by my menu entries as defined by the “Title” list box in the main DeVeDe window. As you can see, I set the background of my menu items to be semi-transparent, and the color of the unselected menu items is yellow. When I place the finished disk into my set-top DVD player and scroll through the menu items, the text of the active one will change to red.

Next, we need to start tweaking our individual files. Select one of the files in the “Files” list box in the DeVeDe main window, and select the “Properties” button. This is where we’ll start making the files fit onto our optical medium. At the top of the properties dialog box is the file you are working with. If you need to change the file, click on the file name, then select the proper file. Below that is all of the information for that file. Be sure that the “Video format” is appropriate for the format used for your region of the world. Next, select the “Audio Track,” if more than one is present. You can also adjust the volume of the audio track.
This is handy if the audio seems to be a bit softer than what you think is appropriate. Below that, we can select any subtitles we may want to include. Typically, these are specially named text files, with a *.srt file extension. The addition of subtitles is optional. Clicking on the “Preview” button will bring up a dialog box that asks you how long of a preview you wish to create. The default is 60 seconds. It’s a good idea to periodically check a preview of your project, just to be sure that everything is as you would like it. Under “Advanced options” is where we’ll start making the tweaks to make all of our files fit onto our optical medium.
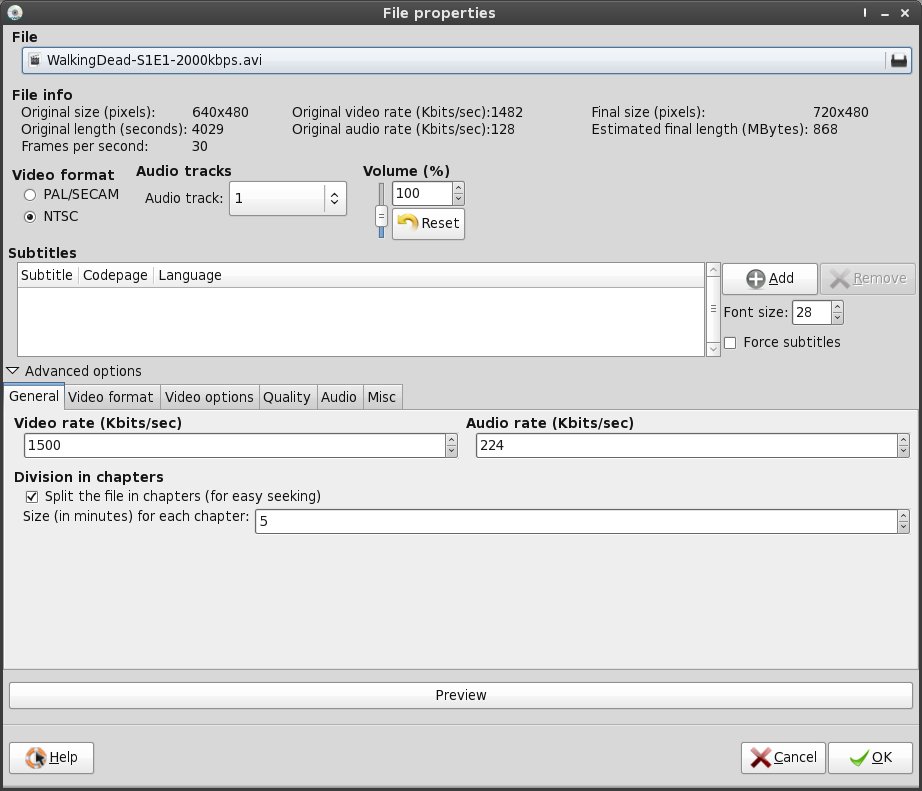
Under the “General” tab of “Advanced options,” you will notice the first field will be “Video bitrate (Kbits/sec).” The default value for each file added is 5001 kbps. I’ve reduced the video bitrate for each of the six files on my DVD to 1500 kbps, so that I can fit them all onto one DVD.
To be perfectly honest, I arrived at the 1500 kbps video bitrate mostly by trial and error. Depending on how many video files (and the total running time of those files) you have on your DVD, you may be able to record your DVD at a higher or lower bitrate than I have done here. More files (longer total running time) will mean a lower video bitrate, while fewer files (shorter total running time) will mean that you can use a higher video bitrate, giving you better image quality. Remember that higher video bitrates typically mean a higher quality video image. For my purposes, a 1500 kbps video bitrate provides an adequate image quality.
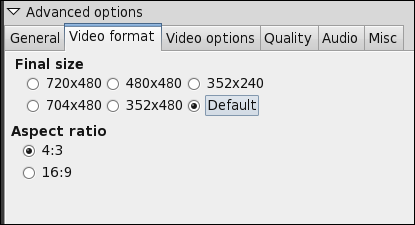
Under the “Video format” tab, you can select the final size and aspect ratio. The size choices under “Final size” change, depending on which video format (PAL or NTSC) you choose. Of the sizes shown above, 720x480 and 704x480 are DVD resolution, 480x480 is for Super VCD resolution, 352x480 is for China Video Disc, and 352x240 is Video CD resolution. You can make a DVD with video sized for a VCD, albeit at a noticeable quality loss. You can also make a DVD with video sized for a SVCD, with less quality loss.
Using smaller video sizes will allow you to place more content on a DVD, since a video with smaller video image size will also be smaller in file size. Choosing “Default” (which is the default setting) will set the video image size to the largest size (for DVDs), or the default size for the other video disc formats listed for you to choose from when you first started DeVeDe.

With the “Video options” tab, you can rotate the video, or mirror the video. The default is for “No rotation,” and for both of the “Mirror” options to be unchecked. Outside of special effects, I can’t see a lot of need to do either of these. You can also swap the field order of interlaced images. Some people feel that swapping the field order gives them a better image, although I’ve not ever noticed any difference. Under “Scaling mode,” you can “Add black bars” (the default setting), or “Scale picture” to make it stretch to the size of your video playback screen.
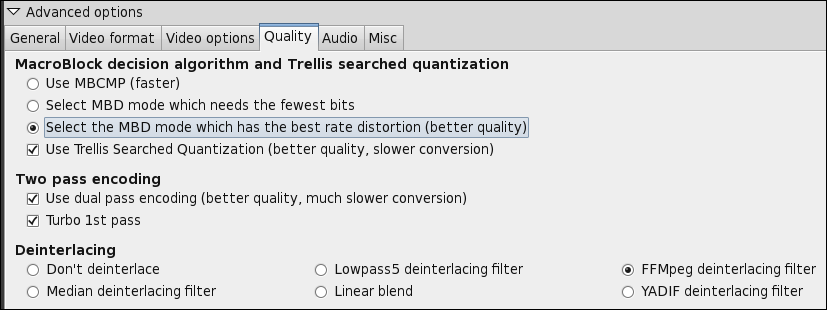
Under the “Quality” tab, you can make some settings that will have a profound impact on the quality of your finished DVD. Under “MacroBlock decision algorithm and Trellis searched quantization,” select the MBD mode that gives you the better quality, and check the “Use Trellis Searched Quantization.” While your conversion will take a bit longer, the payoff in the extra quality is definitely worth it. Under “Two pass encoding,” check both options. With two pass encoding, the video file is analyzed on the first pass, with information about the video analysis stored, then on the second pass, the information gathered on the first pass is used to optimize the video quality. While this option will literally double your conversion time, the payoff in the extra quality is definitely worth it, again.
All of these quality settings gain even more importance when you decrease the video bitrate setting, as I have done with my DVD, decreasing the video bitrate to 1500 kbps. When decreasing the video bitrate, you will want to do as much as you possibly can to retain as much of the quality as you can. It’ll be a decision you won’t regret later on, especially when everyone else is marvelling at the quality of your video production. The final setting is for deinterlacing. I chose the FFMpeg deinterlacing filter, because it’s reasonably fast and produces adequate results from the interlaced video recorded from my cheap TV tuner card.
The default value here is to “Don’t deinterlace,” and depending on your needs and expectations, it may serve you just fine. I just happen to prefer a deinterlaced, or progressive, video image. As for the other deinterlacing options, I’ll leave the discovery of their capabilities to try out on your own. Give them a try with smaller video files and see which one gives you the results you desire.
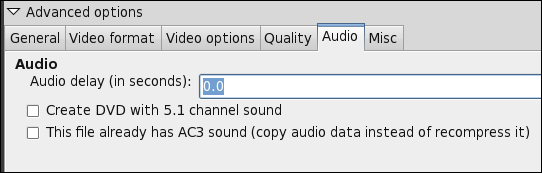
Under the “Audio” tab, you can set an audio delay. This is especially helpful if you find that you are having audio-video sync problems. Positive and negative values are allowed. Use positive values when you find the sound to be ahead of the video, and negative values when the sound is behind where it should be, in relation to the video. You can also create a DVD with 5.1 channel surround sound, or to merely copy AC3 sound, instead of recompressing it.
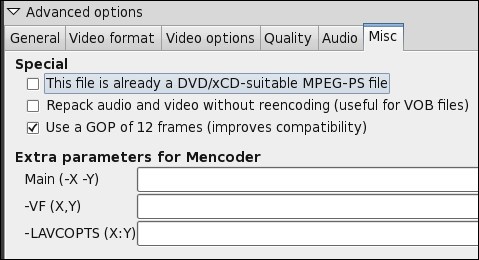
The “Misc” tab has options that will further change the way DeVeDe works with file. Under the “Special” section, the first option, if your video file is already in the MPEG2-PS format, the video will not be recompressed (leading to a reduction in quality). The second option is useful for repackaging audio and video files that are stored in VOB files already, or for MPEG2 video that is stored in an AVI container. The nice thing about this setting is that there is no loss of quality from the original, since there is no recompression of the audio or video portions of the program stream.
The third option causes DeVeDe to use a GOP (Group of Pictures) size of 12 frames, rather than the traditional 15 frames for PAL, or 18 frames for NTSC. Some set-top players balk when they encounter a GOP greater than 12, so this setting helps improve compatibility for playback of the disc. Under “Extra parameters for Mencoder,” you can specify extra parameters for mencoder that provide for hard-coded subtitles, improved picture quality, and many more options.
It is beyond the scope of this article to discuss all the hundreds of possibilities this opens up. Instead, refer to the documentation for mencoder You need to make these settings for each video file you include on your DVD. In my case, since I had six video files, I had to make the settings, separately, for each of the video files on my DVD. Once you have all of your settings tweaked for each of the video files on your disc, it’s time to create the ISO file of your disc.
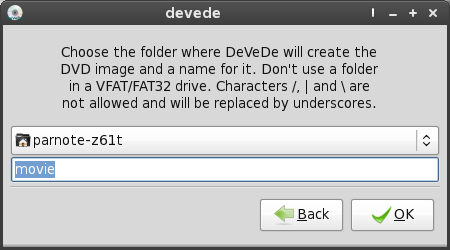
Clicking on the “Forward” button will display the dialog box like the one above. Specify a directory where you want to store your disc data. Be sure to choose a directory that doesn’t already exist. DeVeDe will erase an existing directory, then recreate it, causing you to lose all data that you may have had stored there. Here, I’m using a directory simply named “movie.”

Select the OK button and go out for dinner. Make that a full four-course dinner, with drinks and a movie afterwards. It may take two hours or more (depending on your processor speed and the number of CPU cores) to finish making the ISO file.
The dialog box shown above will keep you updated with the progress of the conversion task. Just please, do yourself a favor, and don't just sit there and watch it. It'll be two hours or more of your life wasted that you'll never get back. At the very minimum, you'll be comfortably numb after sitting and watching that progress bar for that long. Summary DeVeDe is a very powerful tool that should be in your video production tool chest.
Even if you are not into recording programming from a TV tuner card, there may be instances when you may want to make a video compilation from files created with your digital camera, or from old videos that you've digitized. DeVeDe makes the process very simple and straight forward for beginners, and allows plenty of options for those who are experienced with video production to accommodate any special needs they may have.