Backup Basics, Part 2: Using Clonezilla Live
by horusfalcon
In the May issue, we covered the basics of how to plan and implement a backup strategy for the typical PCLinuxOS desktop system. A part of that strategy was to take an initial backup of the baseline system configuration, a task for which Clonezilla Live is admirably suited. What follows is a step-by-step guide to making an image you can use to recover from a crash.Clonezilla Live is a Live CD-based Linux distribution which has been custom-tailored for creating and restoring system images. It is worth noting before we get started that Clonezilla Live is never installed, it is always run from the Live CD. It makes no changes to an existing system when properly used, and is a safe, fast, and effective backup tool.
What is a disk image? In really basic terms, a disk image is a set of specially compressed files which Clonezilla uses to take a sort of snapshot of an entire disk or of a disk partition. That image may be later used to restore that disk or partition to the originally captured state. It may also be used on systems with identical hardware to duplicate a running system from a prototype machine onto all the others. This process is commonly referred to as cloning a system.
The baseline system configuration is best backed up after all the post-install configuration and user customizations are done, but this is not the only time Clonezilla Live can be useful - any time that a complete image of a system is needed it would be hard to find a tool that is faster, more reliable, or easier to use.
Tool List:
The tools needed to do this task are:
* A copy of Clonezilla Live burned to a CD-R. http://clonezilla.org/ covers the minimum system requirements (which are quite modest for all except the oldest hardware). I recommend burning to CD-R instead of CD-RW simply because this won't change, and because CD-RW can be a bit slower to burn and read.
* A storage device capable of holding the image. I will be using a portable USB hard drive for the purposes of this article. A large flash drive could also easily serve this purpose if the data set being imaged is small enough (but it's likely to be somewhat slower).
Downloading CloneZilla Live:
Let's look at that first item: Clonezilla Live burned to a CD-R. To get an ISO image for Clonezilla Live, browse to http://clonezilla.org/downloads/stable/iso-zip-files.php and select an image that is right for your hardware. The URL will take you directly to the stable release images.
There are three basic variants of Clonezilla Live: i486, i686, and amd64.
* i486 is the most generic variant and works with systems back as far as the Intel and AMD 80486 CPU. It should work in most every case except really old hardware. If you own more recent hardware (Pentium-class and up) the optimizations in the other two will prove to be better in terms of speed and efficiency.
* The i686 variant is for P6 microarchitecture Pentium processors.
* The amd64 variant, confusingly enough, is for both Intel and AMD 64-bit CPUs. I typically use the i686 for everything except the really old stuff, but find that there is a small difference in speed on 64-bit hardware with the amd64 variant. I keep them all in my toolkit.
As of this writing, the most recent stable version of these variants is 1.28-23. Go to the downloads site given above for the stable releases and download the ISO image needed to support your hardware.
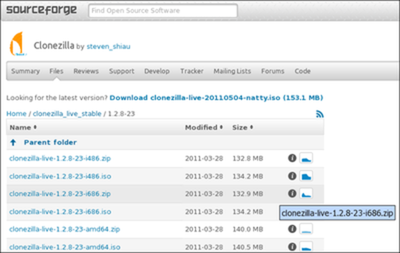
Take note that a zip version of each release is also available, but that we will use the ISO image when making a Live CD. I will be using the amd64 variant, since the system I will be using for this demonstration is an old Compaq V500 laptop (it has an AMD64x2 CPU) with PCLinuxOS 2010 KDE installed on it.
Download the ISO to a location somewhere on your system where you can find it. I've downloaded mine to /home/horus/ISO_Images/Clonezilla.org/, but any convenient folder will do just fine. The download process should look familiar after you have clicked on the variant you want to use. Here's what mine looks like in Firefox:
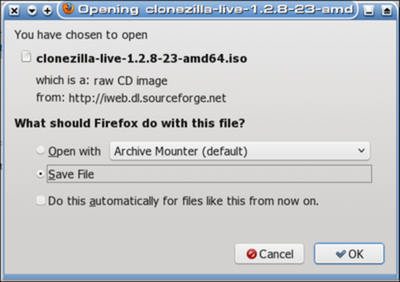
Note that the "Save File" option is selected. If that is not the case when your download dialog opens, go ahead and click that radio button to select it, then click the OK button. Here's a picture of what you should see next (at least on a KDE system):
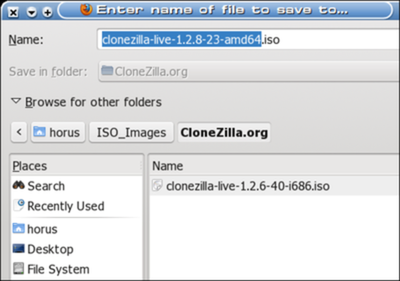
Those of you astute enough to notice will see that I have a previous version of Clonezilla Live already in this folder. Instead of taking the shortcut of using this older version (which still works just fine), I thought I'd take the time to go get the latest version so you could see how that's done. I did skip all the file system browsing to get to this point, though. It's very likely that you are going to choose a different place to store your copy, anyway.
Once the Save button is clicked, the Save File window closes itself, and a download window opens in Firefox (or whatever browser you might choose instead). You may safely browse elsewhere while your download is going on, but you should wait until the download completes to continue to the next step. Those of you who are proficient in burning ISO images may wish to skip ahead to the next topic - Starting Clonezilla On The Target System.
Burning the ISO to a CD:
Use your favorite CD burning software to burn the ISO file to a blank CD. Many choices exist: Brasero and GnomeBaker for Gnome users, Xfburn for Xfce users, K3b for KDE users, grafburn, bashburn, and many others. It is presumed that you should already possess the skills to burn an ISO to a CD, and it is beyond the scope of this article to walk you, step by step, through the CD burning process.
Note that the entire burn process should not take very long at all, since the entire data load is about 130 megabytes. Now we are ready to start Clonezilla Live.
Starting Clonezilla Live On The Target System:
I know everyone is eager to get started, but before we jump in, there are some things I need to share with you about using any imaging software:
* Space Requirements - any image taken with Clonezilla will be compressed, but it will still take up space. Make certain the storage device being used for the backup has plenty of room not just for the image, but also to handle any temporary files Clonezilla will generate during creation of the image.
* Be Sure of Your Targets - on a Linux system, this means you need familiarity with how your drives are named, and with how Clonezilla will use this information. Backing up a drive to itself (which would destroy its current data set) seems to be impossible. I tried it for research purposes and, yes, the system prevented me from doing this, but the result would still be a waste of time at best.
* Read Carefully - I'll be taking us step by step through the demonstration, but your system will likely be different. Apply knowledge of your own system to meet your needs and don't just blindly follow along here. I will do my best to note places where your system's setup needs to be considered ahead of the screenshots so that the possibilities for error are minimized. Take your time, read carefully, and you should be fine.
* Take Things In Order - please don't jump ahead of the prompts that Clonezilla gives you unless you are already an expert! Save any tricks and shortcuts until after you have made a few successful backups and recoveries. This is especially true when/if connecting external storage to be used for storing an image.
Heeding these cautions will save you headaches, folks. Not heeding them is almost certain to induce them.
Configuring Your System To Boot From CD:
Now that the preliminaries are out of the way, the next thing to be attended to is making sure your system can boot from the Live CD. If your system is configured to do this already, skip ahead to the next section. (Most folks who run PCLinuxOS have already figured out how to do this by now, but I've covered the basics of where to go to refresh your memory in case it's been a while.)
NOTE: You should probably go ahead and place the Live CD in the optical drive during or shortly after entering the BIOS Setup as described below. That way, when the system restarts after exiting from the BIOS Setup, it will boot from the Live CD without further intervention on your part.
If you need to know how to do this part, you will almost certainly have some reading to do, as configuring your system to boot from an optical disk is done from the BIOS setup, and is done differently depending on what type of hardware you have (making it difficult to cover all the variations in this article). If you don't have a hard copy of it, you may wish to locate a copy of your motherboard manual or System Users Guide online and print the information on your BIOS Setup for your reference. What you will need to know (if you don't already) is:
* What keystrokes are needed to cause your system to shift into its BIOS Setup. Typically F2, F10, or some other function key during the Power On Self Test (POST) phase of system startup.
* Which menu in the BIOS Setup is used to set up the Boot Order for the system. In newer systems, Boot Order has its own menu, but a lot of systems hide this in the "Advanced" menu of the setup.
* How commands are modified and saved in your BIOS Setup screens. Typically, Page Up & Page DN are used to change values, and F10 is used to save and exit from BIOS, but check your system's manuals for specifics on this information. Some setup menus even have context-sensitive help, so try that, too.
Armed with this information, you want to raise the optical drive (CD or DVD drive) above the system's hard drives in the boot order, and then save the setup and exit from the BIOS Setup screen. Your system will restart upon exit from the setup screen.
Booting From The Live CD:
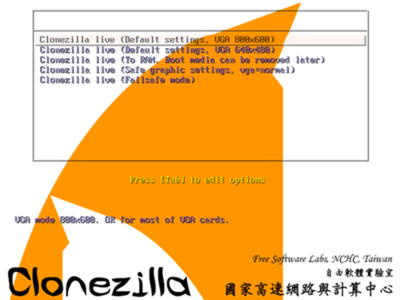
Now that the system is configured to boot from the optical drive, if you haven't already done it, insert the Live CD into the drive and allow the system to boot from it. If all goes well, you should sooner or later see a screen resembling this one:
(Screenshots from Clonezilla.org, used with permission.)
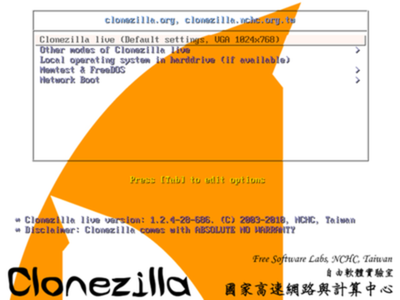
I generally accept the default setting since all my gear does 1024x768 without a problem. If you need to select a lower resolution, scroll using the down arrow key to "Other modes of Clonezilla live" and press ENTER. If you do, you will see a menu that looks like this:
From here, you may easily scroll down to a screen resolution your system is capable of displaying. Now would be a good time to mention that Clonezilla does not use graphics to speak of in the default mode - all the menus from here onward are ncurses text menus. Using your keyboard to navigate is simple enough, and more controlled than using a mouse. Once you have selected a graphics resolution and pressed ENTER, the system will go through a text-mode Linux startup, and, after that, the next screens displayed will help you select any special language and keyboard settings you might need if English and the default keymap are not suitable:
The Language screen:
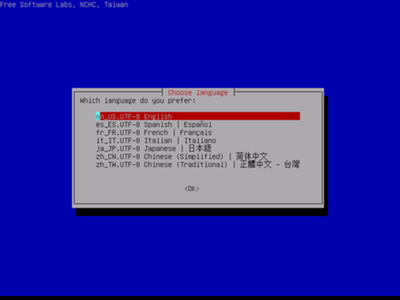
See what I mean? No fancy pictures, nor any graphics (save for "ASCII Art") to speak of, but be advised that Clonezilla supports a fair number of languages aside from English. Make sure you select the right one before proceeding, or you will likely be hard pressed to make sense of the screens that follow. Next up is the keyboard map selection:
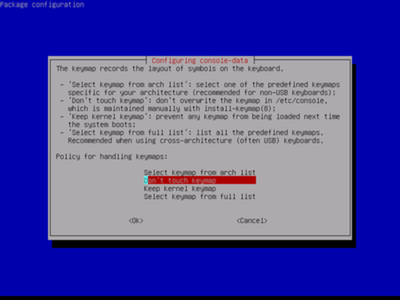
I generally don't touch the keymap, but if you are using a keyboard that requires a special keymap, here's your chance to select the right one for your keyboard. See the instructions in the menu for more details. Next up: actually starting Clonezilla. Here's the screen for that:
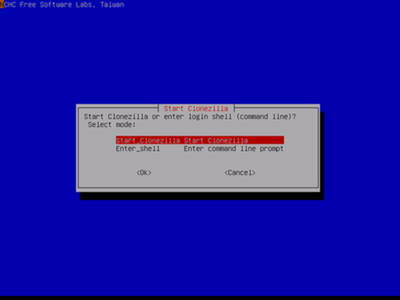
Notice that you can get to a command prompt from here. I've never actually done this, as the Clonezilla mode does everything I've ever needed. I suspect this option is there mainly for developers and more advanced users.
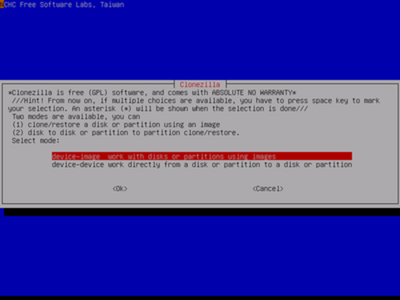
Now we are finally going to start setting up the imaging process (Hint: the instructions on this next screen are worth a look on your first time through). Here's what that screen will look like. Choose the first option, device-image, to take an image of a drive or partition.
Mounting the drive to which we will be saving the image is next. The restore phase comes later:
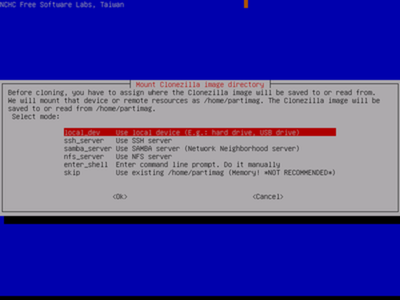
The first option, local_dev, is the one to use for sending an image to a USB device, or to another drive on the same system. Note that other options make it possible to use Clonezilla Live to send the image over a network (e.g., to a file server or other system), but that we will be doing a local backup to a USB device. Once you press ENTER to choose this option, a message displays at the bottom of the screen prompting you:
ocsrootdevice is local_dev
Preparing the mount point /home/partimag...
If you want to use USB device as a Clonezilla image repository, please insert USB device into this machine *now*.
Wait for about 5 secs then press Enter key so that OS can detect the USB device and later we can mount it as /home/partimag.
Press "Enter" to continue......
Plug in the USB device as instructed, and press ENTER. This will bring up a fairly long list of USB enumeration data showing that the system has detected the device. The last message should show:
[ XXX.xxxxxx] sd 4:0:0:0: [sdb] Attached SCSI disk
where XXX.xxxxxx is a number of some kind - I honestly don't know what significance it has.). Take note in the above line what appears where [sdb] appears in the line above, as that information will be useful to you in the next screen if you're following along. Once a similar message to the above is displayed and you know where the device you are using is attached ([sd-whatever]) it is safe to press ENTER to continue.
The next screen will allow you to mount the USB device just attached to the system on /home/partimag. Again, the instructions here are definitely worth a look the first couple of times through.
NOTE: in the case of my demo system, which only has one SATA drive, the USB drive I'm using attached as /dev/sdb, but in a system with more than one drive the USB device may fall out farther down the chain. This is why I recommended you read where your own system attached the device in the previous step.
Unhappily, I don't have screenshot of this particular screen, and it's an important one. The instructions are particularly relevant here, and state:
Now we need to mount a device as /home/partimag (Clonezilla image(s) repository) so that we can read or save the image in /home/partimag.
///Note/// You should NOT mount the partition you want to backup as /home/partimag. The partition name is the device name in GNU/Linux. The first partition in the first disk is "hda1" or "sda1", the 2nd partition in the first disk is "hda2" or "sda2", the first partition in the second disk is "hdb1" or "sdb1". . . If the system you want to save is MS windows, normally C: is hda1 (for PATA) or sda1 (for PATA, SATA, or SCSI), and D: could be hda2 (or sda2), hda5, (or sda5)...:
sda1 12.9GB_ext4(In_ST9120822AS_)_ata-ST9120822AS_5LZ3NND8
sda6 103GB_ext4(In_ST9120822AS_)_ata-ST9120822AS_5LZ3NND8
sdb1 160GB_ntfs(In_HTS541616J9SA00_)_usb-Hitachi_HTS541616J9SA00_FFFACFF0FF000000FB2404FFCFF9Fe-0:0
Here we see in my list, sdb1 is my 160GB external drive, (formatted NTFS so I can use it at work, too), so I scroll down to sdb1's freakishly long entry and press ENTER to continue.
The next screen lists the top-level directories on the USB drive, and asks which directory is for the Clonezilla image. I have created a folder on this device called Clonezilla which I will select by scrolling down to it and then pressing ENTER to continue. Any convenient folder will do, even the root. Clonezilla creates a folder for the image within whatever folder you select.
What is next displayed at the bottom of the screen is a disk usage map so that you have a chance to abort if you don't think you have enough space on the target device. Checking the entry for /tmp-local-dev/Clonezilla I see it has 51 gigabytes free (more than enough to house my freshly installed system), and it is mounted on /home/partimag where it belongs. I press ENTER to continue.
The next screen will show a choice between Beginner and Expert modes. I'm willing to admit I'm still a beginner here, but your mileage may vary (if so, I wish you luck!). Choosing "Beginner" I press ENTER again to continue.
Finally a screen for which I have a shot appears:
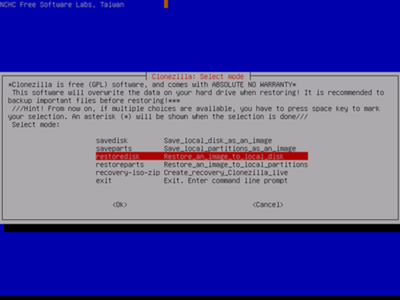
In this screen, we do not want to do a restoredisk as shown- we want to do a savedisk. This should be the default option for this screen, meaning the red highlight bar will be over it. In any case, select savedisk and press ENTER to continue. Once we've been through the demo, feel free to do a saveparts to save partitions, but we're not doing that just now.
The next screen that displays will show the default filename Clonezilla has chosen for your image. Mine looks like: 2011-05-19-01-img. Notice there are no spaces, special characters, or other invalid stuff in this folder name (that's what it is, really). The default is the date in Japanese format (YYYY-MM-DD) followed by a two digit number which naively assumes we won't be making more than 99 images in a single day. You can, of course, alter this, so I will rename mine as follows:
2011-05-19-01-Compaq-V500-PCLinuxOS-img
That's just so I can look at the image and tell a little more about where it came from. I press ENTER to continue, and I'm greeted with another screen asking me to choose a local disk as the source (this is the drive we'll be taking the image from). This choice is easy for me: there's only one hard drive on my system. If your hardware varies signficantly, do the reading and make the choice that will yield the desired result. Whatever you choose is about to be imaged, and the image will be compressed and stored on the target device you have previously selected.
Pressing ENTER to continue (yeah, there's a pattern here), I'm greeted with another screen asking if I want the image checked for restorability. On your first image, it is a good idea to do this, but it takes a bit of extra time (so you'll have to decide for yourself). I will opt to check the saved image and... yeah, there's that ENTER key again.
A block of green text at the bottom of the screen informs me that:
**********************************************************************
PS. Next time you can run this command directly:
/opt/drbl/sbin/ocs-sr -q2 -c -j2 -z1p -i 2000 -p true savedisk 2011-05-19-01-Compaq-V500-PCLinuxOS-img sda
This command is also saved as this file name for later use if necessary: /tmp/ocs-2011-05-19-01-Compaq-V500-PCLinuxOS-img-2011-05-19-01-30
Press "Enter" to continue...
Yep, I'm in for a penny, in for a pound now. Pressing ENTER this time scrolls by a bunch of text and stops with a prompt at the bottom of the screen asking:
Are you sure you want to continue? ? (y/n)
If you press n now, you've just aborted the whole thing and will have to start over if you intend to take an image anytime soon. I press the y key to continue taking the image, and follow it with ENTER.
A whole 'nuther bunch of text will scroll by rather rapidly, at the bottom of which will be a status line which updates the elapsed time, time remaining, percent completion, and the data transfer rate. My crummy little USB drive is doing 1.61 gigs/ minute! The first partition (12.9 gigs, about 4.7 gigs of which is used) is written in a little under two minutes. The /home partition (which only has two gigs of data) takes about a minute and 41 seconds. The recoverability check proceeds automatically, one partition after the other, and takes less than a minute to complete both. Well worth it in my book!
The last message the system will send you is about how to get out. The important part for now is:
****************************************************************
When everything is done, remember to use 'poweroff', 'reboot' or follow the menu to do a normal
poweroff/reboot procedure. Otherwise, if the boot media you are using is a wratable device
(such as a USB flash drive), and it's mounted, poweroff/reboot in abnormal procedure might
make it FAIL to boot next time!
****************************************************************
Press "Enter" to continue...
Yep, press ENTER again. Don't worry, we'll quit before we wear out the ENTER key, hopefully. A short menu at the bottom of the screen is displayed:
"ocs-live-general" is finished.
Now you can choose to:
(0) Poweroff
(1) Reboot
(2) Enter command line prompt
(3) Start over
[2]
That [2] indicates that "Start Over" is the default selection. Me? I'm going to select 1 to reboot the system. Unmount messages and a rude little chirp from the speaker let me know the system is rebooting. When the drive tray pops open on the CD-ROM, I retrieve the disk from the drive, shut the tray door, and (for the LAST TIME, thank goodness) press ENTER to continue.
That completes the process of taking a system image of a disk. My "bare" PCLinuxOS KDE system, (which weighed in around 6.7 gigs) compressed to just under a gigabyte! Wow, that's tight! (I know from experience that this is typical of the "default" compression used by Clonezilla, and is very reliable.) This image could now be transferred to a DVD for archival storage very easily.
The restore process is virtually identical to that which we just completed except that restoredisk is selected at the mode screen instead of savedisk, and the prompts will ask for a source from which to read the image data, which will be on the device and in the folder where the image previously taken was stored, and then for a disk to which this image will be restored. Careful reading of the prompts (especially with regard to the restore target) should get you there safely.
Hopefully you can now play with this useful tool on your own and make it a part of your personal backup strategy. As you may have seen from this simple introduction, it is a powerful toolkit and has many more uses than I've outlined here. A word or two in parting: the Clonezilla website has a rich set of FAQs, and offers a mailing list and forums for support from a very active community of users and developers. Reading and getting involved there will certainly enrich your understanding and help make Clonezilla even more useful to you.
The next tool I hope to survey is luckyBackup, but that's for next time. Until then, may all your backups be recoverable!