Video Part 8 - AcidRip
by Paul Arnote (parnote)There is another video tool in the PCLinuxOS repository that you will want to have in your video tool chest. AcidRip makes it very fast and easy to rip your DVDs to AVI files. Written in Perl and Gtk+ 2.0, AcidRip provides a graphical user interface to the mencoder command line utility, and literally provides one click transcoding from a DVD (if you accept all of the default values).
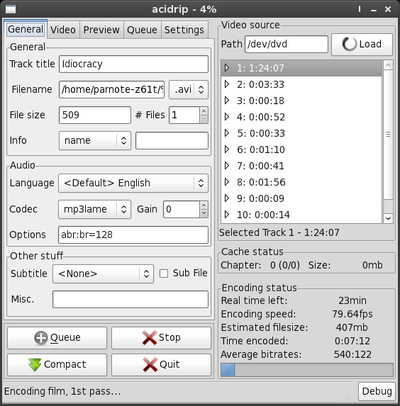
When you first launch AcidRip, you will see something similar to the screen shot above. The window is divided into five tabs, where you can set the options for the transcoding of your DVD movie, as well as the options for how AcidRip behaves and performs.
The first tab is called “General.” In the upper section of the tab, you can label the title of the DVD track you want to transcode, as well as the location and name of the file. You can select between saving your transcoded video file as either an AVI or MPG file. If you are wanting to possibly store the video file on a CD-R, you can set the target size of the final transcoded video file (700 MB). You can also specify how many files you want to transcode the DVD to. The advantage of this is that if you specify multiple files, each targeted at a specific file size, you will end up with video files that use a higher video bitrate, which increases the overall quality of your video images. The target file size option is disabled if you lock the video bitrate setting in the “Video” tab.
In the middle section, “Audio,” you set the format and bitrate of the audio track for your transcoded video. MP3 audio, using mp3lame, at 128 kbps, is the default, but you can select from FAAC encoded audio, PCM (*.wav) audio, MP2 audio (via twolame), lavc encoded audio, or to just copy the audio track as is from the DVD.
The bottom section, “Other stuff,” allows you to choose if you want to include subtitles with your transcoded video.
The four buttons at the very bottom left of the screen are static throughout all the tabs. The “Queue” button adds titles from the DVD to a list of items to transcode. The “Compact” button allows you to switch between the compact view that appears when you start the transcoding and the window presenting the full view. The “Stop” button, stops the transcoding, and appears as the “Start” button before you begin to transcode your video. Naturally, the “Quit” button exits AcidRip when you are finished transcoding video.
Similarly, the right side of the AcidRip window is static, as well. It lists the titles on the DVD in the upper right, and lists a summary and progress bar of the current job in the lower right.
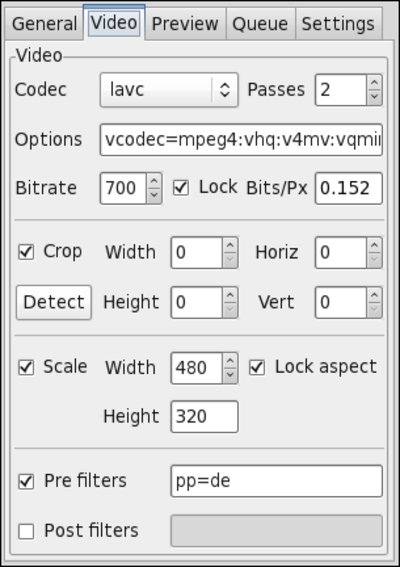
Under the “Video” tab, you make the settings for your transcoded video. At the top of the tab window, you select the video codec you wish to use. The default is lavc, but you can also select from Xvid, x264, vfw and qtvideo, as well as a couple of others. You can also select how many passes you want to make through the video. As we’ve mentioned before, there is a huge advantage to using two pass encoding, and the quality gain far outweighs the disadvantage of taking twice as long to transcode your video.
In the “Options” field, you can set or select any mencoder command line options that you like. Refer to the mencoder man files for more information on how to use those command line options.
If you’ve set a target file size, the resulting video bitrate will be shown in the bitrate entry, and you cannot change the setting. It merely becomes an “informative” entry, to let you know what video bitrate will be used during the transcoding. However, if you place check the “Lock Bits/Px” setting, as I have done here, you will have full control over the video bitrate, and the target file size entry changes to a state where it cannot be changed. For my video transcoding, I’ve opted to target a specific video bitrate, allowing the file size to fall where it may.
The next section of the Video tab allows you to crop your video image, if you feel it is necessary. Be careful that your resulting video height and width are evenly divisible by 16. Otherwise, you may end up with a video file that may not play back properly.
If you want to change the output size of your video, select the “Scale” check box. If you select the “Lock Aspect” setting, setting either the height or the width that you want will make the other default to a proportional value. For my video transcoding, since I’m converting the video for playback on my Blackberry Storm, I want my video to be 480 pixels wide. Fortunately, these are also the default values for AcidRip.
The next settings, “Pre filters” and “Post filters,” allow you to apply special filters for your transcoded video. The default values are shown in the screen shot. For what it’s worth, the “pp=de” setting is a mencoder command that deinterlaces the video before it is recorded to the video file.
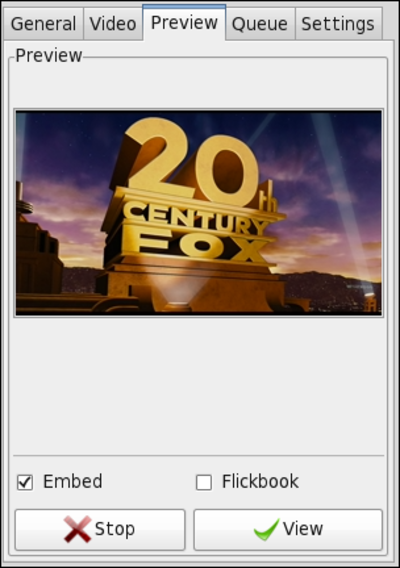
Under the “Preview” tab, you can check to see if you have selected the correct title from the DVD. Checking the “Embed” setting causes the selected DVD title to appear embedded in the AcidRip window, which is also the default setting. If you clear the check box, the preview will appear in a separate MPlayer playback window. Selecting the “View” button will also cause the DVD title selection to appear in a separate MPlayer playback window, regardless of the selection of any of the check box options.
I found the “Flickbook” setting to not be very useful. On my computer, at least, the images flicker by so fast that you can’t even tell what they are.
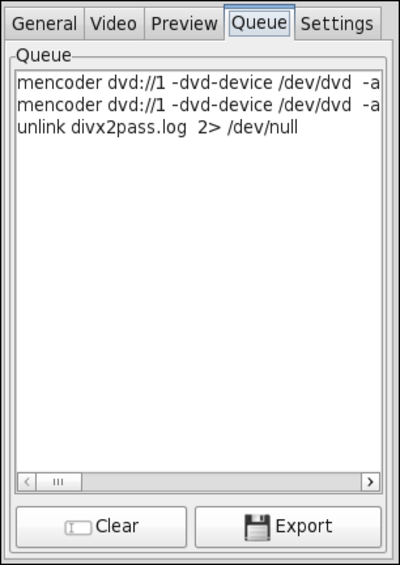
Under the “Queue” tab, you can examine the mencoder command line that is used to transcode the selected title(s) from the DVD. If you want to save these commands, or if you just want to take a look at the mencoder command line used (say, maybe you want to learn more about the mencoder command line), clcking on the “Export” button will allow you to save the output in the Queue tab to a file.
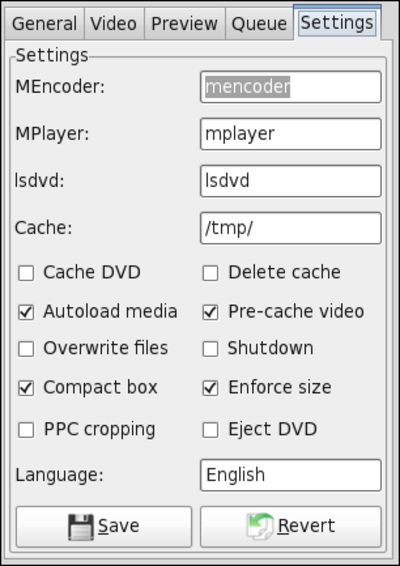
The “Settings” tab allows you to select the options that dictate how AcidRip runs. You can specify the location of the Mencoder, MPlayer and lsdvd application files, as well as the location to use to store the cached files.
Of the options presented, there are only a few that you are likely to find useful. I selected the “Autoload media” option, so that the DVD is automatically loaded when it is inserted into the computer’s DVD player. The default value is unchecked. The other three selected options are the default values for AcidRip, and I have left them unchanged. Selecting the “Revert” button will reset the settings to their default values.
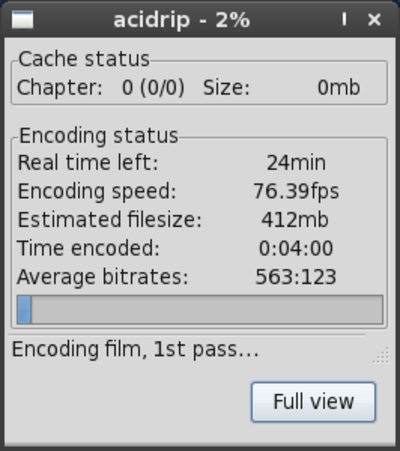
Once you have everything set up how you like it, select the “Start” button. The window displayed on the screen will change to one similar to the one above. This window will keep you updated on the progress and status of your video transcoding. The really nice thing about replacing the main window with this window during the video transcoding is that it makes it much harder to accidentally stop the transcoding process. To do so, you will have to specifically switch back to the main window (by pressing the “Full view” button), and then click on the “Stop” button.
Summary
AcidRip lives up to its billing as being able to transcode DVDs to video files with one click. For most people, the default values will be more than adequate. Of course, you can also tweak those values to your heart’s content. Plus, the more you understand about how mencoder works, the more you’ll be able to milk out of AcidRip.
Basically, if MPlayer can play the DVD, then AcidRip can transcode that DVD to a video file. Initially, I tried AcidRip with my DVD copy of the latest Star Trek movie. I was beginning to think something wasn’t working properly with AcidRip, until I tried playing the DVD. In fact, Phoenix wouldn’t even mount the DVD when I placed it in the DVD player on two different computers. After further investigation, I discovered that even MPlayer couldn’t play the DVD, presumably due to the copy protection scheme used on the DVD. After choosing a different movie (Idiocrocy, from Mike Judge), everything worked as it should.
Often overlooked, AcidRip deserves a prominent place in your video tool chest.