Alternate OS - Plan 9 Part 1
by Darrel Johnston (djohnston)
 secure
Glenda, Plan9’s bunny mascot, in a space suit.
This article is not about Plan9 From Outer Space. It is about Plan9 from Bell Laboratories. It was created in the late 1980s as a research operating system. Some of the team members were also involved in the original creation of UNIX and the C programming language.
In 1992, Bell Labs provided the first public release of Plan9 to universities. In 1995, a commercial second release version became available to the general public. In the late 1990s, Lucent Technologies, having inherited Bell Labs, dropped support for commercial interests in the project. In 2000, a non-commercial third release was distributed under an open source license. A fourth release under a new free software license occurred in 2002.
A user and development community, including current and former Bell Labs members and Massachusetts Institute of Technology personnel, continues to produce minor daily releases in form of ISO images. Bell Labs still hosts the development. The development source tree is accessible over the 9P and HTTP protocols and is used to update existing installations. In addition to the official components of the OS included in the ISOs, Bell Labs also hosts a repository of externally developed applications and tools.
Like the BSDs, Plan 9 is an operating system kernel and a collection of application programs. Most of the software is written for Plan 9 rather than ported from Unix or other systems. It was the first operating system with complete support for the UTF-8 Unicode character set encoding. The graphics display capabilities are built into the kernel, rather than relying on an external server or user space. It is sometimes difficult to port external software to Plan 9. In particular, Plan 9 has no full-featured web browser.
Before UNIX, most operating systems had different mechanisms for accessing different types of devices. For example, the application programming interface (API) to access a disk drive was different from the API used to operate a printer. Unix attempted to remove these distinctions by performing all input/output operations via disk inodes. Every device driver was required to support read and write operations as a means of control. This allowed users to send data from one device to another without being aware of the underlying implementation details. However, as new features like the X Window System were developed, they were implemented outside of the file system. New hardware features, such as the ability to eject a CD in software, also encouraged the use of hardware-specific control mechanisms. The Plan 9 research project rejected these different approaches and returned to the file system-centric view of the system. Each Plan 9 program views all available resources, including networking and the user-interface resources, such as the window it is running in, as part of the hierarchical file system, rather than specialized interfaces.
Plan 9 has a distributed architecture. It can be installed and used on a single self-contained system, but also has the capability to separate the functional components of the OS between separate hardware platforms. In a typical Plan 9 installation, users work at lightweight terminals running the rio GUI and connect via the network to CPU servers that handle computation-intensive processes, with permanent data storage provided by additional hosts acting as file servers and archival storage. Currently available desktop computers can also re-create this architecture internally using multiple virtual machines.
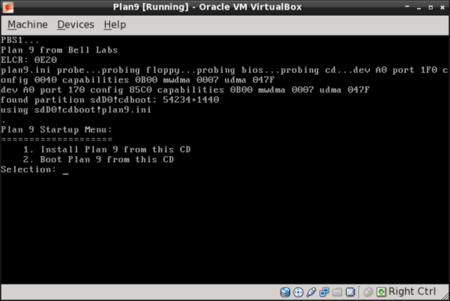
This article will deal with Plan9 installed as a single self-contained system, running within a virtual machine. The Plan 9 CD image is both a live boot CD and an installation CD. When you boot it, a menu will give you a choice between the two. You can boot as a live CD to explore the system. You can obtain the ISO image here. The system requirements for running the OS from the CD, or installing it, are 32MB of RAM and 300 MB of unpartitioned disk space on a primary partition. The installer on the CD assumes that your CD-ROM is on the second IDE master. VirtualBox sets up the CD device this way by default. For this installation, I allocated 512MB of RAM, and a dynamically sized disk partition of 1GB.
The downloaded ISO image is a bzipped file that must be uncompressed to get the resulting ISO CD image. After setting up the VirtualBox Plan9 VM, we begin by booting from the CD. You will see a plain text menu with the option to install Plan9 or to run the OS from the CD. Choose the install option.
OPTIONS:
(text shown in [] brackets is the default choice)
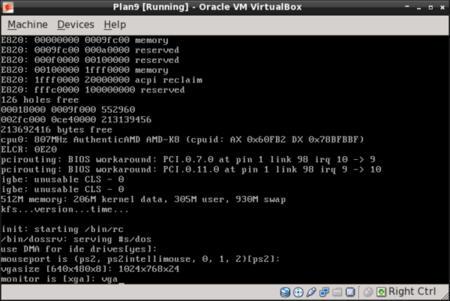
1. use DMA for ide drives[yes]: press ENTER for yes
2. mouseport is (ps2, ps2intellimouse, 0, 1, 2)[ps2]: press ENTER for ps2
3. vgasize [640x480x8]: That screen resolution is too small. Change the options to 1024x768x24
4. monitor is [xga]: enter vga
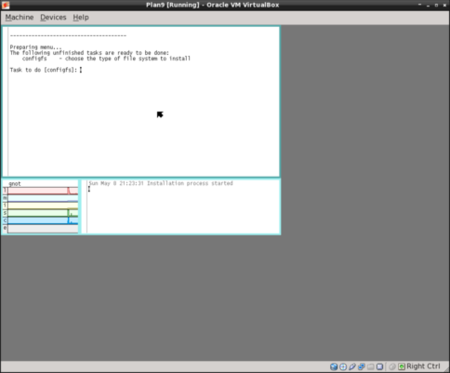
The installation process will begin within a Plan9 GUI window as shown below. Rather than show a screenshot for each step in the installation process, I will summarize the messages given. The messages associated with a step number are complete, along with the response that should be given to complete that step.
INSTALLATION PROCEDURE:
(text shown in [] brackets is the default choice)
1. Task to do [configfs]: press ENTER
2. File system (fossil, fossil+venti)[fossil]: press ENTER
The following tasks are done:
configfs - choose the type of filesystem
The following unfinished tasks are ready to be done:
partdisk - edit partition tables
3. Task to do [partdisk]: press ENTER
The following disk devices were found,
sdC0 - VBOX HARDDISK
sdD0 - VBOX CD-ROM 1.0
4. Disk to partition (sdC0, sdD0)[no default]: Enter sdC0
The disk you selected HAS NO master boot record on its first sector.
5. Install mbr (y, n)[no default]: enter y
This is disk/fdisk; use it to create a plan 9 partition. … you can probably just type “w” and then “q”.
6. enter w
7. enter q
The following unfinished tasks are ready to be done:
prepdisk - subdivide plan 9 disk partition
8. Task to do [prepdisk]: press ENTER
9. Plan 9 partition to subdivide (/dev/sdC0/plan9)[/dev/sdC0/plan9]: press ENTER
This is disk/prep; use it to subdivide the Plan 9 partition. … you can probably just type “w” and then “q”.
(A suggested plan9 partition table will be displayed.)
10. enter w
11. enter q
The following unfinished tasks are ready to be done:
fmtfossil - initialize disks for a fossil server
12. Task to do [fmtfossil]: press ENTER
You have the following fossil partitions.
13. Fossil partition to format (/dev/sdC0/fossil)[/dev/sdC0/fossil]: press ENTER
The following unfinished tasks are ready to be done:
mountfs - choose and mount file system partition
14. Task to do [mountfs]: press ENTER
The following partitions name fossil* were found. Please choose one as the installation file system …
15. Fossil partition (/dev/sdC0/plan9)[/dev/sdC0/plan9]: press ENTER
The following unfinished tasks are ready to be done:
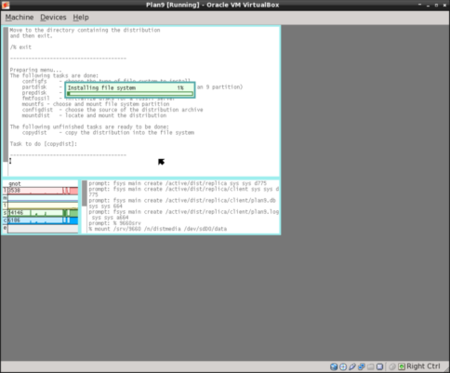
configdisk - choose the source of the distribution archive
download - download or continue to download the distribution archives
16. Task to do [configdist]: press ENTER
17. Distribution is from (local, net)[local]: press ENTER
The following unfinished tasks are ready to be done:
mountdist - locate and mount the distribution
download - download or continue to download the distribution archives
18. Task to do [mountdist]: press ENTER
The following storage media were detected.
Choose the one containing the distribution.
/dev/sdC0/fossil (plan9 fossil)
/dev/sdD0/cdboot (microsoft fat)
/dev/sdD0/data (iso9660 cdrom)
19. Distribution disk [no default]: enter /dev/sdD0/data
Which directory contains the distribution?
Any of the following will suffice (in order of preference):
- the root directory of the CD image
- the directory containing plan9.iso
- the directory containing plan9.iso.bz2
Typing ‘browse’ will put you in a shell that you can use to look for the directory.
20. Location of archives [browse]: press ENTER
This is a simple shell. Commands are:
cd directory - change to directory
lc - list contents of current directory
exit - exit shell
Move to the directory containing the distribution and then exit.
21. (At the /% prompt) enter exit
At this point, the installation will begin copying files to the selected file system with a progress bar showing.
The following unfinished tasks are ready to be done:
bootsetup - create a boot floppy or configure hard disk to boot plan 9
22. Task to do [bootsetup]: press ENTER
Initializing Plan 9 FAT configuration partition (9fat)
….
There are myriad ways to boot a Plan 9 system.
….
23. Enable boot method (floppy, plan9, win9x, winnt)[no default]: enter plan9
If you use the Windows NT/2000/XP master boot record or a master boot record from a Unix clone (e.g., LILO or FreeBSD bootmgr), it is probably safe to continue using that boot record rather than install the Plan 9 boot record.
24. Install the Plan 9 master boot record (y, n)[no default]: enter y
The following unfinished tasks are ready to be done:
finish - finish the installation and reboot
25. Task to do [finish]: press ENTER
Congratulations; you’ve completed the install.
Halting file systems...done
Remember to take the install disk out of the drive.
Feel free to turn off your computer.
At this point, we need to click the close button on the VirtualBox window and answer Power off the machine in the requestor window. Having done that, detach the CD image from the Plan9 VM, then start the VM again.
The boot menu is all text. At the prompt ->
root is from (tcp, local)[local!#S/sdC0/fossil]: press ENTER
At the prompt ->
user[none]: enter glenda
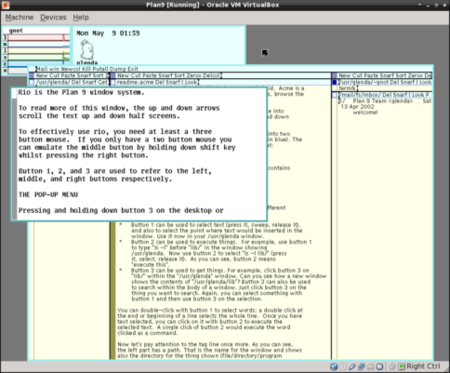
Plan9 has entered a GUI environment, and we are logged in as user glenda. The window at the front is a set of help instructions.
Next month we’ll learn how to navigate the system, create a new user and update the distribution.