Openbox: Tips & Tricks
by Darrel Johnston (djohnston) & Paul Arnote (parnote)
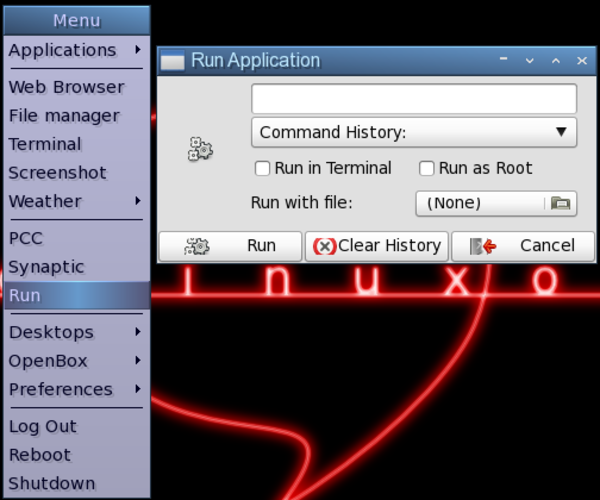
Add a run dialog to the Openbox menu
Open Synaptic and install the gnome-run-dialog package. Once that is accomplished, open the ~/.config/openbox/menu.xml file in a text editor. Add a section like the one shown below.
<item label="Run">
<action name="Execute">
<execute>
gnome-run-dialog
</execute>
</action>
</item>
The item label is what we want shown in the Openbox menu. gnome-run-dialog is the program we want executed when we click on Run in the Openbox menu. Once you have edited and saved the menu.xml file, you can freshen the Openbox menu by logging out, rebooting, or clicking on Reconfigure or Restart in the submenu of the OpenBox label. Once you click on Run in the menu, the gnome-run-dialog window will appear.
Turn off fades and shadows to speed things up
In the Bonsai version of the PCLinuxOS Openbox edition, xcompmgr is disabled. We can enable it at login by opening the ~/.config/openbox/autostart.sh file and uncommenting the line #xcompmgr & by removing the # sign at the beginning of the line. However, this is unnecessary, as the composite manager effects can be turned on and off from the Openbox menu.
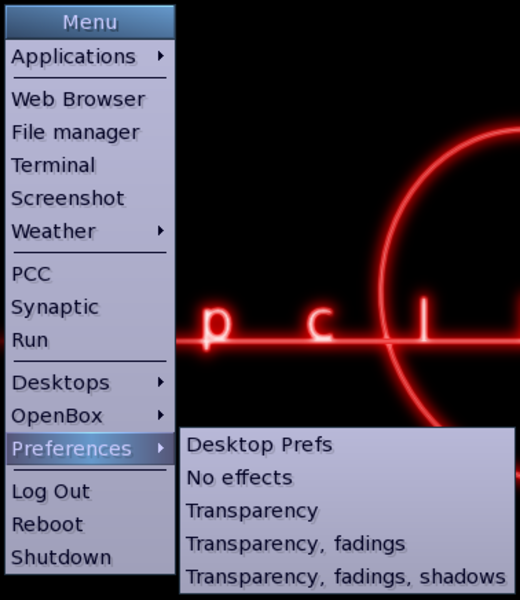
If the effects are off, selecting any of the Transparency menu items will turn the composite manager on. Doing so will automatically uncomment the xcompmgr & line in the autostart.sh file by executing one of the ~/.config/openbox/scripts/xcompmgr.sh options, as defined in the menu.xml file. Selecting Transparency will execute ~/.config/openbox/scripts/xcompmgr.sh set. Selecting Transparency, fadings will execute ~/.config/openbox/scripts/xcompmgr.sh setshaded. Selecting Transparency, fadings, shadows will execute ~/.config/openbox/scripts/xcompmgr.sh setshadowshade. Selecting No effects from the menu will comment the #xcompmgr & line in the autostart.sh file, and will execute ~/.config/openbox/scripts/xcompmgr.sh unset in the menu.xml file. Any changes made are kept at next login.
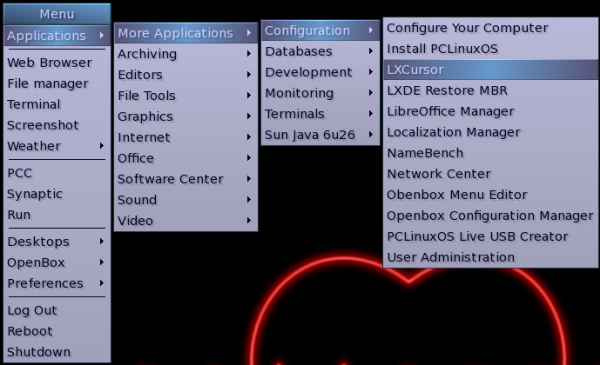
Use lxcursor to change cursor theme
We can use lxcursor to change our cursor theme. Open Synaptic and install the lxcursor package. Once that is accomplished, there is nothing to edit in the Openbox menu.xml file, unless you want to show the item in the main portion of the menu. We will, however, need to edit the desktop file, located at /usr/share/applications/lxcursor.desktop. As user root, open the desktop file in a text editor. Scroll down towards the bottom of the file and locate the line OnlyShowIn=LXDE;. Here, you can either comment the line by adding the # symbol at the beginning of the line, or by deleting the entire line. Once the changes have been made, save the desktop file. To have the LXCursor item show in the Openbox submenu, freshen the Openbox menu by logging out, rebooting, or clicking on Reconfigure or Restart in the submenu of the OpenBox label.
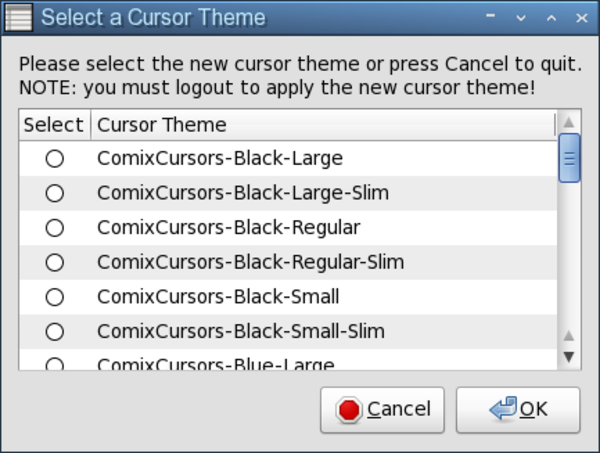
If you change the current cursor theme, the change will not take effect until you have logged out and logged in again.
x--> (just a placeholder
for comments so the above image doesn’t get highlighted)
Screenshots Via The Keyboard – Revisited
In the November 2010 issue of The PCLinuxOS Magazine, back when we were wrapping up our series of articles on the LXDE desktop, we covered how to add keybindings to take screen shots (see the Advanced Keyboard Shortcuts section of the article).
One problem with the keybindings, as they were presented, is that they take the screen shot immediately. Normally, this isn’t necessarily a problem. But it is if you want to capture menus in your screen shots, or some other on-screen animations (as I needed to do when taking the screen shots for the article on launch bars), taking the screen shots immediately won’t work.
Fortunately, there is a solution, and it’s quite simple. For example, take the command to capture the full screen shot (as excerpted from the original article):
bash -c "xwd -root | convert - /tmp/screenshot-$(date +%s).png"
I simply added sleep 5; to the beginning of the command that is between the quotes. This provides a five second delay before carrying out the rest of the command that takes a screen shot of the full screen. The five second delay gives you ample time to activate a menu or animation that you might want to capture in the screen shot. This command uses the keybinding Ctrl + Print.
While I was “tinkering” with this command, I also took time to reformat the file name and where my screen shots were stored. As it was in the original article, it a) stored the image in your /tmp directory, and b) used a cryptic number after the date that specified how many seconds since 01-01-1970 UTC (the %s in the command above).
Instead, I changed the location where the screen shots are saved. I created a “Screenshots” directory under my “Pictures” directory, and used that instead. Second, I reformatted the information after the date to reflect something that is more easily read (and understood) by humans. I ended up with this:
bash -c "sleep 5;xwd -root | convert - ~/Pictures/Screenshots/screenshot-$(date +%F-%H-%M-%S).png"
The %F uses the full date (YYYY-Month-Day), then prints a dash, then the hour (%H, based on a 24 hour clock) as two digits, another dash, then the minutes (%M) as two digits, another dash, then the seconds (%S) as two digits. Done this way, it makes it easier to locate the appropriate screen shot in a directory full of other screen shots.
Another Thing About Screen Shots
The above method does have one teensy-weensy problem: it won’t capture transparency areas of a screen image that you may want to preserve. Instead of showing the transparency, it shows a transparent region as black. Most of the time, that is not a problem – unless I’m trying to show the transparency in the screen shot.
One of the applications I routinely use from the PCLinuxOS repository is MTPaint. When it comes to cropping an image for the magazine, there’s little else that beats the simplicity of MTPaint. It’s much faster to load than Gimp, and it makes sense to me to use a simple tool for a simple job.
Fortunately, MTPaint will also take screen shots. Anyone who has installed MTPaint from the PCLinuxOS repository will also notice that there are two entries in the Graphics section of the applications menu: one for the MTPaint program itself, and another one labeled MTPaint Screenshot. The latter will preserve any level of transparency that is displayed on your screen, as well, which is why I like to use it.
The only problem is that MTPaint Screenshot takes the screen shot image immediately. This doesn’t allow me to capture any menu images or animations on the screen that I may also need to display. Fortunately, the solution was only a very short bash script away.
Borrowing from my five second delay I added to the keybinding method above, I created a bash script that executed a five second delay, and then used MTPaint to capture the screen shot. Here’s the simple bash script:
#! /bin/bash
sleep 5
/usr/bin/mtpaint -s
The first line (of course, after the bash line) causes a five second pause before executing the second line, which runs MTPaint in the screen shot mode (hence, the -s command line option).
The only drawback here is that MTPaint will only grab a screen shot of the entire screen. But, what the hey. It also loads it into the MTPaint editor, where I can easily crop the image to only the part that I need.
Add A Power Manager & Monitor
Openbox, as it comes, doesn’t have its own power manager or monitor. However, you can install the Gnome Power Manager, via Synaptic. With Gnome Power Manager, you can monitor your power and battery status. Additionally, it will warn you when your laptop battery gets low, and suspend, hibernate or shut down your computer when it the battery becomes critically low. Fortunately, Gnome Power Manager doesn’t pull in many Gnome dependencies, helping to keep your Openbox installation light and nimble.
To insure that mine starts every time I start my computer, I added the following two lines to my autostart.sh file, in my ~/.config/openbox directory:
gnome-power-manager &
sleep 1
Now, Gnome Power Manager starts and runs in my system tray all the time, keeping a watchful eye on the status of my power and battery status.
Let There Be Sound
Well, okay. I may be exaggerating a bit, but out of the starting gates, Openbox doesn’t have a sound volume manager running either. Check in Synaptic to see if VolumeIcon is installed already. If it isn’t, go ahead and install it.
Next, much as we did with the Gnome Power Manager above, add the following two lines to your autostart.sh file:
volumeicon &
sleep 1
Now, whenever you start up your computer, VolumeIcon will be ever present to allow you quick and easy access to controlling the sound volume on your computer.