Create A Software RAID1
by Darrel Johnston (djohnston)
Backup, backup, backup your personal files. Your vacation pictures, family tree history files, the movie of your daughter’s graduation, financial spreadsheets and digital art you created cannot be replaced if they are lost. Unless, of course, you have backups. A backup program can be manually run by the user, but that requires the discipline of the user remembering to run the backup. A backup program can be scheduled to be run automatically. However, that means that any new files written after the last backup can potentially be lost before the next backup is scheduled to be run. Creating the backups takes extra disk space, even if the disk space is part of an internet storage service.
With a RAID1 array setup, there is very little chance that you will ever lose your data. That is because a RAID1 disk array is a mirrored setup. Anything written to one disk or set of disks is also written to the mirrored disk or set of disks. So, although you need at least one extra hard drive to set up the disk array, it is not much different from needing extra disk space to store your program-created backups. The advantage is that the backup files are created almost instantaneously. With a two disk RAID1 setup, if one drive fails, the other one keeps running. Once a replacement drive for the failed one is installed, the still running drive synchronizes all its data to the new blank drive. After synchronization is complete, the two drives begin reading and writing data in tandem again.
Many of today’s motherboards come with RAID capabilities built into the board. And, add-on RAID controllers can be bought for reasonable prices. In reality, though, you do not need a hardware RAID controller in order to enjoy the benefits of a RAID1 setup. You can control the RAID1 entirely with software from the PCLinuxOS repositories. Although there may be a slight performance decrease in using a software driven setup rather than a hardware driven one, the performance loss won’t be very much. All you need are two matched hard drives and the willingness to convert them into a RAID1 array.
What I mean by matched hard drives is that they should be close to equal in capability. They do not have to be exact twins. The potential storage capacity of the RAID1 array is only as large as the smallest drive in the array. And the potential read and write speeds in the array are only as fast as the slowest drive in the array. So, it is important to match the drives as closely as possible. You would not want to use a 300GB drive with a 500GB drive because the total capacity of the RAID1 array would be 300GB. The extra 200GB space on the 500GB drive would not be used. The read and write speeds should be close to the same because the slower drive will cause unneeded wait times for the faster drive.
Before beginning, be sure you have the following packages installed on your system from Synaptic: dmraid, dmraid-events, libdmraid1 and mdadm. The setup in this tutorial assumes that the user will use the RAID1 array as a data storage device, and not as a home directory or root filesystem partition. I set up a software RAID1 using two 10GB hard drives and started by creating sdb1 and sdc1 partitions with fdisk.
Creating the RAID1 array
[root@localhost ~]# fdisk /dev/sdb
Command (m for help): n
Command action
e extended
p primary partition (1-4)
p
Partition number (1-4, default 1): 1
First sector (2048-20971519, default 2048):
Using default value 2048
Last sector, +sectors or +size{K,M,G} (2048-20971519, default 20971519):
Using default value 20971519
Command (m for help): t
Selected partition 1
Hex code (type L to list codes): fd
Changed system type of partition 1 to fd (Linux raid autodetect)
Command (m for help): w
The partition table has been altered!
Calling ioctl() to re-read partition table.
Syncing disks.
[root@localhost ~]#
[root@localhost ~]# fdisk /dev/sdc
Command (m for help): n
Command action
e extended
p primary partition (1-4)
p
Partition number (1-4, default 1): 1
First sector (2048-20971519, default 2048):
Using default value 2048
Last sector, +sectors or +size{K,M,G} (2048-20971519, default 20971519):
Using default value 20971519
Command (m for help): t
Selected partition 1
Hex code (type L to list codes): fd
Changed system type of partition 1 to fd (Linux raid autodetect)
Command (m for help): w
The partition table has been altered!
Calling ioctl() to re-read partition table.
Syncing disks.
[root@localhost ~]#
Next, I created the RAID1 array using mdadm, then formatted /dev/md0 with the xfs filesystem.
[root@localhost ~]# mdadm --create /dev/md0 --level=1 --raid-devices=2 /dev/sdb1 /dev/sdc1
mdadm: array /dev/md0 started.
[root@localhost ~]# mkfs.xfs /dev/md0
meta-data=/dev/md0 isize=256 agcount=4, agsize=655292 blks
= sectsz=512 attr=2, projid32bit=0
data = bsize=4096 blocks=2621168, imaxpct=25
= sunit=0 swidth=0 blks
naming =version 2 bsize=4096 ascii-ci=0
log =internal log bsize=4096 blocks=2560, version=2
= sectsz=512 sunit=0 blks, lazy-count=1
realtime =none extsz=4096 blocks=0, rtextents=0
[root@localhost ~]#
Then I checked the results by listing all drives with fdisk.
[root@localhost ~]# fdisk -l
Disk /dev/sda: 8589 MB, 8589934592 bytes
255 heads, 63 sectors/track, 1044 cylinders, total 16777216 sectors
Units = sectors of 1 * 512 = 512 bytes
Sector size (logical/physical): 512 bytes / 512 bytes
I/O size (minimum/optimal): 512 bytes / 512 bytes
Disk identifier: 0x00000000
Device Boot Start End Blocks Id System
/dev/sda1 * 63 2088449 1044193+ 82 Linux swap / Solaris
/dev/sda2 2088450 16771859 7341705 83 Linux
Disk /dev/sdb: 10.7 GB, 10737418240 bytes
107 heads, 17 sectors/track, 11529 cylinders, total 20971520 sectors
Units = sectors of 1 * 512 = 512 bytes
Sector size (logical/physical): 512 bytes / 512 bytes
I/O size (minimum/optimal): 512 bytes / 512 bytes
Disk identifier: 0x00000000
Device Boot Start End Blocks Id System
/dev/sdb1 2048 20971519 10484736 fd Linux raid autodetect
Disk /dev/sdc: 10.7 GB, 10737418240 bytes
107 heads, 17 sectors/track, 11529 cylinders, total 20971520 sectors
Units = sectors of 1 * 512 = 512 bytes
Sector size (logical/physical): 512 bytes / 512 bytes
I/O size (minimum/optimal): 512 bytes / 512 bytes
Disk identifier: 0x00000000
Device Boot Start End Blocks Id System
/dev/sdc1 2048 20971519 10484736 fd Linux raid autodetect
Disk /dev/md0: 10.7 GB, 10736304128 bytes
2 heads, 4 sectors/track, 2621168 cylinders, total 20969344 sectors
Units = sectors of 1 * 512 = 512 bytes
Sector size (logical/physical): 512 bytes / 512 bytes
I/O size (minimum/optimal): 512 bytes / 512 bytes
Disk identifier: 0x00000000
Disk /dev/md0 doesn't contain a valid partition table
[root@localhost ~]#
Notice the invalid partition table for /dev/md0. It doesn’t mean the device is unusable. It simply means fdisk does not know how to deal with a RAID device. Next, I made a mount point for md0, mounted it, checked the space on the drives, then unmounted md0.
[root@localhost ~]# mkdir /mnt/raid1
[root@localhost ~]# mount /dev/md0 /mnt/raid1
[root@localhost ~]# df -H
Filesystem Size Used Avail Use% Mounted on
/dev/sda2 7.4G 2.1G 5.0G 30% /
/dev/md0 11G 34M 11G 1% /mnt/raid1
[root@localhost ~]# umount /mnt/raid1
[root@localhost ~]#
I added one line to my /etc/fstab file:
/dev/md0 /mnt/raid1 xfs defaults 1 2
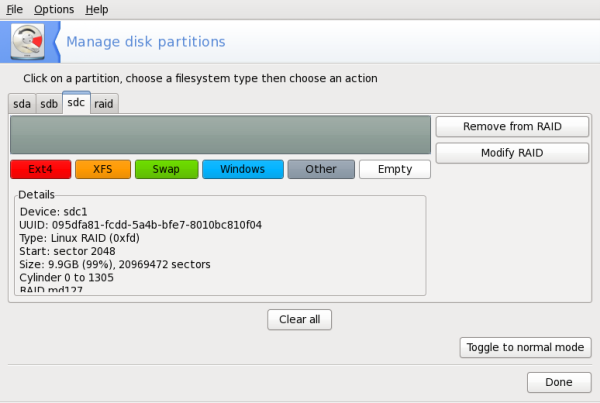
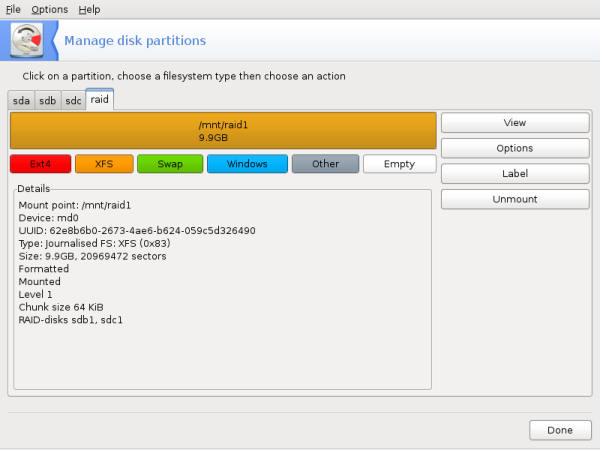
The mount point for md0 is /mnt/raid1. And sdb1, sdc1 and md0 look like the following:

I changed permissions on /mnt/raid1 to give all users full access.
[root@localhost ~]# chmod 777 -R /mnt/raid1
[root@localhost ~]# ls -l /mnt | grep raid1
drwxrwxrwx 2 root root 4096 Jun 29 03:49 raid1/
[root@localhost ~]#
Just one more step to take. As root, edit the file /etc/mdadm.conf. The entire file is commented, so I just added the line below to the bottom of the file.
ARRAY /dev/md0 devices=/dev/sdb1,/dev/sdc1 level=1 num-devices=2 auto=yes
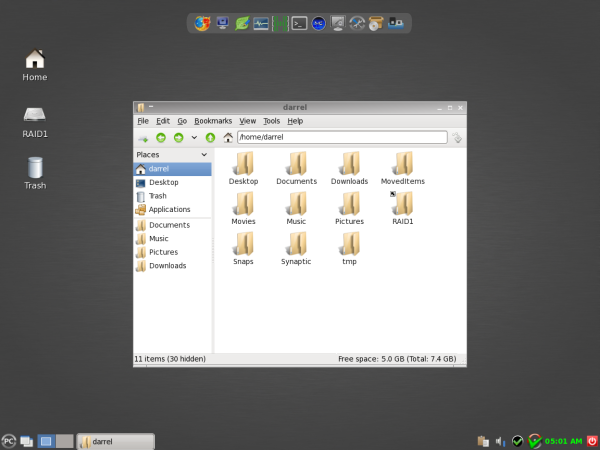
I created a desktop file on my LXDE desktop that I can click on to access the contents of the RAID1 array. I also created a shortcut to the mountpoint on my home directory by entering in a terminal:
[darrel@localhost ~]$ ln -s /mnt/raid1 ~/RAID1
My desktop and home directory look like this:
The contents of the RAID1 desktop file are:
[Desktop Entry]
Type=Application
Icon=/usr/share/icons/gnome/48x48/devices/drive-harddisk.png
Name=RAID1
Exec=pcmanfm /mnt/raid1
StartupNotify=true
Terminal=false
MimeType=x-directory/normal;inode/directory;
Encoding=UTF-8
X-Desktop-File-Install-Version=0.11
So, we now have a RAID1 array set up. Whatever is written to /dev/sdb1 will also be written to /dev/sdc1. To the system, both drives appear to be one unit, /dev/md0. And /dev/md0 is mounted as /mnt/raid1 and has a volume label of RAID1. But how can we be sure that both drives in the array are working? In a terminal, run the command: cat /proc/mdstat
You will see something similar to the following:
Personalities : [raid1]
md0 : active raid1 sdb1[0] sdc1[1]
10484672 blocks [2/2] [UU]
unused devices: <none>
Replacing a failed drive and rebuilding the array
If you have a degraded RAID1 array, instead of the string [UU] you will see [U_]. If a disk has failed, you will probably find a lot of error messages in the log files /var/log/messages and/or /var/log/syslog. Assuming that the log files show /dev/sdc1 has failed, we must remove and replace it. We will use the mdadm RAID management program for all steps. First, we have to mark /dev/sdc1 as failed.
[root@localhost ~]# mdadm --manage /dev/md0 --fail /dev/sdc1
[root@localhost ~]#
Then we check the RAID1 status. /dev/sdc1 should have an (F) designation.
[root@localhost ~]# cat /proc/mdstat
Personalities : [raid1]
md0 : active raid1 sdb1[0] sdc1[1](F)
10484672 blocks [2/1] [U_]
unused devices: <none>
[root@localhost ~]#
Next we need to remove /dev/sdc1 from /dev/md0:
[root@localhost ~]# mdadm --manage /dev/md0 --remove /dev/sdc1
mdadm: hot removed /dev/sdc1
[root@localhost ~]#
When we check the RAID1 status again, /dev/sdc1 should not be listed.
[root@localhost ~]# cat /proc/mdstat
Personalities : [raid1]
md0 : active raid1 sdb1[0]
10484672 blocks [2/1] [U_]
unused devices: <none>
[root@localhost ~]#
Once the failed drive has been logically removed from the software RAID controller, it is time to shut down the computer, physically remove the drive and replace it with another.
[root@localhost ~]# shutdown -h now
After you have replaced the failed hard drive and rebooted the computer, you can easily duplicate the partitioning scheme of the still running drive with just one command:
[root@localhost ~]# sfdisk -d /dev/sdb | sfdisk /dev/sdc
Run fdisk -l as root to check that both drives have the same partitioning. Next we need to add /dev/sdc1 to /dev/md0.
[root@localhost ~]# mdadm --manage /dev/md0 --add /dev/sdc1
mdadm: re-added /dev/sdc1
[root@localhost ~]#
Now the array /dev/md0 will be synchronized. Run cat /proc/mdstat to see when it's finished.
During the synchronization the output will look like this:
[root@localhost ~]# cat /proc/mdstat
Personalities : [raid1]
md0 : active raid1 sdb1[0] sdc1[1]
10484672 blocks [2/1] [U_]
[=>...................] recovery = 19.9% (2414398/10484672) finish=1.4min speed=126519K/sec
Once the synchronization has completed, the RAID1 array will again look like the following.
[root@localhost ~] cat /proc/mdstat
Personalities : [raid1]
md0 : active raid1 sdb1[0] sdc1[1]
10484672 blocks [2/2] [UU]
unused devices: <none>
[root@localhost ~]
xyzabc-placeholder