My PC is HOT!
by Tim Robinson
Like many people, I've never been able to afford the latest and greatest PC hardware. Most of the time, I do minor upgrades one item at a time, until I reach that point where technology has made it impossible to continue with that particular CPU and motherboard combination. Then I start the process all over. To get maximum bang for my computer buck, I have always visited local small computer shops and purchased their products. As a result, I almost never get anything in a box. The last CPU I bought was an AMD 2500+ that I paid (I think) about $50 for when the same chip at CompUSA was just under $100. I'm pretty sure I bought a "cull" or "take-off." All such chips I have used over the years have run significantly hotter than was considered normal, no matter what I did in the way of add-in fans.
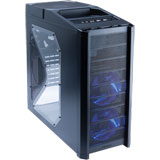
My CPU has been running pretty consistently at 60 degrees Celsius, right at the upper limit for that chip. Nothing I tried seemed to get it any cooler. Today, I decided to solve the problem. I visited my local CompUSA and purchased an Antec model 900 case. Short story: problem solved and my CPU is now running at 40 degrees Celsius. This is a case you should consider when investing in your next "build-it" project. The details follow.
Specifications:
Here are the specs, lifted directly from Antec's site at:
http://www.antec.com/us/productDetails.php?ProdID=15900.
- Unique Top mounted 200mm "Big Boy" TriCool exhaust fan to cool the hottest system
- Perforated front bezel for maximum air intake
- Two front loaded HDD cages for up to 6 hard disk drives
- The HDD cages act as air ducts to take air in more efficiently. Optional middle 120mm fan bracket to cool the hottest graphic cards or CPU
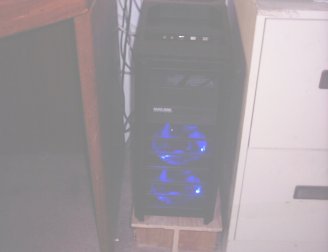
- Two 120mm TriCool blue LED front fans to cool hard disk drives
- Window side panel comes with an optional 120mm fan mount for maximum VGA cooling
- Top tray for your MP3 player, digital camera, etc.
- Power supply mounts at the bottom of the case (power supply not included)
-
Advanced cooling system:
- 1 top 200mm TriCool fan with 3-speed switch control
- 1 rear 120mm TriCool fan with 3-speed switch control
- 2 front 120mm special black TriCool blue LED fans with 3-speed switch control to cool HDDs
- 1 side (optional) 120mm fan to cool graphic cards
- 1 middle (optional) 120mm fan to cool CPU or graphic cards
-
9 Drive Bays
- External 3 x 5.25"; Internal 6 x 3.5" for HDD, or
- External 6 x 5.25"; Internal 3x 3.5" for HDD, or
- External 9 x 5.25"
- Motherboard: Fits micro and standard ATX
-
7 Expansion Slots
-
Top mounted I/O ports
- Power & reset button with blue LED
- 2 x USB 2.0
- 1 x IEEE 1394
- Audio In and Out
-
Unit dimensions:
- 19.4" (H) x 8.1" (W) x 18.4" (D)
- 49.3 cm (H) x 20.6 cm (W) x 46.7 cm (D)
-
Package dimensions:
- 21.5" (H) x 10.6" (W) x 21.1" (D)
- 54.6cm (H) x 26.9cm (W) x 53.6cm (D)
-
Weight:
- Net: 18.52 lb / 8.4 kg
- Gross: 24.36 lb / 11.05 kg
Making the Switch
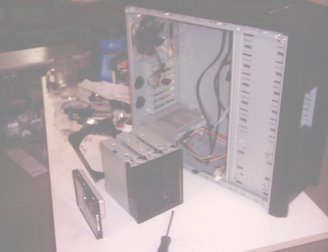
I powered down my system and opened the case. Removed power supply, hard drives and DVD drive and set them aside.
Note: NEVER stand a hard drive on edge. Lay it down. If it tips over, your drive is trashed.
Then I located my canned air and blew the dust out of the power supply and from around the connectors on the hard drives. I removed the six screws that secured the motherboard to the case and carefully lifted it out. Not having any anti-static plastic, I placed it on a sheet of aluminum foil. I know, I might have shorted out the CMOS battery, except that the first thing I do when I get a new board is to apply a strip of electrical tape to the bottom of the board where those contacts are.
Next, I removed the two memory boards and set them on the tinfoil. Again, the canned air did its job and cleaned out the amazing amount of dust that accumulates in those connectors. I reseated the memory chips and moved to the new case on my work table. First I installed the power supply and did a quick confirmation that the cables would be long enough to reach.
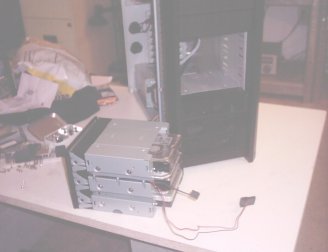
Installing hard drives has always been problematic. It seems no case makers can quite agree on where the screw holes should be. I've always wound up having to fight the case to get the screws into the drives, or have resigned myself to using only two screws per drive. Not here. Antec brilliantly engineered the hard drive mounting system into two 3-drive units that, once released from the case (thumbscrews, not those bitty ones I always manage to drop), make installing the drives painless. The units are full-width, with an interior channel for each drive. Slide the drive into place and secure with the long screws provided. Always be sure to use all four screws to secure your drives. They hate being loose.
Once I had my three hard drives in the mounting unit, I slid it into the case from the front and re-secured it with the four thumbscrews provided. A perfect fit. Each drive mounting unit has its own 120mm blue-LED fan in the front to provide airflow over the drives. The front is perforated to facilitate airflow.
If you are not going to mount any drives in the other drive mounting unit, there is a plastic mount that can be placed on the inboard end of that unit and a 120mm fan mounted there, so it runs in tandem with the fan in the front. This is the "middle (optional) 120mm fan to cool CPU or graphic cards" mentioned in the specifications above.
There are three full width bays above the two hard drive mounting units. I used one of these to mount my DVD drive. If needed, I could have installed a floppy disk drive in another one. Antec provides a plastic adapter and a front panel that matches the rest of the panels to accommodate the 3 1/2" drive.
Next I mounted my mini-ATX form factor motherboard. There were already standoffs in place to accommodate a full size ATX. Antec provided a bag of hardware and I found the other spacer in that bag. Six screws mounted the motherboard. I brought the power cable over to the connector on the motherboard and was afraid it would not reach. The problem was that for the past year, the cable had been routed to that connector from the opposite direction. It DID reach after I re-formed the wires a bit. It passes directly over my AGP video board, but that was not a problem.
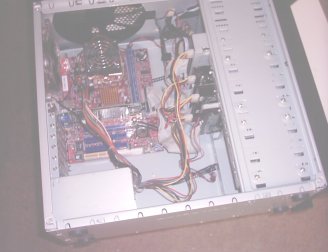
Now I hooked up cables. Each fan in the case comes with the standard four pin power connector used on hard drives, so I daisy-chained them off one power supply lead. The connectors "stack." Then I connected power cables to four drives (three hard drives and the DVD drive). I plugged the signal cables into the motherboard and then to the drives. I should point out that all the fans that come pre-installed have a short cable with a switch on the end. This allows you to select any of 3 speeds. I put all the switches in the "fast" position (slide the button all the way toward the END of the switch cable).
The cables from the "front panel" (which is actually located on top of the case) routed easily to their matching connectors on the motherboard. It was nice of Antec to make the connector for USB into a single block connector. Much easier to plug in than two thin plugs. I don't have Firewire on this motherboard, so I folded that cable up and placed it out of the way. Antec provided tie-downs in the case to help route cables so they stay where you place them. The only problem I ran into was reading the itty-bitty printing on the motherboard so I could tell where to place the power, reset and HDD LED plugs. Its a shame that board manufacturers haven't standardized that cluster of connections.
The Run-Up
Everything installed, side cover still off, it was time to test. If everything went well, I should have my system exactly as before, except running a lot cooler. I pressed the power button and the fans began to spin, pretty blue LEDs shining. The POST ran, and then bad stuff happened. The system couldn't find my drives. I went back to my notes and discovered I'd placed both my slave drives on one channel, and therefore both masters on the same channel. BIOS didn't like that. It took only a few minutes to redo my cables, and I powered up. Moments later, I saw the familiar PCLOS boot screen, and then I was UP!
I immediately started GKRELLM to see what would happen with temperature. If you haven't looked at this little application, please do. It can provide a good picture of what's happening on your system. Ambient in my living room was 80 degrees Fahrenheit (26.7 degrees Celsius). I have circulation problems and am always cold, so I feel comfortable at that temperature. My computers don't. I watched and waited.
After 30 minutes, temperature stabilized at 41 degrees Celsius, a 20 degree improvement! I did not purchase the optional fan to fit inside the left side cover. I'll do that tomorrow. It sits directly above the AGP board, and of course, that places its draft just below the CPU. Should help both devices to run even cooler.
In all the years I've been computing (and was able to check CPU temperature), I have always had to keep the left side cover off to keep temperatures low enough. Finally, I can close my case.
Conclusion
Antec labels this as a Gamer's case. They are entitled to their opinion. In MY opinion, this is simply the best case design I have ever used. It was well thought out to address common problems, notably, simplifying hard drive mounting, extreme cooling, thumbscrews where they are most usable, and good looks. I love the controls being on top where these tired old eyes can see them, and I don't have to bend over to hit power or reset. There is a nice tray rear of the control panel that can hold things like my MP3 player; Antec provided a textured rubber pad to sit in the bottom of that tray so things don't slide around.
What do I like about this case? Pretty much everything. What do I dislike? Well, I'm messy. For many years I've piled stuff on top of my computer; note pads, cell phone, junk. Now I can't do that; it would block that massive fan on the top of the case. Never mind; I'll deal with that!
At $139 USD locally, this is not a cheap case. You can still get "plain Jane" cases for a lot less. But, in my opinion, it's worth every penny. I purchased from a local store. If you hunt on line, you may find this case for less, but be sure to figure in the shipping when comparing prices.
Now I have a not so hot computer.
