Command Line Interface Intro: Part 12
by Peter Kelly (critter)
The vi editor
I'll be honest. I don't like vi. The newer vim (vi – improved) is well named, being an improvement, but none the less, still vi. I find that the commands are not intuitive and, unless you use it regularly, difficult to remember.
The main reason to learn vi is that you must do it if you are going to use the command line in any sort of a serious way. Also, it is sometimes the only editor available, but it invariably will be available. Some system commands, such as cron, rely on vi, and it will drop you straight into vi when editing crontab. The sudo command insists that you use a special version of vi named visudo to edit its configuration file /etc/sudoers, although it is not really necessary to do so. Many other system utilities base their commands on this editor.
Although I personally don't like vi, I have to admit that it is a very powerful editor. And, once you are familiar with vi, it can be a very fast way of editing text files. There is a lot of documentation available for vi and vim, if you want to learn how to use it as a professional. Here, I will show you the basics that can be learned in just a few minutes, and will enable you to do most of the editing that you need to do to get out of a sticky situation, when vi(m) is the only editor available.
You start the application by typing vi, followed by a file name. If the file doesn't exist, then it will be created when you save your changes. You may also open a file at a particular line number by typing a plus sign (+), followed by a number, or at the first occurrence of a pattern of characters with a +, then a forward slash (/) and the pattern to be matched. This is useful when editing a script and trying to get a particular section working correctly. Try vi +/$USER /etc/passwd to open that file at your entry in it. If working as an ordinary user, the file will open, but as you don't have write permissions, it will be in read-only mode. This fact will be displayed at the bottom of the screen.
The first thing that most new users fail to do is to get out of the application, as there is no easy "quit" or "exit" command. Let's get this out of the way right now. vi is bi-modal. This means that it has two different modes of operation: command mode and insert mode. When you open a file, you are placed in command mode, with the text of the file on screen, which you can move around in but not edit directly. To edit the file, you need to issue a command that will put you into insert mode. But you cannot exit the application from here, and that is mostly what confuses new users. To exit insert mode, you press the escape key. If you forget which mode you are in, or just feel lost, then press the escape key and you will always be put back to command mode.
Once in command mode, you can exit the program. To do this, type a colon, which will appear at the bottom left of the screen. vi then waits for you to type a command. The command to quit is q. If there have been no edits, then the application exits and returns you to the command line. If the text of the file has changed, you will get an error warning stating "no write since last change". Now you can do one of two things.
- :wp
- the w writes out the changes then quits
- :wq
- the w writes out the changes then quits
- :q!
- the exclamation point tells vi to discard the changes and then quit
In summary, to exit the file, press escape, then type :wq.
Moving around in the file can be done with the cursor keys, but was traditionally done by using the h j k l keys to move left, down, up or right respectively (l to go right?). To move one full word forward press w and then b to move back a word, and 0 and $ to move to the beginning or end of a line. Ctrl-f and Ctrl-b moves forward or backward a screen at a time. Ctrl-d or Ctrl-u moves up or down half a screen at a time.
In command mode, you can use the following commands:
- c
- change
- d
- delete
- y
- yank which means copy
- p
- put or place the yanked text at the cursor
When you issue the c or d commands, the text is removed from the screen and placed in a buffer known as the cut, or yank, buffer. The y command places a copy of the text into the buffer, leaving the screen unchanged. You can then re-position the cursor and press p to "put" the contents of the buffer at that position. The stored text can be re-used as many times as required, until it is replaced by another operation.
What you change, delete or yank are objects, including words, lines, sentences, paragraphs or sections. But for our simple editing needs, I will limit it to words and lines. You can also specify how many objects you want the command to operate on. To make the whole line the object, you repeat the command cc dd or yy.
Examples:
- 5cw
- change the next 5 words. this deletes the next five words and allows you type in some new ones
- 3dd
- delete 3 lines starting with the current line
- 2yw
- copy the next 2 words starting at the cursor, not necessarily at the beginning of the word
- 4yy
- copy the current line and the next 3 lines
Insert mode is entered by typing one of the following commands:a, A, c, C, i, I, o, O, R, s or S. You will then see - - INSERT - - at the bottom left of the screen. These commands allow you to append, change, insert, replace or substitute text or open up a new line to type in some text. When users had to make do with a rather unforgiving dumb terminal, most of these options would have been welcomed. Today's desktop computer keyboard interface is rather more sophisticated and standardized.
With the movement keys outlined above, we can quickly move to the part of the text that we need to modify, and press i to enter insert mode. We can now begin typing new text. Press the insert key on the keyboard to toggle overwrite mode. You will notice the "- - INSERT - -" at the bottom changes to "- - REPLACE - -", or use the delete key to remove text.
If you are using the more advanced vim, which I would recommend if you have a choice (and PCLinuxOS users do have this choice), you can activate a visual highlighting mode, which can be character-wise, line-wise or block-wise. Press the escape key to get into command mode, and press v. You are now in character-wise visual mode, and text under the cursor is highlighted as you move around. Uppercase V puts you in line-wise mode and full lines only can be highlighted. Ctrl-v enters block-wise mode. Here a rectangle of text is highlighted as you move across and up or down. A simple experiment in each of the three modes will demonstrate this much more easily than I could describe the effects.
With the text highlighted, you can issue the c, d or y commands, with the c command automatically putting you in insert mode to type in the replacement text.
This brief introduction to vi will allow you to perform almost all of the editing that you will ever need to do on the command line. Obviously, if you learn some more of the available commands, then your editing will become even more efficient. But this is enough to get you out of trouble when things aren't going so well, or to enable you to edit files like crontab or sudoers.
Midnight Commander
One of the most useful utilities for the command line user is Midnight Commander. For those of you who aren't familiar with it, I'll explain. Midnight Commander is a two panel file manager, very similar to KDE's Krusader. The main difference is that it is entirely text based and used from a terminal. It provides a graphical interface to most file system management tasks, using elements from the ncurses and S-lang libraries to provide the text drawn graphics. The application is extremely customizable, and it is installed by default in most full variants of PCLinuxOS. It will also be found in most other Linux distributions. Mouse interaction is supported and works fine in a terminal emulator under a windowing system. But for use in a 'true' terminal, as you will get by typing Ctrl-Alt-F2, you will need to install the gpm mouse server from the repositories. Midnight Commander includes a text file viewer and an excellent editor, and can be used over remote connections. Midnight Commander will also let you look inside compressed files and rpm packages by simply pressing enter when the file is highlighted.
Midnight Commander (hereafter referred to as MC) can be started from the command line by simply typing mc. It is intuitive enough to be used immediately by even the newest Linux user. You may be wondering why I have not introduced such a wonderful time saving utility before now, and why you have had to jump through hoops in an unfriendly and often unforgiving environment to achieve even the simplest file system commands, such as copying and moving files. Quite simply, you have now seen the interior workings of the Linux system and are more able to take full advantage of it, and to understand the many advanced features, which many users do not comprehend or miss completely.
By default you will start with a screen like this:
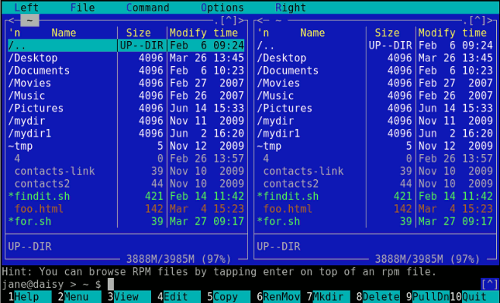
The top line is a drop down menu bar, accessible with the mouse or by pressing F9 and then the arrow keys. Directly below are the two panels that are split vertically by default, but can be changed to horizontal from the configuration menu. Then left and right on the top line will read above and below . At the bottom of each panel is a status bar, which displays some file information and file system usage (default). Next down is the command line. Anything entered from the keyboard that is not interpreted as a command to MC goes here, and enter sends it to the shell for processing. The bottom line is a set of buttons corresponding to the Function keys, but they are also mouse clickable. The panels are overlaid on the output screen, and can be toggled on or off by pressing Ctrl-o (that's letter o, not zero). You may want to do this to see, for example, the output of a command executed from the command line window.
Anything that you type in MC is examined to check whether it is a MC command. If it's not, it is passed to the shell to be dealt with. There are a lot of commands in MC and shortcuts to them are shown in the drop down menus like this:
- Ctrl-u
- hold down control and press u – this one swaps the panels over
- Ctrl-x c
- hold down control, press x, release both and type c – brings up the chmod dialog
- Meta-?
- hold down the meta key, more usually known as the Alt key, and type ? bring up the find file dialog
Basic configuration is done through a menu found under options on the top menu bar. Drop this menu down and press Enter on the configuration entry. You will get a dialog like this:
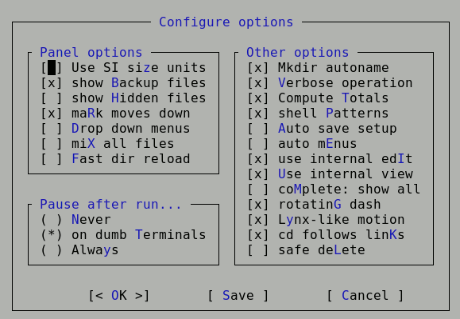
Use the arrow keys to move around, and press the space bar to add or remove an option, or hold down the Alt key and press the letter in blue. Most of the options can safely be left at their default settings. I prefer to not show hidden files unless necessary, as they are hidden for good reason. I also recommend checking Lynx-like motion. Lynx is a text only web browser which uses the arrow keys for navigation through links, and this option allows you to move up or down through highlighted directories by using the left and right arrow keys. The shell Patterns option, when checked, uses search patterns such as wild cards, as you would use in shell 'globbing.' Unchecked, it uses the full power of regular expressions, which makes it an extremely powerful tool. If you need more help on the other options, F1 will bring up a fairly comprehensive help system.
For most operations, you will want to have the two panels showing the contents of two different directories, perhaps source and destination directories for copy and move operations. Switch between panels with the tab key, and select files by tagging them with Ctrl-t or the insert key. F5 copies selected files from the active panel to the other panel by default, but pops up a dialog box to allow you to change this. F6 moves them across, with the option to rename the file, and F8 deletes them. While a file is highlighted (not tagged), pressing F3 displays the contents where practical, and F4 opens it in the editor, although you must have write permission to save any edits to the file.
If you find that you need to frequently drill down down to a directory buried deep within the file system, you can add it to the hot-list dialog. type Ctrl-\ and select add current (Alt-a). You will be prompted for a name for the entry. The full path-name will already be there if you want to use it. Want to go home? Type cd, (the letters go into the command line box as you type), then press Enter and the active panel will show your home directory.
The panels are not limited to displaying a directory listing. By dropping down the left or right menus (F9),
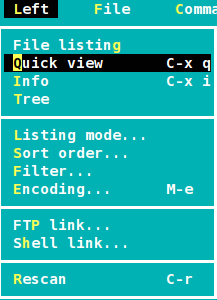
you have the option to change the display in that panel to the contents of the currently highlighted file in the other panel, or to display a heap of information about the file. It can also be set to display the file system in a tree like structure. If you keep the directory listing, the same menu will allow you to select the amount of detail shown similar to the -a, and -l options of the ls command. Or you can set up a custom display to show exactly what you need. The listing can be sorted in any way you like as shown below.
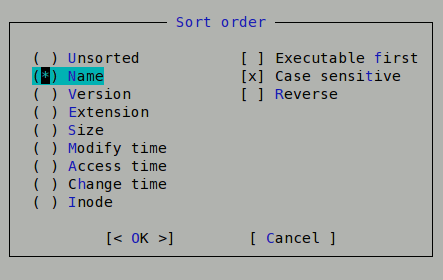
You can set up a filter to show only files that match a pattern. The rescan option, Ctrl-r, refreshes the contents of the active panel if the contents have changed since the directory was entered.
The ftp and shell link options are one of the cleverest parts of MC. They allow you to display the contents of a directory on a remote system, and let you navigate around as though it was on your own hard drive.
Try this:
- Set the right panel to quick view.
- Tab back to the left panel and drop down the left menu.
- Select ftp link …
- Enter ftp.nic.funet.fi in the dialog box that appears.

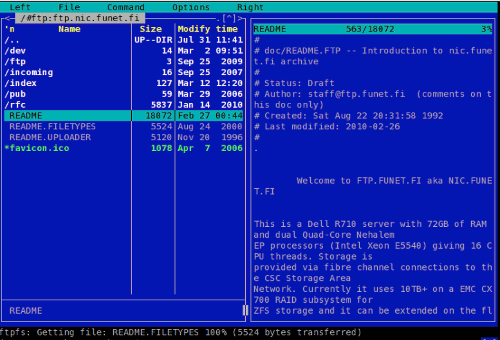
On the right hand panel are displayed the contents of the highlighted file in the left panel. The files shown in the left panel are on a file server in Finland. Funet is the Finnish University and Research Network. You can freely browse any directories for which you have been granted access, and you may read or copy documents to your own home directory. It's a great research tool. Try opening the pub/ directory. You can even add it to your directory hotlist (ctrl-\), and give it a nicer name for quick future access.
There are hundreds of free ftp sites that can be accessed in this manner. If you want to download software or a live cd image, I would recommend a dedicated ftp client application, such as gFTP, or the ftp capabilities of a decent web browser.
To use the shell link … option to connect to another machine on the local network, make sure that the /etc/hosts file contains a line with the IP address and host name of the remote computer to allow address translation. In the dialog that is presented when you select shell link … from the menu, type in something along the lines of jane@daisy. You may then be asked for Jane's password before being granted access to the machine as Jane.
When you enter a directory with lots of files and sub-directories, you can home in rapidly with the quick search function, Ctrl-s. Try navigating to the /etc directory and type Ctrl-s fs. You will be taken straight to the /etc/fstab fil,e where you can press F3 to view the contents, or F4 to edit it.
Under the file menu are options to perform most of the file handling commands that you would normally carry out on the command line. For example, to create a symbolic link in the right panel to a file in the left panel, simply select Symlink, and a dialog is shown with the defaults already filled in. Press Enter to accept or change the symlinks name to your preference.
At the bottom of the file menu are a group of commands to tag a group of files according to a pattern. As an example, if shell patterns are disabled, then a pattern such as ^\.bash.* in your home directory will tag all of your (hidden) bash related files ready to be copied to a backup directory.
Pressing the F2 key brings up the user menu. What this shows depends upon the contents of the file ~/.mc.menu, and you can edit the file to your hearts content to customize the menu. Open up the default menu, and you will see just how complex you can make the menu commands. But simple commands are also acceptable.
There is a simple find files dialog accessible from the command drop down menu or by pressing M-? This is pretty easy to use, with a space for the start directory, which can be filled by selecting a directory from the Tree option and spaces for the search criteria, which may be either the file name or content. Both can use either shell expansions or regular expressions. When the list of files is displayed, you have the option to 'panelize' them, which means display them in the active panel for further processing. To get back the previous contents of the panel, use the refresh Ctrl-r command. This is an excellent place to practice your regular expression skills, with the Again option taking you back to the pattern for modification or refinement if the results are not what you expected.
If you need even more power, the External Panelize command will provide it. This is activated from the command drop down menu, or Crtl-x !. This command allows you to execute an external command, and to put the results into the active panel. You can even save regularly used commands under a friendly name.
Also available from the command drop down menu is the directory tree command, which displays a dialog showing the file system in a tree like structure, and changes the function key definitions at the bottom of the screen. F4 or Rescan refreshes the tree display. F3 temporarily removes a directory from the display. This useful when there are lots and lots of sub-directories making navigation difficult. F4 toggles between static and dynamic tree navigation. Play around with it and you'll see the difference. Pressing the enter key on any directory closes the dialog and switches the active panel to that directory.
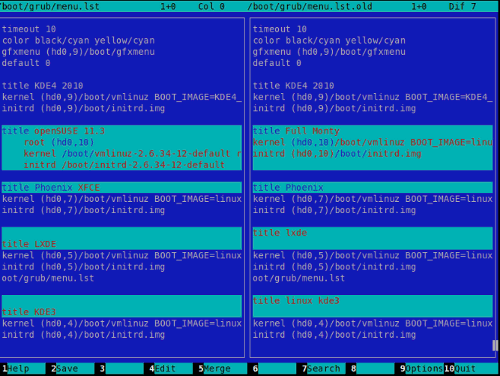
To compare the contents of 2 files that you have been editing, select one file in the left panel, and the other in the right. Then, from the command drop down menu, select view diff files and a new, two panel window will open, showing the contents of both files, with the differences highlighted.
If you need to keep two directories synchronized, the Compare directories, or Ctrl-x d, is a boon. With one of each of the directories in its own panel, execute the command, and you will be prompted for the type of comparison to make, and the files that differ will be tagged on both sides. You can then simply copy the tagged files across with the F5 key.
When you open a file in the editor or viewer, or compare two files, a new screen is shown. MC can have multiple screens open at any time, and you can switch between them as you wish, using these commands:
- Alt-}
- forward one screen
- Alt-{
- back one screen
- Alt-`
- list the open screens (that's the back tick)
Unfortunately, you may only have one file listing screen open at a time.
If you forget to close an open screen and try to leave, MC will issue a warning.
If you think that I have done a comprehensive job of covering the features in MC, then you are not even close. I've only covered the features that I regularly use. Read the help files and you will find a lot more to play with.
Playtime
When you are working in a text only terminal, either because you are trying to achieve a command line oriented goal, are simply locked out of your beloved X windowing system temporarily, or just because you want to, (sadly), you don't have to sit there in monastic silence.
There is a widely available tool known as sox, which is an incredibly powerful audio application with a bewildering array of options. It recognizes most audio formats, can play back or record, add effects, split, combine and do just about anything that a reasonable person would wish to do with, or to, an audio file.
If you are so inclined, then please, be my guest. Read the manuals and produce your masterpiece. Personally, I would much rather use a graphical application, such as audacity,to perform such magic.
sox can be called in one of three incarnations:
- sox
- the full version
- play
- the play back part and
- rec
- the recording function part.
Let's concentrate on play.
To simply have some music while you work, you can call play -v {number} {song}. The -v option controls the volume and number is a real number, the default being 1. Enter 0.5 for playback at half volume, 2 for double the default volume, or normal volume and so forth. Be warned that entering too high of a number may damage your hardware or ears.
Here's a little script that will allow you to have your favorite music playing while you work. It expects a folder containing compatible music files on the command line as a play list. This version looks for mp3 files and plays them back at half volume. Edit it to your own preferences.
Open a virtual terminal with Ctrl-Alt-F2 and run the script. Use Ctrl-Alt-F3 to open another terminal to do your work. Enjoy!
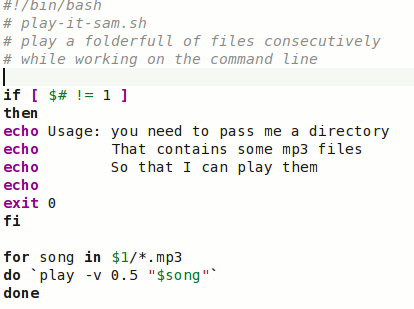
Call it with a command like ~/play-it-sam.sh /data/Music/The-Who/ (so, I like 60's pop, okay?).
The script could use a little more error checking, and has the potential to provide more functions, such as volume control. I'll leave that to you. If you make any significant improvements, and I am sure that you can, I would be interested in seeing them.
Where to next?
If you want to stop right here, that is fine, What I have covered in this introduction is more than enough to lift you out of the 'newbie' class, and will almost certainly cover most of what the average user needs to make efficient use of the command line. Should you wish to delve a little deeper, there are several ways to do this.
Almost all of the commands include some sort of documentation as part of the installation. As a minimum you can follow the command with - - help, which will usually give you some idea of the usage, along with the available options of the command.
Most commands are also documented in the man pages, a special type of built in help system. The manual pages are not always installed by default in every distribution, but are almost certainly available from the software repositories, and are well worth installing. If a man page is not available from the repository for a given command, try http://linuxmanpages.com/. It's a great source.
The manual pages are accessed by typing man command, where command is the name of the command you are interested in.
As a reference, they are invaluable. But they are not very beginner friendly, although the information that they contain is usually accurate. If you see a reference to a man page, it is often followed by a number. This is the section number. For convenience, the manual pages are organized into sections, but the number is optional. The sections include:
- user commands
- system calls
- library functions
- special files
- file formats
- games
- conventions and miscellany
- administration and privileged commands
When the man command fails to provide sufficient information, use the info command. The content is similar to the manual pages but often much more detailed. Unfortunately, the info command's user interface is terrible so remember this: type q to quit, and type h for help.
That should get you by.
There is, of course, lots of information available on the internet, but beware that some of it may be inaccurate. The most reliable source is LDP – the Linux documentation project (http://www.tldp.org). Here you will find a wealth of information on all things Linux, in a variety of formats and languages.
Another reliable online source is The Linux Gazette (http://linuxgazette.net/), with all back issues available in the archives. The Gazette has been around since 1995.
If you prefer a good, old-fashioned book, then you will be spoiled for choice, as there are literally thousands of them available. Which to choose can be a headache and a kind of lottery. My personal experience is that you can't go far wrong with the excellent O'reilly series of Linux reference titles. They are usually well written, reliably factual, and durable. I have a 10 year old copy of Linux in a nutshell that shows little sign of wear despite the years of rummaging through its 600 odd pages).
PCLinuxOS users are fortunate enough to have their own magazine, which is an excellent source of distribution-centric information. All previous issues are available for free download.
Last, but not least, there is the PCLinuxOS forum. If you can't find a solution to your problem, then ask there and surely one or more of the friendly resident experts will help. Even Texstar, the distribution's main man, is a regular contributor there.
The only other thing you need to become more proficient is practice. Only you can provide that. The more that you use the methods outlined in this introduction, the easier you will find them to use. Reading about a command is fine. But to understand it fully, you must use it regularly.
Editor's Note: This, the 12th installment of the Command Line Interface Intro article series, is also the last. Critter, a.k.a. Pete Kelly, has provided us, the PCLinuxOS community, an outstanding tutorial on how to use the command line. If you have followed along, I'm sure that you have discovered just how powerful the Linux command line truly is, and how easy it can be. Critter is not, however, "going away." He has agreed to stay on and write additional articles for The NEW PCLinuxOS Magazine. You will be seeing more from him in the coming months.
Meanwhile, we will be publishing a special edition of The NEW PCLinuxOS Magazine, containing all of Pete's excellent Command Line Interface Intro articles, in order from the first article, up to and including this final article. If you are (or get) serious about learning the Linux command line, then the special edition would serve as an excellent starting point, not to mention an excellent reference resource. Watch for it, coming soon.
Thank you, Pete, for all of your hard work in producing this outstanding tutorial series for The NEW PCLinuxOS Magazine.
Paul Arnote, PCLinuxOS Magazine Chief Editor
