| Previous
Page |
PCLinuxOS
Magazine |
PCLinuxOS |
Article List |
Disclaimer |
Next Page |
OTA Broadcast TV With Kaffeine |
|
by Paul Arnote (parnote)  As I promised last month, I'm winding up my series of articles on how to watch OTA (over the air) TV broadcasts on your PCLinuxOS computer. You will, of course, have to have the hardware (or access to the hardware … namely, a TV tuner card/dongle that's supported under Linux) to be able to receive these broadcasts, hooked to an antenna/aerial or cable TV input. In the July issue of The PCLinuxOS Magazine, I covered how to use VLC to receive and watch OTA TV broadcasts. I included a bash script to make it easier to scan for the channel information and save it to a file that can be loaded into VLC at will. In the August issue of The PCLinuxOS Magazine, I covered how to use MPlayer to receive and watch OTA TV broadcasts. I included two bash scripts with that article. One was to simplify scanning for channels, and the other was to make it easier to watch those TV stations with MPlayer. If you are one of those Linux users who prefer to avoid the Linux command line and/or bash scripts, you will be relieved to know that by using Kaffeine to view OTA TV broadcasts, you won't have to mess with any of that. By far, Kaffeine is the EASIEST to use to watch OTA TV broadcasts. All of the abilities are built into Kaffeine for scanning for the channels available in your area, and then watching them. So, to get started, let's take a look at Kaffeine's description from the LinuxTV.org Wiki Kaffeine is a media player. What makes it different from the others is its excellent support of digital TV (DVB). Kaffeine has a user-friendly interface, so that even first time users can start immediately playing their movies: from DVD (including DVD menus, titles, chapters, etc.), VCD, or a file. Kaffeine version 2.0, launched in June 2016, has its GUI written on the top of KDE Frameworks 5 and Qt5. For video/audio playback, it uses libVLC as its backend, and it interfaces with Linux TV devices via libdvbv5. It has a simple but intuitive interface and is easy to set up. Amongst its list of supported formats are CDDA, VCD, DVD, … and, since versions >0.5, it also provides full DVB support. The latest version is 2.0.3. Yes, Kaffeine is a complete multimedia program. With it, you can playback your multimedia files, audio CDs, video CDs (I haven't seen nor created one of those in about 20 years … I didn't even realize that they were still a "thing"), DVDs, and digital TV. But, for this article, we're going to focus on its ability to play digital OTA TV broadcasts on your desktop. Getting Started 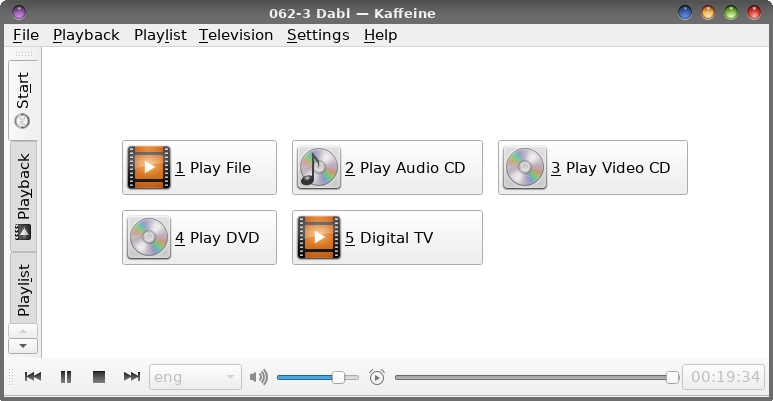 When you first launch Kaffeine, you should see something similar to the image above. To get started watching OTA TV broadcasts, you will click on the "Digital TV" button. For a quick reference, here's a "key" of sorts for the important buttons in the Digital TV window of Kaffeine. 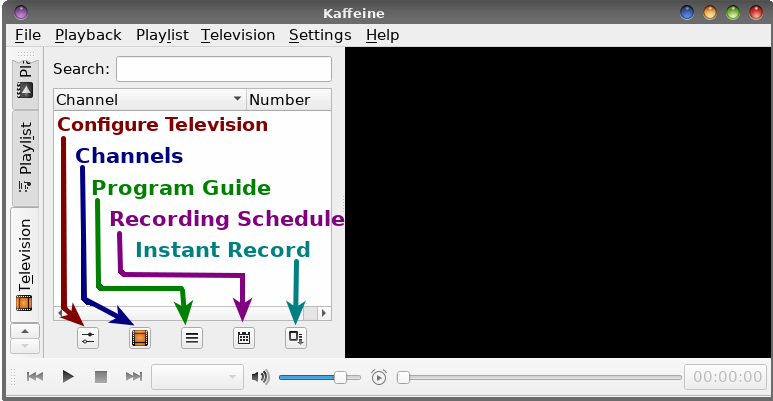 Before we can really get down to business, we will need to make a few configuration settings for the digital TV portion of Kaffeine. 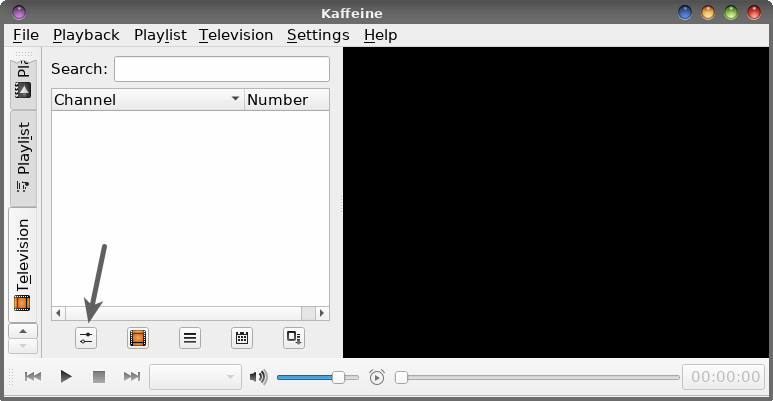 Click on the settings button at the lower left part of the Kaffeine window, indicated by the gray arrow. Alternatively, you can select the Television > Configure Television… menu item. 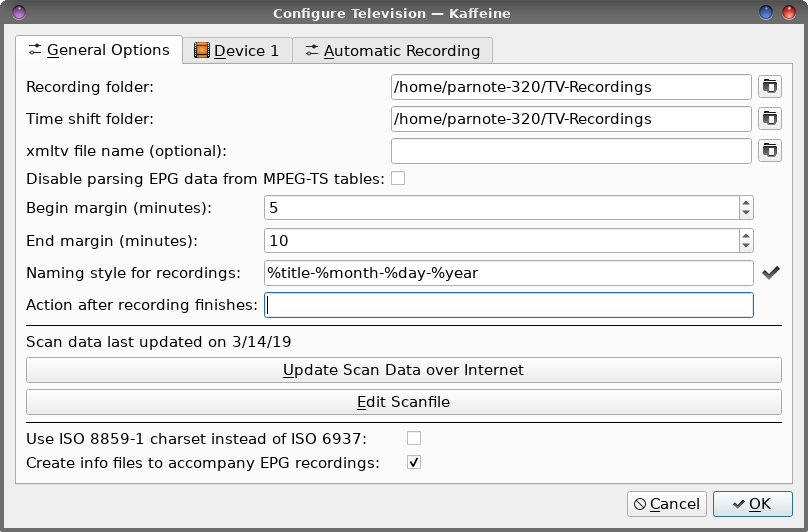 You will need to set the "Recording folder" and "Time shift folder" for where your recordings and timeshift recordings will be stored. I created a folder in my /home directory, called TV-Recordings, and then used that. You might also want to adjust the "Begin margin" and "End margin" settings. By default, they are set to begin recording five minutes before the scheduled program time, and to end ten minutes after the program's scheduled end time. That's too much for my tastes, so I change these to two minutes each. That is, I set the recording to start two minutes before the scheduled start time, and to end two minutes after the scheduled end time. For most cases, that should be sufficient. 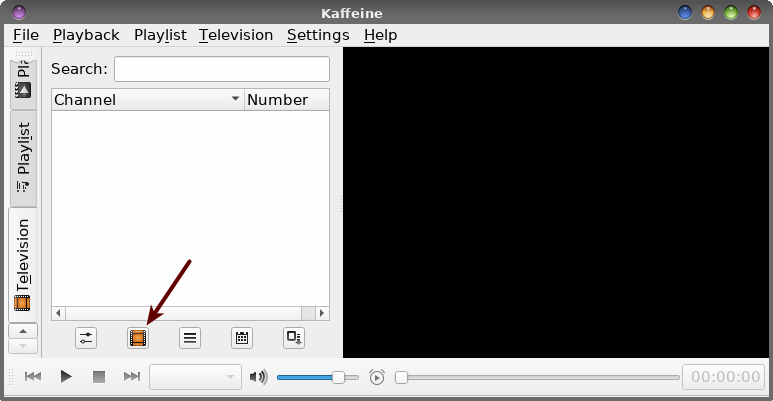 When you click on the "Digital TV" button, you should see something like the image above appear. Even though it doesn't look promising, don't fear. This couldn't possibly be any easier. We haven't scanned for OTA TV broadcasts in our area yet. To do so, click the button at the lower left of the window indicated by the arrow. Alternatively, you can also select the Television > Channels menu item. 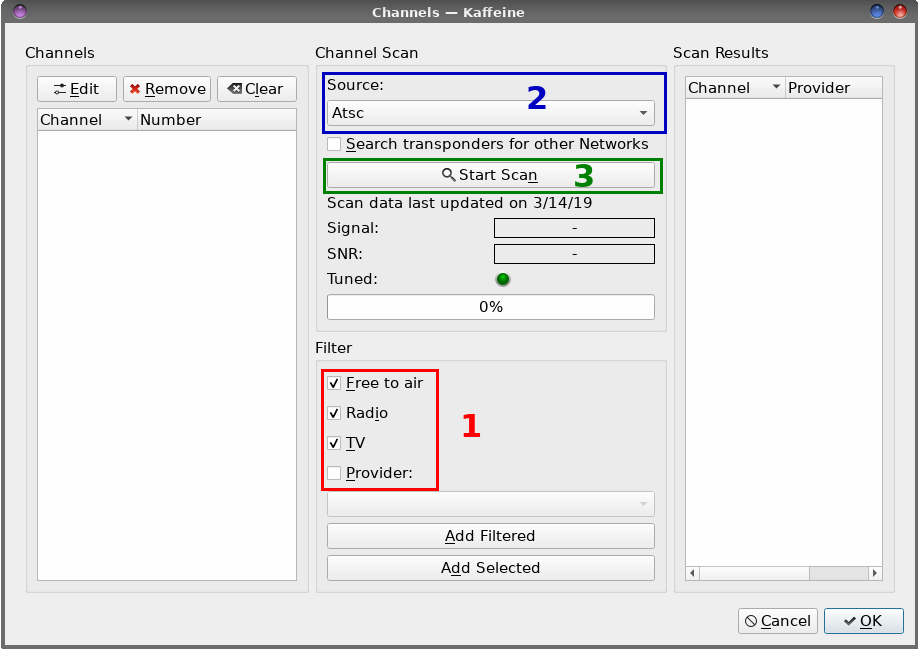 Clicking on the Channels button from the previous window (or selecting the Television > Channels menu item) will lead you to the window shown above. For your convenience and to make it easier to follow along, I've numbered each step in the image. First, you need to select what you want to search for. Here, I've selected "Free to air," "Radio," and "TV" as the filter criteria. Second, you need to be sure to select the broadcast standard for your area. Since I'm in the U.S., my broadcast standard is ATSC. In other parts of the world, it will most likely be DVB-T or DVB-T2. Third, click on the "Start Scan" button. This will take a few minutes, so sit back and relax while Kaffeine scans for OTA TV broadcasts in your area. 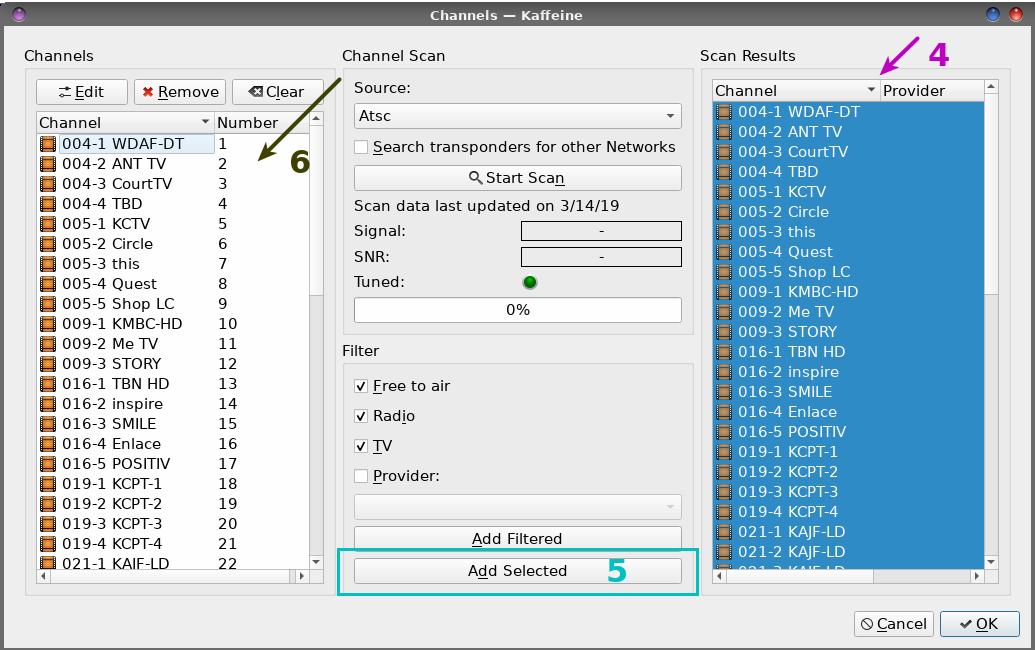 Fourth, once the scan is complete, click on the first TV channel listed in the listbox on the right side of the window, and then press Ctrl + A on the keyboard to select all of the channels. Fifth, click the "Add Selected" button at the bottom center of the window. The selected OTA TV channels will then be added to your Channels listbox on the left side of your window (item 6). Finally, select the OK button at the lower right corner. 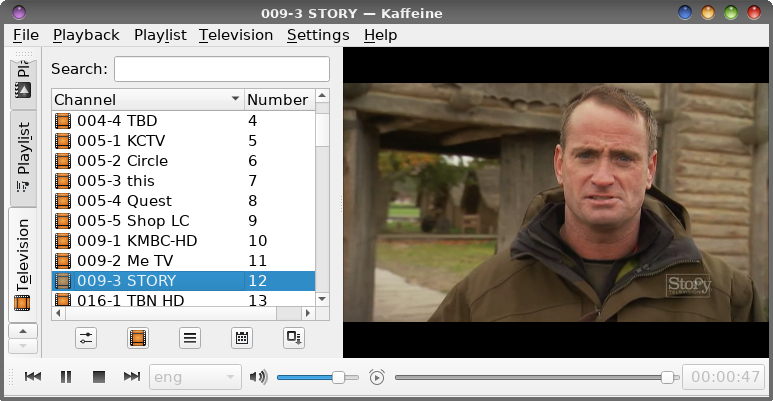 Now, just double click your mouse cursor over the OTA TV channel you want to watch, and the OTA TV broadcast should appear in the playback area on the right half of the Kaffeine window. To change channels, simply double click on the new channel you want to watch. If you just want to "surf the channels," use the "Previous" and "Next" buttons in the lower left corner of the Kaffeine window. For a while, at least, you might want to "surf the channels." I have to admit that I never knew many of these channels even existed. At home, we have digital cable TV, and it seems that my cable system doesn't include many of these channels. So, by "surfing the channels," you get the opportunity to see if the channel's programming is something you might be interested in. But please … don't get hooked on the shopping channels that are on the OTA TV broadcasts. Your bank account will thank you. In my area (the Kansas City area), there are no fewer than seven different OTA TV shopping channels being broadcast at any given moment. Geez! I thought their popularity candles blew out long ago. 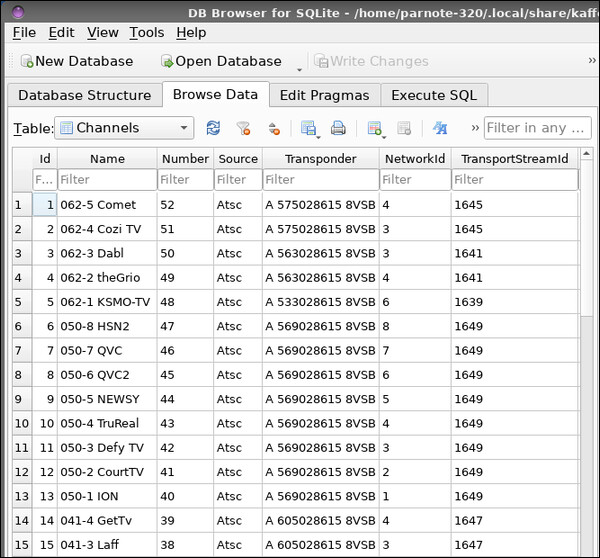 So where does Kaffeine save the results of the channel scan? This one had me extremely puzzled for a long time. I actually spent HOURS picking through the Kaffeine source code, to no avail, to figure out where the channel scan results were stored. Finally, with the help of Only16 (via a private chat on PCLOS-Talk), the location was found. Those results are stored in the ~/.local/share/kaffeine directory, in a file called sqlite.db. This file is not readable in a text editor, at least in any kind of readable manner. To view this file, you have to install the sqlitebrowser package from Synaptic. Then, load in the sqlite.db file into sqlitebrowser, and go to the "Browse Data" tab (image above). Tada! There they are! I'm not sure what the advantages are of storing the channel scan data in a binary sqlite database file versus a text file, but it does seem a bit like overkill to me. Curiosity can lead to a lot of wasted time. And, even though it does seem rather excessive to me versus a regular text file, I'm just glad to have found it and that it works. Plus, it reminded me how much I hate reading C++ source files (which is what Kaffeine is written in), because I could never get a handle on C++. With "regular" C, I'm good. But not with C++.  Also, don't be surprised if you're not able to view every channel that the channel scan detects in your area. As shown in the image above, weak stations may appear as pixelated blobs on your desktop. It's part of the gamble. Receiving some channels may require a reorientation of your antenna/aerial in order to receive an adequately strong signal. Some things you can try include moving your indoor antenna/aerial to a window, or raising the elevation of your antenna/aerial. For some, you may never receive an adequately strong enough signal to avoid the pixelated mess on your screen. In my area, we have seven low power, low definition channels that my channel scans detect (there are more in my area that are never detected), and being able to tune in to any of them is truly hit or miss. There are other factors to consider, as well. Weather systems and sun spot activity are two variables. Terrestrial terrain is important, too. Having a few hills or mountains between you and the broadcast tower can severely limit decent reception, since OTA TV broadcasts are generally "line of sight." That means signals go in a straight line, and don't bend to adapt to the terrain. Thus, having hills or mountains between you and the signal can seriously degrade reception signal strength. Distance from the tower is a factor, also. In the image above, that broadcast signal originates from a broadcast tower that's about nine miles (about 14.5 Km) from me, with several hills in between me and the tower. In the U.S., you can check out the OTA TV broadcast towers near you by visiting OTADTV.com. There, you can put in your address, and a map with all of the OTA TV broadcast towers will be displayed for your area. This is also how I know that there are more low power, low definition OTA TV broadcast towers near me that are never detected in a channel scan. The map will also display how far away the broadcast towers are from your location … as a crow flies (straight line radius). My current setup is less than ideal. To be perfectly honest, my USB TV tuner dongle is attached to my laptop in my living room, on the coffee table. The antenna/aerial is propped up behind my laptop's lid. Without a doubt, I would get a much better signal if I were to at least reposition the antenna/aerial in the window. But for now, this is good enough for my use. Also at the bottom of the playback window is your volume control. Click on the little sound icon to mute or unmute the sound. Slide the control to the right to increase the volume, or slide the control to the left to decrease the volume. Alternatively, you can hover your mouse cursor over the playback window, and then scroll with the mouse wheel to raise or lower the volume. Diving Deeper: There's More Kaffeine also has an EPG, which is short for "Electronic Program Guide." That information is usually sent out on the OTA TV broadcast signal, from what I can tell. 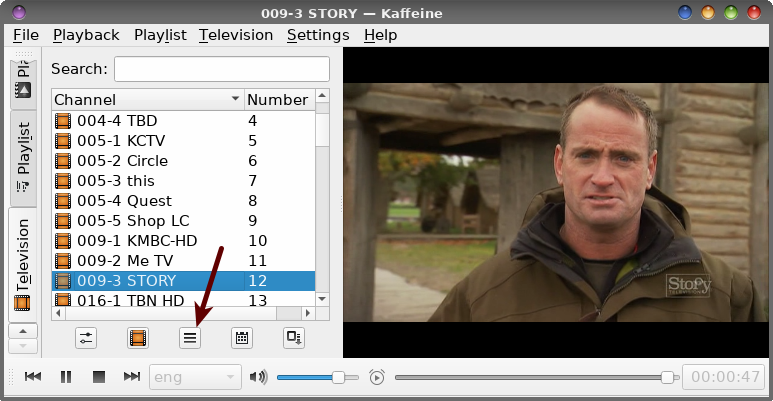 To access the EPG, click on the third button from the left in the group of buttons at the lower left half of your Kaffeine window (indicated by the arrow in the image above). Alternatively, you can select the Television > Program Guide menu item, or just hit the "G" key on your keyboard, which is set up to be the hotkey for Kaffeine to access the EPG. 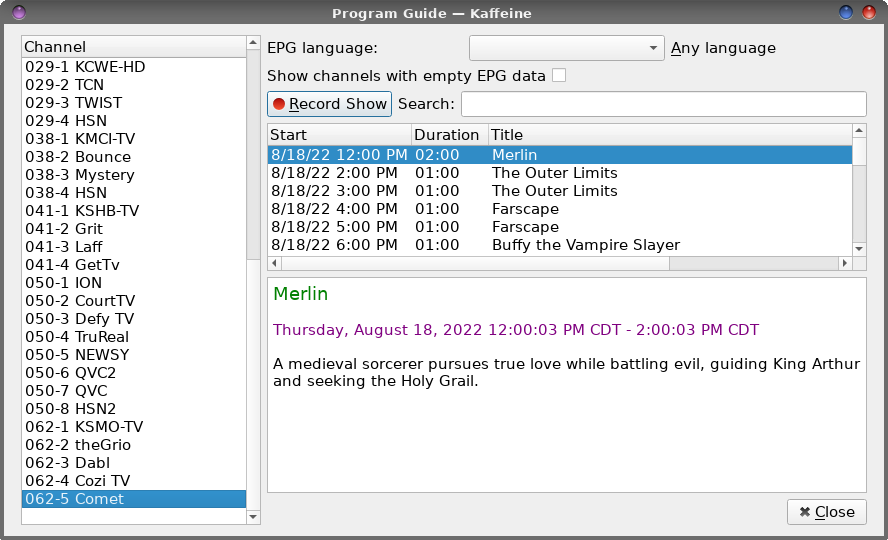 The EPG will open to the channel you are currently watching. It will (most likely) have the entire day's worth of programming for that given day. Don't worry when opening the EPG for the first time if hardly any channels appear in the listbox on the left side of the window. These will fill in as you watch more channels. If you want to peruse what's on, just single click the channel in the left-side listbox, and that channel's programming data will be displayed. You cannot change channels from here, but you can see what's on. Some stations do not have EPG data at all. In my area at least, I've found that the low-power low-definition stations do not have EPG data available. As you can see from the image above, the start times of the shows are displayed, along with the length of each show. When available, a brief description is available for the selected show in the programming guide in the bottom right pane of the window. That is usually the case, but in some cases, no descriptions are available. I've found this to sometimes be the case on channels like Antenna TV, where they show programming from the classic days of television … otherwise known as old shows, like Dennis the Menace, Bewitched, That Girl, and Welcome Back Kotter. And Even More … Recording & Time Shifting You might have noticed the record button in the last section discussing the EPG. Or you may have noticed that we talked about setting the directory and start/end times for recordings. Yes, Kaffeine makes recording OTA TV broadcasts a trivial matter. Regardless of how trivial it is, I do have to warn you. These recordings will consume a LOT of hard drive space. So, be sure you have plenty of available hard drive space before making your recording(s). Recording a 30 minute show (which is actually 34 minutes, with my recording "margins" set to two minutes before the show starts to two minutes after the show's scheduled stop time) consumes just over 500MiB of hard drive space. So, that means – on average – one hour of video comes in at about 1GiB of hard drive space.  The easiest way to record a show is to go to the EPG window, select the show you want to record, and then hit the "Record Show" button. When you do, a red dot will be placed before the show title to indicate that it is scheduled to be recorded. The recording will be placed in the directory that you specified when you set up Kaffeine's Television settings. The other way to record an OTA TV broadcast is to hit the "Instant Record" button in the row of buttons at the bottom left of the Kaffeine window. It's the last/fifth button on the row, just below the channel listing. Clicking it once will start the recording, and change the button's appearance to a large red dot. Clicking it again during the recording will cause the recording to stop. It hardly gets any simpler than that. Despite various reports that Kaffeine will allow you to record one program while watching another, that isn't necessarily true. And, for all I know, it may just depend on what hardware you have. I know that with my KWorld ATSC USB Tuner dongle, you cannot record one thing while watching another. But, for recording a show while I'm away, it works perfectly … as long as I leave Kaffeine up and running. That isn't a problem for me, since I typically leave my computers on 24/7. Kaffeine records the program(s) as m2t files. If you're not familiar with those types of files, those are MPEG2 transport stream files. Those files are not necessarily the most economical file format when it comes to file size. So, using a bash script I wrote several years ago, I converted the m2t file to a MP4 file that uses H.264 compression. In doing so, I reduced the size of the m2t file from 502.0MiB to a MP4 file of 276.0MiB. That's a 45% reduction in file size, which is significant. At least to my eyes and ears, I can't perceive any degradation in image or sound quality with the MP4 file compared to the m2t file. Of course, there are a LOT of variables involved with how big the MP4 file is, and one of the biggest is the video bitrate setting. Lower video bitrates mean smaller files, and vice versa. The video bitrate for the MP4 file in my example here was set to 1000kbps. The quality is decent. By raising the video bitrate on the conversion to 2000kbps, the MP4 file is a similar size as the m2t file. I'll have to leave it up to you to decide what quality level you want for the video, versus how much you'd like to reduce the file size. I've covered video bitrates multiple times over the years, so I'm not going to go over it again here. I've nothing more to add to what I've written in the past. The previous articles are easy enough to find by using the DuckDuckGo search feature on the magazine's website. Summary So, as I mentioned earlier, Kaffeine is the absolute easiest program to use to watch and/or record OTA TV broadcasts. In my experience with it, Kaffeine has worked its way to being my choice program to use for either watching or recording OTA TV broadcasts, supplanting VLC as my previous go-to program. Don't get me wrong. I still love VLC, but Kaffeine makes the whole process so much easier. |