How to change the localization of PCLinuxOS
by pinoc
Contact info: peter.vogt@jrc.it
Two months ago I removed Windows and installed PCLinuxOS in our local nursery in Italy; the kids love playing Gcompris and Tuxracer and the teachers are happily using a free office suite on a suddenly much faster computer. Roberto, the head of the nursery, has just bought a new laptop and he was surprised to see that the applications on the shiny Vista were not running any faster than on his 4-year old laptop he had before, and that in spite of the multiple amount of RAM and CPU power, but we all know this story... After a brief discussion we quickly agreed to liberate the poor new laptop and replace the pre-installed Vista with an Italian PCLinuxOS installation.
This article summarizes some simple steps to change the English localization of a standard MiniME 2008 installation to the Italian language, but these steps are equally applicable to any other language. In case you are interested in a German localization, I strongly suggest you save yourself some time and download the excellent German remaster by LinuxDoc from the German PCLinuxOS web page.
So, let's start from a fresh MiniME 2008 installation and change the localization from English to Italian.
- Installation of the necessary language packages
- Change the system language to Italian
- Change the KDE desktop to Italian
We need to install some packages which are not on the MiniME2008 Live-CD, so set up your Internet connection first and make sure it works. Then start Synaptic: "Start -> System -> Configuration -> Packaging -> Synaptic Package Manager" and enter your root password. At first, you will only see the packages from the CD and we need to click on the "Reload" button to inform the system about all the other additional packages of the PCLinuxOS repository. Then we click on the "Search" button to search for and install the following three packages: locales-it, glibc-i18ndata, kde-i18n-it. Then we close Synaptic.
Start the PCLinuxOS Control Center: "Start -> System -> Configuration -> Configure Your Computer" and enter your root password. In the left panel click on "System" and then on the right panel on "Select the language and the country or region of the system". In the following window select "Italian", click on the "Next" button, select your country, and click the "Next" button again; actually it is no longer called "Next" but already changed to the new language, in my case "Avanti". Finally we click on the "OK" button in the following window and then we close the PCLinuxOS Control Center.
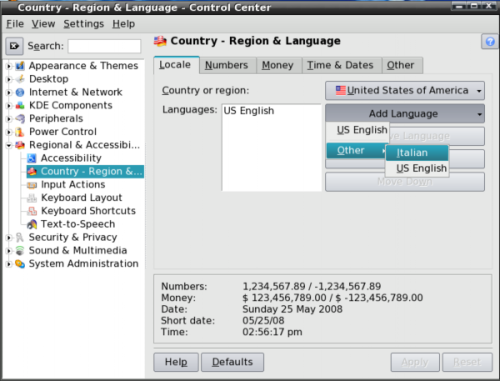
Start the KDE Control Center: "Start -> System -> Configuration -> Control Center". On the left panel open the entry "Regional & Accessibility", then click on "Country - Region & Language" and on the right panel on "Add Language - Other - Italian" and you should see something like this:
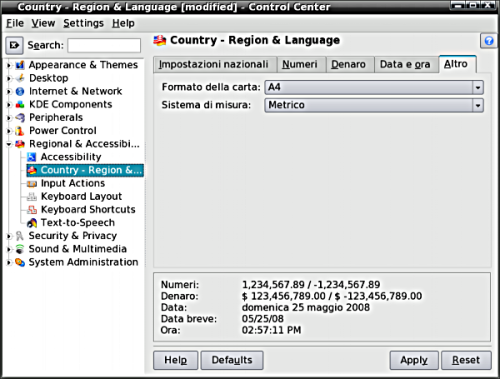
After this, Italian will be at the top of the language list and the names of the tabs will already be in Italian. Now we can also amend some other useful things, for example in the "Altro" tab we can change the paper format to A4 and the system units to metric:
- Start a new session and re-install existing programs
Finally, we click on "Apply", close the KDE Control Center and any other open windows, and terminate the session: "Start -> Log Out".
To start a new session, enter your user name and password at the Login window. Starting from now, any new installed software will have the interface of the new localization (Italian), if the programmers provided this language that is. However, all currently existing programs were installed with the default English interface and as a result they are all showing up in English. To change this, we need to reinstall all existing programs and it is thus meaningful to do the language conversion as early as possible. First, we need to get a list of the currently installed programs. Open a terminal, "Start -> System -> Terminals -> Konsole", and enter the following command:
rpm -qa --queryformat " "%{NAME} > installedRPMS.list
Now open the file "installedRPMS.list" with any text editor and insert the following three lines at the beginning of this file in such a way that your RPM list starts in the third line after the "--reinstall " (Note: there is also one empty space after the --reinstall). So, the head of this file should look like this:
#! /bin/bash
apt-get update
apt-get install --reinstall <your rpm-list>
In the above example, replace "<your rpm-list>" by the actual list and remember to have one blank space between "--reinstall" and your rpm-list. Within your list you can also remove the "kernel"-entries since we do not need to reinstall the kernel. Next, we save this file, exit the text editor, and enter the following command in the terminal to make this file executable:
chmod u+x installedRPMS.list
To perform the re-installation we need to become root , so we enter the command "su -" in the terminal and supply the root password. At the red root prompt enter the full path to the now executable file "installedRPMS.list", e.g.:
/home/<your_username>/installedRPMS.list
Replace <your_username> by your actual username and press the Enter key. Now Apt, the "motor" under the hood of Synaptic, will reload the repository RPM sources and finally ask for your confirmation to re-install: "Do you want to continue ? [Y/n]" and our answer is "Y" (without the quotes). This will take some time...
NOTE: It may happen that Synaptic can not re-install some packages because they are no longer available in the repositories. In this case it will complain and provide you with a list of these packages. Remove these names from your file "installedRPMS.list" and then try again.
When the re-installation has finished, we can clean the packet cache by entering the following command in the root terminal:
apt-get clean
Finally, close all windows, do a Logout/Login and there you go! Now everything should be in your chosen language/locale. Only those programs which do not provide an interface in your language will have the default English interface. And now join in with Roberto and have fun with your newly localized PCLinuxOS!
