KDE Desktop on PCLinuxOS
Published by the United Nations Development Programme's Asia-Pacific Development Information Programme (UNDP-APDIP)
Kuala Lumpur, Malaysia
Web: http://www.apdip.net/
Email: info@apdip.net
© UNDP-APDIP 2004
The material in this guide may be reproduced, republished and incorporated into further works provided acknowledgment is given to UNDP-APDIP.
This work is licensed under the Creative Commons Attribution License. To view a copy of this license, visit http://creativecommons.org/licenses/by/2.0/ or send a letter to Creative Commons, 559 Nathan Abbott Way, Stanford, California 94305, USA.
This guide has been modified by Papawoob to reflect the Linux distribution of PCLinuxOS 2007.
Chapter 4: Using Common Mass Storage Peripherals
Besides the main components which make up the modern PC, there are many optional peripherals which can be attached to it. When these are properly utilized, they can contribute to make the computing environment and experience more convenient, productive and pleasant. The more common peripherals include:
- printer
- scanner
- mass storage devices
In this chapter we shall be looking at how to access and use the common peripheral mass storage devices:
- floppy disk drive
- CD-ROM drive
- USB mass storage device
- CD-RW drive
Setting up and using a printer and scanner will be covered in the next chapter.
Note: The method is to use the My Computer icon located on the Desktop. Double-click on the My Computer icon, and it will display all the system devices as well as the file system.

Fig. Accessing System Devices and File system in KDE
The Floppy Disk Drive
While most of the work is done using the hard drive (system and user data are stored on the hard drive), sometimes you may want to transfer or copy files to another PC. One convenient way to perform this (provided that the file sizes are not too large) is to use a floppy disk or diskette. Diskettes are very useful as a portable storage medium for small files (1.44Mb or less).
Mounting and Using the Diskette
Before a diskette can be used, you have to perform an operation called "mounting" the diskette. This is to let the system know that you are going to access and use the diskette in the floppy drive.
The KDE desktop environment uses a series of background processes to accomplish various tasks. Mounting drives is handled by the "Media" process. Simply click on the Storage Media icon in the System (My Computer) folder, and the Media task will be shown.
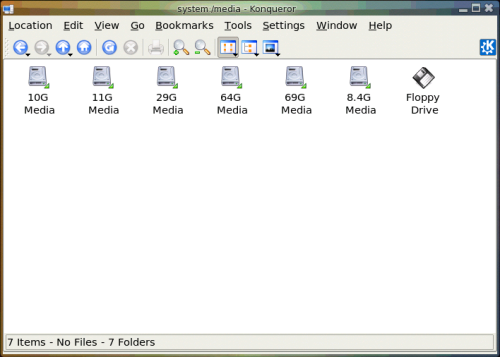
Fig. Storage Devices
Disk access is done by double clicking on the My Computer icon on the desktop. Double clicking on the "Storage Devices" icon will open the window seen above. Next, double click the "Floppy Drive" icon.
This will mount the floppy and add a floppy icon on the desktop. Double-clicking on this will list out the files and folders in the floppy under the File Manager as seen below:
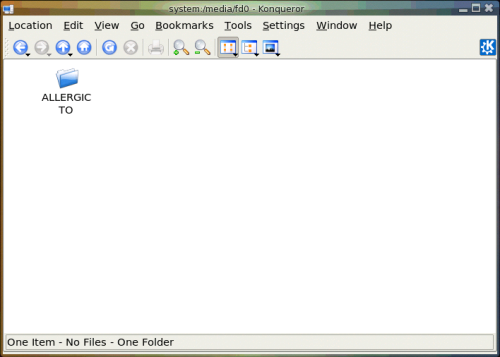
Fig. Mounted Floppy
Once you have successfully mounted the diskette and listed out its directory contents under the File Manager, you can treat it like another folder to read and write files and folders to. However, you have to bear in mind some differences between the floppy diskette folder and the normal folder you have been working with.
The diskette has a very low storage capacity compared with the hard disk; a floppy diskette typically will have about 1.44 MB of storage capacity only. In contrast a hard disk will have at least a few hundred MB of storage capacity at the minimum!
If the write-protect tab on the diskette is enabled, then the diskette can be used for reading only, i.e. you can read the contents of the files on it only. You cannot write to the files, and so you cannot modify and/or create new files or folders.
After using the diskette, you will need to unmount it before you take the diskette from the floppy drive. To unmount the diskette, right-click on the floppy icon on the desktop and select "Unmount". This will unmount the diskette and the floppy icon will disappear from the Desktop. Once this has happened, you can safely remove the diskette from the floppy drive.
Note: It is important that you unmount the diskette before removing it from the floppy drive, especially if it has been mounted for writing. Failure to do so may result in incomplete data being written to the diskette and corruption of the file system on the diskette.
Formatting the Diskette
Before a diskette can be used it has to be "formatted" first. This will create the directory structures and other information needed for the system to keep track of where the data is stored on the diskette. You need to format a diskette once only. You can subsequently format it again after using it for some time, but re-formating will result in the loss of the original contents of the diskette.
KFloppy does not come with the default install. You can install it and several other useful utilities by opening the Synaptic Package Manger and installing kdeutils.
To format a diskette, you can use the KFloppy formatter selection from the Main Menu.
"Main Menu -> System -> Configuration -> Hardware -> Utilities -> KFloppy"
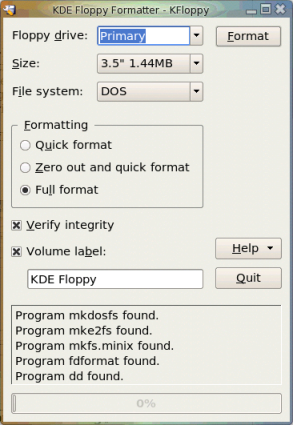
Fig. KFloppy Formatter Dialog
Choose the default floppy density of 3.5", 1.44 MB and the DOS (FAT) file system type. This will enable the diskette to be read on almost all commonly used operating systems including Microsoft Windows. You also have two other options for the filesystem; ext2 or Minix. Next, you can choose the type of formatting; Quick format, Zero out and quick format, or the default, Full format. After you have made your choices click the Format button located at the top right of the window.
Exercises
Format a floppy diskette, mount it for read-write and copy the following files/folders found in the /etc directory to it: hosts, termcap, motd and rc.d.
Unmount the diskette, mount it again and copy its entire contents to the folder tmp in your home directory (create this folder if it is not there). Unmount the diskette after the copying.
The CD-ROM Drive
Nowadays the CD-ROM is widely used as a means to store and distribute data and information. A typical 5.25" CD-ROM can store up to 700 MB of data. It is thus ideal as a medium for distributing large files, multimedia games, and software packages.
By default, when a CD-ROM is placed in the drive a new window will open that says "A new medium has been found. What do you want to do?" Below this you will see a list of options. Choose "Open in New Window" and whatever data is on the CD will be displayed in a new window. If it is an audio (music) CD it will be auto-mounted, and then the default KDE CD player, KsCD, will open on your desktop and begin playing the music on the CD.
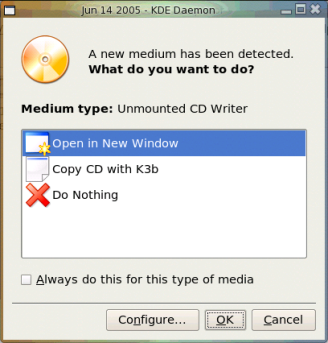
Fig. New Medium Detected
The File Manager can then be used to access the files and folders on the CD. If the CD-ROM is a read-only medium, you can only read the contents of the CD and not write to it.
After using the CD, you will need to unmount it before you take it out of the CD-ROM drive. To unmount the CD, right-click on the CD icon on the desktop and select "Unmount". This will unmount the CD and the CD icon will disappear from the desktop. It is now safe to remove the CD.
The USB Mass Storage Device
Another popular portable storage medium is the USB mass storage device (sometimes also known as a thumb drive). Like the floppy diskette, you can read and write to a thumb drive but it has the advantage of storing much more data than a diskette. Thumb drive devices of capacities 128MB up to 8GB are common.
To access the thumb drive, place it in the USB slot (port) provided and a window will open on the desktop. Choose "Open in New Window."
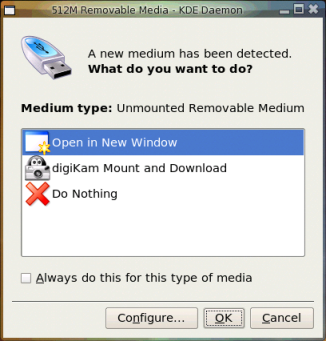
Fig. Removable Media dialog
This will mount the USB thumb drive and add a thumb drive icon on the desktop. Double-clicking on this will mount the USB thumb drive, add a thumb drive icon on the desktop, and list out the files and folders in the thumb drive under the File Manager. You can then treat it like another folder to read and write files and folders.
After finishing with the thumb drive, you will need to unmount it by right-clicking on the thumb drive icon on the desktop and selecting "Safely Remove", before removing it from the USB port.
The CD-RW Drive
While the CD-ROM drive is very useful as a portable storage medium due to its high capacity and low cost, it suffers from the disadvantage that it is a read-only medium.
To overcome this, many PCs are sold nowadays with drives which enable you to record data onto CD-R (CD recordable and CD-R(W) (CD rewritable) disks. The former refers to a CD medium which allows you to record to it only once, while with a CD-R(W) disk it is possible to rewrite data to it multiple times.
Note: While a CD-R(W) drive supports both CR-R and CD-R(W) functionalities, the CD medium that you utilize determines whether you can write data to it only once (CR-R) or multiple times (CD-RW). So it is important that you buy the correct medium type for the function that you want.
K3b The CD-Burner
Your system has a program which enables a user to copy files and folders very easily to a CD-R(W) drive. To use this feature, start the K3b program from the Main Menu.
"Main Menu -> System -> Archiving -->CD Burning -->K3b"
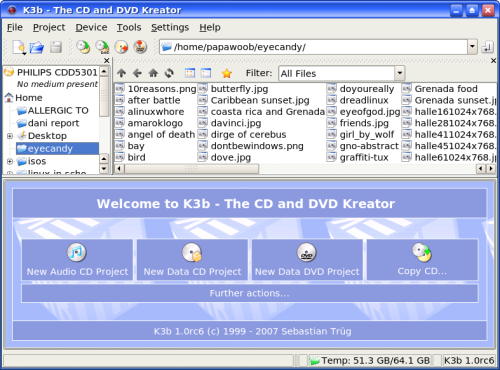
Fig. K3b CD Burning Program
Top Window - Data Sources
The K3b window has 2 main window sections, top and bottom. The top window is divided into 2 windows, left and right. The left window shows a list of data sources; Unix Tree, Internal Structure and CDROM drives. The data sources are the sources for the data to be copied and burned into the CD-R(W).
The Unix Tree represents the file system on the computer. Clicking on the + icon of the tree will expand it to display the file system, i.e. the hierarchical tree structure comprising files and directories (folders). Clicking on a directory will cause the files in the directory to be displayed in the right panel of the top window.
Clicking on CDROM drives will expand into a listing of the CD-ROM drives present in the system and clicking on one of the drives will display the tracks in it on the right panel.
Bottom Window
The bottom window gives you 4 choices as to what you would like to do with your CD/DVD; Audio CD, data CD, or data DVD. The fourth choice is to make a copy of a CD. If these are not what you are looking for then you need to click on the "Further actions" tab to see a complete list of options available as seen below:
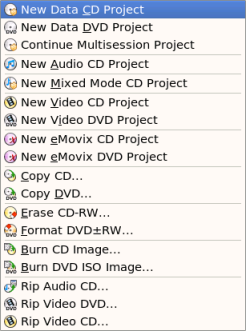
Fig. Further actions
Writing data to the CD-R(W) involves selecting which type of project you would like to create. After choosing which project, you can add the data from the data sources window described above by dragging and dropping them into the bottom window panel. The bottom window has three possible selections; the virtual file system, the track editor, and the recorder settings. Each of these can be selected by clicking on the icons in the left panel of the bottom window.
The virtual file system represents a view of the file system setup in a track of the CD-R(W) to be written to later. Note that this is not part of the actual file system on your computer and so manipulating the files here will not affect the ones in the computer file system. The virtual file system can be managed and edited by right-clicking the mouse.
The track editor shows you the tracks that you have selected to be burned to the CD-R(W). You can edit them using the track editor by right-clicking the mouse before committing them to be burned.
When you have added all the data or music that you would like to burn to the CD you need to click on the "Burn" button. This will open the burn window which enables you to change from the default, the various parameters for recording, e.g. recording speed, writing mode, etc.
Fillstate Status
At the bottom of the K3b window is the Fillstate status panel. This shows you the current space that will be taken up by the selected tracks as a percentage of the space available on the CD-R(W). This space utilization is also displayed in megabyte (MB) units as well as the audio playing time.
Duplicating CDs
It is easy to make a duplicate of a CD using K3b. To do this you will need one CDROM drive and one CD/RW drive. With K3b opened on your desktop, choose "Copy CD" and then insert the source CD into the CD drive. Next, insert the CD/R or CD/RW into the CD/RW drive. The drives will automatically be selected in the Source Medium and Burn Medium windows. You will see a window like this:
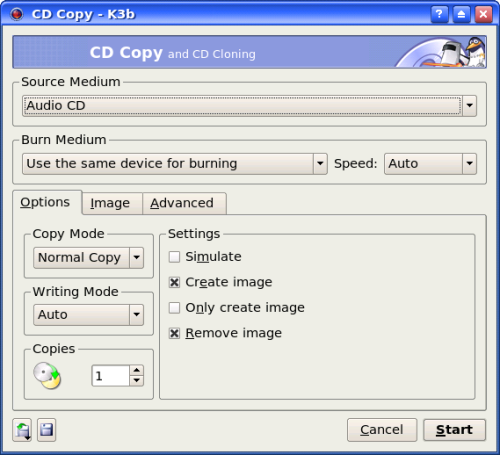
Fig. CD Copy window
The only setting that you may want to change is the burn speed. Auto will select the speed for you but a tip to remember is that the lower the burn speed, the better the burn. To start the actual recording (burning) of the CD, click on the Start button at the bottom right corner of the K3b window.
Creating a Data CD
This section will discuss how you can copy files and folders from the mounted file system and record them into a CD-R(W). You can select the files and folders you want to copy from the Unix Tree in the Data Source window at the top left or from the top right window and drag them into the virtual file system right panel in the bottom window. The files and folders in the virtual file system can be edited by right-clicking on the mouse. You can create, delete and rename files and directories (folders).
After you have selected all the files you want, you should select the Burn button as above and then choose Start to start the recording.
Writing ISO Images
It is possible to copy and store all of the data on a CD in the form of what is known as an ISO image file format. If this ISO image file is then written to a CD, the new CD will be a duplicate of the original one from which the ISO image was created. This provides a convenient way of duplicating a data CD if you can copy or download the ISO image file from another source to the file system on your computer.
To write ISO images to a CD-R(W), select "Further actions" or "Tools" (at the top of the window) and select "Burn CD Image." This will open a window like the one seen below:

Fig. Burn ISO Image window
Next, select the ISO image by clicking on the file folder icon on the right side of the "Image to Burn" tab at the top left of the window and navigating to the ISO image file that you want to burn. Select the image by left clicking on it. Next, insert a blank CD-R(W) into your CD-R(W) drive. After that, ensure that the recording settings are correct and click on the Start button at the bottom right of the window to start the burning.
Help
There are many more options and features which K3b has, e.g. multisession burning, mixing audio and digital data, working with CD-RW media etc. The K3b documentation should be consulted for these more advanced features. The K3b User's Guide may be obtained from: