Command Line Interface Intro: Part 7
by Peter Kelly (critter)
Shell Scripting
A script is simply a list of instructions that we want the system to execute, and in its simplest form it will do just that, line after line, obediently and blindly, with no concern of the consequences. Writing scripts is not difficult, but care must be taken to ensure that the instructions passed in the script perform what is intended, which unfortunately is not always what is actually written.
There are two common types of computer programs: compiled programs and interpreted programs. Compiled programs have their code converted to a machine language that the processor can understand, but is unintelligible to humans. This enables them to execute extremely quickly, but makes them more difficult to alter. Interpreted programs are mostly plain text files that are read line by line by the interpreter, which then instructs the processor. Shell scripts are interpreted programs, and in a bash script, the bash shell is the interpreter.
When we are at the command line, we can type in commands and have the shell perform some function for us. Sometimes, we type in the same commands regularly over a period of time, and at times, the commands get quite long and complex. Other times, we have to type in a whole series of commands to get our end result. If this sounds like you, then it is time to find out about scripting, and let the machine do the tedious work. The bash shell scripting language is a vast topic, and you will see many large volumes devoted to the subject in book stores. Fortunately, you need only a small part of all that wizardry to become a proficient script writer, and to be able to understand some of the scripts which are used to manage and control your system.
To write a script, you have to be able to type text into a file, and to then make that file executable. That can be as simple as entering text on the command line as follows:
cat > myscript
echo Hello
   Type Ctrl+D here to end the text entry and close the file.
chmod +x myscript
Typing ./myscript would then execute the script and print the word Hello to the screen. (The ./ is needed to tell the shell where the script is, as it is not in any of the usual places where executable files are to be found).
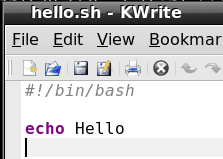
The method above works, but if we really want to write scripts, we should use a text editor, not a word processor, as these include strange formatting sequences that would confuse the shell. Any text editor will do. My personal favorite is kwrite, but there are many others. Ideally, you want an editor that supports syntax highlighting. Any programming language comprises many things such as comments, keywords, variables, text etc. Syntax highlighting displays these things in different colors to make it easier to find a certain item.
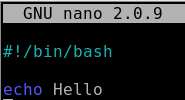
If you want to be able to do this using a terminal editor, then nano supports syntax highlighting, but by default it is turned off. To enable it, you need to copy a file to your home directory. In a terminal, type cp /usr/share/nano/sh.nanorc ~/.nanorc.
Now every file that you edit in nano that ends in .sh will have syntax highlighting suitable for the bash scripting language. Other files will not be affected. The .sh extension is not required for scripts, but is a way of telling nano that "this is a bash script, so highlight it accordingly," and it does help to distinguish your scripts from other files. It is also a good idea to create a scripts directory in your home folder and store all your scripts in there. If you write a script that you find really useful, you can always transfer it to the /bin directory so that that is always available, as that directory is almost certainly in your PATH environment variable. Before you do that, please make sure that it is fully tested and won't one day spring a nasty surprise on you or any other user of the system.
When an executable file is passed to the shell, it passes it to the kernel, which then starts a new process and attempts to execute it. If this is not a compiled, machine language file (usually referred to as a binary), then this will fail and return an error to the shell, which then searches the file for commands that it knows how to process. It may get lucky, as in the simple myscript example above, but as there are many scripting languages, this is not guaranteed and so we should tell the shell which interpreter to use. If the very first characters on the first line of a script are #! (known as shebang), then bash will take the rest of the line to be the fully qualified path of the interpreter. For a bash script we should always start with
#!/bin/bash, or #!/bin/sh /bin/sh is usually a symbolic link to /bin/bash. For a perl script for example, we might use #!/usr/bin/perl.
What needs to be in a script? Well just the one line #!/bin/bash is technically a script, although it wouldn't do very much. In fact, it would do absolutely nothing more than start and end a process. To get results, we need to give it some commands, which it will execute one after another, unless we tell it to do things differently. This is the clever bit. We are in control and now have so much more power than when we simply typed in commands at the terminal. With a script, we can execute commands in the order that we want to, when we want to, dependent upon certain conditions that we define or that arise from system activity, and we can do this repeatedly or until a certain condition is met. We can pass options and arguments to the script at start up, or read information from a file or from the user at the terminal.
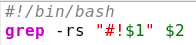
We could write a simple script to search a directory for all bash scripts like this:

(Don't forget to make it executable with chmod +x).
The quotes are needed so that the script doesn't treat everything after the '#' as a comment. The second argument /usr/bin/* has no quotes, as we do want the shell to expand the * into a list of files.
We could do this at the command line without a script, or even define an alias that we might call find-scripts: alias find-scripts='grep -rs "#!/bin/bash" /usr/bin/*'
Both of these would work, but would also find the pattern anywhere in a file or text embedded in a binary file, not only at the beginning, which denotes a bash script, but they suffice as examples.
About variables
To make the effort worthwhile, we can enhance our script by passing it the name and path of the scripting language on the command line, making its use similar to a regular Linux command.
find-scripts {search pattern}
To do this we need to use variables. We've met variables before. They are the names of bits of information that we or the shell need to keep track of, such as PWD, which holds the absolute path name of our current working directory, and PATH, which is a colon separated list of directories to search for executable files. These are Environment Variables used by the shell, but generally available to the user. You can also create your own variables. They are known as variables because if, for example you did a cd to another directory then the contents of PWD would change: Their contents are variable.
Many programming languages require that variables are declared before they are used, and that the type of content that they will be assigned is defined in that declaration. The type of content may be a string (of characters), an integer, floating point number or any one of many other types. Variable declaration is available in bash using the keyword declare, but for most purposes, it is not necessary, and the variables you create can be used to store strings or integers, as you require. Bash doesn't handle floating point arithmetic and needs to use utility commands, such as bc, when that functionality is required.
Bash also supports one dimensional arrays — one dimensional means that you can't (easily) have arrays of arrays!. An array is really just a group of variable elements with the same name and an index starting at zero for the first element. Arrays in bash are extremely flexible. For example, if we create an array named pets with the command pets=(cat dog horse), then pet[0] refers to the value cat and pet[2] the value horse. If we now add pets[4]=parrot then that element gets added to the array even though pets[3] hasn't been assigned.
To access the contents of a particular element of an array we need to use brackets to enclose the index and braces to prevent expansion by the shell:
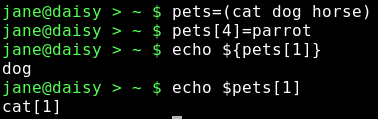
echo ${pets[1]} correctly prints out dog, but echo $pets[1] prints cat[1] as the shell expands the variable pets, with no index number, to the first (zero) element of the array, and then echo treats the string [1] literally and adds it to the text on screen.
Quite often arrays in scripts are iterated through in a loop and their values passed directly to the rest of the code for processing which is a great way of getting things like lists of names or music into a script.
There are, of course, some special ways of accessing certain information about an array.
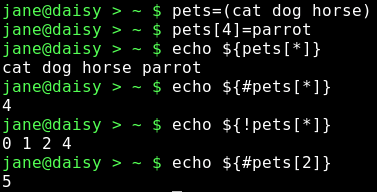
echo ${pets[*]}    Outputs all the elements of the array

echo ${#pets[*]}   Outputs the number of elements in the array

echo ${#pets[2]}   Outputs the length of element [2] in the array

echo ${!pets[*]}   Outputs all the indexes of elements present in the array.
         Notice that the unassigned index 3 is not present.
Special bash variables
The shell has many variables at its disposal and uses some special ones to access arguments passed to a script. The first argument is known as $1, the second as $2 and so on. In the unlikely event that you need to pass more than 9 arguments to a script then the number must be enclosed in braces as ${14} for the 14th argument. $0 contains the name of the command as used on the command line.
Modifying the script like this:

allows us to call the script and pass it the absolute address of the interpreter.
./find-scripts /bin/bash to locate our bash scripts or ./find-scripts /usr/bin/perl to find any perl scripts. We use the fact that the shell stores the first argument passed to it in the variable $1.
Notice that here I have changed the single quotes to double quotes, which allow variable expansion ($1 is replaced by the first argument) to take place, but still treats the #! literally. This is where syntax highlighting is invaluable. In the first example, the "#!/bin/bash" in the command expression is displayed all in red text, which is the color used for strings. In the second example, #! is in red text, while $1 is in green text, the color used to highlight variables. If I had used single quotes here, then the $1 would not have been expanded, leaving grep searching for files containing the pattern of characters #!$1.
We can further refine the script by passing it the search directory as a second argument, which will be stored in $2. We now call the script like this ./find-scripts /bin/bash /usr/bin, passing two arguments to the script and making it much more flexible.
During execution, $1 will be expanded to /bin/bash, and $2 expands to /usr/bin.
These enhancements unfortunately add a complication to the script, as we are now required to pass these arguments to the script. If we fail to pass the correct number of arguments to the script, then the variables $2 and/or $1 will be undefined. That means their value is not controlled by us and will contain a null value. As we are only reading files from a directory here, then we shouldn't cause any damage. But if the script was writing or deleting stuff, then the consequences can be imagined. You can get into a whole lot of trouble with an empty gun! This simple example should be enough to convince you!
rm -rf /$RETURNED_PATH   DON'T TRY THIS!
rm remove
-r recursing through the sub-directories
-f without asking or prompting
/$RETURNED_PATH: if this variable is undefined, then it expands to / and the command completes as "remove everything below the root directory recursively, without prompting" and deletes everything in and below the root directory — your entire system is gone, permanently and without so much as a "thank you".
Conditional Programming
Another special variable is $#, which contains the number of arguments passed to the script. We can use this to check that all is OK before proceeding.
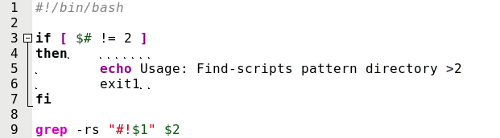
I've put line numbers in to help clarify things. They have nothing to do with the script are not typed in.
Lines 3 to 7 contain a construct known as an if-then statement. After the initial if keyword on line 3, we test a condition for truth. Here the test [ $# != 2 ] checks if the total number of arguments passed is not equal to 2. The spaces inside the brackets are very important.
If it is true (that there are not 2 arguments) we execute lines 4,5 and 6. Line 4 is the entry point to commands that are only executed when the test condition is true. Line 5 echoes a usage message to the terminal. Line 6 exits the script, as we don't have sufficient information to continue, and returns a value of 1. Line 7 ends the conditional statement and allows the script to continue.
In this instance we don't use the return value of 1, which by convention signifies a failure — 0 means success. Other numbers up to and including 125 are available for the programmers use. If this script was called from another, then that parent script would know the outcome from this value and could then act accordingly.
If you use the script in a couple of months time, or even a few years down the line, you might not remember what pattern and directory the script is complaining about. It is even less likely that another user would know. One thing we can and should do is to add comments to the script, detailing what is going on. A comment is any text on its own line, or at the end of a line, that starts with a # (with exception of the initial #! which has special meaning to the shell). This text is ignored by the script.
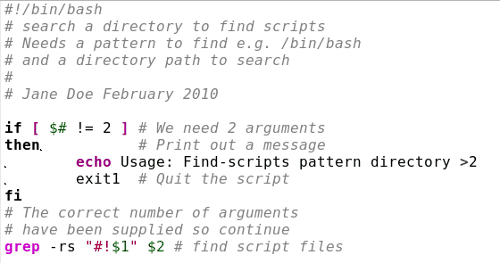
There are more comments in this file than you may usually find, but an informative header can save a lot of head scratching. Indentation can also help to make a script more readable.
The test used in the example above, $# != 2, is derived from the negation symbol !. And with the equality symbol = together, they give a 'not equal test.' But what if we want to test if a file was a directory or if the file even exists? Well, the shell has its very own test command with the following basic syntax: test {expression1} {condition} {expression2}.
Using this command the test in the if statement would have been written like this: if test $# -ne 2. As a matter of the fact the two forms are completely interchangeable, and the conditions available for the test command can be used equally well by the original format [ $# -ne 2 ]. The shell has many functions like test built in to it. They are known, unsurprisingly, as shell builtins. The keyword test is a builtin, as is [, which has the same meaning.
The use of tests is so central to shell scripting to determine the flow of the program that you should be aware of the tests available. I give here a complete list of the tests available as described in the official man page documentation.
Where EXP is an expression:
( EXP )         EXP is true
! EXP           EXP is false
EXP1 -a EXP2    both EXP1 and EXP2 are true (logical and)
EXP1 -o EXP2    either EXP1 or EXP2 is true (logical or)
where STR is a string:
-n STR         the length of STR is nonzero
STR            equivalent to -n STR
-z STR         the length of STR is zero
STR1 = STR2    the strings are equal
STR1 != STR2   the strings are not equal
Where INT is an integer:
INT1 -eq INT2  INT1 is equal to INT2
INT1 -ge INT2  INT1 is greater than or equal to INT2
INT1 -gt INT2  INT1 is greater than INT2
INT1 -le INT2  INT1 is less than or equal to INT2
INT1 -lt INT2  INT1 is less than INT2
INT1 -ne INT2  INT1 is not equal to INT2
Where F is a file:
F1 -ef F2      F1 and F2 have the same device and inode numbers
F1 -nt F2      F1 is newer (modification date) than F2
F1 -ot F2      F1 is older than F2
-b F           F exists and is block special
-c F           F exists and is character special
-d F           F exists and is a directory
-e F           F exists
-f F           F exists and is a regular file
-g F           F exists and is set-group-ID
-G F           F exists and is owned by the effective group ID
-h F           F exists and is a symbolic link (same as -L )
-k F           F exists and has its sticky bit set
-L F           F exists and is a symbolic link (same as -h )
-O F           F exists and is owned by the effective user ID
-p F           F exists and is a named pipe
-r F           F exists and read permission is granted
-s F           F exists and has a size greater than zero
-S F           F exists and is a socket
-t FD          file descriptor FD is opened on a terminal
-u F           F exists and its set-user-ID bit is set
-w F           F exists and write permission is granted
-x F           F exists and execute (or search) permission is granted
That list should give you some idea of the flexibility you have when performing a test.
Note! The -e test for the existence of a file can also be written -a, but I choose to ignore this, as it is too easy to confuse with the -a (logical and) test. You may, however, see it used in other scripts.
The if-then statement may also contain the else keyword, which works like this:
if {condition}
  then     commands to execute if the condition is met
  else     commands to execute if the condition is not met
fi
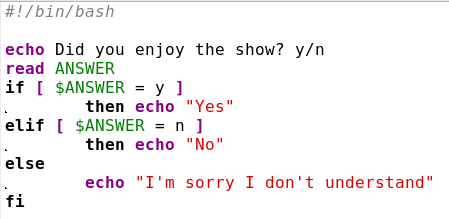
In the next example, I use the command read, which is an easy way to get user input into a variable as a script is running.
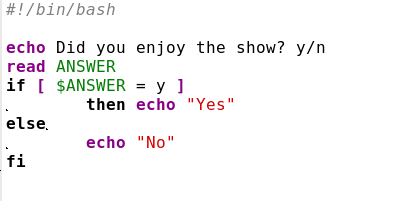
After the first echo command, the script pauses until the user enters something at the keyboard and presses the return key. The users input is stored in the variable ANSWER. This time the script does something different, depending on the users input.
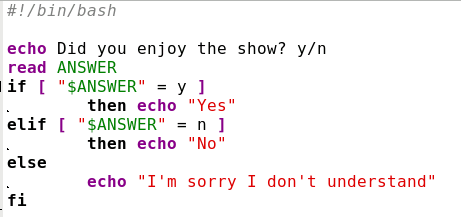
But what if the user types in something other than Y or N? To cope with this, we introduce another keyword — elif.
In this script, the acceptable responses are caught and acted upon. Any other response is dealt with by the code after else. This would appear to solve the problem, but if the return key is pressed without the user entering a response, then nothing is assigned to the variable ANSWER, which defaults to a null value, and the script would see the tests as [ = y ] and [ = n ], which produces the error message unary operator expected. The way around this is to use double quotes around the variable, which causes the test to be seen as [ "" = y ] or [ "" = n ], which are valid expressions that the shell can work with. The "" in the test is an empty string (a string with no characters), which is not the same as a null.
You can have as many elif tests as you wish, and the if statement can be nested as many times as you can keep track of.
If [condition]
then
   if [condition]
   then
      if [condition]
      …
      …
      …
      fi
   fi
fi
And of course each if statement can have its own elifs and elses. Here's a longer one with those line numbers again.
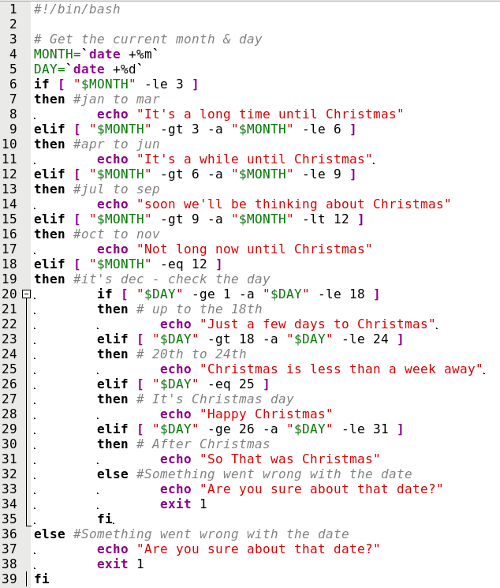
Line 1 is our standard bash script header. Line 3 is a comment and ignored.
Lines 4 & 5 use the date function with format modifiers (%m and %d) to get the current month and date into our variables
Line 6 Starts the first of 2 if-then constructs checking if the month is less than or equal to 3.
Line 9 tests if the month is greater than 3 and less than or equal to 6. That is, it is either 4, 5 or 6.
Line 19 We've discovered that it is December so we start the second if-then construct to check the day.
Lines 23, 26 and 29 do more day testing.
Line 32 the default else statement. If we got here, the the day was not in the range 1 — 31, so something is wrong and we leave the script.
Line 36 We find ourselves back in the first if-then construct at the else statement. If we got here, the the month was not in the range 1 -12, so something is wrong and we leave the script.
Line 39 Terminates the first if-then construct.
While the above script is useful to demonstrate the use of nesting if — then statements and the use of multiple elifs, it is not the only way or the most efficient way to program this.
We could have used the case statement, which is another conditional construct. This is the syntax for the case statement.
Case {pattern} in
   value1)
      commands
      ;;
   value2)
      commands
      ;;
   …
   …
   …
   *)
      commands
      ;;
esac
In this structure, the pattern is something, like the contents of a variable, that you want to use to control the actions of the script. If it has value1, then those commands up to the ;; are executed. Value2 causes a different set of commands to be executed and so forth, until all values that you wish to test for have been checked. The default at the end of the statement catches any other value, and is used as a fail-safe for unwanted or unexpected values. It can also provide a way to exit the script (or code segment). To test for multiple values, separate them with a pipe symbol |.
In the next example, I have mixed a case statement and the nested if-then statement from the previous example, and added line numbers to the figure.
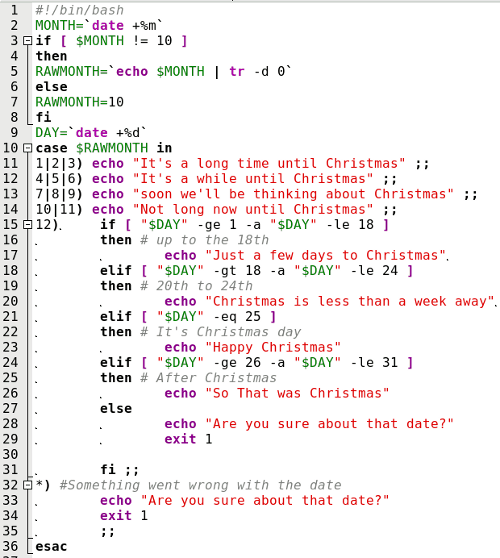
Because the values to be tested in line numbers 11 t o 15 are integer numbers and the date function returns a two character string such as "02," the tests in lines 8 to 12 would fail because of the leading "0". To overcome this, we echo the value through a pipe to the tr (translate) command and use the option -d (delete) with the argument "0," which deletes any zeroes in the string. unless the string is "10," which is an integer. This expression is evaluated in the back ticks and assigned to the new variable RAWMONTH.
We could have used the two character string as returned from the data function in the case statements, but using integers demonstrates the need to be aware of the type of data we use in tests.
Each test in the case statement is on one line here to make it more compact. If there are multiple commands for a test, then they should be separated by a semicolon or by a newline character (which means on separate lines). I think that you'll agree that the case statement is easier to read than the many elifs in the if statement.
The if-then and case structures are examples of conditional programming where the progress and direction of the script is determined by the results of certain tests. The shell has two conditional operators, && and ||, known as "logical and" and "logical or". They work both in unary (one argument) and binary (two arguments) mode.
In unary mode:
[ "$A" -gt 4 ] && echo "yes"
If the expression [ "$A" -gt 4 ] evaluates to true the the echo command is executed, if false the script ignores the interruption and continues.
The || operator has the opposite effect in that the expression has to evaluate to false for the command to be executed.
Binary mode is used to test two arguments:
if [ "$A" -lt 4 ] && [ "$B" -gt 9 ] echo "yes" The echo command is executed if and only if both expressions are true.
if [ "$A" -lt 4 ] || [ "$B" -gt 9 ] echo "yes" The echo command is executed if either or both expressions are true.
This is similar, but not the same, as the test operators -a and -o. When using the test operators, both expressions are evaluated, and then the test is performed. The && shell operator evaluates the first expression, and if it is false, then there is no point in looking at the second expression, as the 'and' condition cannot be met.
In a similar manner. if the first expression in an 'or' test using the || operator evaluates to true, then the condition has already been met and the second expression doesn't need to be evaluated. For this reason, they are known as short circuit operators.
The scope of variables
As we have now started to use our own variables, it is important that you understand the scope of variables before we move on. The scope of a variable is where its assigned value is valid. Variables may be local or global. For example, while on the command line, you are in a running shell and you may create variables

The scope of that variable is the currently running shell process. When you exit the shell, the variable ceases to exist, and if you start a new shell the variable isn't available, as it is local to the shell process where it was created. When you run a script a new shell process is started and any variables that you create are local to that script and not available elsewhere.
Environment variables are global variables and are available to all processes. In order to make your variables available to other processes, they need to be exported to the environment. All new processes inherit the environment of their parent process. When an exported variable is passed to a child process, it retains the value assigned it in the parent process. The child process may change the value of the variable, but the value seen by the parent remains unchanged.
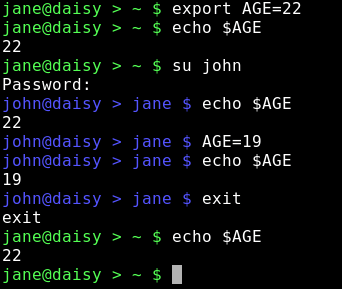
Jane set the variable AGE to 22, her age, and exported it. When the su command was executed to switch to user john, a new shell process was started which could access the variable and its value, as set by jane, which john subsequently changed to 19, his age. Jane still sees the variable set as 22.
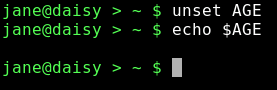
To remove a variable, use the command unset
Another command used with variables is readonly, which has the effect of turning a variable into a constant — a variable whose value, once set, cannot vary. For example, readonly KB=1024. The assigned value cannot be changed during the life of the process and readonly variables cannot be unset.
The env command is used to display the environment variables that are currently set and to control the environment that gets passed to commands. The env command on its own will display a list of all current environment variables. If the env command is followed by one or more variable assignments and used before a command, the environment passed to the command will be modified, but the current working environment will be unaffected. With the -i option the current environment will be ignored and only variables passed to the command will be used.
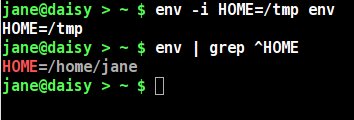
The environment variable HOME, which normally contains the full path name of the users home directory, is temporarily changed to /tmp, and all other environment variables discarded. This new environment is then passed to the command env, which starts in a new process and lists out all its known environment variables. There is only one, as the others were discarded.
The env command is then immediately executed in the current shell, and the output searched for lines that begin with the pattern "HOME". The changed environment existed only for the process to which it was passed.
Answers to Mark Szorady's Double Take: (1) "Gotta" changed to "have to"; (2) Necklace missing; (3) Doorknob higher; (4) Cabinet larger; (5) Arm lower; (6) Plug added; (7) Laptop screen smaller.
This month's Double Take features Old Polack, a PCLinuxOS Forum Global Moderator. To learn more about Old Polack, check out the Behind The Scenes column in the August, 2009 issue of the PCLinuxOS Magazine.