Xfce 4.6.2: Panel Plugins
by Paul Arnote (parnote)
Despite its reputation and role as a lightweight desktop environment, Xfce has a good number of panel plugins to help increase the functionality of your Xfce desktop — 45 of them, actually. Just as we did when we took a look at the KDE 4 Widgets, let's take a look at what all is available with the Xfce Panel Plugins.
Below is a list of plugins that are available for the Xfce desktop. All of those listed are in the PCLinuxOS repository. The plugins that are pre-installed in a default installation of Phoenix 2010 are highlighted in red. The information following the plugin comes straight from the definitions that appear in the "Add New Items" dialog box that comes up when you go to add a plugin to your panel.
At the end of the article, we'll also take a closer look at some select plugins and how to configure them. But first, let's take a look at the list of available plugins. The default, pre-installed plugins are highlighted in red text.
- Launcher
- Program Launcher with optional menu
- Action Buttons
- Log out or lock the screen
- Battery Monitor
- Show and monitor the battery status
- Brightness plugin
- Control your LCD brightness
- CPU Frequency Monitor
- Shows the CPU Frequency and Governours
- CPU Graph
- Graphical representation of the CPU load
- Cellualr Moden Monitor
- Monitor line quality and type of cellular modems
- Clipman
- Clipboard manager
- Clock
- What time is it?
- DateTime
- Date and Time plugin with a simple calendar
- Dictionary
- A plugin to query different dictionaries
- Disk Performance Monitor
- Show disk performance
- Eyes
- Eyes that spy on you
- Free Space Checker
- Monitor free disk space
- Generic Monitor
- Show output of a command
- Icon Box
- Show icons of all running applications
- Keyboard Layouts
- Keyboard layouts setup and switch plugin
- Linelight
- A simple frontend for the locate search
- MPD Client Plugin
- A client for MPD, The Music Player Daemon
- Mail Watcher
- Check mail from multiple mailboxes
- Mixer
- Volume control for your sound card
- Modem Lights
- Simple PPP connections via modem
- Mount Devices
- Shows all mountable devices and (un)mounts them on request.
- Notes
- Notes plugin for the Xfce4 desktop
- Notification Area
- Area where notification icons appear
- Orage Clock
- What time and date is it?
- Places
- Access folders, documents, and removable media
- Radio Plugin
- V4l radio plugin
- Screenshot
- Take screenshots of the entire screen, of the active window or of a region
- Separator or Spacing
- Adds a space or a line between panel items
- Show Desktop
- Hide all windows and show the desktop
- System Load Monitor
- Monitor CPU load, swap usage and memory footprint
- Task List
- Switch between open windows using buttons
- Time Out
- Automatically controlled time outs and breaks
- Trash Applet
- Display the trash can
- Verve Command Line
- Command line interface with auto-completion and command history
- WMdock
- Plugin for WindowMaker dockapps
- Wavelan
- View the status of a wireless network
- Weather Update
- Show current weather conditions
- Window List
- Switch between open windows using a menu
- Workspace Switcher
- Switch between virtual desktops
- XfApplet
- Display Gnome applets in the panel
- Xfce Menu
- Shows a menu containing categories of installed applications
- Xfce4 Playercontrol Plugin
- Audio player control plugin for Xfce 4.4 panel
- Xfce4 Timer
- Timer plugin for Xfce 4.4 panel
As you can see, the plugins available for Xfce span a wide variety of interests.
Installing Plugins
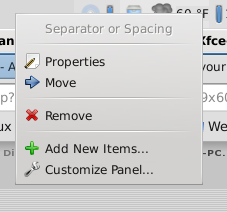
Adding panel plugins is actually quite easy in Xfce. First, right click your mouse cursor on an empty spot on the panel you want to add a plugin to. You will get the following pop up menu.
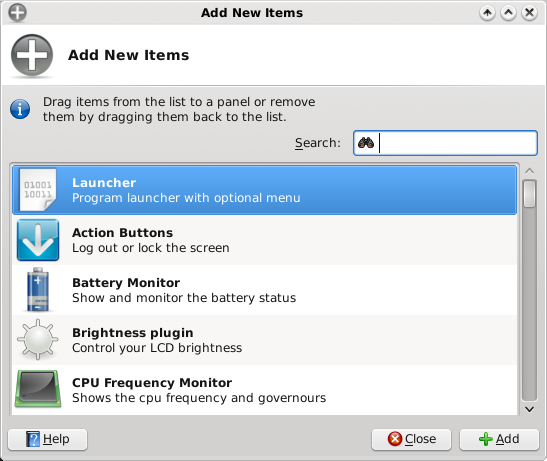
Select the "Add New Items…" menu item, and you will be presented with the dialog box displayed below. Just scroll through the (mostly) alphabetized list to find the plugin that you want to add. I say "mostly alphabetized," since Launcher appears at the top of the list, because it's the item most people add most often.
Once you have the item on your panel, you can use the same pop up menu to move the item to your desired location, if you don't like the default location. Just select "Move" from the menu, and drag the vertical bar to where you want it, and click the mouse cursor. It's actually pretty simple.
Selecting "Properties" from the pop up menu allows you to set and customize the options for each of the plugins. Of course, the options will vary from plugin to plugin, but this allows you to tailor the plugin to your needs and to make it behave in a way that better suits your needs.
Customizing Select Plugins
There are some Xfce plugins that, like everything else, are more popular with most users. As such, we'll go over the configuration of some of those more popular plugins. My apologies up front if your favorite Xfce plugin is not covered here. But take solace in the fact that most of the configuration options are fairly straight forward and easy to figure out.
Launcher
By far the most popular Xfce plugin, Launcher allows you to put your most popular and most used programs only one click away on one of your panels. No hunting through menus to start your program. Just click on the launcher icon, and your program starts right up.
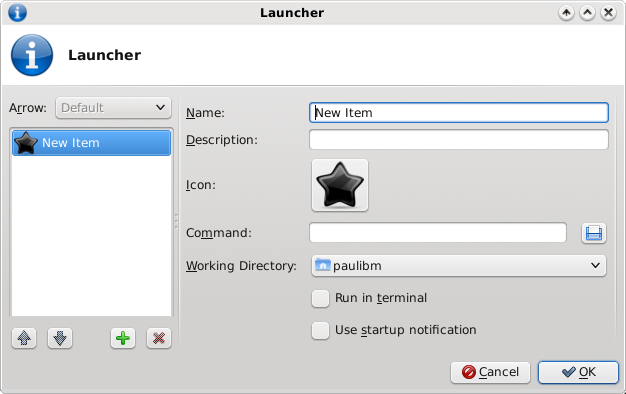
When you select to add a launcher to your panel, you are greeted with the screen shot above. In the first space, enter the name for your new launcher. Under description, whatever you put here will be displayed in the tool tip when you hover your mouse over it. Next, click on the black star icon, and you can choose the icon you want displayed for your launcher. Next, under the command entry, enter the command line to launch your program. Oh, what's that? You're not sure what the command line is? Click on the disk icon next to the text entry box. A file selection dialog box will open, already pointing to your /usr/bin directory. Scroll through the list and find your program, and click on OK after you've highlighted your selection with the mouse.
Seems pretty easy, huh? Well it is, but Launcher can do more. (But wait … there's more!) Launcher can also set up a menu of choices when selected. Take a look at the screen shot below. I'll explain things after you've had a look.
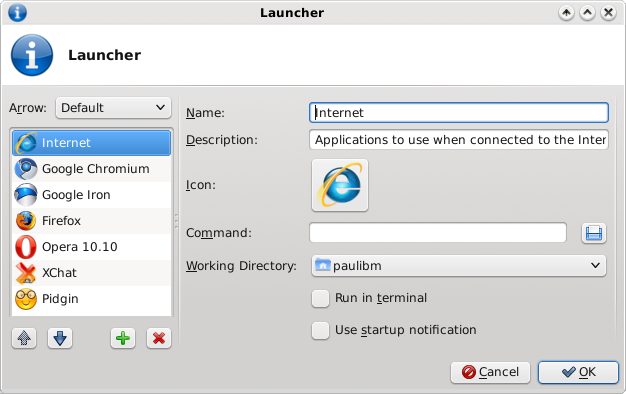
Now take a look at the list in the far left column. There are now six different programs listed, in addition to an icon I chose to use to represent the category (I chose "that" particular icon because I have no other use for it). With the "Internet" entry highlighted in the left pane, the Name field is filled in simply with Internet. Below that, the Description field has a longer comment or description that will appear when a user hovers the mouse cursor over the icon.
Once you have the first item entered, which essentially becomes the "menu" for the other entries, you can start adding other programs to the "menu." By selecting the green "+" icon, you will then get a blank Launcher screen to fill in. And filling it in is exactly the same as we did earlier with the single launcher entry. Repeat this process, selecting the green "+" icon for each and every Launcher you want to place in the list.
You can remove anything you wish, at any time, by right clicking on the top-level "menu" icon, and selecting Properties from the pop up menu. When the above Launcher window opens, simply select the item you want to remove, and click on the red "X" icon. Similarly, you can organize the list of programs into whatever order you like. Highlight the item you want to move up or down in the list, and select either the blue up or down arrows. Click OK to close the Launcher window, and your changes will be automatically saved.
Here is what it looks like on your panel:

Xfce-screenshooter
This plugin is not installed by default in Phoenix 2010, but it is available in the PCLinuxOS repository. In fact, Phoenix 2010 comes with Shutter pre-installed as the default screen capture program. But sometimes, something else is needed. The Xfce-screenshooter can certainly hold its own when compared to KDE's KSnapshot, and has been touted to be even better than Gnome's gnome-screenshot applet. In fact, if you've ever used either screen capture utility, then Xfce-screenshooter will feel very, very familiar to you.
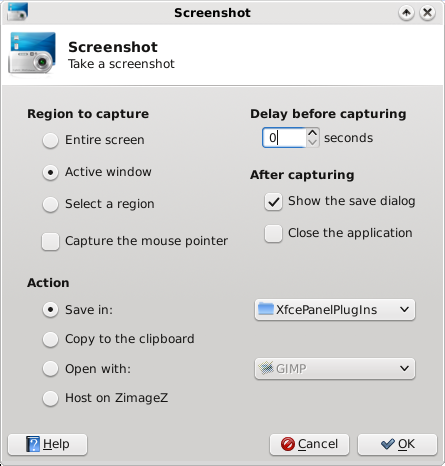
Although it is listed in the list of panel plugins, use of Xfce-screenshooter feels a bit awkward used that way. Why awkward? Because when you use it as a panel plugin, you have to go into the Properties of the plugin to change whether you want it to capture the entire screen, just the active window, or a region of the screen. The better (and easier) way to use Xfce-screenshooter is from a Launcher you place on your panel. You will not only have more options, but you will also have all the selections (entire screen, active window, region of the screen) right at your fingertips and easier to select on the fly. Plus, the Xfce-screenshooter will re-appear on your screen after taking and saving the screen shot. When used as a panel plugin, the program window disappears/closes every time you take a screen shot.
With Xfce-screenshooter, you can, as we discussed, choose to capture the entire screen, just the active window, or only a region of the screen. You can also select whether or not to capture the mouse pointer in the screen shot. You can set a delay, in seconds, before Xfce-screenshooter "snaps" the picture. This is especially handy if you want to capture menus. If you give yourself between five and 10 seconds, you will have the chance to open those menus before the screen shot is captured. Just keep the menu open until you see the File Save dialog open.
You can choose whether or not to open the save dialog. You can also select for Xfce-screenshooter to close automatically after taking the screen shot capture. You can also choose what action to take on the resulting screen capture. You can choose to save it to your computer, and even specify what directory you want to save it to. You can choose to merely copy the image to the clipboard, or to open it with Gimp (or any other graphics program you may be using). You can also choose to host your screen capture on ZimageZ, a special graphics host for Xfce users.
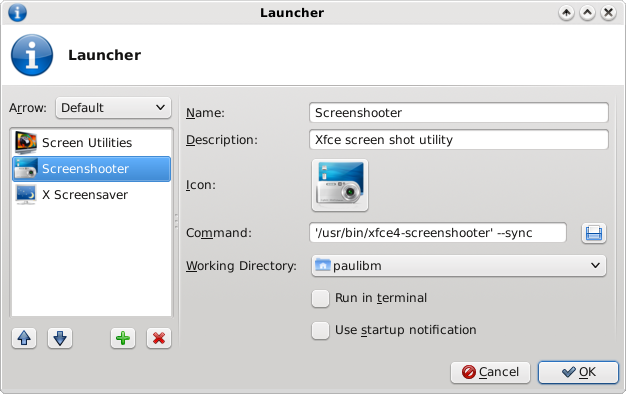
Take note of the command line used in the screen shot of the Launcher for Xfce-screenshooter, above:
'/usr/bin/xfce4-screenshooter' --sync
The --sync parameter makes calls to X synchronous.
Battery Monitor
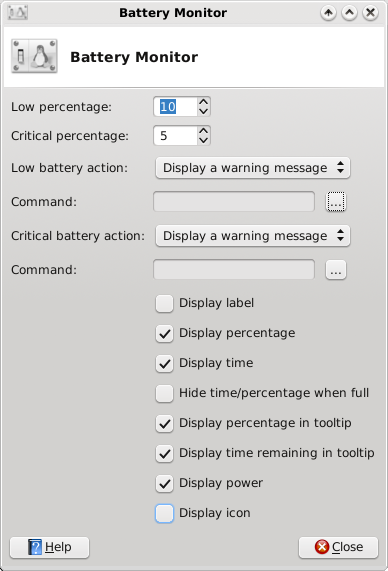
The Battery Monitor plugin allows laptop users to properly monitor the charge and discharge status and state of their battery. After adding it to your panel, right click on the battery monitor icon on the panel, and select Properties from the pop up menu. You will then be looking at a window like the one in the screen shot above.
With it, you can define what Xfce does when you have a low, then a critical, battery level. If you want, you can have it run a command that you specify (like you may want to have your laptop hibernate/suspend to disk when your battery reaches the critical level). Feel free to toggle the various options off and on to configure the Battery Monitor to a configuration that works for you. The check boxes are, after all, simply a switch to turn that particular feature off or on.
Weather Update

There are a lot of desktop environment specific add-ons and plugins available for monitoring the weather. But that's just it — they are specific to each specific desktop environment. Gnome has a few, KDE 4 has a few … and Xfce has its own, as well. Although this plugin is not in the default installation of Phoenix 2010, it is available in the PCLinuxOS repository.
Once installed to your panel, you need to open up the Properties window for the plugin, via the pop up menu that appears when you right click on the plugin. You will get a window very similar to the one in the screen shot above.
The first thing you will need to select is if the information supplied is in Imperial (U.S.) format, or in Metric format (pretty much everywhere else). If it hasn't already been preset, you will need to enter the location you want to monitor. You can search for your location either by city name, or by postal zip code.
Next, you set any proxy settings, if applicable. Finally, you choose which items you want to display. The choices should be fairly obvious in the list. Choose the item you want displayed, and select the "Add" button. Repeat this until all the items you want to display show up in the scrolling list in the lower half of the window. If you want Weather Update to animate the transitions between your selected labels, simply check the box below the list. The selected labels will appear in the panel, to the right of an icon that illustrates the current conditions.

When you click the left mouse button on the Weather Update plugin, it will display an extended five day forecast for the selected location, just like the one shown in the screen shot above.
Action Buttons
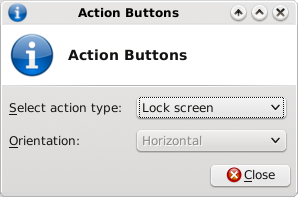
Even though you already have access to this, via the pre-installed version in Phoenix 2010, I've found it handy to install a second implementation on my lower panel. The Action Buttons has three settings you can choose between: Quit, Lock Screen, and Quit & Lock Screen. I have the one on my lower panel set to simply lock the screen when I have to walk away from my computer. Just one quick click, and my screensaver is activated and my screen (and computer) is locked.
Conclusion
As you can see, Xfce has many panel plugins that can add additional functionality and convenience to your Xfce desktop. And it accomplishes this added functionality and convenience while still staying within the mindset and goals of Xfce: a functional desktop environment, without all the bloat. Do yourself a favor and explore the available Xfce plugins. You're likely to find one, or two, or a few, or more that help make your Xfce experience richer and easier.