LXDE: Tips & Tricks
by Paul Arnote (parnote)
We've covered several topics related to using and customizing PCLinuxOS-LXDE. There are some other things you can do to further customize your LXDE installation, but some of these are simply too short to justify their own article. Even so, they are important enough to cover, so I've decided to collect them here, in a "Tips & Tricks" article. There are 12 "tips and tricks" explained, to help you get more out of your LXDE experience.
Put a Sox In It
In a default installation of PCLinuxOS-LXDE, there is no way to play sound files from the command line. Before you say, "But I can play sound files from [insert your favorite GUI sound application here]," this inability may be something you want to correct. For example, I like to use checkgmail to notify me of new email in my primary Gmail account. One of the abilities it has is to execute a command when new email is received. I like for a sound to be played when I receive new mail. But without the ability to play sound files from the command line, there is no way for me to play a sound (via checkgmail) when I receive new mail.
Enter sox. Available in the PCLinuxOS repository (only 816 KB in size), sox allows you to play sound files from the command line. Sox stands for "Sound Exchange," and it bills itself as the "Swiss Army Knife of Sound Manipulation." As such, with the added ability to play sound files from the command line, I am able to play a sound when new mail arrives to my Gmail account. Simply enter the command, similar to the one below:
play -v 0.10 /home/paulibm/Sounds/r2d2-1.wav
The command line instructs sox to play a sound file at 10 percent volume (-v 0.10), and the path to the sound file I wish to play (/home/paulibm/Sounds/r2d2-1.wav). The "play" command is actually very powerful, and the above command doesn't even scratch the surface of what it is capable of doing. You can get a better idea of its full capabilities by typing play --help at the command line, or by entering man sox at the command line to view the extensive man page documentation.
While I'm not going to steal the thunder of discovery from your looking through the documentation or help for the play command, I will touch on one other command line switch you may want to use. While it's not usually necessary to do anything special to play a valid sound file, it can be helpful to give the play command some additional "guidance" on what type of sound file you want to play. So, if I want to play an MP3 file, I can tell sox to "get ready" to play that type of file, with the -t command line switch. Here's an example:
play -t mp3 -v 0.50 "/home/paulibm/Music/THX - Dolby Digital Sound Effects Trailer.mp3"
Since the file name has spaces in it (and if the file name of your sound file has spaces in it), you will need to enclose the file name in double quotes. Otherwise, your sound file will not be able to be found to be played back, since a space has special meaning on the command line. This is just one reason that spaces in file names is discouraged under Linux, since spaces in the file name can become problematic when trying to utilize the file from the command line.
Play a Sound When PCLinuxOS-LXDE Starts
Perhaps it's the relative youth of the LXDE desktop, but there is no obvious way to play a sound when LXDE launches. If you followed through with the previous tip and installed sox, then playing a sound when LXDE starts up is easy.
First, create a simple bash script, similar to the one below:
#! /bin/bash play -t mp3 -v 0.40 /home/paulibm/Sounds/startup.mp3
Next, follow the instructions from the LXDE: Autostart Apps With .desktop Files article in the September, 2010 issue of The NEW PCLinuxOS Magazine. Make the bash script executable, and copy it to your /usr/bin folder (as the root user). While you can name your script file whatever name you wish, I named mine startup-sound.sh. Now, either create a .desktop file that points to your "startup-sound.sh" file, and place it in your $HOME/.config/autostart directory, or add startup-sound.sh & to your lxde-autostart.sh file. In fact, you can even just place the entire play command into your lxde-autostart.sh file, if you want. I prefer to keep it modularized and in its own bash script file, where I can make changes without the risk of messing with my lxde-autostart.sh file.
I've not yet been able to figure out how to get LXDE to play a sound when you are exiting the desktop.
Install a Better Power Manager
It's no secret that the LXDE Power Manager is seriously lacking in functionality. In fact, it's known to be buggy. For laptop users, this is a huge deal. You can circumvent the buggy LXDE Power Manager by installing a different power manager. If I were you, I'd avoid the Xfce4 Power Manager, since it also has some current issues and does not work properly. About the only other choice is to install the Gnome Power Manager. It is available in the PCLinuxOS repository, and although it's a Gnome application, it pulls in hardly any extra Gnome dependencies. As an added benefit, Gnome is also based on the Gtk+ 2.0 libraries, which are the native libraries upon which LXDE is built. But most importantly, the Gnome Power Manager just works, and works as it should.
The command to start the Gnome Power Manager is gnome-power-preferences --sync. If you want the Gnome Power Manager to automatically start when you start your LXDE desktop, you can add gnome-power-preferences --sync & to your lxde-autostart.sh file that you created from the instructions in the LXDE: Autostart Apps With .desktop Files article in the September, 2010 issue of the magazine.
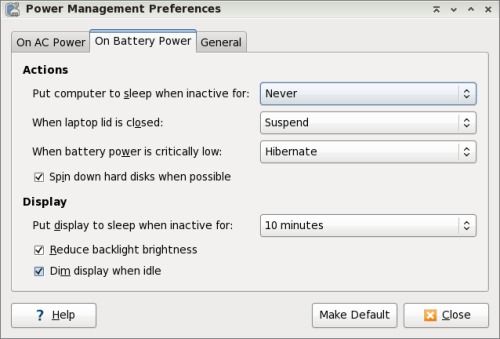
The Gnome Power Manager will properly inform you of remaining battery time (when working unplugged), or remaining battery charge time (when plugged into a power source). If you are using LXDE on a notebook or netbook computer, this becomes a very important issue, for the obvious reasons.
Workaround For Trash In LXDE
To start with, the lack of a bona fide trash can has been remedied in the newest release of PCManFM that is default in PCLinuxOS-LXDE 2010.10. In earlier versions of PCManFM, trash does not work. You can get around this issue by installing xfe from the PCLinuxOS repository. Xfe, short for X File Explorer, resembles Windows Explorer in Windows 98.
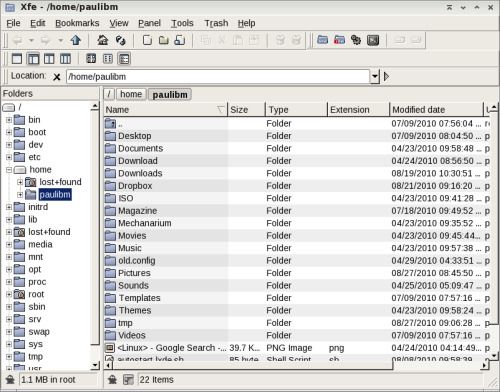
When you come across a file that you want to send to the trash, open xfe. Go to the directory that contains the file you want to send to trash, right click on the file and select "Move to Trash."
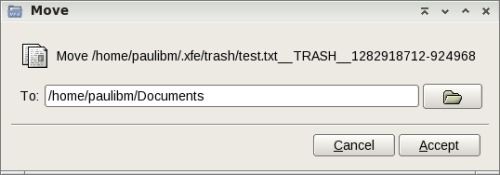
Similarly, you can restore items from the trash. Again, open xfe, and select Trash > Go to trash from the Trash menu. Right click on the file you want to restore, and select Move to… from the context menu that pops us. Type in the name of the folder you want to move it to (or select the destination by clicking on the folder icon button next to the text entry box, and selecting the destination with your mouse). Click "Accept" to complete the move of the file.
To delete files in the xfe trash, select Trash > Empty trash can from the menu.
Place Icons On Your Desktop
Granted, not everyone wants icons on their desktop. In fact, some LXDE users are a bit "miffed" about a PCManFM bug that places an unremovable "My Documents" icon on the desktop. (I fall into the category of users who really don't want a lot of icons on my desktop - it's too reminiscent of Windows for me). But gauging from the screenshots posted to the monthly screenshots thread in the forum, there are just as many users who do want icons on their desktop. If you fall into the latter category of LXDE users, you too can adorn your desktop with all of the icons you desire.
There is a utility for LXDE, called lxshortcut. While not installed by default, it is available in the PCLinuxOS repository. Lxshortcut is a utility that helps make a .desktop file that is compliant with the de-facto freedesktop.org standards. I know, I know … you're asking yourself "now why didn't he tell me about this before now?" To be perfectly honest, I didn't know it existed until I stumbled across it while researching other "tips and tricks" for this article. But given the relative simplicity of how a .desktop file is constructed, knowing the structure of the file isn't necessarily a bad thing. And now that you have a better understanding of that file structure, lxshortcut will help eliminate some of the work you have to do. Really, it's a good thing.
Don't bother going to look for an icon in your PC Menu for lxshortcuts. It doesn't exist. Instead, you start it from the command line. To start it up, simply type lxshortcut --input=[name-of-file].desktop at the command line. You will be presented with the window below:
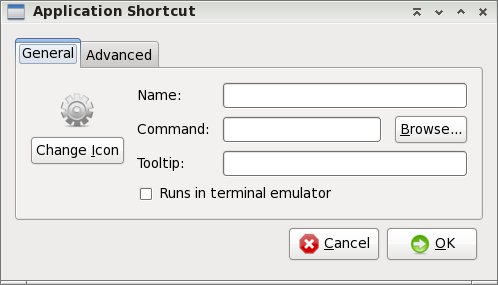
In the first text entry box, "Name," enter the text of what you want to call the shortcut. In the second text entry box, "Command," enter the command you want to execute when the shortcut is selected (or click on the "Browse" button and select the application to launch from the list of installed applications in /usr/bin). In the third text entry box, "Tooltip," enter the text you want to be displayed when your mouse hovers over the icon. At the far left side of the window, click on the "Change Icon" button and select the icon you want to use for the shortcut. The only thing under the "Advanced" tab is "Use Startup Notification," and this is typically left unchecked. As you can see, its use is fairly cut and dry.
Once you have everything entered the way you want or need it, then click on the "OK" button. A properly structured .desktop file, with the name you assigned it when you opened lxshortcut with the input= command line switch, will be written to your $HOME/.local/share/applications folder. It should look something like this:
[Desktop Entry]
Encoding=UTF-8
Type=Application
Name=Xfce4 Screenshooter
Name[en_US]=Xfce4 Screenshooter
Icon=applets-screenshooter
Exec=/usr/bin/xfce4-screenshooter
Comment[en_US]=Take screenshots of your desktop
Now, it really isn't doing us much good there in its current location, since it still isn't showing the shortcut on our desktop. Open PCManFM and go to that directory. Find your new .desktop file, right click on it, and select "Cut" from the context menu that appears. Over in the top left pane of PCManFM, you will see an entry defined as "Desktop." Click on it, and paste the .desktop file into your "Desktop" folder. Immediately, your new desktop shortcut icon should appear on your desktop. Repeat these steps for each and every shortcut you would like to place on your desktop.
As a bonus, this method should actually work on just about any desktop environment. Just install lxshortcut from the PCLinuxOS repository, and you should be able to similarly create desktop shortcuts for Xfce, Gnome, KDE, and any other DE that conforms to the freedesktop.org standards.
Customize Your LXDE Menu
While we are talking about .desktop files, it's also a good time to discuss how to customize your LXDE menu. We touched on it briefly, when we were talking about how to add applications to be automatically started when LXDE starts, in the LXDE: Autostart Apps With .desktop Files article in the September, 2010 issue of the magazine.
Just by simply placing your properly configured .desktop file in the /usr/share/applications directory, you can add items to your PC Menu. But in order for items to properly appear in your PC Menu, you have to first list the menu category to place the item in. All it takes is one small typo to prevent your item from showing up in the menu.
There are just two things you need to do. First, using the .desktop we created in the previous step (presuming you want to make a menu entry for that application), add the following line:
Categories=X-MandrivaLinux;Graphics
Second, copy the .desktop file to your /usr/share/applications directory (you must have root privileges to do this). Now, your application will have an entry in your menu.
Here are some categories you may want to use when adding applications to your menu:
X-MandrivaLinux-System-Configuration-Other;
X-MandrivaLinux-Multimedia-Sound;
X-MandrivaLinux-Office-Wordprocessors;
X-MandrivaLinux-System-FileTools;
X-MandrivaLinux-Internet;
There are more categories; I'm not going to try to bother to list them all here. The easiest way to figure out the category is to open the .desktop file of another application that appears in the menu location where you want to place your application. Simply copy the "Categories=" line from that .desktop file, and paste it into the .desktop file of the application you want to appear in that category.
Customize Your LXDE Menu: Part Deux
You may have noticed that when you right-click your mouse on the desktop, you get a different context menu that appears like this:
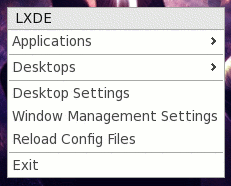
Believe it or not, this is not exactly an LXDE menu (even though it says so at the top). Rather, this menu is under the control of the OpenBox window manager. As such, the configuration file for controlling this context menu is the menu.xml file, located in /usr/share/lxde/openbox. (Psst … much of this information also applies to the OpenBox remaster of PCLinuxOS).
Probably the one area of this context menu you will be most interested in is how to add applications to the "Applications" menu item. Here is the structure for the "Applications" menu:
<menu id="apps-menu" label="Applications">
<item label="PCManFM">
    <action name="Execute">
    <startupnotify><enabled>yes</enabled><icon>pcmanfm</icon></startupnotify>
    <command>pcmanfm</command></action>
</item>
<item label="LXDECC">
    <action name="Execute"><command>lxdecc</command></action>
</item>
<item label="Configure Your Computer">
    <action name="Execute"><command>/usr/sbin/drakconf</command></action>
</item>>
<item label="Package Manager">
    <action name="Execute"><command>/usr/sbin/synaptic</command></action>
</item>
<item label="LXTerminal">
   <action name="Execute"><command>lxterminal</command></action>
</item>
<item label="Firefox">
    <action name="Execute"><command>firefox</command></action>
</item>
</menu>
Since it is written in XML, the file structure is very similar to HTML. We briefly covered this in the LXDE: All Hail The Halo Of halevt article elsewhere in this issue of the magazine. Basically, once you issue a XML command, you must close it. Notice how the first line of the "apps-menu" section of menu.xml starts with <menu id= … >, and the last line in the section is </menu>, telling the system that this is the end of this particular menu. Notice how each <item …> ends with </item> before listing the next item. Similarly, <action …> is ended with </action>, and <command>[your command here] is ended with </command>. Just be sure to close the commands in the reverse order that you issued them.
So, if I want to add my favorite screenshot application to this "Applications" menu, I would insert the following right before the last line that reads </menu>:
<item label="Screenshooter">
    <action name="Execute"><command>xfce4-screenshooter</command></action>
</item>
This would place a menu item, named "Screenshooter," in the context menu, under Applications, right after Firefox. Pretty simple, huh?
An Alternate Autostart Method
You gotta love it. As usual in Linux, there are always multiple ways to get things done. This is not an exception when it comes to configuring applications to automatically start when LXDE starts.
Buried in the /etc/xdg/lxsession/LXDE directory is a file named, ironically enough, autostart. Simply add an @ symbol, immediately followed by the name of the application you want to automatically start (e.g., @conky). Now, whenever LXDE starts up, Conky (or whatever other application you inserted at the end of that file) will automatically start. Just remember that you can edit the autostart file only if you have root privileges.
Get A New Doo: Installing OpenBox Themes
Definitely one way to customize your LXDE desktop is to give it a whole new look. The easiest way is to head over to http://box-look.org/ and download a new OpenBox window manager theme. Once you find the one (or several) that you like, download them to your /home directory. I place mine in my /home/paulibm/Downloads directory.
You are likely to find the OpenBox themes in different formats. Many of the themes are available as *.obt files, and these are the easiest ones to install. Once you've downloaded them, right-click your mouse on the .obt file and select "Open With OpenBox Configuration Manager." This will install the theme to the $HOME/.themes directory, automatically.
If you download a theme in either a .tar.bz or .tar.bz2 format, you will need to do a little more work to install the theme. First, open the archived file with File Roller (or any favorite archive manager). Look for a directory that says "openbox-3." Extract that directory, and any sub-directories, to a folder in your $HOME/.themes directory. It's best to name the new folder the name of the new theme you are wanting to use. At the very least, it helps avoid confusion later on. Next, re-start the OpenBox Configuration Manager. Your new theme should be listed among your choices.
Get More Control Over Your Sounds
The sound volume panel plugin for LXDE is pretty lame. You basically only have control over the volume. Period. That's it. It is very basic, and it's a rare situation where it will meet the needs of hardly any computer user. Fortunately, there is a (better) alternative.
Open up Synaptic and install volumeicon from the PCLinuxOS repository. Once installed, you will not only have control over the volume of your sound card, but also access to set the other levels for the additional ports on your sound card. To start volumeicon, click on your PC Menu icon, select "Run," and type in volumeicon.
By default, volumeicon uses alsamix, a command line mixer opened up in xterm. While functional, I prefer to use a GUI based sound mixer. When you right-click your mouse on the volume icon in the notification area of your panel, you can select Preferences from the context menu. When you do, you will see a window similar to this:
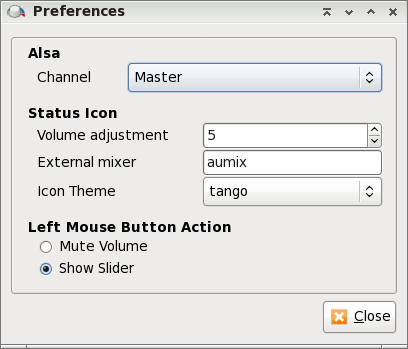
Here, you can specify a different external mixer to use. I have chosen to use aumix, a lightweight mixer that does not seem to be desktop-specific. You could just as easily choose GMixer (the Gnome sound mixer), AlsaMixerGUI (a GUI alternative to the command line alsamix), or any other sound mixer you prefer to use. Whichever sound mixer you choose to use will be launched when you select "Open Mixer" from the context menu of volumeicon.
At the top of the window, you can choose which sound channel you want volumeicon to control. The "Volume adjustment" sets the increment to raise or lower the volume when you rotate the wheel of a mouse over the sound icon. The "Icon theme" allows you to set the appearance of the icon displayed in the notification tray. Finally, you can determine what action to take when the left mouse button is clicked on the sound icon. The default value is to mute the volume. I have changed it to show the volume slider, since I rarely use the mouse with the notebook computer I have LXDE installed on.
Make PCManFM Sing & Dance
Although being a lightweight file manager, PCManFM does have some "hidden" tools and features that will make your life easier.
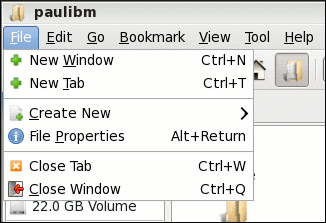
It may not be immediately apparent, but PCManFM can display multiple tabs, with each tab containing/displaying different folders on your computer. Under the "File" menu, select "New Tab." Alternatively, you can just press Ctrl + T when PCManFM has the focus, and a new tab will be created. The use of tabs means you only have to have one PCManFM window open to view or work on the contents of multiple folders, which can save you some memory usage. This is especially important if you are working on an older machine with limited memory.
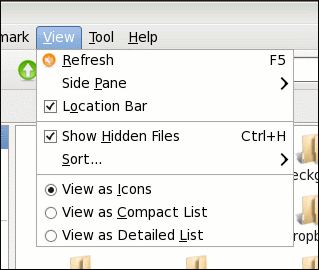
It's also very easy to view hidden files on your computer. From the "View" menu, select "Show Hidden Files" to toggle the display of hidden files. You can also use a keyboard shortcut, Ctrl + H, when the PCManFM window is focused to toggle the display of hidden files.
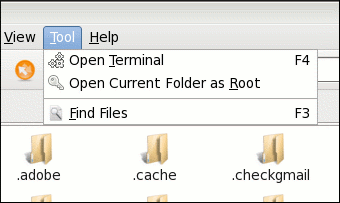
Under the "Tool" menu are three very useful tools. First, you can open a LXTerminal session simply by selecting "Open Terminal" (or simply by pressing F4 when the PCManFM window has the focus). As an added bonus, your terminal session is opened up with the currently displayed folder as the active directory in your terminal session.
Sometimes, it's necessary to elevate your "privileges" to the root user to perform various actions on files. PCManFM makes this easy. Simply select "Open Current Folder as Root" from the "Tool" menu. After being prompted for (and properly supplying) the root password, another copy of PCManFM will be opened up with root access to the currently displayed folder.
Finally, you can use the "Find Files" item under the "Tool" menu to search for files on your computer. You can use the normal set of wildcard characters, and tell PCManFM where to look, so you can narrow your search.
Icon Display On Your Panel
It isn't quickly apparent how to control the display of icons on your panel, so it certainly deserves mention here. The question came up in the PCLinuxOS forum a month or two ago, and the user was having difficulty finding where to control this setting.
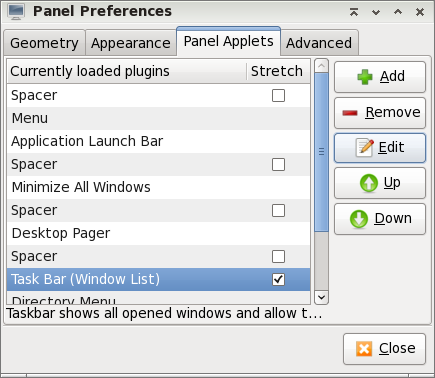
Right click on the panel, and select "Panel Settings" from the context menu. When the "Panel Preferences" window opens, click on the "Panel Applets" tab. Find and click on the "Task Bar (Window List) line. Then click on the "Edit" button on the right side of the window.
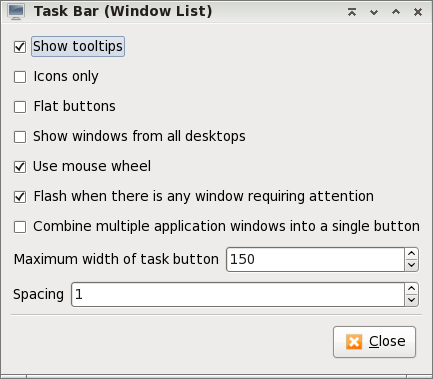
This brings up the window above. The first option, "Show tooltips," is checked by default. I cannot think of a reason to turn this option off, but if you don't want tooltips to be displayed, you are free to uncheck this setting. If you want to only display the icons of the open windows, without any text, check the option labeled "Icons only" (second option from the top). This will display only the icon of the open window in your task bar, similar to the "Smooth Tasks" widget in KDE 4.
Select the third option, "Flat buttons," if you do not want your panel buttons to have a 3D appearance. Select the fourth option, "Show windows from all desktops," if you want to see icons representing all of your open applications from all of your desktops, and not just your current desktop. This might be helpful if you are likely to forget that you have an application already open, but on a different desktop, and memory is at a premium.
With the fifth option, "Use mouse wheel," you can use your mouse wheel to switch between available desktops simply by scrolling your mouse wheel on an empty portion of your desktop. This option is turned on by default in PCLinuxOS-LXDE. The sixth option, "Flash when there is any window requiring attention," flashes the window icon in the task bar whenever there is a window that requires your attention.
The seventh option, "Combine multiple application windows into a single button," causes only one icon to be displayed in the task bar, regardless of how many instances of the application you have open. So, if you have this option selected, and you have six instances of Leafpad running, only one icon for Leafpad will appear in the task bar.
The final two options allow you to set the maximum width of a task button (default is 150 pixels), and the spacing between buttons on the task bar (the default is 1 pixel spacing).
Conclusion
Despite it being one of the newer desktop environments (it is, after all, only four years old), there are already lots of features built into the LXDE desktop. I think you will agree with my assessment that there is a lot of room for many improvements and enhancements in the LXDE desktop, and I have no doubts that these improvements and enhancements will find their way to fruition as the LXDE desktop matures. Meanwhile, the LXDE desktop is already a robust desktop environment, and it should provide most any intermediate to advanced Linux user a satisfying desktop experience. And it does so, without getting in its own way and while adhering to its "mission" to be a full, complete lightweight desktop.
As you have seen, there are many ways to "tweak" the LXDE desktop, if you only know where to look and know what to do.