Windowmaker on PCLinuxOS - Keeping up Appearance
By Patrick G HornekerLast month, we started discussing the internal files that WindowMaker uses to configure itself. Display Attributes were also discussed. This article goes more into the changing of the appearance of your desktop (called Workspace in WindowMaker terminology). For this article, we will use the WindowMaker Configuration Manager, which is called from More Applications -> Configuration -> WindowMaker Configuration Manager on the system menu. (From here on out, WindowMaker Configuation Manager will simply be referred to as Configuration Manager.)
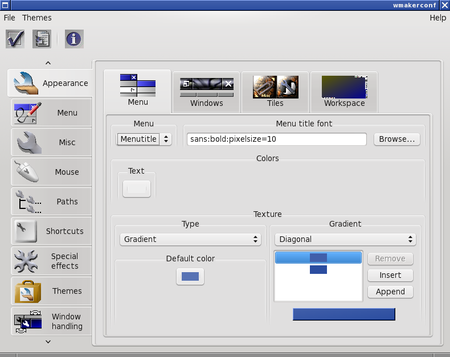
This is what appears when you first launch the Configuration Manager. There are four types of items that can be configured from the Appearance tab, namely Menu, Windows, Tiles and Workspace. Tiles refers to the space where icons such as those assigned to applications, or special icons such as the Dock and the Clip reside. Think of Tiles as a background to icons in WindowMaker. If an icon assigned has any transparency, the Tile fills in the gap created by the transparency.
As shown here, you can select options to change the appearance of the menu header (called Menu Title here).
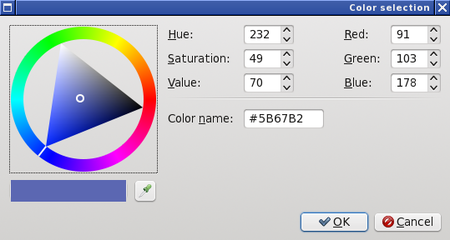
Clicking on the button below Text allows you to select the color of the text to appear in the menu header.
The value in hexidecimal that appears in Color Name will be the color assigned to whatever value (display attribute) is being assigned.
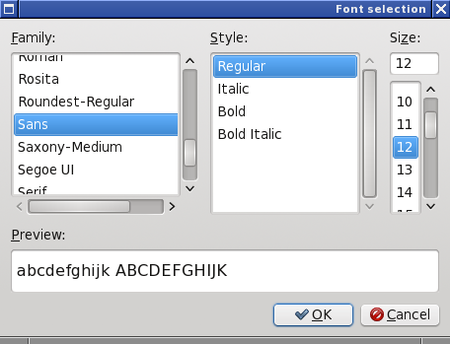
Now, let us look at the Menu Title Font. Does the value shown here look familiar? It should as this is the value assigned to attributes that require a font name. Fortunately, Configuration Manager has a dialog box that does this for you. Click on Browse... and you will see this:
Notice there are three parameters you need to set. The third parameter, Size, sets the pixelsize= parameter that we saw in last month’s article on internal configuration files.
Thankfully, we get to see a preview of the resulting font before we click on OK, which will select the font to be used.
When we close this dialog box, the resulting string will represent the font we have selected and will appear in the Menu Title Font in the correct notation.
On the upper left hand corner of the Configuration Manager is a Check box, which closes out the Configuration Manager, and a “arrow on the document” box, which Saves the configuration files to ~/GNUstep/Defaults. The ~ stands for your home directory assigned to your user account.
Be sure to always save your changes by clicking on that second box at the upper left hand corner of Configuration Manager. or your changes you have made will not take effect the next time you start WindowMaker. If you click on the Check box, Configuration Manager will ask if you want to save any changes before exiting.
Texture options for all configurable display attributes is consistent, be it for a menu, a window, a tile, or the background itself.
Solid Color: This option is just what it says. The only configurable option here is the color of the display attribute.
Pixmap: We described this option when we were discussing backgrounds for WindowMaker. You can use any image in the JPEG, PNG, GIF, TIFF, XBM or XPM (The latter are X Window System bitmap/pixmap graphics) formats not only as a desktop background, but as a background for title windows (including the popup menus), icon backgrounds (or Tiles), or as a background that displays in the popup menu. (Imagine the possibilities here. You cannot do this with GNOME 3 menus!)
Gradient: Here you can compose your own gradients with as many colors in the mix as you want. In addition, you can choose whether you want the gradient to be vertical from top to bottom, horizontal from left to right, or diagonal from upper left corner to lower right corner.
Textured: This option is similar to Gradient, except that the gradient is overlayed on top of whatever image you supply. The image provides the textured effect.
Interwoven Gradient: The first two colors supplied at the top end of the cluster provide a background gradient. The bottom two colors provide the foreground gradient. Each line in the gradient is drawn as lines of x pixels thick where x is supplied as the numeric parameter in the dialog box. The swatch between the selections is what you will see when you commit the changes to WindowMaker.

We have already discussed the Workspace tab when we discussed desktop backgrounds.
The Windows tab has several configurable options:
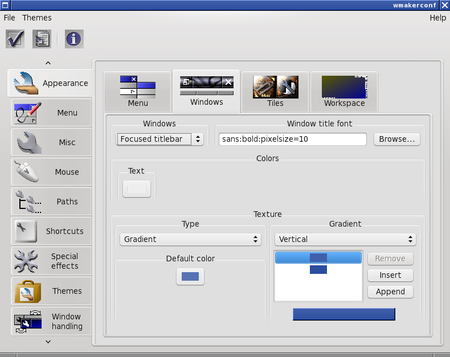
Focused Titlebar and Unfocused Titlebar: Windows are considered focused when they are active and ready to receive mouse and keyboard input. For PCLinuxOS, windows automatically focus when you move your mouse on them. There is an option elsewhere in Configuration Manager that allows you to change the mouse behavior so that you can click on a window to make it active (similar to the default in GNOME and KDE).
Parent Titlebar: When some applications open a new window, the main application window is called the parent window, and the windows they open are called child windows. This configurable option only configures the title bar on these windows.
Resize Bar: Located at the bottom of most windows in WindowMaker, this is where you adjust the size of the windows being displayed.
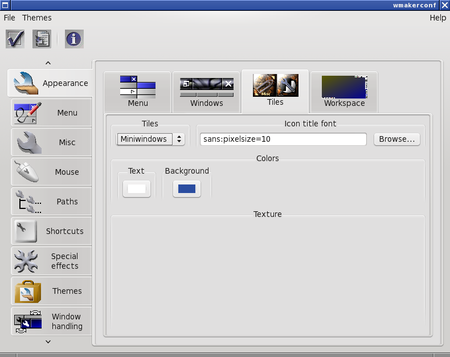
The Tiles tab has some configurable options for icons and dock applications (called Miniwindows), and for the Dock and the Clip.
The Dock and Clip allows the use of the same options that are assignable to the Menu tab, with the addition of two selectable colors: one color is for the active (focused) state, and one for the inactive (non-focused) state.
The Miniwindows option has only two selectable colors: one for the foreground and one for the background.
With all of these options available to you through the Configuration Manager, you are provided with opportunities to customize your WindowMaker desktop in ways you could not easily do with GNOME or with KDE.