Backup BAsics Part 3 - luckybackup
by horusfalconHello again, everyone! Before we go any further, I’d better confess an error I made in an earlier article. While luckyBackup does have the ability to create compressed backups, it is not “built-in” to the program itself - it is necessary to pipe the output of luckyBackup through the compression tool of your choice with a “run after” command from the advanced options when creating the task.
Such tasks should be configured and tested very carefully. Built-in support for tar and bzip are rumored to be in the pipeline for future versions (a lot of requests from users have prompted this), but it’s not ready just yet. I’m sorry for any confusion this may have caused.
With that out of the way, we’ll be looking at how to use luckyBackup to perform two simple tasks. The first of these is an on-demand backup that introduces fundamental concepts. The second progresses from there to setting up a simple unattended task to help backup a selected user data set automatically.
What Is luckyBackup?
Before we get started on how to use it, let’s briefly review what exactly luckyBackup is.
At its simplest, it is a front-end which helps a user define and pass parameters to rsync for executing backup tasks. It does more than that, though, as we’ll see a bit later on.
This does beg the question, however: what is rsync? The short answer is that rsync is a utility for mirroring data from a source to a destination. This destination can be a local one or one that is remotely connected via a network. (A good technical introduction to rsync may be found here for those who would like to know more.)
Installing luckyBackup
We’ll keep this part short & simple because, for PCLinuxOS users, it really is. luckyBackup installs via the Synaptic package manager. To find it quickly, just press the Search button on the Synaptic menu, enter luckyBackup in the search field and go. As usual, any dependencies needed by luckyBackup will be also selected automatically for installation. Once it is installed, menu items for luckyBackup may be found under the Archiving sub-menu.
Getting Started
Since we will be dealing with user data in this example, luckyBackup is started as a regular user, not as the super user. This will preserve the permissions and metadata associated with the original files in the backup so that the original user will still have all their privileges on any restored data.
Once luckyBackup is started and opens its main window we see something like this:
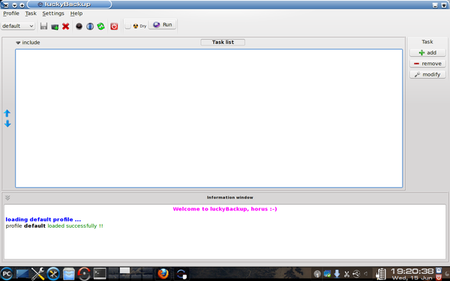
That message in the information window at the bottom about “profile default loaded successfully!!” is significant. It tells us that the program has started successfully and loaded its plain (default) profile. (At this point it might be useful to know that a “profile” in this setting is merely a collection of tasks. The default profile is blank right now because no tasks have yet been defined for it.)
Creating a New Profile
Since the first task I have in mind to create is for demonstration purposes only, I will be creating a new profile to keep it in. We could easily create other profiles for other reasons. (The best reason for creating separate profiles is to group tasks that share a common schedule, since all scheduling is done at the profile level, but we’ll see more about that later on.)
Creating a new profile is easy - look at the screenshot below. The mouse cursor is resting on the New Profile button on the Profiles toolbar.
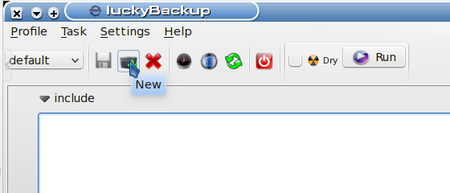
Clicking the New Profile button will bring up a dialog box which asks for a name for the profile being created. I named my new profile Demos. The information box updates to show that this profile has been created. Now let’s create a simple backup task.
Adding a New Task
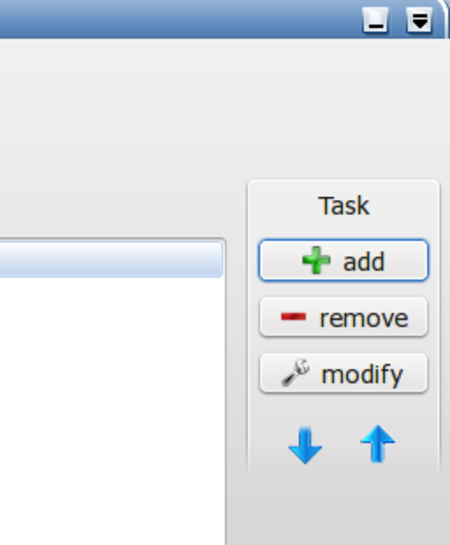
At the right of the Task List portion of the window there are three buttons which trigger actions related to tasks for this profile.
Clicking on the add button will open a dialog box which asks for data relating to this task:
There are some basic steps here:
1. Name the task.
2. Select a task type
3. Select a source from which to create the backup
4. Select a destination on which to store the backup
5. Select whether to create a subfolder for the backup on the destination (default)
6. Select how many snapshots of the data to keep.
7. Validation of the newly created task
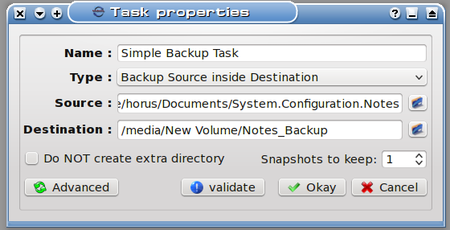
The name I have given this is Simple Backup Task (sounds simple enough). Next up is selecting a task type.
There are two types of tasks: the one I’ve selected, “Backup Source inside Destination” will copy the data from the source into the destination. The other type is “Synchronize Source and Destination” and it uses a more refined method to delta copy only the differences so that both the source and destination reflect the most recent changes to the data set. This can be much faster than a straight copy of the data, and very useful for data that changes often because of the time saved backing it up by this method.
For this demo what I’m creating is a backup of my System Configuration Notes files (stuff I’ve learned about how to set up systems the way I like them.) Clicking on the folder icon at the right of the Source field allows me to browse to the folder where I keep my notes and select it.
Notice also that the destination here is /media/New Volume/Notes_Backup. This is on an external hard drive in a folder I was able to create on-the-fly after browsing to that drive. I could have easily clicked the check box for “Do Not create extra directory”, but I want to demonstrate what happens when the default option is used. (It helps that I had the external drive already connected and automounted.)
One last thing to notice above: the number of snapshots to keep. I will only be keeping one snapshot, since this task is for demonstration only. Some of you are probably wondering: What’s a snapshot anyway, and what’s it good for?
Data snapshots can be thought of the same way as photographic snapshots - they are particular instances of a backup task over time. Multiple snapshots of critical data can be handy when it becomes needful to recover a previous state of the data set. (e.g., Say someone made a mistake saving a Report to The Shareholders and wiped out a bunch of important data instead. Recovering from a previous snapshot could save the day!)
Finally we get to the last step: validation. After all options are selected, clicking the Validate button will put up a dialog box which shows the actual rsync command line generated by the choices made, also showing any errors in that command. In the case of this example, it is sufficiently simple that no errors were generated.
At this point, clicking Okay in the New Task dialog will post the new task to this profile’s task list. We’re through defining tasks for now, and are ready to run the new task to actually create a backup using it.
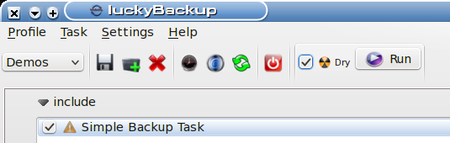
Our first step in using a task is to include it. In the screenshot, notice that the include checkbox for our task is checked. (Click on this checkbox to toggle it between checked or unchecked.)

In the lower section, note the information displayed:
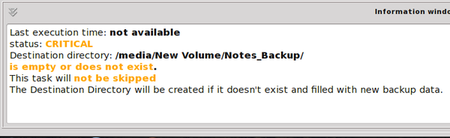
This looks pretty serious! What’s that CRITICAL warning? Not to worry - it’s warning us that this task has not yet been run, which means our precious data is not protected at this time. The other warning is telling us nothing exists in the destination directory (folder) or that the destination folder itself does not exist. Since I created this folder on-the-fly when I selected the destination earlier, I would reasonably expect it to be there. Just to take out some cheap insurance, though, my first attempt at this task will be a dry run:
Note the checkbox for Dry is checked now. This means that on the run I’m about to do, everything will be done except for actually writing the data for the backup. This allows us to test complex or advanced tasks before actually doing them. My next step is to click the Run button and watch the information window:
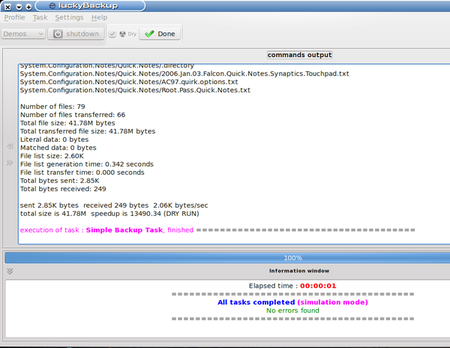
We can see from the information window that all tasks were completed without error. All the statistics in the top section of the window, including a list of the individual files involved and some neat time slice info, can be useful in debugging tasks that fail their dry runs. As I said earlier, this task was simple, so there was no real need to worry.
Unchecking the dry run checkbox and rerunning the task will repeat this task and actually write the data. I just did this, and note that the task took a few more seconds (since the system actually did something useful this time), and that luckyBackup attempted to send an email but was unable to. That’s because I didn’t bother to configure this feature, which would be more useful for something that was more critical or that was backed up remotely.
So where’s my backup stored? On the path:
/media/New Volume/Notes_Backup/System.Configuration.Notes
Note that the data on this path is not compressed, nor is it encrypted, so it is available for immediate use. Yeah, it’s a straight copy.
A More Complex Task
Since this next task I want to create will be a scheduled task, I will first create a new profile for it, called Automated Demos. I won’t belabor this, as profile creation is simple enough. The reason I’m creating this new profile is because schedules are created at the profile level. Since I don’t want to include our previous task, I need a separate profile for the new one.
You may note, if you have to re-start luckyBackup at this point to keep following along, that the profile default loads automatically (we would expect this, though). Simply click on the New Profile button as before and create the new task. Once it is created, it should load automatically, ready to accept new tasks. (If you need to select this profile at some point in the future, use the drop-down list to access it.)

As before, we click the Add button at the right of the task list, and enter information in the task definition dialog that opens (I have already completed the information here):
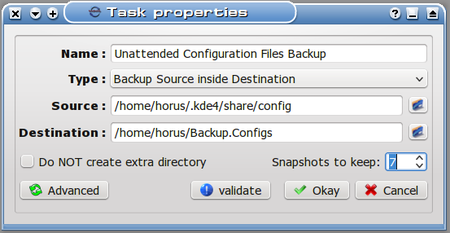
(It’s worth noting that the path for the source includes a hidden folder. To be able to browse to this location, once the browse window is open, right-click it and select “View Hidden Files”. Browsing to the desired location is then a simple point-and-click process.)
Note the number of snapshots went up. We’ll be keeping seven snapshots of this task because the data can change rapidly on my system. Note also that I’m keeping this in a subfolder of my home folder, which might not be the best location if the task was truly critical. I’m doing this so I don’t have to connect up a USB drive again every time this backup is scheduled to run, and so I will have ready access to the data locally. If I’m truly worried, I can always copy this backup to another drive (backups of backups? It’s not as crazy as it sounds, really, if the data is important enough.)
Now we can schedule this task. First, remember to click the include checkbox for the task so that it will actually run when the schedule tells it to. Now click the Schedule button on the toolbar:

After clicking the button, we can see the scheduling dialog box:
We see that no schedule elements are present at this time (nothing exciting about that), but we can also see by a survey of the buttons at the bottom that luckyBackup relies on cron to schedule its tasks. This is yet another example of how modular tools in Linux are leveraged to accomplish complex tasks (but enough politics for now). What’s important to know here is that the current user’s crontab is where these schedule elements are added. For this reason, it is important when using a scheduled profile to ensure that crond is actually running. The way to do this in PCLinuxOS is to open the PCLinuxOS Control Center:

Once you are here, select “Manage system services by enabling or disabling them”. This will bring up the following dialog to control system services. BE CAREFUL HERE! This is big medicine.
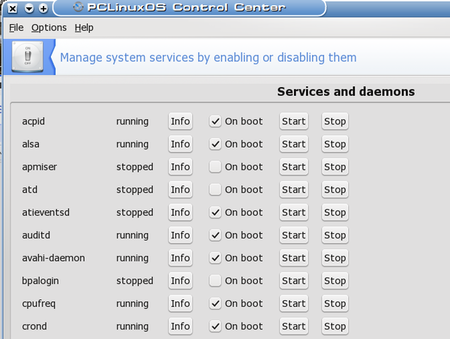
I have enabled crond to start at boot, so it shows running already. If your system is not already running crond, you will have to enable it (I believe PCLinuxOS does not run cron jobs by default). Now that this little divertimento is done, we’ll return to the Scheduling window in luckyBackup, already in progress.
Clicking the add button at right alters the landscape somewhat:
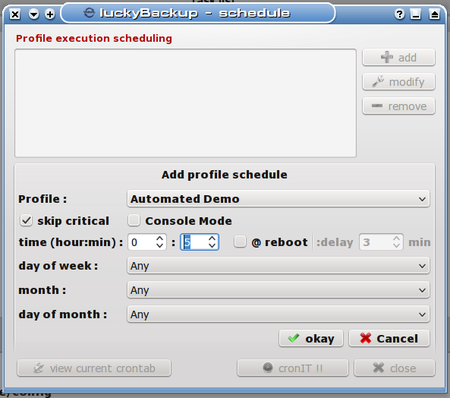
In the entries for hour:min, I enter 13 for hour and 15 for minute, respectively. This will set the time of execution for the first schedule element.
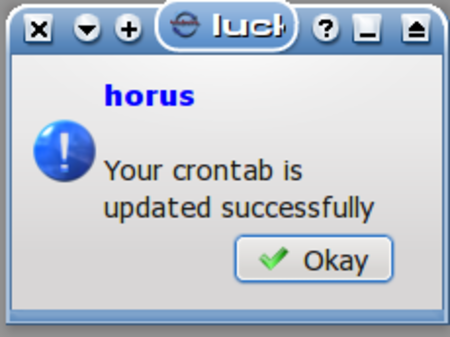
This shows the first of eight tasks I’m scheduling five minutes apart. Rest assured I’m just doing this for demonstration so that it doesn’t take me all day to show the results of the task (after all, I don’t want to miss my deadline here...). The backup task in this profile is relatively small, and should complete in under five minutes, so after I add this schedule element to my crontab by clicking the cronIT !! button we see:
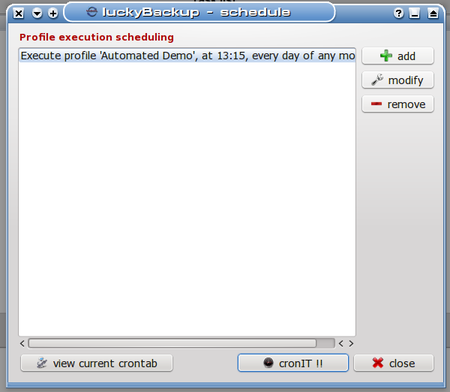
Clicking Okay will bring me back to the previous dialog, where I could easily click the button to view my current crontab, but that’s not really necessary. I will go ahead and add the remaining seven tasks so that the schedule looks like this:

As I’ve been typing along here, I’m noting little pop-up boxes about every five minutes that flit by really quickly to notify me that my scheduled tasks are being executed even though I presently don’t have the luckyBackup window open. I’m going to take a break, get a quick sandwich or something for a late lunch, and we’ll check on how it’s going when I get back.
It’s now 13:51 local time, and I still haven’t gotten lunch yet! Oh, well, busy, busy. Meanwhile, our tasks have all completed - just look! (Click on Tasks -> Manage Backups to open this dialog.)
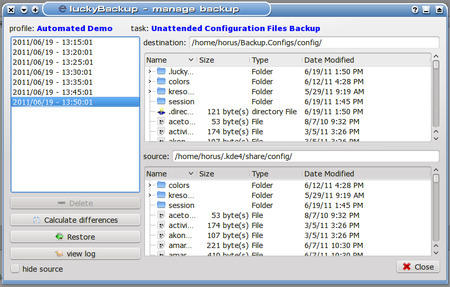
So what happened to the snapshot at 13:40? We asked the system to save seven snapshots when we defined the task. As can be seen here, the snapshot for 13:40 was eliminated. What we can’t see is that I crept back in the room between 13:40 and 13:45 and injected a file (an innocuous text file) into the session folder just to create a difference there. I removed that file after 13:45 again, so that the 13:50 backup would also show a change, and that has been duly tracked, but since all the previous backups matched the 13:40, it was discarded as irrelevant. Not exactly what we would have expected, but functionally equivalent to it.
Restoring From A Snapshot
Take another look at this dialog above, and we find the Restore button in the lower left. Yes, this dialog is the place to select a snapshot and then restore from it. I left the 13:50 snapshot selected and clicked Restore, which brought up this dialog:
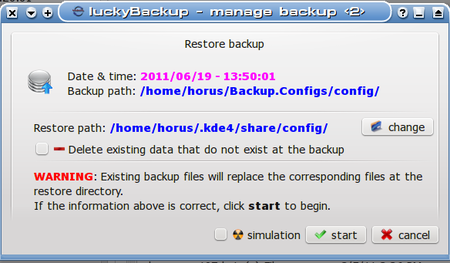
As is shown above, it is possible to make several choices here before beginning a restore operation:
1. We may change the Restore path (to restore to a different destination)
2. We may choose to delete any data that exists at the destination which does not exist in the snapshot we are using.
3. Finally, we may choose to simulate this operation for test purposes.
I would recommend that last one as a good place to start with any new restore operation. The log file generated by the simulation is verbose enough that it is generally easy to figure out if it is doing what we might expect it to, and it doesn’t take long.
That second option is not enabled by default (erring on the side of caution), but it is useful when trying to make sure a restored folder contains only data from the backup set and not any pre-existing files.
Conclusions
luckyBackup is a powerful toolset for creating on-demand and unattended backups. It demands a bit from the user because it is so powerful, and because it draws its strength from the modular tools rsync and cron which it harnesses to do much of its work.
We have explored how to set up simple uncompressed backups. What we have not explored are the many and powerful advanced options this package possesses which can make it truly versatile and able to serve a wider range of backup needs. These could fill a book. What I have tried to present here is a primer to give the reader some familiarity so that further explorations can be taken up individually with confidence.
As one of the tools in the Linux user’s backup arsenal, it makes a good choice for backup of data that changes often, or that needs to be handled automatically and/or stored remotely. Used as part of an overall backup strategy, it can be very useful in helping to ensure the user is able to able to recover gracefully from a crash or system failure.