QEMU: The Other Virtual Machine (Part One)
by Patrick G Horneker (phorneker)
VirtualBox has been the emulator of choice for many articles in PCLinuxOS magazine. It is easy to use and configure, and is very popular in the world of information technology.
However, VirtualBox is not the only game in town when it comes to x86 machine emulators.
There are two other machine emulators available for installation from Synaptic: QEMU and Bochs. Bochs emulates x86 machines manufactured in the late 1990s, and was the first PC emulator for UNIX systems. Hardware emulated in Bochs is very limited, and Bochs was designed to run early UNIX and DOS systems.
What Does QEMU Emulate?
QEMU emulates the following processors:
- x86 (both 32-bit and 64-bit) machines
- PowerPC
- Oracle (formerly Sun Microsystems) Sparc (32-bit and 64-bit)
- MIPS (32-bit and 64-bit)
- various ARM processors (found in Android tablets and early PalmOS devices)
- Motorola ColdFire (5206 and 5307)
- Etrax Cris
- Microblaze
- SH4
- Xtensa
Note: ColdFire is now manufactured by FreeScale Semiconductor, a spinoff of Motorola Corporation. The Motorola reference here is to show the evolution of the 680x0 processor once used in early Macintosh systems. The 680x0 evolved into the ColdFire processor.
The Etrax Cris and Microblaze are typically used in embedded systems that run Linux.
SH4 is Hitachi’s processor that is a RISC system (as is Microblaze). This processor was used as the processor for Sega’s Dreamcast video game console. Note: The Dreamcast was the first video game console with a connection to the Internet. The bad news is that Embedded Windows[a] was used as the operating system for Internet access and to run the games available for the console. The good news here is that Linux is available for Dreamcast.
An article at http://www.linuxfordevices.com/c/a/Linux-For-Devices-Articles/Running-Linux-on-the-Sega-Dreamcast/ shows how this is done. This is not for the faint of heart as this is a complicated procedure due to the fact that the Dreamcast console does not include a hard drive.
Dreamcast games have two tracks on the CD-R. The first track is an audio track, obviously for the game’s music. The second track is a standard ISO9660 containing the game’s program and data.
Tensilica’s[b] Xtensa is also a RISC processor, but this is typically used with multimedia hardware such as DSPs for video and audio. (Look at how many televisions you can purchase today that embed Linux.)
Kernel Module Available Only for x86 Emulation
Like VirtualBox, QEMU comes with a kernel support module, which works only for x86 emulation. Called KVM (for Kernel Virtual Machine), the kernel module allows QEMU to use the host processor instead of the emulated processor for faster performance.
x86 Hardware Emulated
For x86 machines, QEMU emulates the following hardware:
- Choice of VGA video with VESA 2.0 extensions or Cirrus 5446 video adapter
- Standard mouse and keyboard
- Floppy disk
- Serial and parallel ports
- Choice of SoundBlaster 16, ES1370, Intel 82801AA AC97, Intel HD, Adlib OPL2, Gravis Ultrasound GF1, or Cirrus CS4231A for audio
- PCI and ISA bus
- IDE with ATAPI support for disk storage
Network cards emulated for the PCLinuxOS installation of QEMU are:
ne2k_pci: Novell NE2000 (PCI version)
i82551: Intel 82551
i82557b: Intel 82557
i82559er: Intel 82559
rtl8139: Realtek 8139
e1000: Intel EtherExpress 1000
pcnet: AMD PCFastIII (same as that emulated in Virtualbox)
Disk Images in QEMU
QEMU can use actual storage devices such as hard drive partitions, floppy drives, or CD/DVD drives, or QEMU can use virtual disk images (of any size).
The qemu-img utility is used to create and manipulate disk images.
The dd command (featured in Peter Kelly’s article) creates disk images in the raw format that can be used with QEMU, VirtualBox and other emulators.
To create a hard disk image for use with QEMU, we must invoke the qemu-img utility as follows:
qemu-img create <disk name> <disk size>
where <disk name> is the name of the image you wish to create. By convention we append .img for virtual disks that represent hard disks (and sometimes floppies), and .iso for images representing CD and DVD disks.
<disk size> represents the size of the image file in bytes. Append G to represent gigabytes, M to represent megabytes, and K to represent kilobytes. (T can be used to represent terabytes, but this is impractical for this type of operation as it would take an enormous time to create such a virtual disk image.)
Suppose we wanted to create a 4GB disk image to install FreeDOS. We would type the following:
qemu-img create freedos.img 4G
This creates a virtual disk of 4 gigabytes in size in the raw format. The raw format is the default used by this utility to make virtual disk images portable between emulators such as VirtualBox, VMWare and Bochs.
Another advantage of using raw format images is that once formatted in the virtual machine (or created with the dd command), they can be mounted under PCLinuxOS. Just create a mount point (where feasible) and mount the disk image.
qcow2, qcow and cow are virtual disk formats that are native to QEMU. cow stands for Copy on Write. Disk images here start with enough space allocated to store the disk format, but not the data. As data is written to the disk image, the image expands as needed (hence Copy on Write), not unlike disk images in VirtualBox.
qcow is the native disk image format for QEMU versions before 0.12.0. It is supported in current versions of QEMU for compatibility reasons.
The current version of QEMU for PCLinuxOS supports the qcow2 format.
Disk images in the raw format can be converted to qcow2 with the qemu_img utility invoked as:
qemu-img convert -f raw -o qcow2 <raw image> <qemu2 image>
vdi format is used to create virtual images that can be used on VirtualBox 1.x. Use vmdk if you want to create virtual disk images for use in VMware 3 and 4. Use vpc is you want to use the virtual disk image in Microsoft’s Virtual PC.
To check the integrity of a disk image, type:
qemu-img check <disk image>
If you are not sure what type of disk image you are using on QEMU, type:
qemu-img info <disk image>
You can resize disk images with the following:
qemu-img resize <disk image> <size>
size can be an absolute value (use K for kilobytes, M for megabytes, and G for Gigabytes) or a relative value, that is prepend the value with + or - followed by the size you wish to expand (or shrink) the disk image.
Invoking QEMU From the Command Line
The x86 machine is the default emulation for all versions of QEMU. Unless you want to install an operating system designed for another supported processor, we shall invoke QEMU for an x86 machine.
Typing qemu by itself will open a new window and display the following:
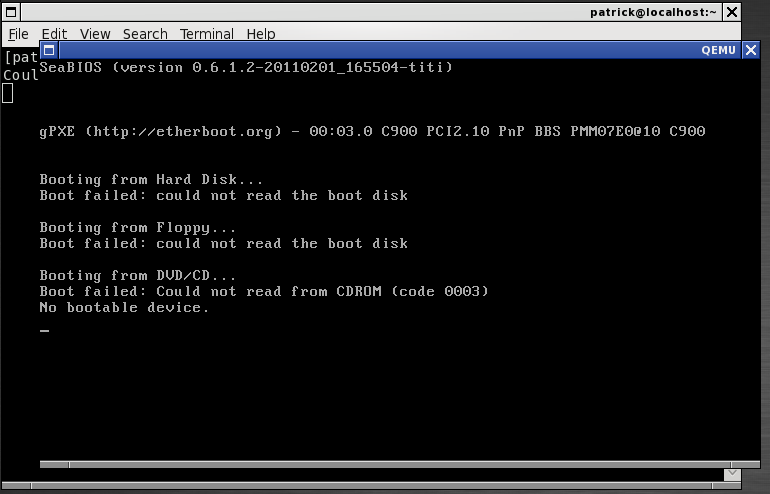
Obviously, nothing could happen here as QEMU has nothing to work with. This was invoked no disk images supplied, and no CD or DVD disks in the DVD/RW drive.
Let us see what happens when I insert a operating system CD/DVD in the DVD drive. For this test, I shall use a copy of FreeDOS 1.1.
Invoking qemu here yields the same result. Clearly, we need to tell QEMU what disk images are to be used. In addition to disk images, you can use actual disk devices on the host instead of virtual disk images.
Just as with real computer hardware, QEMU needs some type of disk or network connection to boot an operating system. (You can use QEMU to boot an operating system from a boot server through a network connection.)
Disk Parameters
QEMU supports two floppy drive devices and four hard disk and/or CD/DVD devices, either actual hardware devices or virtual disk images (hard drive or ISO images).
-fda First floppy drive or floppy image
-fdb Second floppy drive or floppy image
-hda First hard drive image or actual partition
-hdb Second hard drive image or actual partition
-hdc Third hard drive image or actual partition
-hdd Fourth hard drive image or actual partition
-cdrom ISO image or actual CD/DVD drive
Note: You can use -cdrom or -hdb for ISO images, but not both on the command line as -cdrom and -hdb represent the same device to QEMU.
Theoretically, we can use up two six disk devices for a QEMU session. In practice, we want to emulate a typical x86 machine setup, which consists of a single floppy drive, a CD/DVD drive and a hard drive. Hence, we want to supply parameters for -fda, -hda, and -cdrom.
One of the better uses for QEMU is to implement a old school PC running either DOS and/or Windows on PCLinuxOS. Unless you have a properly licensed version of DOS and/or Windows (usually packaged for retail sale or on some restore disks that come with old school PCs),[c] you must use FreeDOS to implement a DOS machine in QEMU.
For FreeDOS, we only need -hda and -cdrom devices. Why use -fda? If you have old DOS-based software, chances are, the software was distributed on floppies.
Let’s Implement A DOS Machine
Why not just use DOSBOX for this task? DOSBOX was designed to run DOS-based games with VGA/SVGA graphics that run off one CD-ROM or one floppy diskette and nothing more.
QEMU emulates a full x86 machine to run most any software that ran under DOS, including parallel and serial ports. (DOSBOX does not emulate any serial or parallel ports.)
Assuming we have already downloaded the FreeDOS ISO image (which should be in your Downloads folder as fd11src.iso as of this writing), it is a good idea to create a directory to store your virtual machines.
On my laptop, I created a directory called vm (for virtual machines). Within vm, I created a directory called iso to store CD/DVD images, and a directory called floppies to store floppy disk images.
To get FreeDOS to where it is going to be used, I typed:
mv ~/Downloads/fd11src.iso ~/vm/iso
Now, the FreeDOS ISO image is in a directory where we can easily access it. Let’s get into the vm directory. (Type chdir ~/vm to get there.)
Now, we have the parameter for -cdrom, namely iso/fd11src.iso which contains the FreeDOS ISO disk image.
Note: This version of FreeDOS
is not a
LiveCD as is typical for most Linux distributions, but is
instead a basic installation CD, which gives you a bare bones
DOS installation.
Next, we have to create a disk image in which to install FreeDOS.
Typically, DOS supports only the FAT16 filesystem for versions 6.22 and earlier. FAT16 supports partiton sizes of up to 2GB. FAT32 was introduced with Windows 95 and supports partition sizes of up to 137GB.
FreeDOS supports both FAT16 and FAT32 partitions, with FAT32 being the default for new FreeDOS installations.
Under PCLinuxOS (and other Linux distributions), a FAT16 partition is mounted as type msdos, whereas a FAT32 partition is mounted as type vfat, when dealing with disk images on the command line.
So what size of a disk image do we want to create for a new FreeDOS installation? VirtualBox defaults to a 512MB partition for FreeDOS disk images. I recommend 2GB for a FreeDOS installation as this is the maximum amount of space available for a typical DOS machine. We can then type:
qemu-img create freedos.img 2G
on a command line.

We now have a 2GB virtual disk image ready to be formatted and FreeDOS to be installed. Notice that the raw disk format is used. This is useful as after we install FreeDOS, we can mount the disk image on the command line and transfer files to and from the disk image as we need to. We will need to do this when we setup networking for FreeDOS.
Now, we have a parameter we can supply to -hda, namely freedos.img. We have all the disk parameters we need to launch QEMU and install FreeDOS.
Other Necessary QEMU Parameters
To get QEMU working properly, we need to tell QEMU not only the disks to use, but how much memory to allocate and which disk to boot the operating system from.
DOS was designed as a 16-bit operating system, which has a memory limitation of 64MB due to the physical memory limitations of the 8088 and 80286 processors.
FreeDOS can support up to 4GB as it is a 32-bit operating system with 16-bit compatibility for commercial DOS applications. Like any other version of DOS, FreeDOS works best with 32MB of allocated memory for QEMU (and for VirtualBox).
Hence, for our virtual DOS machine, we shall allocate 32MB of memory to QEMU. The -m parameter tells QEMU how much system memory (in megabytes) to allocate for this virtual machine. In this case, we supply -m 32 to allocate 32MB of memory for the DOS machine we are implementing.
But we’re not done yet. We need to tell QEMU which disk to boot FreeDOS from. The -boot parameter takes care of this detail. The following is a list of what we need to supply to QEMU as to where to boot from:
-boot a Boot from the first floppy image or physical drive
-boot b Boot from the second floppy image or physical drive
-boot c Boot from the first hard disk image of partition
-boot d Boot from the CD/DVD disk image, CD/DVD drive, or second hard disk image or partition
Those of you who are familiar with DOS and/or Windows will easily recognize the parameters as drive letters that you use to access the disks.
Since we are installing FreeDOS from a CD image, we will need to boot from the CD image. Hence, we need to use -boot d as the other necessary parameter.
We Are Ready To Install FreeDOS
Now we have all necessary parameters needed to install FreeDOS on QEMU. Let us now invoke QEMU with the following command line:
qemu -hda freedos.img -cdrom iso/fd11src.iso -boot d -m 32
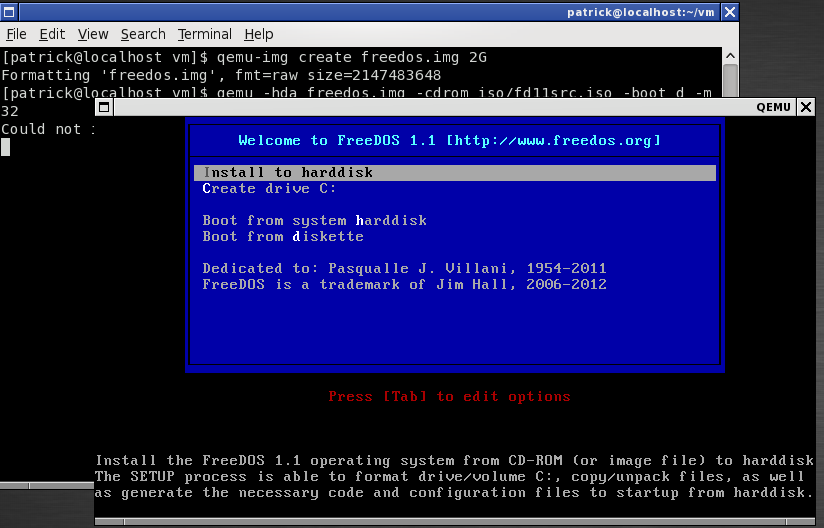
The first thing we need to do is to allocate space on the disk image for FreeDOS. Select Create Drive C: to accomplish this task.
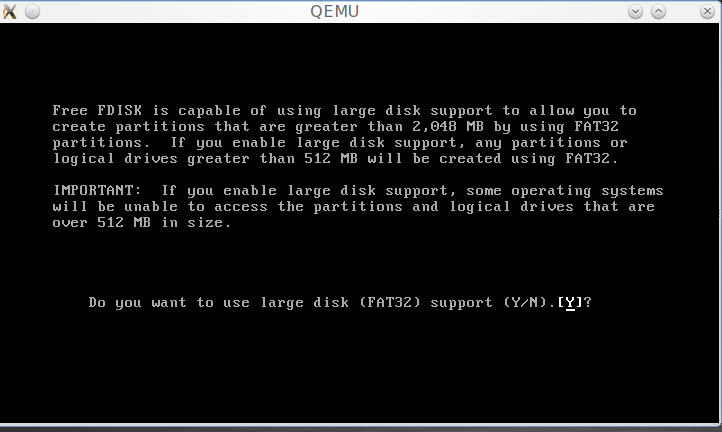
I recommend using FAT32 support for installing FreeDOS, so you may answer Y to this question. When you mount freedos.img, you will mount this disk image with type vfat rather than msdos.
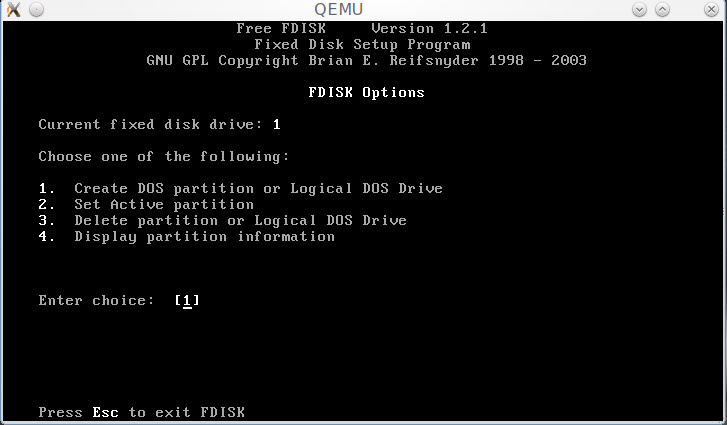
Next, we get the FreeDOS version of the famous FDISK utility. Here, you will need to create a new partition on your virtual disk. Fortunately, you may press Return here as the correct selection is already selected.
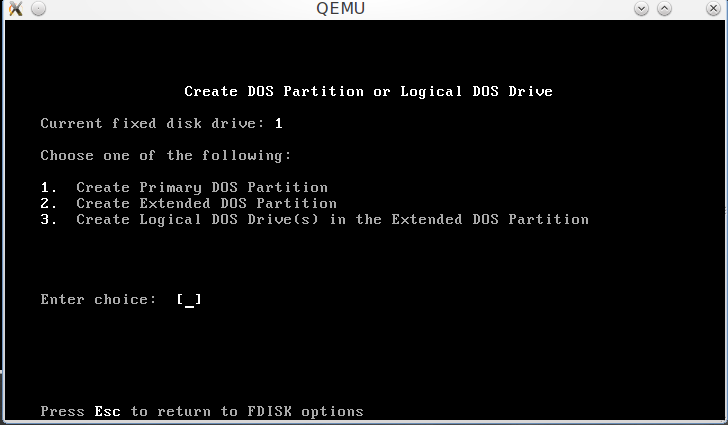
We will need to create a primary DOS partition to install FreeDOS. The extended partition options are for hard drive (and images) greater than what FAT16 or FAT32 will allow for one partition, not unlike allocating primary and secondary partitions on PCLinuxOS.
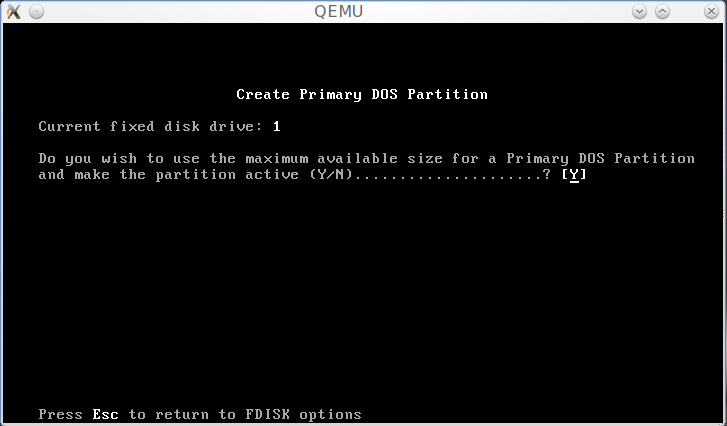
This is a no brainer here. Since we are using the entire virtual disk to install FreeDOS, we can safely say Y here. The entire disk is used to create the partition and make it bootable from QEMU.

This screen makes it obvious we have done so. Press ESC twice and this will appear:
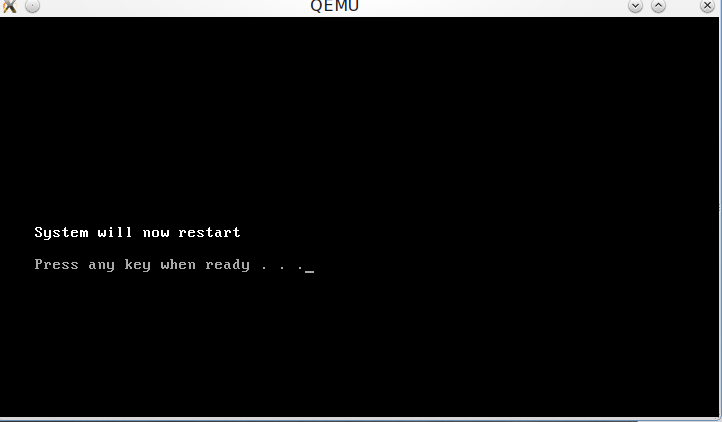
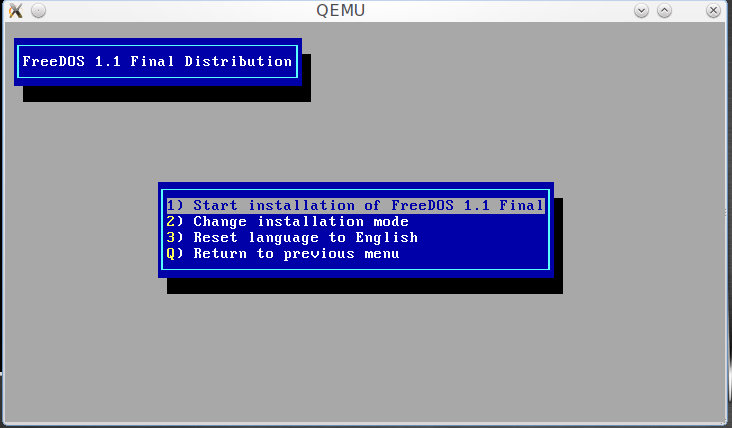
QEMU will reboot FreeDOS from the CD image. When the installation screen comes up, press Return to start the installation process.
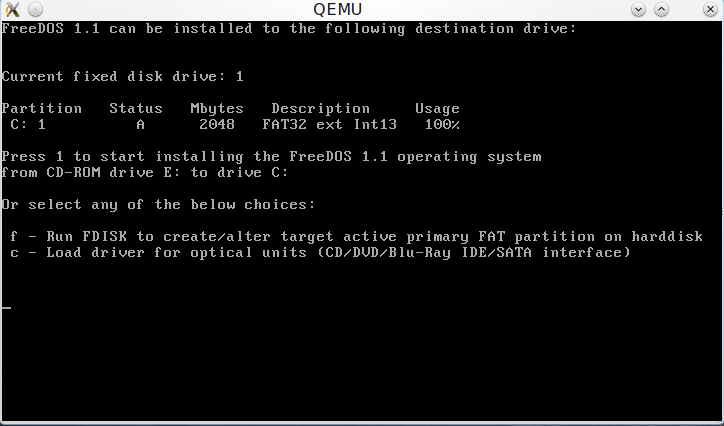
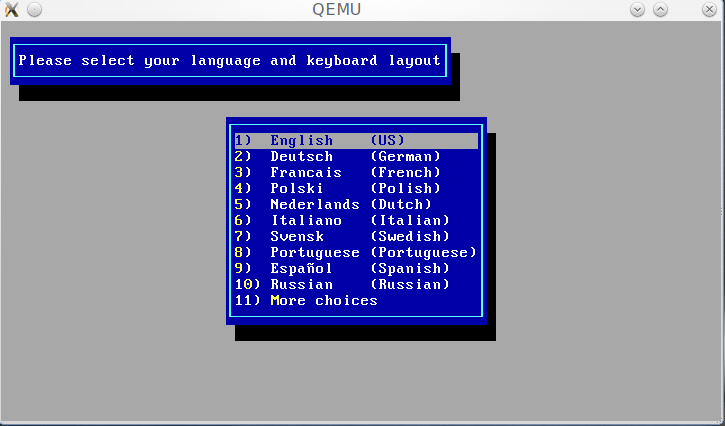
Press 1 to start the actual installation of FreeDOS. Press return to select the default keyboard layout.
Of course, we will need to format the hard drive image. This sets up the FAT32 filesystem on the virtual hard drive image.
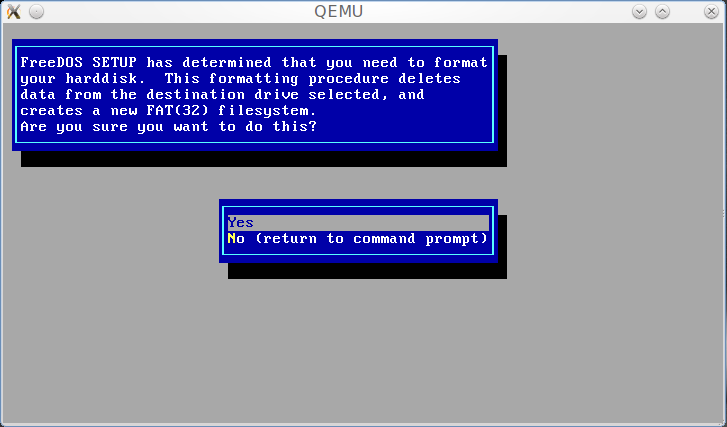
Press Return to create the new filesystem. You will need to type YES (type in the actual word YES). FORMAT.EXE will run and format the entire virtual disk. When FORMAT is finished, the following will appear:
Press Return here and this will appear:
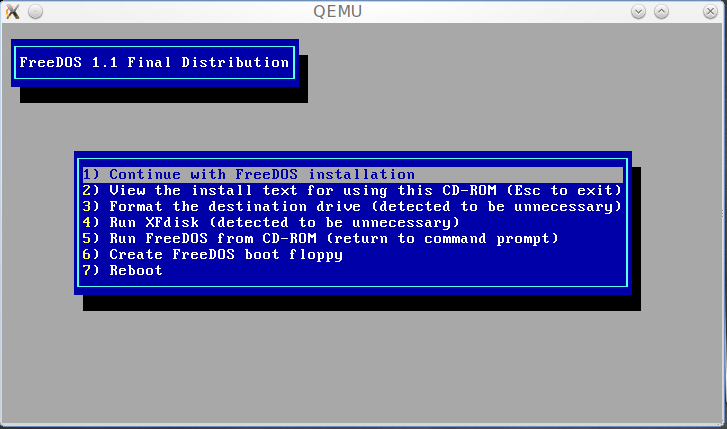
You will get a notice about the General Public License. Press Return to accept the license. There will be one last message about being ready to install FreeDOS. Press Return again and this appears:
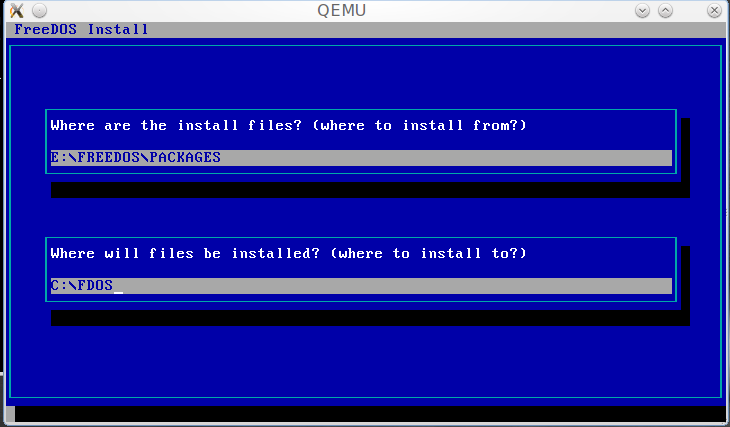
Leave everything as it is and press Return twice. We are now ready to select packages.
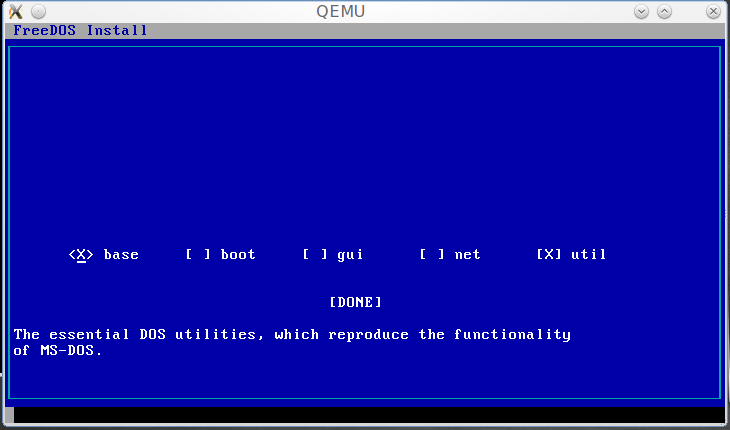
Press the right arrow key, then space to select boot. Press the right arrow key and then space to select GUI. Press the right arrow key and space once again to select net. Then press the right arrow key twice and then Return twice to move to the next screen.
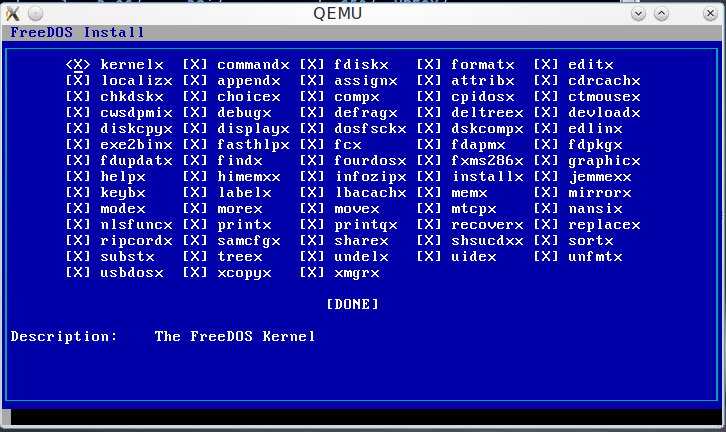
Press the down arrow key thirteen times to get to Done. Press Return twice and the base packages will be installed. This process will take a considerable amount of time as packages are being installed from the virtual CD image.
Follow the prompts on the screen until this appears:
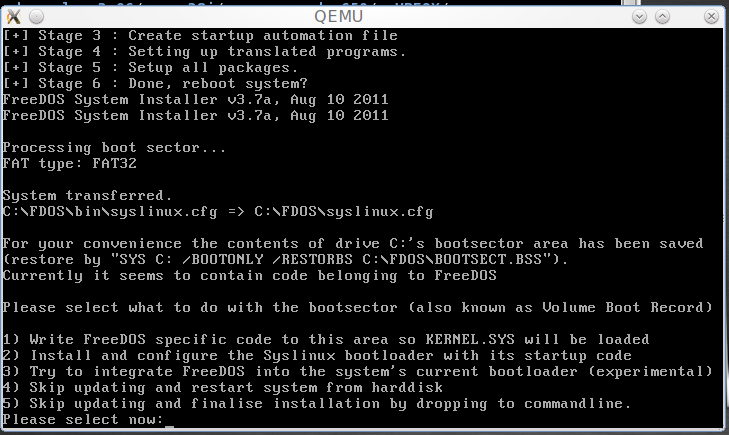
Select option 1 from this menu to install the bootloader. When the process is completed, you will return to the main menu. Choose Boot from system hard disk to boot FreeDOS from the virtual hard drive.
You will get a boot menu. Press Return and the following will appear:

You have successfully installed FreeDOS on QEMU.
Next time, I shall show you how to configure virtual hardware on QEMU.