Just The Fax Ma'am ... And It Works In Linux!
by Paul Arnote (parnote)
I know what you’re thinking … faxes are “old school.” Faxes are “so 1980s.” Nonetheless, the business community has tightly hung onto faxing as a part of their business model. Indeed, many business still rely heavily on faxes. For them, it’s as deeply ingrained as much as the checkout line is at the grocery store. Plus, unless you are rather savvy with a flatbed scanner, faxing a document is easy enough for even the most technologically challenged individual to muddle through.
Fax software has been around … well … ever since some bright individual figured out how to bypass the fax machine and do paperless faxing from a computer equipped with a fax modem. Yet, for many Linux users, sending a fax isn’t necessarily the easiest thing to do – and it has nothing to do with a lack of fax software. Nope. The problem is that most computers come with a WinModem. WinModems are software driven fax modems that … you guessed it … work especially well with Windows, but not so good with any other platform.
Understanding the proliferation of WinModems is easy: they are a very cheap fax modem solution, and since the vast majority of computers come with Windows installed (except for your home built computers), WinModems have pretty much become the dominant and ”preferred” modem installed in new computers. Unfortunately, this goes back many years, so that even the older equipment you might find lying around – say 10 or so years old – has a WinModem installed.
Of course, you know the drill. The manufacturers of the WinModems won’t reveal the technical specifications for the software that drives the modem, using the excuse that they don’t want to reveal “industry trade secrets” about how their software works. Damn the proprietary closed sourced community! Although there are packages in the PCLinuxOS repository that might help you get a WinModem up and running, it’s usually a “hit and miss” (mostly miss) proposition.
I discovered the frustrating reality of WinModems under Linux a couple of months ago, first hand. My wife was needing to fax some paperwork back to the contracted company that the hospital we work for uses to manage the “short term disability” plan, when she had to take a couple of weeks off of work following a minor surgery. Then, a few weeks later, she needed to fax a medical questionnaire to the offices of a specialist that her doctor had referred her to. By the way, my wife is fine. We can’t say the same for our frustration level after trying to fax all of the paperwork back to the respective parties.
Never having a need to fax anything during the entire time (nearly six years) that I’ve been a Linux user, I never took the time or expended the energy to setup a fax modem. Like most of you reading this article, I saw faxes as outdated. Indeed, they are an outdated form of document transmission, but a necessary evil when dealing with businesses who rely on that outdated technology to help run core parts of their businesses.
Finding A Solution, Part One
I set out to try to find a viable solution to my lack of “fax-ability” under Linux. My first attempt was to seek out one of the many “free” fax services that dot the internet landscape. If you have limited fax needs and don’t need to fax very many pages, you might actually get by using an internet based “free fax” service.
They all work pretty much the same way. You upload your document, usually as a PDF or *.docx file, and the service will fax your document to the party you indicate (via the phone number you enter for the recipient). You will then receive an email to inform you whether your fax was successfully or unsuccessfully delivered.

However, most of the “free” fax services are ad based, meaning they place ads on your fax cover sheet. Also, most of these “free” services limit you to between three and eight pages per fax, with most of them placing their limit at the lower end of that range. If you want to fax more pages than the “allowed” limit, they all offer a “premium” service. With the “premium” service, you can pay a monthly fee to be able to fax up to 200 faxes per month, coupled with a more generous page limit. There were only a few “premium” services that would have allowed us to fax the 21 page medical history forms back to the specialist doctor.

As you can see from the screenshot from the Fax Zero web site, the paid service listed is for a “per fax” premium service. Many others offer other “premium packages” that allow more pages and a large number of faxes per month. Most of the “premium” services cost around $10 per month. Just enter “free internet fax” into your favorite search engine, and you will be inundated and overwhelmed by all the sites offering “free internet fax” services.
Like I mentioned earlier, I did not have a need to fax anything in the past six years that I’ve been using Linux, and probably hadn’t faxed anything from home in the past 10 years or more. (The last fax software that I remember using was the old WinFax v2.0, and if I remember correctly, either Windows 98 or Windows XP had some rudimentary fax software application that did all I wanted.) I couldn’t see a good reason to sign up for a monthly service that I haven’t needed in that long of a period. So, the internet fax service definitely wasn’t for me.
Finding A Solution, Part Two
Since the internet fax service wasn’t going to adequately or efficiently resolve my lack of ability to send faxes, I started searching for another solution. I figured, why not take a stab at seeing if I had just one computer where the WinModem would work? To be perfectly honest, of the 10 computers I tried, the WinModem was seen by PCLinuxOS on only four of them.
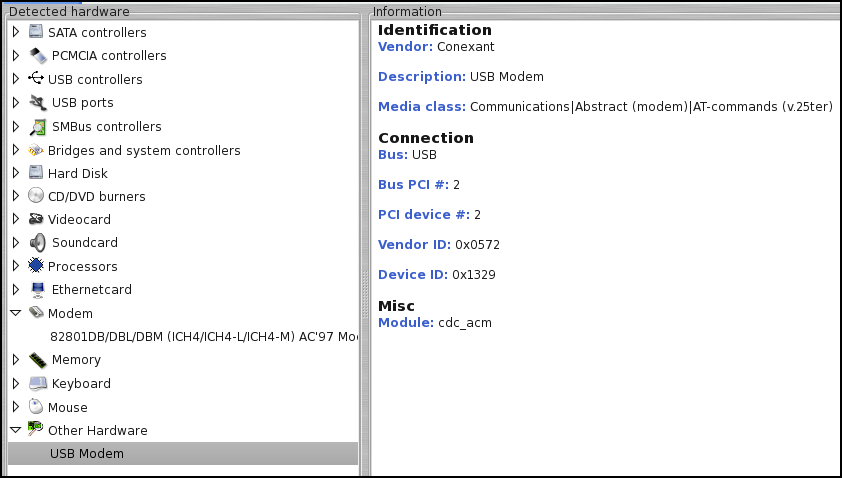
To see if PCLinuxOS can even see the WinModem installed in your computer, open PCC (PCLinuxOS Control Center), select the “Hardware” entry, then select “Browse and configure hardware.” If PCLinuxOS can even see your WinModem, you will see an entry called “Modem” in the left hand pane of the window. Don’t hold your breath, however, hoping you’ll be able to actually configure and use your WinModem, even if it can be seen. It’s relatively rare that they work under PCLinuxOS – or any other Linux distro. For what it’s worth, I was unsuccessful at getting any of the seen WinModems on the four computers configured or running. Just because the hardware can be seen doesn’t necessarily mean that it can be configured to work; it just means that the device answered the query during the polling of available hardware. The “Modem” shown in the above image, by the way, does not work under PCLinuxOS.
So, I figured if none of my WinModems were recognized or useable, why not try to find a modem that is useable with PCLinuxOS? Believe it or not, external RS-232 serial modems do still exist! That simple find did surprise me. U.S. Robotics, Hayes, Zoom, Dynex … they are all still out there selling the trusty, old school external modems. But looking around Amazon.com, I also saw USB fax modems. Given that Linux has a history of excellent USB support, I figured that a USB fax modem might be my best bet, despite the fact that I hadn’t realized that they even existed before I went searching for an external fax modem.
How else can I say this? SCORE! Touchdown! Home Run! Victory Lap! Triple Crown! Not only did I find an affordable USB fax modem, but the very description even touted that it was useable and compatible under Linux. I found the TRENDnet 56K USB 2.0 Phone, Internet, and Fax Modem TFM-561U (White) for only $22.48, on Amazon.com.
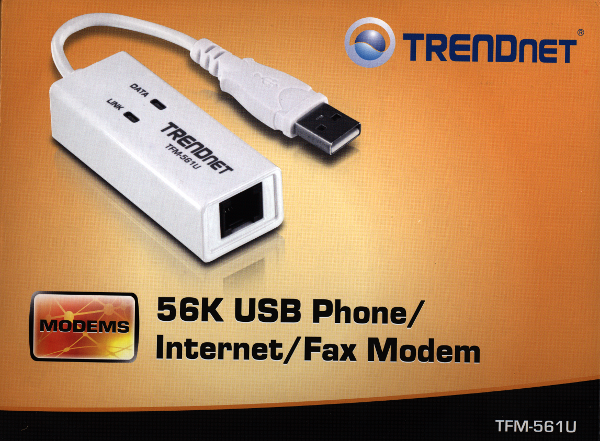
Sure enough, on the side of the box it lists Linux as a compatible operating system!

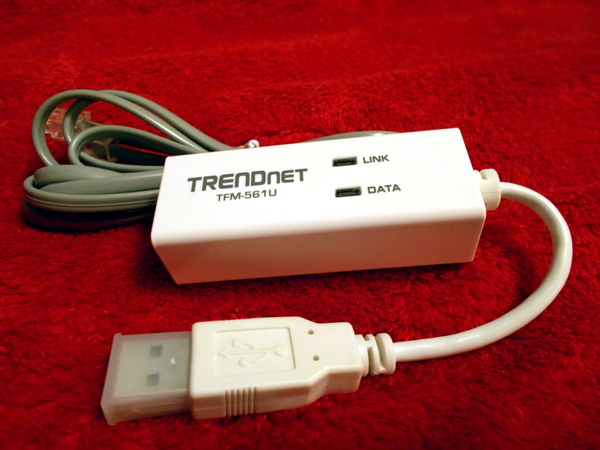
Here are the unboxed contents of that retail package (excluding the CD-ROM that contains the user guide, and all the paperwork):
The “installation manual” on the CD-ROM did make me laugh, though. The Windows installation section goes on for 14 pages with baby step instructions. Meanwhile, the Linux installation instructions take up less than one-half of a page, consisting of poorly explained commands to be entered on the command line. Here are those instructions (copied and pasted, verbatim, from the user guide PDF):
Linux
You can refer the below how to do install Harley USB Modem under Linux.
$ cat /proc/bus/usb/devices
$ modprobe usbserial vendor=0x1111 product=0x2222 ----> (1111 & 2222 is VID & DID)
<TFM-561U Vendor =0x0572 product=0x1329>
$ dmesg
$ minicom -s ---> ( dev/ttyUSB0 *
* 115200/8N1/
save
$ minicom
That’s it. So let me try to help a bit, if I can. First, unless you are using the fax modem for dial up networking, the last two commands are not necessary. Minicom, available in the PClinuxOS repository, is a terminal based application designed to help you get connected to your dial up provider.
Next, plug in the fax modem to an available USB 2.0 port. While I haven’t tried it yet, I’ve heard reports that the fax portion of the modem doesn’t work with a USB 1.1 port. However, the modem will work for dial up networking through a USB 1.1 port. This shouldn’t be an issue, except on very old hardware that does not have USB 2.0 ports. More recent hardware usually has an abundance of USB 2.0 ports.
You will need to enter the commands as the root user. So, su to root, then type the first line exactly as shown above. Enter the next line exactly as shown below:
modprobe usbserial vendor=0x0572 product=0x1329
Next, enter the dmesg command on the command line. You will have a rather lengthy output. (Note: you can shorten the dmesg output shown by entering the command as dmesg | tail -n 100 to display only the last 100 lines of the dmesg output. If you don’t see what you are looking for, increase the number at the end of the tail command.) You are looking for something similar to this:
usb 2-1: new full-speed USB device number 2 using uhci_hcd
usb 2-1: New USB device found, idVendor=0572, idProduct=1329
usb 2-1: New USB device strings: Mfr=1, Product=2, SerialNumber=3
usb 2-1: Product: USB Modem
usb 2-1: Manufacturer: Conexant
usb 2-1: SerialNumber: 24680246
cdc_acm 2-1:1.0: ttyACM0: USB ACM device
usbcore: registered new interface driver cdc_acm
cdc_acm:
USB Abstract Control Model driver for USB modems and ISDN
adapters
On my computers, this bit of information (fortunately) appears near the end of the massively long dmesg output. You are interested in the serial address that PCLinuxOS has assigned to the USB fax modem. I’ve highlighted that information above in red. Write this down. You will need it later when you set up the fax software. While your computer may report it exactly as I’ve shown above, don’t count on it. You may have other USB serial devices plugged into your computer, which may change the assigned serial address. DO NOT skip this step.
The only thing you now have left to do is to plug in one end of a modular phone cord to the other end of the USB fax modem, and the other end of the modular phone cord into an available modular phone jack. A 6 foot (1.8 m) modular phone cord is provided with the fax modem, but if you’re like me, you have a thousand of these things lying around already.
The Software: efax-gtk
Now, you will need to install efax-gtk from Synaptic. Yes, there are other fax software packages available in the PCLinuxOS repos, but efax-gtk is simple, easy to use, and probably better suited for personal faxing from your home. One of the other fax packages that is available is called Hylafax, but it is more suited for use in an enterprise environment and would most likely be overkill for home use. Thus, we’re going to focus our attention on setting up and running efax-gtk. If you want the more “technical details” of efax-gtk, you can view the efax-gtk man page online, here.
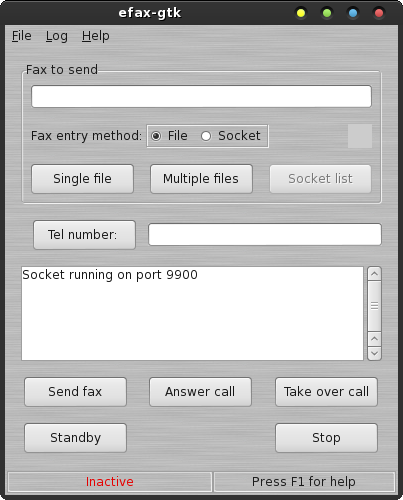
Don’t let the simple appearance of efax-gtk fool you. There’s more power under the hood than you might think. To be honest, the simple appearance of efax-gtk is one of the reasons I find it such a pleasure to use. It stays out of your way, yet all the whistles and bells are close at hand for when you need them (and if you even need them). It follows the principle adhered to by many Linux developers: do one thing, and do it well.
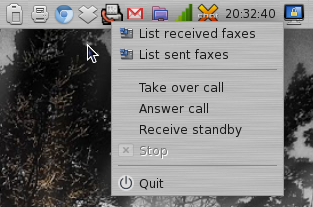
When you launch efax-gtk, you will notice an icon placed on your panel. Right clicking on this icon will grant you access to the most common and useful controls available in efax-gtk. When you “close” the efax-gtk main window, the icon remains present and running in your panel. “Closing” the efax-gtk window only hides it from your view; it is still running, albeit in the background. A left click of the mouse on the icon will cause the efax-gtk main window to reappear.
Before we can use efax-gtk, we first need to set a few things up. Select File > Settings from the menus.
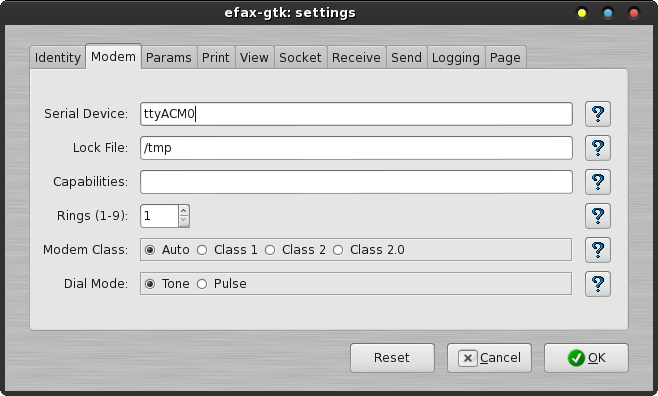
On the first tab, you simply enter your name and the number from where you are sending your fax. I’m not sure about anywhere else, but it is a FCC regulation in the United States to list the number you are faxing from on your outgoing faxes. Remember that serial address I told you to write down when you were setting up the fax modem? Well, on the second tab, you will need to enter the serial address that PCLinuxOS assigned to your fax modem when you set it up. Enter only the serial address, without any preceding slashes or anything else. On the second tab, you can leave everything else set to the default settings.
You can, if you choose, skip the next three tabs. The third tab lists the modem string for initializing the modem. I found that you can leave this set to the default values, and that it works as is. The fourth tab allows you to determine how to print out any faxes you might receive. I have the “Use GTK+ Print System” checked. Under the fifth tab, “Print,” you can set the default application to use when viewing received faxes. The default is gv, also known as ghostview, but I have changed mine to “evince,” since that is the postscript/PDF viewer I use under Xfce. KDE users may want to change “gv” to “okular,” allowing them to use the powerful Okular document reader to view their faxes.
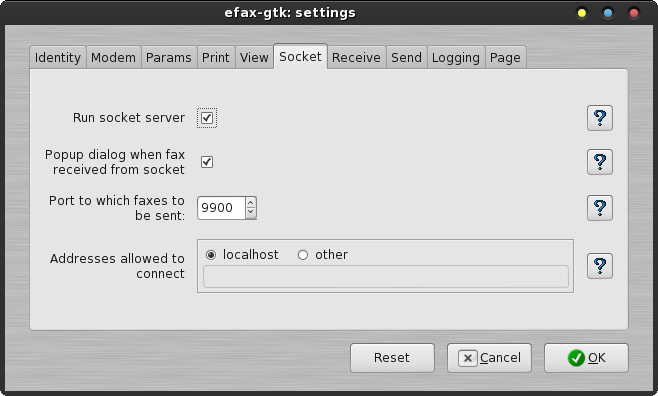
The “Socket” tab is definitely one you will want to set up. This sets up efax-gtk to listen in on a CUPS socket (default is 9900) so that you can send a fax directly from any application that allows you to print. We’ll cover setting up the socket a little bit later, but it isn’t all that hard (once you’ve been introduced to how to do it). I had to dig through the online efax-gtk man page to figure it out. To make it easier for you, make all of your settings mirror what I have entered on this tab, shown above.
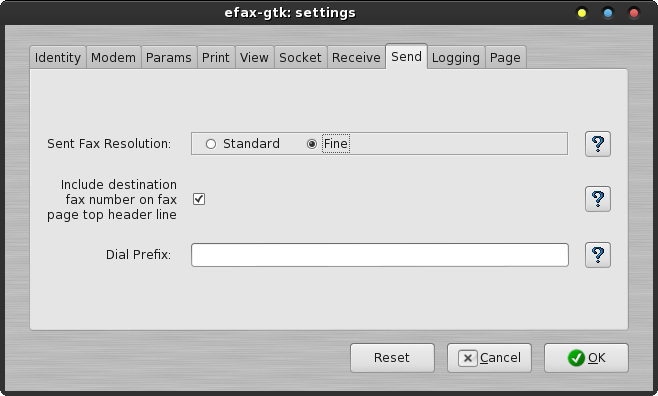
There aren’t a lot of choices under the “Receive” tab. There, you can choose whether you want efax-gtk to display a popup window when you receive a fax, and you can also specify a program or script to execute whenever you receive a fax. I just told efax-gtk to display a popup window, then moved on. Under the “Send” tab (the eighth tab), you can set the fax resolution you prefer (I always set mine to “Fine”). You can also check the box to include the destination fax number on the fax page top header line. On the third line, you can specify a prefix to dial before the actual number is dialed. This is particularly useful if you wish to disable call waiting before making your call (*70 on most U.S. phone networks).
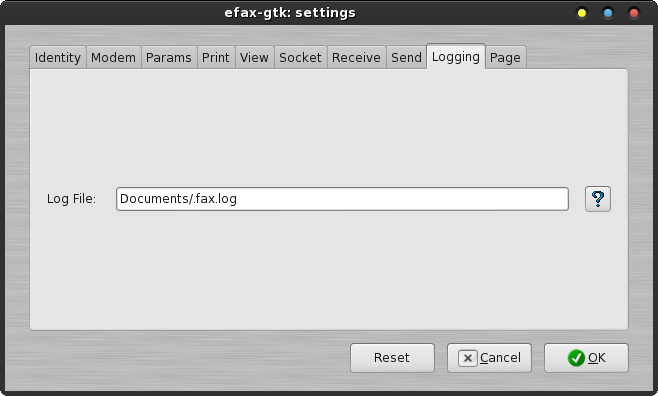
In the ninth tab, “Logging,” you can set up where to write the fax log. I have created mine as a hidden file in my ~/Documents folder, by placing a “dot” before the filename, and called it simply .fax.log. Be sure to create the empty log file before pointing efax-gtk to it, or otherwise, efax-gtk will complain that the file doesn’t exist. I strongly encourage you to keep a fax log. It can be quite revealing if you should ever encounter errors. A quick look at the log file will spell out everything that transpired while attempting to send that fax.
The tenth and last tab, “Page,” allows you to set the paper size efax-gtk is going to deal with. Your choices are A4, Letter or Legal. Most U.S. users will want to choose Letter, while my European friends will most likely choose A4.
Putting It All To Work
Now that we have efax-gtk all set up, it’s time to put it to work, doing what it’s intended to do: send and receive faxes.
What’s that, you say? You don’t know anyone to send a fax to so you can test your fax modem? Ah-ha! That’s an easy solution! There are a couple of different routes you can take. To start with, you could find a local friend and send them a fax, via their fax modem. You could also fax something to your place of employment (it would probably be best to get your boss’s OK first, though).
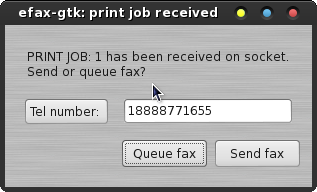
But the best solution I’ve seen (for U.S. users, anyways) is to dial 1-888-877-1655. The number is toll free, within the United States. Once your fax is sent, wait a couple of minutes and head over to the FaxToy website. If your fax was successfully sent, your fax will appear on their website. Just keep hitting your browser’s refresh button. They suggest you send a single page fax only. If you send a multipage fax, only the last page will show up on the FaxToy website.
If your fax didn’t send successfully, review the fax log file to help diagnose any problems you might be having. You will know if there are any errors when sending the fax, since they will show up as red text in the text area that’s in the lower half of the efax-gtk window. Since all errors – minor and major – show up in red text, you will need to check to see which ones are important enough to follow up on.
There are other “fax test” numbers you can use. Hewlett-Packard (HP) has a test fax number on their website. You send a fax to the HP fax test line, and a return fax will be sent to you in less than five minutes. This is good, since it also gives you an opportunity to test how well you are able to receive faxes.
You can also test your fax modem’s ability to receive faxes. One way is to head over to Interpage Network Services, Inc. website and follow the instructions to have the service send you a fax. Alternatively, you can go to FaxZero and send yourself a free fax by entering your phone number into the recipient field.
So, pick which test service you want to use, and let’s start off by first sending a fax from our fax modem. I chose the FaxToy service for my initial tests. Remember that whatever you are sending via efax-gtk has to be in the PDF format (we’ll get to sending a fax from a word processing document later). Select the “Single File” button, then select the PDF document you want to send.
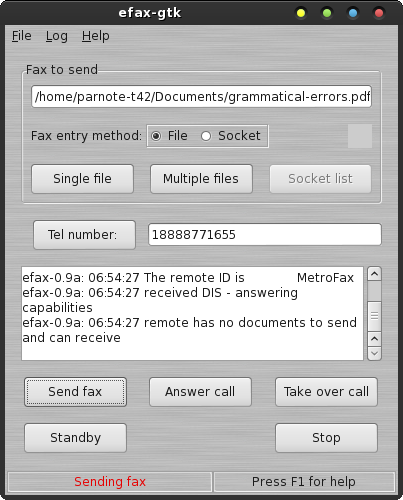
Next, enter the phone number for the fax service you are using. Do NOT use any spaces or dashes in the phone number. Once you have entered the phone number, make sure your fax modem is plugged into your computer, and that the modular phone cord is plugged in at both ends (one end to your fax modem, the other end to a modular phone jack). Then, just click on the “Send Fax” button and wait for the process to complete. You should see the lights on the USB fax modem spring to life and start blinking madly.
Similarly, to receive a fax, press the “Answer Call” button in the main efax-gtk window. Your fax modem should now answer the call and display the connection data in the text area. In the inadvertent case that you receive a voice call and you have your fax modem answer that call, you can click on the “Take Over Call” button to wrest control away from your fax modem.
If you’ve done everything properly up to this point, you should be able to send and receive faxes. If not, go back and recheck your entire setup, and make sure you didn’t skip any of the steps that I’ve outlined. Also check to make sure you entered everything properly. Just one misspelled command on the command line would be enough to prevent a successful setup of your fax modem.
The “Extras”
As I mentioned earlier, there are many powerful features hidden under the simple appearance of efax-gtk. One such nice feature is the built-in address book. This allows you quick access to someone that you might want to send faxes to repeatedly.
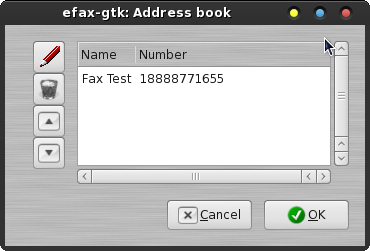
Of course, when you first open the address book, it will be empty. Click on the button with the pencil icon on it to make an address book entry.
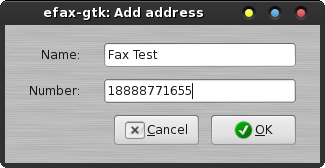
Enter the name of the contact on the first line, and the contact’s fax number on the second line. Click on the OK button, and you will see your fax contact in the efax-gtk address book. Now, when you click on the “Tel number” button in the efax-gtk window, the address book will open. Select your recipient, and click on the OK button. Your fax recipient’s phone number will be transferred to the telephone number line in the efax-gtk main window.
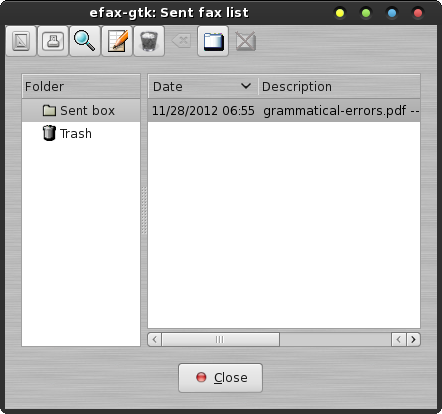
Another nice feature built into efax-gtk is the “List Received Faxes” and the “List Sent Faxes” lists. Both dialog boxes look identical, except for the dialog box title on the window title bar. Simply highlight the fax you want to work with, and choose whether you want to print or just view the fax, edit its description, or send it to the trash. You also have the option to add custom folders and to move your sent faxes to custom folders, (like for keeping track of faxes sent to or received from a particular recipient).
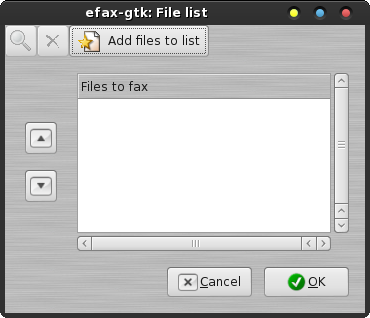
You can also send multiple documents/files to a recipient during a single fax session. Not only is this handy, but it also makes sense to fax them all in one fax session, as opposed to having to send each document as a separate fax. Just click on the “Add files to list” button at the top of the dialog box, and select the files you want to include in the fax. When you’re finished adding files, click the OK button at the bottom. Your files will be queued for sending.

Under the “Log” menu, you have the option to either print the log file, or to view the log file. If you choose the latter, the contents of the log file are displayed in a dialog box, like that above. Of course, if you haven’t set up a fax log file under the “Logging” tab of the efax-gtk settings, you will not have anything to print out or display.
“Printing” To A Fax Recipient
As I mentioned earlier, you can set up efax-gtk to send a fax directly from your favorite word processor to your fax recipient. In fact, you can do this from any application that supports printing. Before we can “print” to a fax recipient, however, we have to set up our fax modem as a “printer.” Trust me … it’s easier than it sounds.
To set up our fax modem as a “printer,” we need to install a new printer in the PCLinuxOS Control Center, a.k.a. PCC. If you have not yet installed task-printing from Synaptic, now would be a good time to do so, before proceeding any further.
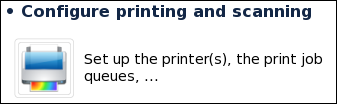
Under the “Hardware” tab in PCC (in the left pane), click on the “Configure printing and scanning” section (in the right pane, as shown above). Once you get to the next window, click on the first icon on the toolbar to bring up the “New Printer” dialog box.
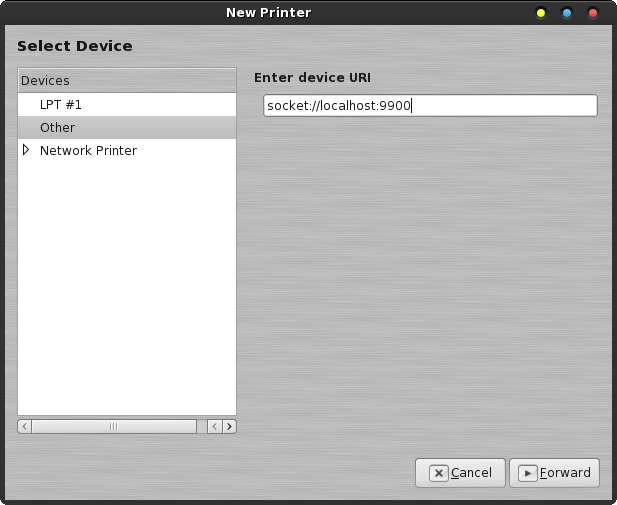
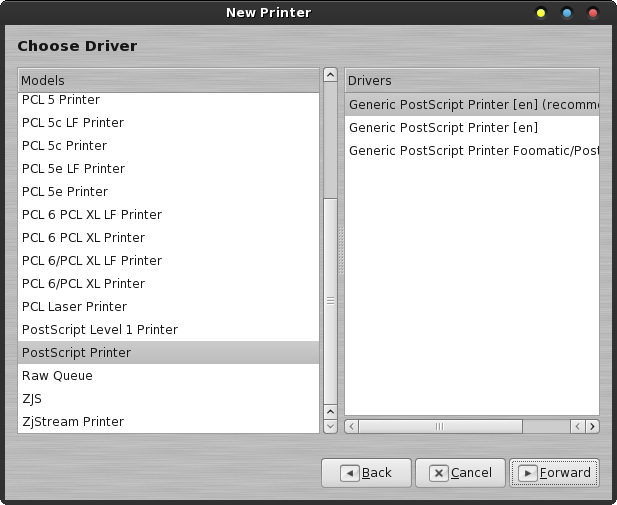
In the first window of the “New Printer” wizard, select “Other” in the left pane of the window. Then, enter socket://localhost:9900 as the URI entry. Click on the “Forward” button. A smaller dialog box will open to inform you that PCLinuxOS is searching for drivers. Let it run until the next screen appears.

Once at the screen above in the PCC New Printer Wizard, accept all the defaults and simply click on the “Forward” button.
Once again, accept all the defaults in the window above, and simply click on the “Forward” button.

You can accept the default values here, but I would make a suggestion that you change the name and description to something simple, like “Fax.” Otherwise, it won’t be apparent that this is the fax “printer” in the list of available printers. If you choose to not change them now, you can change them later in the PCC Printer Configuration window. All you have to do is highlight the printer whose name you want change, press F2, and type in the new name – just like changing a filename in your favorite file manager. Click on the “Apply” button to finish the setup of your fax modem as a “printer.”
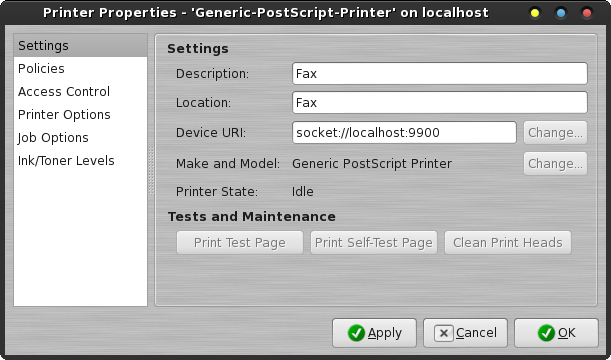
If you right click on a printer in the Printer window of PCC, you can select “Properties” from the pop up context menu. When you click on the fax “printer” icon, you will get a window similar to that shown above. You can make changes to the description and location of the printer here, too.
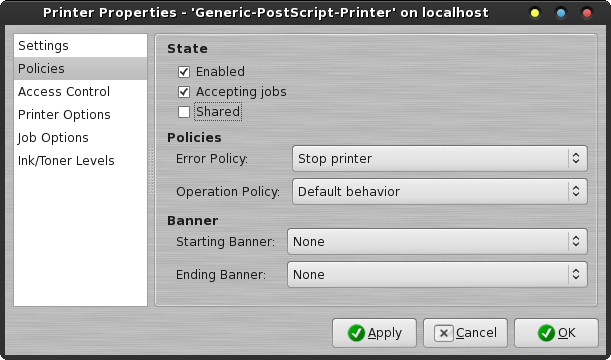
Select the “Policies” category of printer properties. You will find that “Shared” is checked by default. Click on the checkbox to deselect the check mark for sharing your fax modem. This will keep the fax modem exclusive to the machine that you have it set up on, and help you to avoid conflicts with CUPS wanting to share your fax modem over your entire home network. Also, if you have multiple computers in the house and you set up the fax modem on multiple computers, having them all shared will make multiple entries for the fax modem appear on all of your computers. You won’t know which fax printer is for the local machine! Take it from me that neglecting to unshare the fax modem is problematic, and this is the easiest solution.
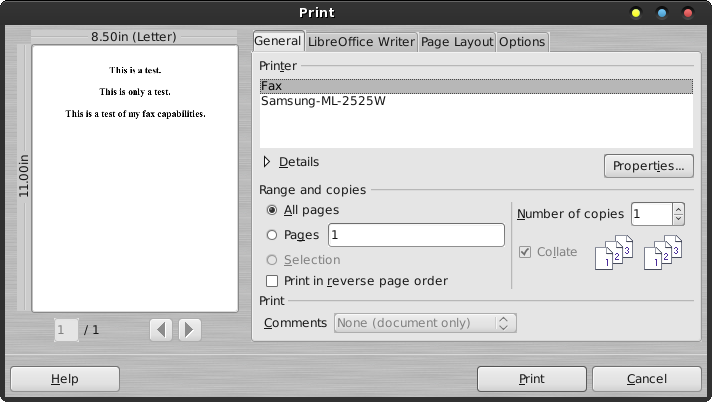
Now that you have the fax “printer” installed, you will notice that “Fax” shows up in your list of available printers. Simply select “Fax” as your printer, and click on the “Print” button.
Click on the “Tel number:” button to select a number from efax-gtk’s address book, or manually enter the fax number in the space provided. Then, click the “Send fax” button. From this point on, efax-gtk will take care of faxing your document to the selected recipient.
Things To Keep In Mind About Faxes
Like we mentioned at the beginning, faxes are an old, archaic technology. Some of the limitations of faxes are ruled by a couple of factors. First, there are the speed limitations of the POTS/PSTD telephone network. Second, the fax “standard” has become static, and in the process, hasn’t kept up with technological advances. Part of the second factor is due to the first one. They are inextricably linked, to a large degree.
The second thing to keep in mind about faxes is that the fax world is a black and white world. Color images will get dithered to black and white, so that your fax ends up as shades of gray that are made up of black dots on a white background.
Third, faxes are inherently low resolution. Even the “fine resolution” setting is, maximally, only 200 dots per inch. Below are some examples of how a “color” document gets dithered, and the resulting resolution that your recipient sees.

On the left is a snippet of the original color image. In the middle is a snippet of the dithered TIFF image that makes up the outgoing fax. On the far right is the low resolution image that was placed on the FaxToy website. Looking from left to right, the direct comparisons above make it easy to see the quality loss from the original to the lower resolution images that your recipient receives.
Some “Cleanup” Tasks
When you installed and first ran efax-gtk, you will notice that it also created some special folders in your /home directory. Below is a snippet of those directories, as they appear in Thunar on my Xfce installation.
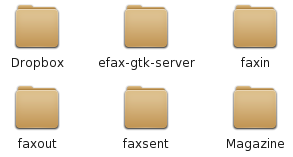
You will notice four folders that have “fax” as part of their names. Let me explain what is in each one. In the “efax-gtk-server” folder are postscript files containing a copy of what was transmitted by efax-gtk using the “socket.” The “faxin” folder contains TIFF copies of incoming faxes that you have received. The “faxout” folder contains TIFF copies of faxes that are in the process of being sent. Finally, the “faxsent” folder contains TIFF copies of faxes that have completed sending.
TIFF (Tagged Image Files Format) files, if you’re not familiar with them, aren’t necessarily the smallest image file to store. I suspect that they are used because they are capable of storing and maintaining images at a high resolution. TIFF files may or may not employ LZW compression. LZW compression will make them consume less space, but will make them take longer to display. TIFF files may also contain multiple images within the TIFF “container,” which initially makes them appear to be a single image. Because of the amount of space these files consume, you may wish to periodically clean out old files from these folders that are no longer needed.
One other “house cleaning” chore you may wish to perform is to periodically pare down the fax log file, especially if you do a lot of faxing. Since the most recent log information is appended to the end of the fax log file, you will want to trim it down from the beginning of the file. An ordinary text editor (KWrite, Mousepad, Leafpad, Geany, etc.) can be used to edit down your fax log file. If it is important to you to keep records of your fax activity, you may want to print out the fax log before you trim it down. Otherwise, there is no other reason to keep records of your fax activities even several months after the fax has been sent.
Are There Alternatives?
Yes, Virginia. There are better alternatives to faxing. The main alternative is to create PDF files, (either by printing to a file or by scanning documents with a flatbed document scanner), and email them to the recipient. Email is faster, more reliable and a lot more efficient than faxing. Even some of the more advanced office copiers can create a PDF file that is emailed to the recipients, rather than sending them a fax. The added benefit is that your recipient not only gets a document at a much higher quality, but they can also receive color images within the PDF file.
Because of one fiasco that we recently encountered, (the “Time Off From Work” contractor’s fax machine was “messed up” and we made 26 attempts to fax the required paperwork back to them so that my wife could return to work), I now ask for an alternate email address I can simply email the PDF file to. Even my 300 dpi scans from my flatbed scanner have much better resolution than the paltry 200 dpi maximum resolution of a received fax. I also used this method to send pictures taken during my wife’s laparoscopic surgery to the specialist doctor, scanning the images and putting them into a PDF file.
Summary
As you
can see, it’s not difficult to gain fax capabilities under Linux
– provided you have the right equipment. Although fax technology
is old, slow, inefficient and archaic, it remains firmly rooted
in the business community. Because of that entrenchment, faxing
remains a necessary evil for the rest of us have to endure,
despite its limitations. Not all of your fax recipients are
going to be willing to provide an email address to receive a
alternate email from an untrusted and unknown user. They will,
most likely, be running Windows and will be afraid of viruses in
received files. It also doesn’t help that Adobe (who “invented”
and drives the PDF format) has a much-less-than-stellar
reputation with “security vulnerabilities” in their proprietary
file formats. The best we can do is to make our use of faxes as
painless as possible. The ability to use a fax modem on Linux
does remove some of the sting