| Previous
Page |
PCLinuxOS
Magazine |
PCLinuxOS |
Article List |
Disclaimer |
Next Page |
Gimp Tutorial: Create A Shiny Button
|
|
by Meemaw We've all seen those shiny buttons that people make, so now we're going to make one. Start a new project, 640 x 400 with a white background. If your project has some other color background, you can always change it by choosing white on your color palette, and using the bucket fill tool. Choose the rectangle select tool and draw a rectangle. In your tool options below, check Rounded Corners. A slide will appear, allowing you to set the amount you want rounded. I set mine around 25. We want to save this item, because we will use it again. Go to the Select menu and choose Save to Channel. We haven't really talked about Channels yet, but are used to designate the colors in an image, and also any selection masks that may be used. Our drawing has no color yet, but we have selected and saved a rectangle, so it is saved there. 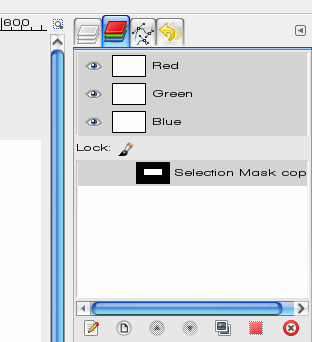 Next, we want to add a layer. Make sure Transparency is selected in your add layer dialog. With the new layer selected, bucket fill your rectangle with black. Notice the rectangle is the only thing that gets filled. Save your project as Button.xcf Now add another transparent layer. On this one, choose Select > Feather. You want to choose your feather setting to be the same as the height of your rectangle, so if your rectangle is 90 pixels tall, make your feather setting 90 pixels as well. Mine will be 100 pixels. Notice that this outline is a little different. 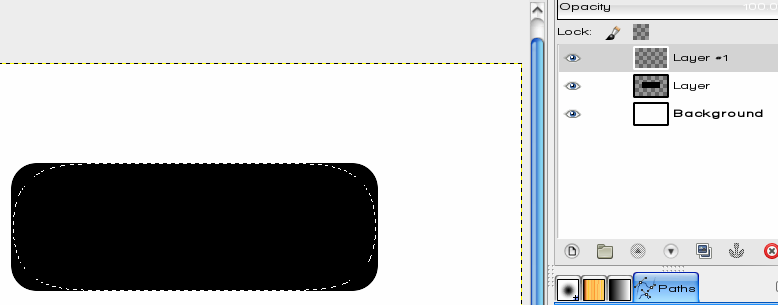 Now, bucket fill your drawing with a color you like. I used a teal blue (00c0f5). If you make it darker your button will be darker. Notice your fill now is blurry around the edges. That's the feathering. However, look at your drawing, and you will notice that the feathering extends beyond the edges of your original rectangle. Let's get rid of that. 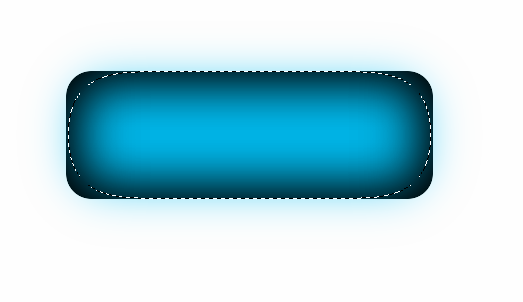 Make sure your color layer is selected, then go to the Channels tab and select the rectangle you saved. Click the red button at the bottom of the tab. (When you hover your mouse over the button, it will say, "Replace the selection with this channel.") Now the dotted lines that surround the selection are around the original rectangle. However, we want to delete everything outside that rectangle. Make sure you go back to your Layers tab and the colored layer is selected, then click on Select > Invert. This will choose everything except your rectangle. NOW, press your Delete key, and the outer color will disappear. 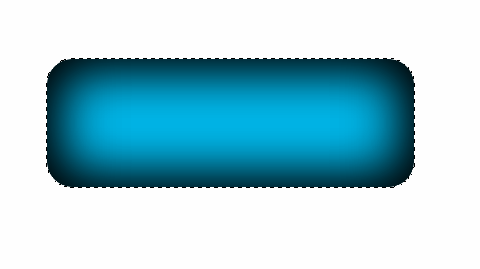 Go back and click Select > Invert again, since we are working on the button itself. Now we want to make our button shiny. First we want to choose the ellipse select tool. Start your mouse to the left and above our button, and end up to the right about centered. Hold down the <CTRL> and <Shift> keys while you draw it. This will select the intersection of the two figures (see the dotted line?) 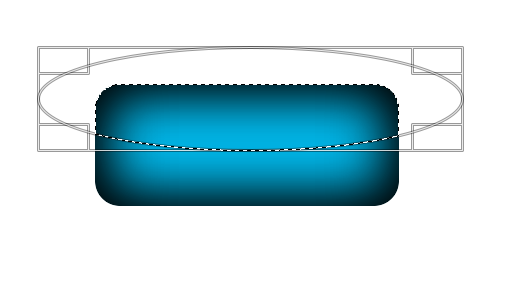 Next, choose Select > Shrink to shrink the selection you just drew. When the settings box appears, choose to shrink by 3 pixels. Notice that the dotted line is now inside the button. 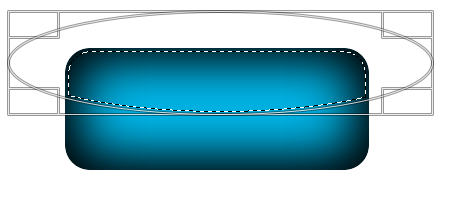 This will be the shiny part. Click on your color chooser to make the foreground white, then click on the Blend, or Gradient, tool. Choose the gradient FG (Foreground) to Transparent. Create another transparent layer, choose your Gradient tool, hold down the <CTRL> key to make your gradient straight, and draw a line from above your button to about halfway between your selection and the bottom of the button. (You can probably play with the gradient and get it the way you like it.) Clicking on Select > None removes all your selection lines so you can see what it looks like so far. If you like what you've done since you saved last, save your work.  Now, let's put some text on our button. Choose the text tool, formatting your font, size and color in the text tool options on the bottom left. I think the tool's appearance has changed since we did text earlier. Your text box will appear wherever you click similar to a rectangle select. Enlarging the box and clicking in it will allow you to type your text. When you have the text typed and formatted correctly, change to the Move tool to position your text box. 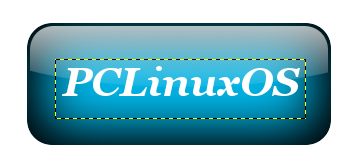 We want to move our shiny layer OVER our text as well, so click on the shiny layer (here Layer #2) and then the up arrow at the bottom of the layers tab to raise the shiny layer to the top. I've already moved mine.  You should have saved everything while you were working on it. While I was working on mine, I decided I wanted the text larger and in a different font. Simply click on the text layer, click on the Text tool, highlight your text and change the font and size. You may have to reposition it so it's centered again, but that's easily done by clicking on the Move tool. I also made a smaller button that I can use for the menu button on my panel.  
Have fun! |