| Previous
Page |
PCLinuxOS
Magazine |
PCLinuxOS |
Article List |
Disclaimer |
Next Page |
Inkscape: ms_meme & the Holiday Tree
|
|
by Meemaw A couple of years ago, ms_meme and I entered a holiday wallpaper contest on the Linux Graphics Users Forum. We both used Inkscape to design our wallpapers, and ms_meme won first prize!  When I asked her how she did that beautiful wallpaper, she said that she had gotten the idea from a Christmas card she'd seen, and opened up Inkscape to see what she could do. The first thing you should do is the tree. Opening Inkscape, choose your "paper" size (for a wallpaper, I choose 1600 x 1200). Selecting the Bezier tool, make a zig-zag set of lines, clicking every time you want your line to change direction.  When you get something you like, right-click to end the drawing process. Your line should be green when you have clicked to change direction, and red until you click the next time, and black (or whatever your stroke color is) when it's finished. Then click on the Nodes tool (at the left side under the cursor arrow). Now your selected tree should be red again, with a node at each corner. 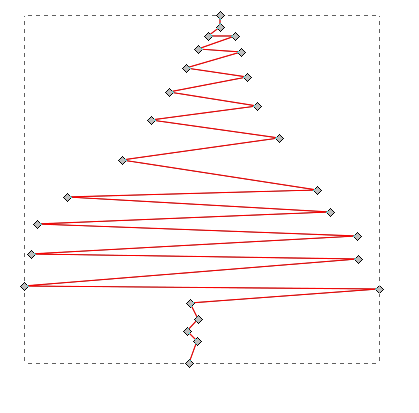 We're going to mess with these a bit. If you click on the node (the little square on the end), you can lengthen and shorten the lines and move them up and down, space them out, whatever you want. If you click on the red lines between the nodes, you can curve the lines a bit. You should move and curve until you get the nodes arranged the way you want your tree to look. I have clicked on the upper line just inside each node, and dragged out to make the curves.  Click on your cursor tool every so often and see what your curve looks like, then go back and move your line and nodes until you have what you want. This would also be a good time to save your work in svg format. You can name it "Tree" or whatever. 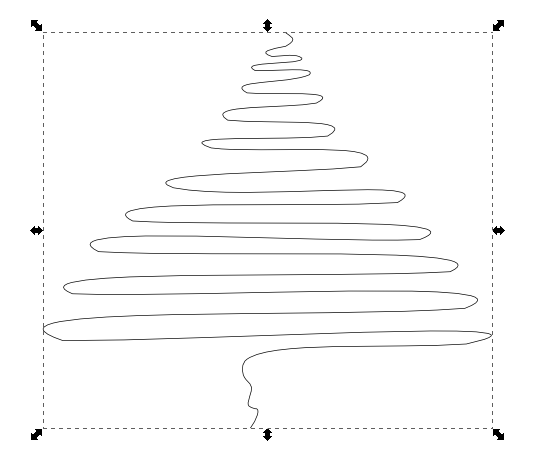 When you are satisfied and your file is saved, select the tree you just created, and duplicate it (Edit > Duplicate or <CTRL> + D). When you duplicate an object, the new one is created in the exact same spot as the one you have. If you notice anything, you might notice that the colors of your object are deeper. The duplicate is selected, so grab it with your mouse and move it around a bit until you like how it looks. You can enlarge it a bit by grabbing the arrow on one of the corners or sides and pulling out. You can reverse it. You can even go back to the nodes tool and move it a little more.  When you are satisfied, use your cursor to select both objects. From outside them, click and drag a large rectangular area. The rectangle should disappear, and both of your curves should be selected. Click on Object > Group or click the Grouping tool in the toolbar above. You can also press <CTRL> + G. If you are satisfied, save your work. The good thing about saving in the svg format is that it is all saved as data, so you can still go back and change things (even a font if you have text) after you have saved a drawing. Anything can be changed in the svg file. When you are finished, you should export your work in a different file type. I usually export to a png file, but there are many file extensions you can use. The exported file can't be changed, but you will still have the svg file in case you want to try something different. You can move your tree to the side of your page while we do the decorations. Let's do the colored balls first. Click on your circle tool, hold down the <CTRL> button, and click & drag a circle. Remember, we held down the <CTRL> key to make our circle perfectly round. If you like ovals, then make them oval. Choose your fill color and, if you want to, choose a hairline gray stroke. They will be small enough that the stroke won't be visible. Duplicate the circle. On the duplicate, change your fill to white, and send it to the bottom. On your colored circle, change your fill to a round gradient. 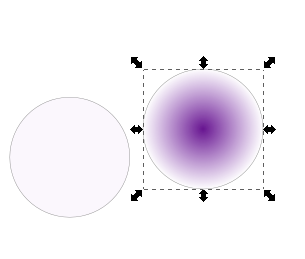 We need to edit this a bit. In your Fill & Stroke window, click on Edit. You will get a new window where you can change your gradient around. Click on one of the gradients in the drop-down, and slide the indicators in the lower slider to the other end. Choose the other gradient and slide those to the other end as well, then close the window. In the left side tool bar, click on the gradient tool. You will see the gradient lines on your circle. Click on the one in the center and drag it up and to the left to change the highlight on your circle. 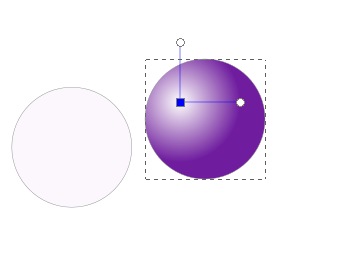 Select both circles and center them both ways. Next, draw a small rectangle at the top of the circles. It should have a grey fill and a dark grey or black stroke. This is the addition at the top where the hanger is attached. It needs to be behind the circles, and centered at the top. When you get them placed and are happy with your work, group them to make one decoration. You can duplicate it as well. In fact you should make a couple of duplicates and ungroup them long enough to change the fill color, unless you want them all the same color. Don't forget to regroup them. 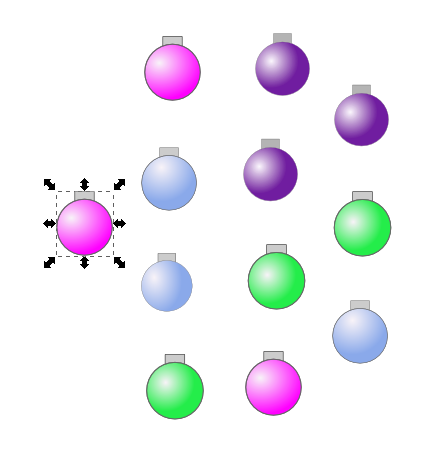 We can also make stars to help our tree shine. I have put a dark blue background on my page so I can see the stars. A blue rectangle the same size as your page will work. Make a couple of stars, one of them a six-point star and one of them an 8-point star, both with a spoke ratio of .1, filled with white and no stroke. Click on Filters > Shadows and Glows > Glow to make your star more "shimmery". I applied that filter twice on many of the stars.  You can manipulate your stars with the handles, rotating and stretching them out so they aren't all exactly alike. You can also go back and create stars with more points if you wish. Make lots of duplicates, and arrange them on your tree as you desire. You can even make a larger star to go on top. 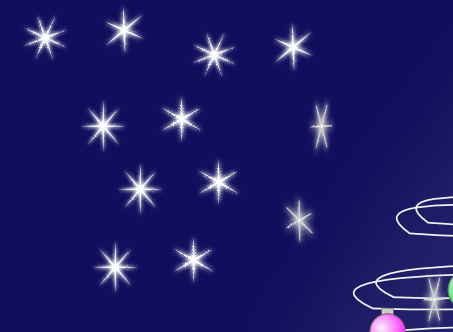  As a bit of accent, select your blue background, and change the color to a radial gradient. The default is blue in the center extending to transparent on the outside, but it might look better if you edited your gradient so the blue is outside and the transparent is in the center. It doesn't even have to be totally transparent. Click on your gradient tool and change the handles as below to make your highlight a little less circular. You can make it as big or small as you want.  Save your work, then export your picture. The good thing about Inkscape is that you can always go back and change it if you decide you want it a little different.  As you can see, my tree is designed basically the same as ms_meme's but turned out differently (her decorations are all smaller, for one thing). Remember though, that it is your creation, not someone else's, so it is up to you to decide how it looks. I'm sure your design will be wonderful! |