| Previous
Page |
PCLinuxOS
Magazine |
PCLinuxOS |
Article List |
Disclaimer |
Next Page |
GParted: Manage Your Partitions |
|
by loudog Recently I was faced with a dilemma. You may empathise with me, possibly having faced similar circumstances at one time or another. I was happily computing along, browsing Synaptic for magazine article ideas when I came across a particularly interesting looking program that I had not noticed before. Hmmmm, this must be new because I doubt my subconscious would have allowed me to skim past it without triggering a red flag. I quickly clicked on it to read the description. Yep, I had found my next article. Cool. As I selected it for installation my subconscious now signaled me with the red flag. Okie dokie, what am I missing here. I scrutinized the package more closely and soon realized it would require a substantial amount of the remaining free space on my root partition. I had already run bleachbit which netted me only 11.5MB of space, deleted a number of unneeded packages and old kernels, gaining another 300MB or so, but I had already used up most of that. It was time to face the facts. My root partition was busting at the seams and in dire need of expansion. A sinking feeling went through me. If I load the package, then I may not have enough room for some future updates, let alone more programs down the road. Let's see, what options do I have other than make a backup, reinstall, reconfigure the desktop and preferences to my tastes, load and configure all my extra programs etc, etc. Ewwww. Not what I wanted to do. Hopefully, next time I'll remember OP's advice and add some extra room to the default size of the root partition when installing the OS. I guess I'm paying for that lapse in judgement now. Well, Boogers. 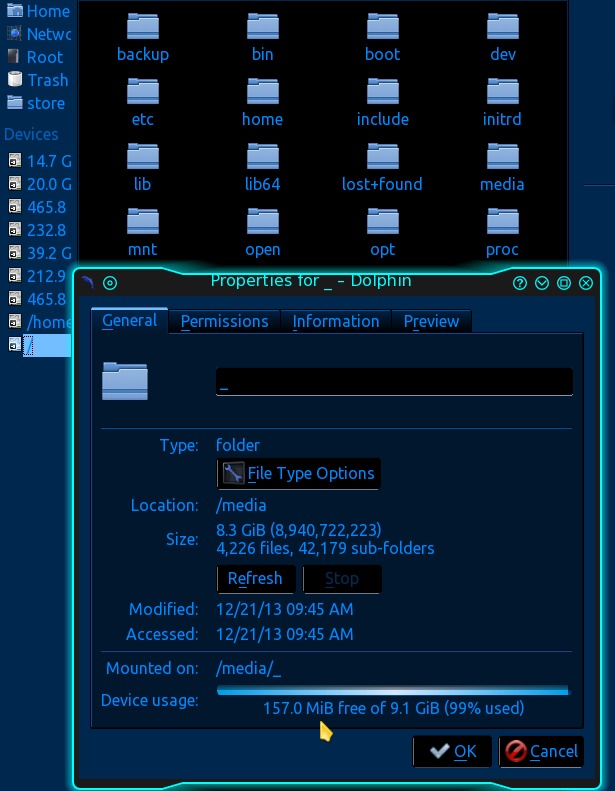 Hey! That reminds me. There was this prank I have been planning to pull on my wife (did I mention I'm a stinker?) I sat and thought about the steps involved and slowly choreographed the prank in my minds eye. Yep that should be a good one. Hmmm, this is not the appropriate place for practical jokes but I believe the forum sandbox should be okay. Ill post it there just for fun. And voila! There you have it. While my conscious mind was distracted, contemplating my dastardly deed, my subconscious came up with the solution to my problem. Works every time. I can use GParted to move my partitions around and resize them at the same time. Hoop! There it is! For the sake of my screenshot program (Shutter) and to properly illustrate the article, I will be using a hard drive in an external swap dock that has been mocked up to look like my original install. This way, I can load GParted's GUI from the repository and use it on the desktop. Originally I used a Live CD to make these alterations, but the steps are basically the same. Backing up your data is the single most important step to take before starting this process. You have been officially warned. When starting GParted on the desktop, you will be asked for your root credentials. The Live CD version will not. Looking at the GUI, we see the program first scanning all disks and their partitions. From the dropdown menu at the top right, I will select the mock drive. 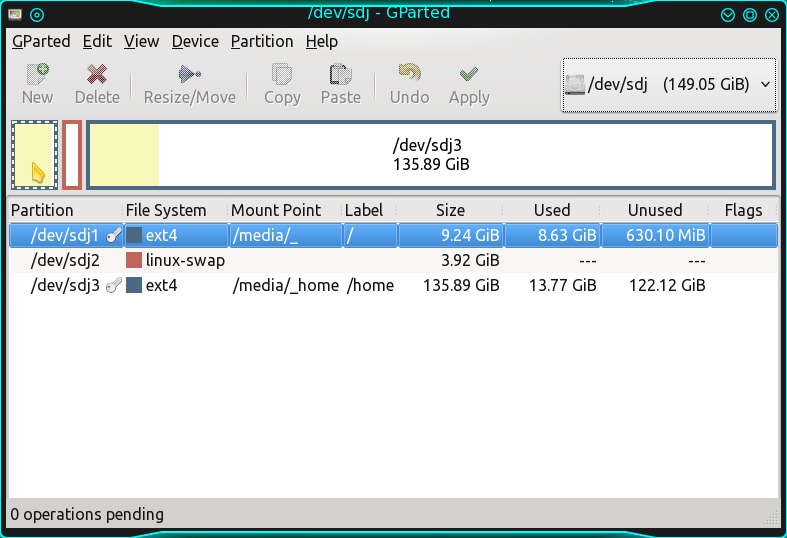 Looking at the information provided, I noticed that GParted says there is 630.10 MiB free on the root partition. For those of you who don't know MiB (mebibyte) is different than MB (megabyte) and can be a little confusing if different programs report sizes in differing standards. This gives you a little homework research if you are so inclined: I was. I can see dolphin reports size in MiB also. Oops getting off topic, sorry. Now, where were we? Oh yes, hey! Now wait just a cotton-pickin minute here, Dolphin just reported that I only had 157 MiB free. I guess I'll take GParted's word for it, as it is a partition editing program, whereas Dolphin is a file manager. I'm, though, a little confused as to the reason for the size discrepancy, and a rather large discrepancy at that. Hmmm, I wonder what Filelight would report? Anyway, moving on. Even though it appears I may have half a GiB more room than I first thought, I believe resizing the root partition is still in my best interests in the long term. I also think I will expand my swap partition while I'm at it, which should be easy enough. The first thing I want to do is decide how much extra space I will need to swipe from my home partition. After deciding on 14 GiB for root and 5 GiB for swap, I came up with 6GiB needed. First thing to do is move/shrink the last partition on the drive, "/home" in this example. Right clicking the last partition, I unmount it first. Now that the partition is unmounted, the resize/move option is no longer greyed out. Selecting the resize/move option, we want to look closely at the configuration window that is presented. 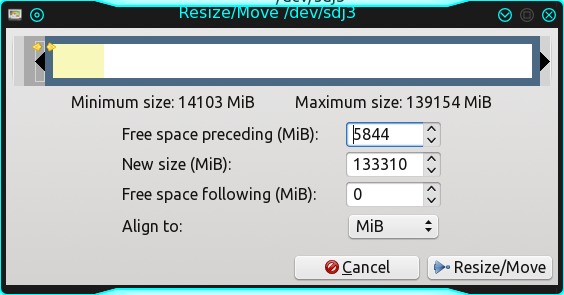 Notice my mouse cursor grabbing the left side of the partition. Thats because we want to create the free space before /home so we can keep shifting it back to the swap and root partitions. You can also see I have created a little more than 5.5 GiB of free space (free space preceding). Looking at the minimum size the partition can be shrunk to, we determine that we have roughly 14 GiB of data on the partition already. The minimum size requirement is equal to the existing data on the partition. Since the advent of super size drives and ssds, I always align my partitions to MiB, rather than to cylinder. If your drive was originally aligned to cylinders, I would use that setting. Next, clicking the resize/move tab triggers a warning. 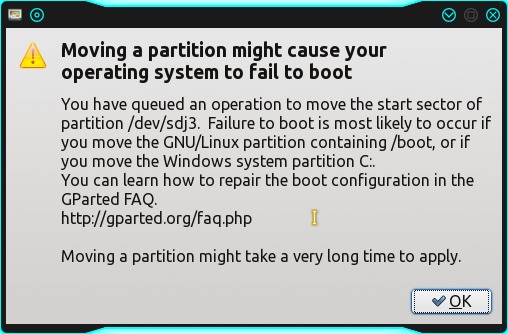 Failure to boot is most likely to occur. Quite the ominous little snippet there. Reading on, we determine that since this is not the root partition that contains /boot, I can ignore this. If you have a large home partition, this will take quite a bit of time as is stated in the warning. After clicking ok, you will see something new appear at the bottom of the main window, the operation scheduler. This gives you an overview of what exactly it is you have instructed GParted to do. We will continue to add operations to the scheduler until we are done. The next thing to do is move swap over to the beginning of the /home partition, so I'll select it. As the swap partition is grabbed by the cursor in the middle this time, we can move the entire thing at once over to the right. Make sure the "free space following" reads zero. Examine the space before and after the partition as I move it over. It's only partway over at this point. You will also notice the actual size of the partition is about 4 GiB (4009 MiB) in the "new size" readout. 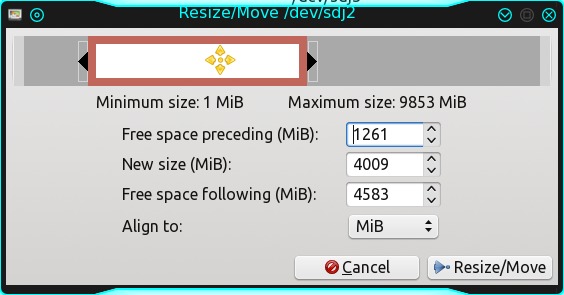 Now we simply grab the left end of the partition, like we did with /home, and expand it to the left until we see the new size we desire show up in the "new size" section. We still have 4.8 GiB of free space to allot to root (free space preceding). Good. 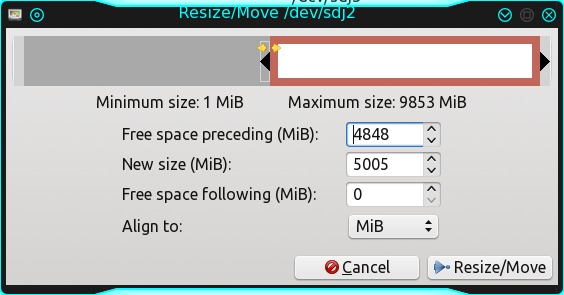 Clicking the resize/move button gives us the same warning as before and again, not being the root/boot partition, we ignore it. The swap space moving/resizing will go very quickly during operation execution. The modifications are queued into the operations window, and we move on to our root partition. Selecting that, we need to unmount it first then resize. Grabbing the end of the partition in the same fashion as the others except from the right side this time, we expand it until the readout for "freespace following" is zero. Clicking the resize/move button does not generate an error message this time because we are not moving the partition, just expanding it. 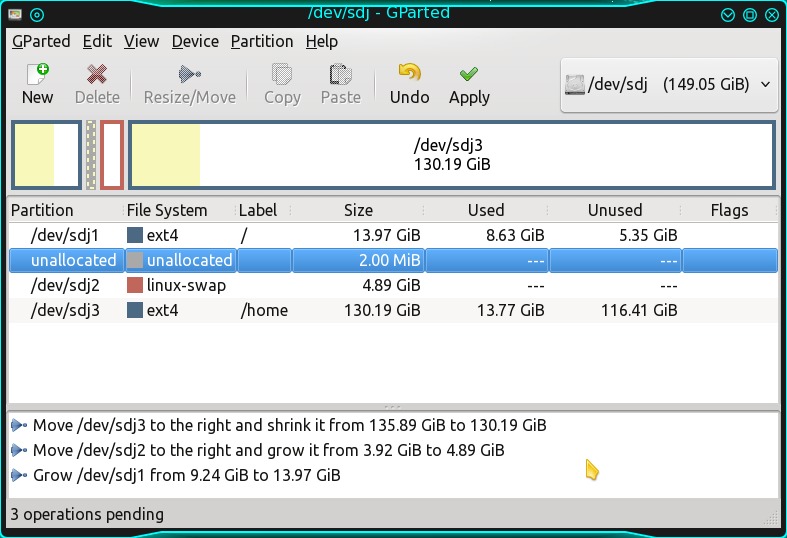 In some cases when manually resizing/moving partitions, the align to MiB option will leave one or two MiB's of empty space between them as you can see in the image. This is normal. After we look over the operations section and accept that all is well, we click the apply button. This will bring up the operations window. In this window all the operations are mapped out for you to observe in real time. If we click the details button, we can get a glimpse of what is really happening in the here and now. With the expandable menu, many of the menu options open to reveal sub-menu options so that a precise and detailed record of what has/is being done and when, can be scrutinized. I see we have 3hrs 23mins remaining until the first operation is completed. Wow. It's a good time to get some lunch and check back later. 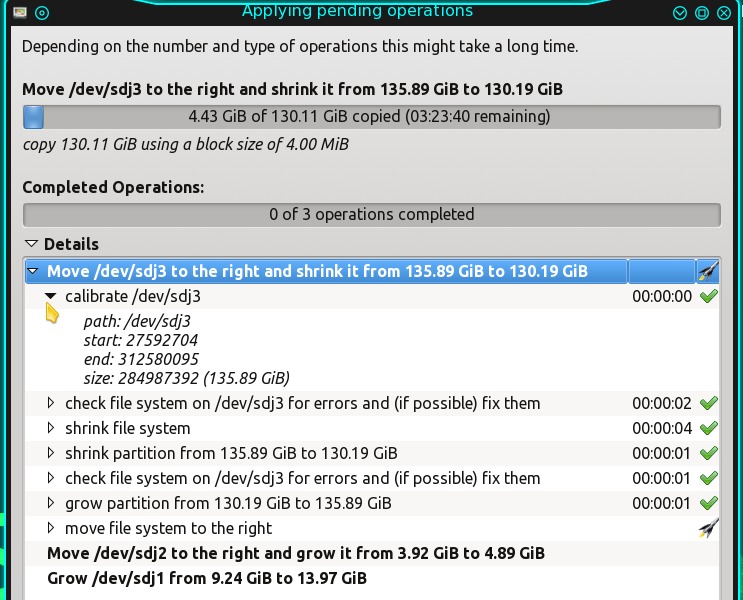 Ahhh, nothing like a nice relaxing lunch chatting and laughing with the wife to bring out the sunshine. Ohhhh, shoot! Nothing like coming back to an error message to change the forecast to partly cloudy. Houston, we have a problem. 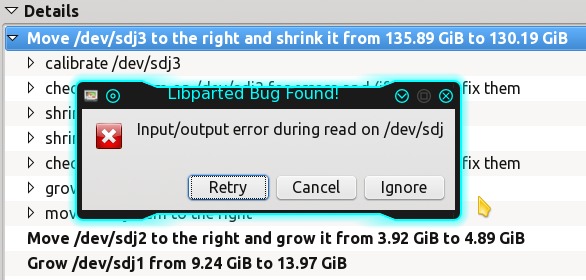 Although I did not plan on this happening (who does?), it is a prime example of why we always make a backup of our data first. Imagine Clint Eastwood pointing his .44 Mag at your hard drive and saying "feelin lucky punk." If you have your backup, you can look ol' Clint in the eye and say "Yes, I am". Seeing the error message is bad enough. Why add the "All your data is fubar" to the mix? Once, in my early years, I accidentally deleted my entire /home directory with no backup. I expected YouCanToo to rub my face in it, as he had warned me numerous times about data loss and the need to have regular backups. To my surprise, he was very sympathetic, leading me to believe that a similar thing may have befallen him in the past. Data loss is simply not funny, no matter how you slice it. Just say "no" to data loss with regular backups. Well, in this case, it looks like the hard drive is having issues. After a number of ignores it became apparent that all was not well so I selected cancel out of curiosity, as I have never encountered this situation before. That brought up this window. 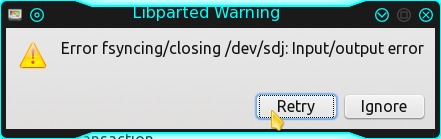 Selecting retry, the program restarted the operations from the beginning. Since I was 104.4 GiB and 2hrs 50 mins into it before the error, I didn't want to go through all that again just to encounter another error. What I wanted to do was check the drives SMART status. I cancelled the GParted program, opened Gsmartctl, and was presented with the blood red hard drive icon that Indicates imminent death. MY, my, my, I wonder what happened here? The drive wasn't that old either, according to the SMART data. 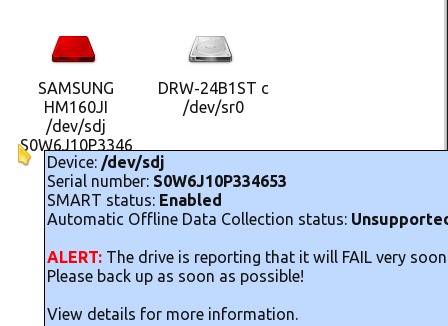 Suddenly, I remembered where it came from. This drive was removed from a laptop that a motel guest had owned. One day after becoming totally frustrated with Windows, he threw the laptop from the parking lot into the laundry room almost hitting the maid. Since the maid on duty at the time was my wife, and he was fairly intoxicated at the time and primed for a fight, I obliged him. He ended up beaten, and I ended up with 2 broken ribs and a broken laptop. Eventually I fixed the laptop by replacing the hd and returned it to him with PCLinuxOS in a dual boot configuration. We later became good friends and he respects PCLinuxOS for its stability. Nothing like fighting for converts. He no longer throws his laptop. Realising this drive was unfit to finish the article with, I quickly dug up another one and prepared it to take over where we left off. Now that GParted has finished the modifications to the drive, let's look at the operations window again. 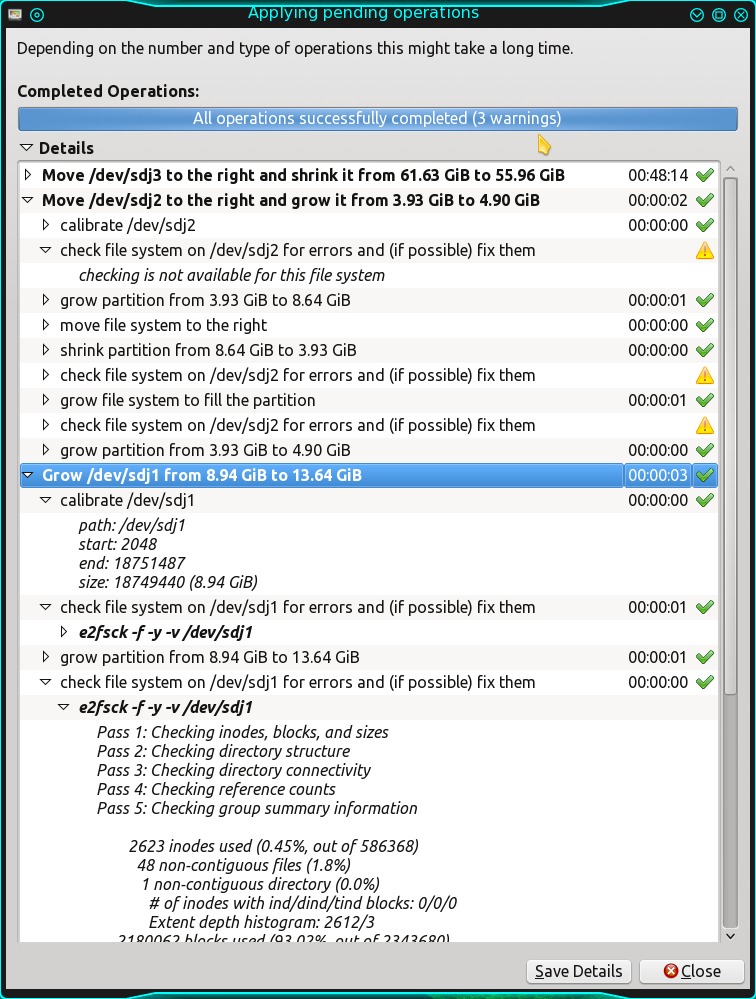 I simply love the detail that GParted gives us in the report section. You can see that all operations completed successfully, but with three warnings. The warnings are flagged with the yellow caution symbol at the right side of the report. I have the first one expanded and the warning is that checking is not available for this type of file system. Hmmm. This is the swap partition and we all know that swap is a completely different critter than normal filesystems, so I'm betting all is fine. The actual hard drive I originally performed these modifications on is what I'm using now to write this article. Since it was my main OS disk, I used GParted's Live CD ISO, which you can download from here. In the end, all was good as the open source community continues to supply quality software in the modern age. PCLinuxOS is simply the best! |