| Previous
Page |
PCLinuxOS
Magazine |
PCLinuxOS |
Article List |
Disclaimer |
Next Page |
Use ImageMagick To Make HQ Photo Collages |
|
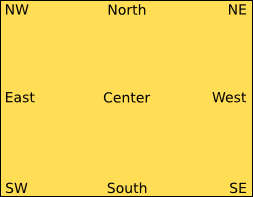
by Paul Arnote (parnote) Many PCLinuxOS users have heard of ImageMagick. It's included in all but the slimmest of "mini" PCLinuxOS ISOs. I'm betting, too, that many PCLinuxOS users avoid using ImageMagick. ImageMagick is a command line tool that is the swiss army knife of graphic tools. No other graphics tool can rival its power. If you're not familiar with ImageMagick, you should familiarize yourself with at least some of its most basic commands. Learning to use ImageMagick is intimidating, to say the least. It has so many command line options, and not one of the tools is actually named ImageMagick. Instead, it's a suite of command line tools, each with their own different names and use. They go by such stealthy names as convert, mogrify, montage and composite -- to name a few. Background During what seems like a lifetime ago -- 26 years ago, to be precise -- I worked as a professional newspaper photographer. I covered all the typical things you might expect a newspaper photographer to cover: sports (local, high school, college and professional), news, features, advertising, photo essays, etc. I won awards for my work along the way. From the time that I taught myself photography at the age of 12, I succeeded in following my childhood dream of working as a newspaper photographer. The character of "Animal" on the then popular "Lou Grant" television series was one of my favorites. But the low pay, long hours, intense competition and stress of the job -- things you never envision in your dreams -- caused burnout. Couple that with the somewhat silly desire for food on my table and a roof over my head, I sought out a second career in the medical field, where I've worked ever since. Fast forward to the present day. In the first two months after our son Ryan was born, we had already spent $700 on two separate photo packages of him. Given my background, I thought this was a bit steep, especially since I knew I could do it far cheaper with equal (if not better) results. Sure, the pictures were nice, but then so was the price. Additionally, this portrait company talked glowingly of wanting to do repeat pictures every six months. This simply was not something we could afford to do every six months, given the state of the economy and our limited resources. Having been out of the field for over a quarter of a century, my "old" 35mm camera equipment (what I have left, after selling some off, is shown in the image below) was no longer the state of the art equipment, as it was when I exited the profession. Oh, that equipment still works, and works very well. But when I changed careers, the first digital camera had been released -- for a price that was more than some peoples' annual wages. Everything was still film based back then. Film was king, and Kodak was still a very profitable powerhouse company. I needed to "update" my equipment to the more modern (and infinitely more convenient) digital offerings.  Most of my older, 35mm camera equipment. So, for less than the cost of a year's worth of pictures purchased through the portrait company, I found and bought a new digital SLR camera (compatible with my existing, older camera equipment), new studio equipment, and various other pieces of equipment that will be necessary. My often-placed-on-hold remodeling project now has a new reason to be completed, since I am now planning on incorporating a full fledged, full time portrait studio into the project (since I've acquired the equipment, I now need a place). 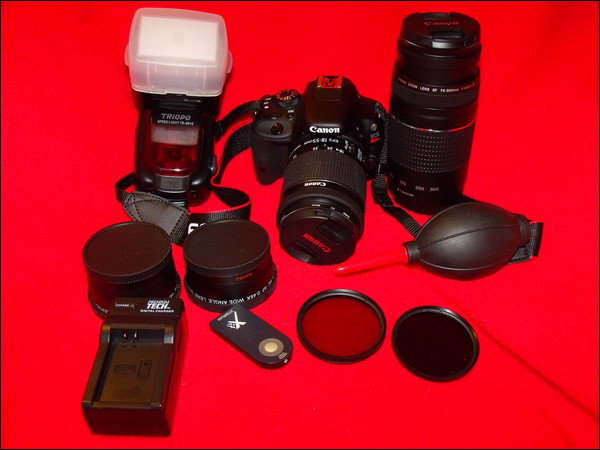 Most of my newer, digital SLR equipment, sans the studio equipment. The purchase of the new camera equipment, coupled with the recollection of my photo skills and knowledge, has reignited a spark inside of me that I thought had long been extinguished. In fact, I'm even seriously considering doing portrait photography on the side, to earn some extra money. (My plan is to do it part-time, but who knows ... it may turn into something more, if I'm lucky. I can only imagine how nice it would be to work for myself, rather than someone else). I've even created a web page for such a business (but it only exists on one of my computer's hard drives at the moment). If I price my services right, it has potential to be a real income booster. Ideas Spring Forth One of the items that the portrait company was peddling was a very nicely done 20x20 collage of photos from the photo shoot. In order to get the collage, you had to buy one of the more expensive print packages. If I'm going to set up a little business on the side, I at least need to be able to compete and offer something similar, albeit for a lot less cost. Enter ImageMagick. 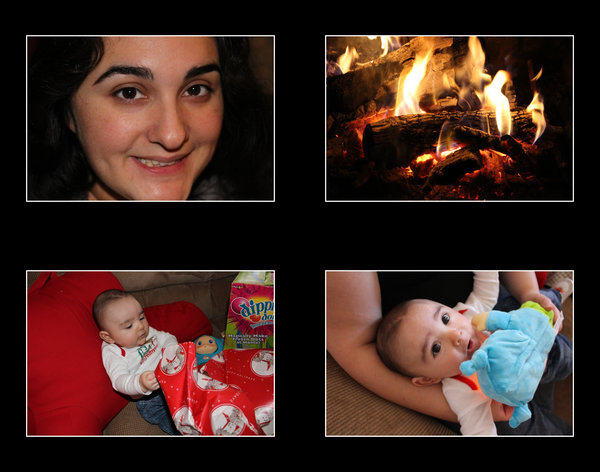 With ImageMagick, I've been able to come up with a few different collages. The challenge is setting them up as templates, so that I can produce them quickly, with a minimum of effort. Sure, I could always produce them in Gimp, but that would require quite a bit of labor intensive work each and every time. I need a way to automate the process as much as possible. Since ImageMagick is command line based, it's the best choice. I can create a bash script of the necessary commands to automate the task of creating the photo collages. In fact, each photo collage should be able to be completed in under one minute, on a modern multicore processor. Doing A Little Homework Before you can create something like this, you will have to do a little homework. To create decent looking enlargements, you will need to have at least a 6MP camera -- minimally. The higher the resolution, the more data there is in the picture, leading to greater detail and sharper images. My new dSLR produces images with 18MP resolution, which will be more than adequate. To figure out what resolution you need to produce photo quality prints, I highly recommend checking out the Quality vs File Size chart here. It's about halfway down the page. You may be able to "milk" more out of each resolution, by settling for good, very good, or excellent ratings, but let's just focus on the actual photo quality rating. The old adage "garbage in, garbage out" applies fully when it comes to digital photographs. Respect the limits of each resolution if you want to get the best results from your digital photo equipment. To summarize the information on the aforementioned chart, a 1MP camera will produce photo quality prints up to 4x6" size. A 2MP camera will produce photo quality prints up to 5x7" size. A 4MP camera will produce photo quality prints up to 8x10" size. A 6MP camera will produce photo quality prints up to 11x14" size. An 8MP camera will produce photo quality prints up to 16x20" size. A camera with 10MP or greater will produce photo quality prints up to and including 20x30" size. (My apologies to my non-U.S. readers ... to convert from inches to cm, simply multiply the inches by 2.54 to reveal the equivalent metric print sizes). Doing The Math Since we're after high quality prints, it's a good idea to use 300 ppi (pixels per inch) as the threshold for the quality we want. This also makes it easy do our calculations for sizes. Pixels per inch is relative to your image and computer screen, while dots per inch (dpi) is a measurement that's pertinent to printers. One unit of measure does not necessarily equal the other. We won't enter the long, ongoing, ad nauseum debate over these terms here. There is plenty of discussion on this topic and their differences on the Internet. As far as I'm concerned, they can fight it out among themselves. I have better/other things to focus my energies on. All I'm interested in is creating high quality prints. Pixels Per Inch ‹–› Pixels Per Centimeter: Don't get all knotted up about which unit of measure used here. This measurement is simply to insure that we're able to get high quality prints from our photo finisher, and will work regardless if your print is output to imperial or metric measurements. To convert to Pixels Per Centimeter, simply divide Pixels Per Inch by 2.54. Thus, 300 Pixels Per Inch = 118 Pixels Per Centimeter, if you're using non-imperial (metric) measurements. So, for the sake of keeping things simple, let's say we're going to target 11x14" as my print size. Multiply 11 by 300, and you get 3300 pixels as the dimension of the "short" side of the print. Multiply 14 x 300, and you get 4200 pixels as the dimension of the "long" side of the print. You will also need to know size information about your photos. The photo collage works best with images of the same size. If you install jhead from the PCLinuxOS repository, you'll get all kinds of information from the JPG file's Exif header (including the image size). Just type in the command as jhead -v [filename]. Jhead also has other uses too, so it's not just wasting the little bit of space it takes up on your root drive. With jhead, you can also strip out all but the most essential information from the JPG Exif header, or you can add extra comments to your Exif header. Enter jhead -h on the command line to get a feel for all the stuff that jhead can do. Next, let's lay out the images like in the collage above. That image is in landscape orientation, with four photos laid out in a 2x2 grid. To keep things easy, let's set 176 pixel spacing around each photo (about one half inch at 300 ppi, to help insure that our "real" images aren't covered by any frame we might put the image into for display), along with an 8 pixel white border around each photo. The latter is optional, but has to be included in our measurements if you are going to include them in your collage, as I have done. That gives us the following measurements, in pixels:
Spacing = 704 pixels That gives us 736 pixels used by the spacing and border. Subtracting 736 from 4200, we end up with a total pixel count of 3,464 to fit in two images, horizontally. Divide this in half, and we have the width for each photo. In this case, this results in a horizontal space of a 1,732 pixel width. Double check your math by adding everything back together (3464 + 736). If it equals 4200, then you've done everything correctly. Now, if we divide 1732 by the original width of the image (5,184 pixels), we end up with a sizing factor of 0.3341. To find the height of each image, take the height of the original image (3,456 pixels) and multiply by our sizing factor (0.3341). This gives us an image that's 1,154.65 pixels tall. We'll round that up to 1155 pixels (it's a bit hard to measure out 0.65 pixels). Since the height of our new image is 3300 pixels, let's calculate how much spacing we will need to evenly space the images out vertically.
Images = 2310 pixels (two images, each 1155 pixels tall) That gives us a total of 2,342 pixels already spoken for by the images and the 8 pixel white borders. Subtracting 2342 from 3300, we get 958 pixels remaining. Dividing 958 by 4 (spacing around the top and bottom of each image), we end up with 239.5. So, we round up to 240 pixels as the vertical spacing. To double check our measurements, add them all up. In our case, it's 2310 + 32 + 240 + 240 + 240 + 240, which totals 3302 -- just two pixels more than the 3300 pixel size of the "short" edge of our 11x14" image. So, here is the command I used to produce the collage above (entered all on one line): montage -geometry 1732x+176+240 -tile 2x2 -background black -bordercolor white -border 8 IMG_0014.JPG IMG_0052.JPG IMG_0506.JPG IMG_0541.JPG -quality 95% montage-trial20.jpg We use the ImageMagick command montage to perform our magic. The -geometry 1732x command sets the width of each image. Notice that we didn't specify the image height. When the height is skipped, ImageMagick will automatically maintain the aspect ratio of the images. The +176+240 part sets the spacing around each image. Using the -background black switch sets the background color to black. Similarly, the -bordercolor white -border 8 switches set the image border color to white and eight pixels wide. Next, list the original images you want to include in your collage, in the order you want them to appear. The first image listed will be placed in the upper left corner of the 2x2 image matrix, the second image in the upper right corner, the third image in the bottom left corner, and the fourth image in the bottom right corner. To preserve the image quality, we use the -quality 95% switch (you can omit the percentage sign, if you wish). Finally, we provide the filename for the output file (in our case, montage-trial20.jpg). 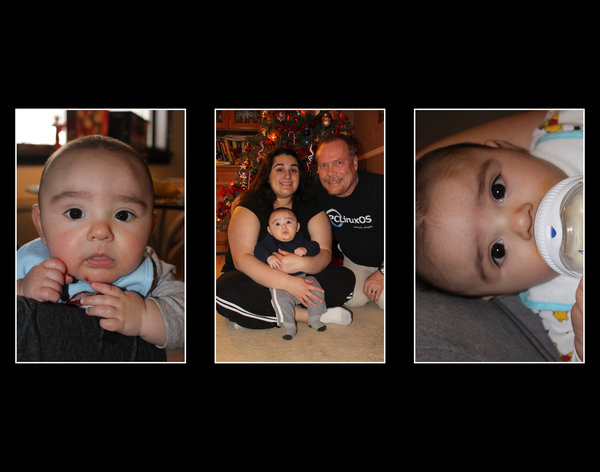 Dressing Things Up By chaining several ImageMagick commands together, we can dress up our photo collage with some custom text. This time, let's do a different arrangement in a 3x1 (three images in one row) grid, like shown above. This grid works best with three vertical images, preferably all the same size. We'll be using three ImageMagick commands this time: montage, convert and composite. Since we already know the base dimensions in pixels, we'll create another 11x14" image. Let's start out with determining our horizontal image spacing. To keep things simple, we'll make our horizontal image spacing 100 pixels. So with three images, that makes 600 pixels accounted for. If we use a 10 pixel white border around each of the three images, that accounts for another 60 pixels. That leaves 3,540 pixels to display three images in. Divided by three, that allows for a 1,180 pixel width for each image. Doing more math, dividing 1180 by 3456 (the width of each image) gives us a sizing factor of 0.3414. Multiply the height of the image (5184) by the sizing factor (0.3414), and you get 1770 (rounded) as the new height of the image. Taking 3302 and subtracting 1770, we come up with 1,512 pixels remaining. We want to center those images vertically. Dividing 1512 by two gives us a vertical spacing of 756 pixels. Here is the command for this portion of the photo collage, which is very similar to the previous command. This command (entered all on one line) gives us the image above, which we'll call our base image: montage -geometry 1180x+100+756 -tile 3x1 -background black -bordercolor white -border 10 IMG_0172.JPG IMG_0106.JPG IMG_0013.JPG -quality 95% montage-trial2a.jpg A word about colors with ImageMagick: You might have noticed that I've used actual color names when specifying colors in my commands. You can find a full list of colors that are recognized by ImageMagick here. You can also use HTML color statements (e.g., black = #000000, red = #FF0000, green = #00FF00, blue = #0000FF, yellow = #FFFF00, purple = #FF00FF, white = #FFFFFF, etc.), or RGB statements (e.g., black = rgb(0,0,0), white = rgb(255,255,255), red = rgb(255,0,0), green = rbg(0,255,0), blue = rgb(0,0,255), yellow = rbg(255,255,0), purple = rgb(255,0,255), etc.). While I find it easier to simply use the actual color names, you are free to use whatever method works best for you. Now, let's create the text to place on the top of the image. Let's dissect the command after we look at it. Again, this is all entered on one line. convert -density 300 -units PixelsPerInch -background black -font Times-BoldItalic -fill white -pointsize 100 label:'Christmas 2013' montage-trial2b.jpg  Using the ImageMagick convert command, we set the resolution to 300 pixels per inch (-density 300 -units PixelsPerInch). We set the background color to black (-background black). For this text, we're going to set the font to bold italic Times New Roman (-font Times-BoldItalic), set the text to white (-fill white), set the text size to 100 points (-pointsize 100), and set the text to say "Christmas 2013" (label:'Christmas 2013'). Finally, save the generated image with the specified filename (montage-trial2b.jpg). A word about fonts in ImageMagick: To use a font in ImageMagick, you first need to know what it's called. This is easier than you might think. As a regular user, simply go to the /etc/ImageMagick folder (do this as a regular user, so you can't alter the files and render things royally screwed up), and look for the *.xml files that start with the word "type." On my computer, there are four files that start with the word type. Look in those files for the font you want to use, and you'll discover the name that ImageMagick uses for that particular file. Typically, there are separate font files for bold, italic, regular and bold italic styles of the same font ... so make sure you're using the one you want. We can use a similar command to create the text for the bottom of the image. convert -density 300 -units PixelsPerInch -background black -font Arial-Bold -fill white -pointsize 50 label:'Ryan, Laura & Paul Arnote' montage-trial2c.jpg  The only differences from the command that creates the text at the top of the image is that we changed to the Arial-Bold font, changed the font size to 50 points, and changed the text. Now, we need to start putting it all together. We do that with the ImageMagick composite command, as below (entered all on one line): composite -gravity north -geometry +0+200 montage-trial2b.jpg montage-trial2a.jpg montage-trial2d.jpg A note about the -gravity command: The -gravity command uses a compass point orientation to determine where to place items. That placement is further refined with the +xxx+yyy statement (can also be a -- sign, instead of just a + sign) in the -geometry command. The graphic below explains the compass point orientation: The first command switch is -gravity north, which places the overlay image at the top center of the base image. The -geometry +0+200 tells ImageMagick to not shift the placement of the overlay image horizontally, but to place the overlay image 200 pixels from the top of the base image. Next, you have to list the images you want to use to create the composite from. Pay particularly close attention here. The overlay image (the image containing the text) must be listed first, followed by the base image. Finally, specify the filename for the composited image. Below is the image we end up with. This new composited image becomes our new base image. 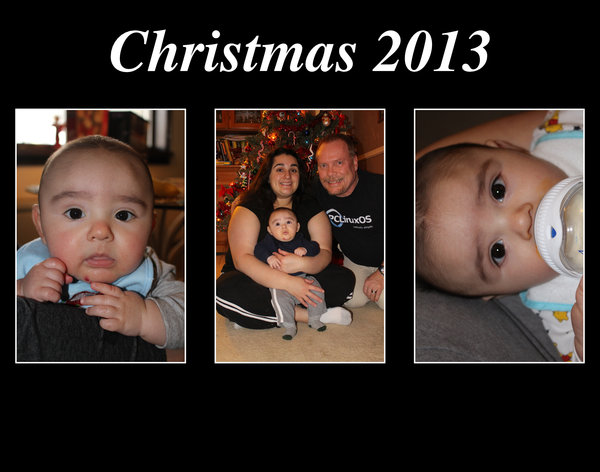 Finally, it's time to insert the bottom line of text. composite -gravity south -geometry +0+300 montage-trial2c.jpg montage-trial2d.jpg montage-trial2.jpg Similar to the previous command, there are some differences. First, we place the overlay image of the bottom text at the bottom, with the -gravity south command switch. The -geometry command switch is similar, except that we move it up 300 pixels from the bottom edge of the base image. We list our overlay image filename first, followed by our new base image filename. Finally, we specify our output filename, which is our final image (below). 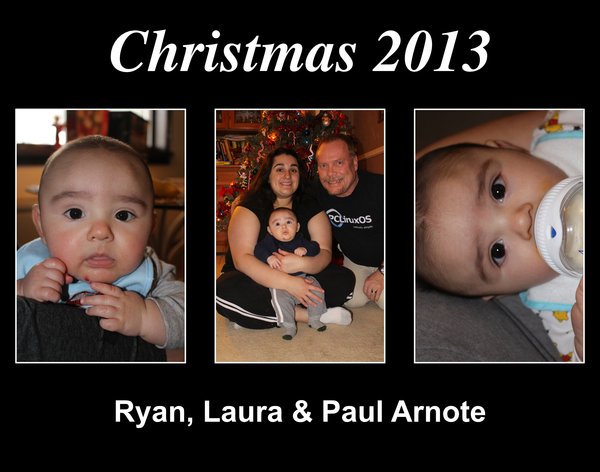 The nice thing is that you can chain all of these commands together, simply by placing a semicolon between each command, like this: montage -units PixelsPerInch -density 300 -geometry 1180x+100+756 -tile 3x1 -background black -bordercolor white -border 10 IMG_0172.JPG IMG_0106.JPG IMG_0013.JPG -quality 95% montage-trial5a.jpg; convert -density 300 -units PixelsPerInch -background black -font Times-BoldItalic -fill green -pointsize 100 label:'Christmas 2013' montage-trial5b.jpg; convert -density 300 -units PixelsPerInch -background black -font Arial-Bold -fill red -pointsize 50 label:'Ryan, Laura & Paul Arnote' montage-trial5c.jpg; composite -gravity north -geometry +0+200 montage-trial5b.jpg montage-trial5a.jpg montage-trial5d.jpg; composite -gravity south -geometry +0+300 montage-trial5c.jpg montage-trial5d.jpg montage-trial5.jpg 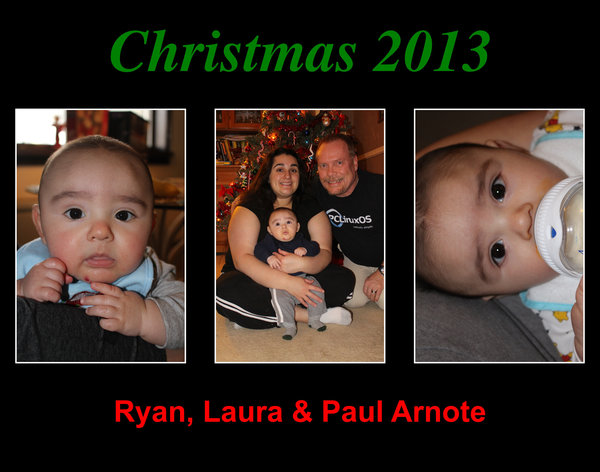 As you can see, I've dressed it up a little more by making the top text green and the bottom text red. All I did was change the color passed to the -fill command switch to create the desired color. Also, instead of making the background color of the text overlays black, you can change the -background black command switch to -background none to create your text overlay with a transparent background. However, should you choose to do that, you will have to change your file type from JPG to PNG, since JPG files do not support transparency. I've found it easier to just create my overlay images with the same color as the base image, then save it as a JPG file (same as my base image), to help avoid any confusion with file types. Summary Without a doubt, this task is absolutely ripe for the creation of a custom bash script. I haven't yet decided how much flexibility to build into the script. I don't want to overly complicate the process, but I definitely want to automate it. If I take care, I think I can build in just enough flexibility so that I can automate the task. As you can see, ImageMagick is a VERY powerful tool. But with that power comes a lot of complexity, mostly on account of the many, many options that are available. I've used the ImageMagick commands a lot over the past few years. With the exception of a few Thunar Custom Actions that I published in the Xfce Power User Tips & Tricks series, I've not really written much about the ImageMagick suite of command line tools. Specifically, I avoided writing about ImageMagick commands for the same reason that many users avoid using it: its perceived (and real) complexity. Still, I've yet to find anything that the ImageMagick commands can't handle. I used the convert command to extract the still images that appeared in last month's issue of the magazine from the animated GIFs.Just as soon as I've created the custom bash script, I'll publish it here in the magazine. Meanwhile, let your imagination (and your math skills) run free, and create some custom photo collages from your personal images. After all, it'll make your personal images all that much more "personal." |