
| Previous
Page |
PCLinuxOS
Magazine |
PCLinuxOS |
Article List |
Disclaimer |
Next Page |
Multiple Command Line Windows Using Tmux |
|
By Peter Kelly (critter) In a recent article about the GNU Screen utility, I briefly mentioned tmux as an alternative and then said little more about it. Screen is, and has been for many years, the de-facto upgrade for terminal users and was first released in 1987. The new kid on the block is tmux, which has itself been around since 2009, an age in modern computer life times, and in that time has become a popular and stable alternative to screen. The two programs are similar, but tmux packs in some extra features, and is generally a little easier to configure. If GNU screen does what you want, then fine. If, however, you find yourself thinking, "I wish I could do this in screen,” then that is why tmux was developed. In tmux, you probably can do this. Screen is released under the GNU General Public license, while tmux is released under a BSD license. Both are approved by the Free Software Foundation. Tmux is described as a 'terminal multiplexer application,' which is not something that will set many hearts beating faster, but the program can be extremely useful if you spend any amount of time using a terminal. The application inherits most of the functions of screen, improves on many of them, and adds a few tricks and features of its own. It can be found in most Linux distributions and is a part of the basic OpenBSD system. Also in the previous article, I drew an analogy with graphical desktop environments, their virtual desktops and with KDE’s activities. Tmux comes a little closer to realising the truth in that statement utilising sessions, windows and panes to achieve a more efficient workflow. The base work unit of tmux is the 'session', of which there can be as many as you find necessary -- although in reality, very few will be required. Tmux uses a client-server relationship, and sessions can be attached to or detached from the server as required. Detaching a session allows it to continue as long as the host machine is running (or until it is deliberately killed). Re-attaching the session is seamless, and it allows you to then continue where you left off. The theory Each session will contain one or more 'windows', only one of which will be visible at any time. Each window will start with a single 'pane' which can be split into many panes each containing a separate process. 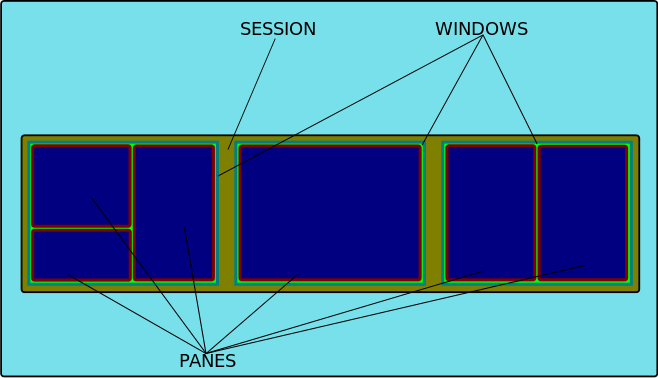 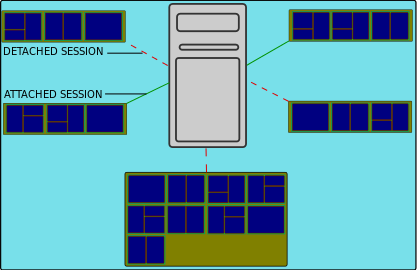 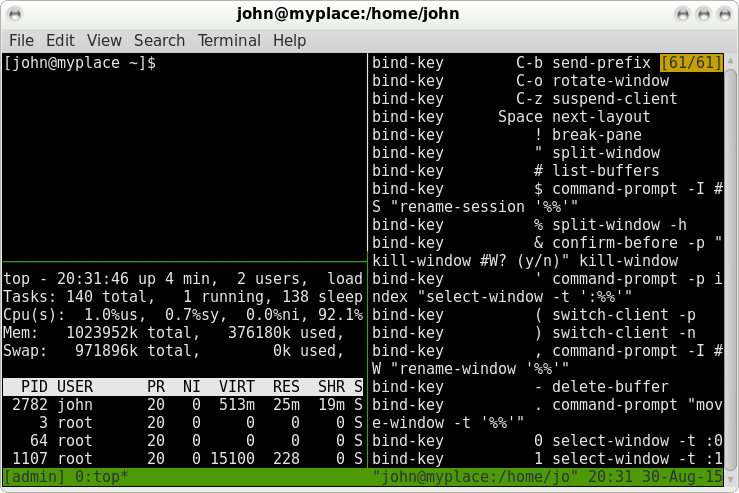 The schematics above show how things fit together. In a terminal you will see only one window and the panes that it both contains and are currently visible. In this screenshot, I am running a session that I named 'admin', and I have divided the initial window into three panes: one showing a bash prompt, the one below running the top command and another one on the right displaying a list of current configuration settings. Other than that, this is the way it looks on first run. Most users will want to configure further, and there is an awful lot of stuff that can be configured here. The status bar at the bottom of the screen is not how I would like it and I want to change some of the key-bindings. Both GNU screen and tmux require that you press a command key combination or 'prefix' then some other key to enter a command. In screen this prefix is control-a, but in tmux, the default is control-b (noted as C-b from here) which I find confusing and so later I will change that to control-a, as used in screen. Getting started To get started we need to create a new session. If you don't name the session it will be given a name starting with '1' which is not very descriptive. Windows can also be named and this is also very helpful, especially if you re-attach to a session on a server that you haven't visited for a while. To create the 'admin' session with a window named 'log-files', I used the command: tmux new -s admin -n log-files 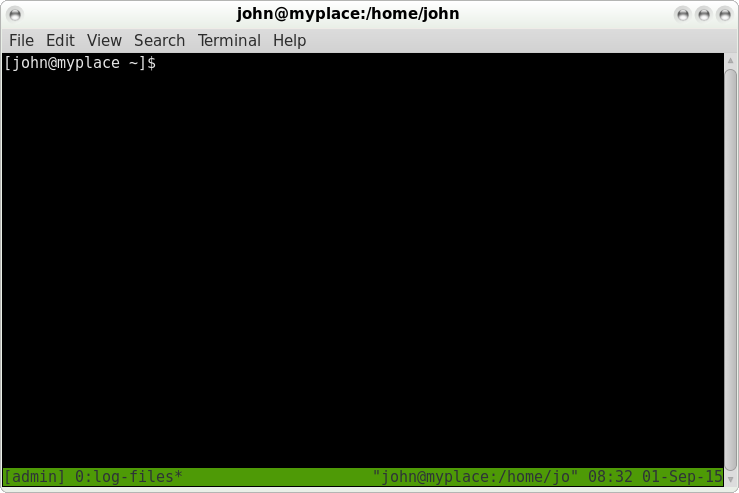 This also opens the session with the cursor in the single pane of the window, which has an index of 0 and is named log-files. This is displayed in the status bar, bottom left. Now that we have a session up and running, I'll do a quick tour to demonstrate some of the available features. Then you can decide if this is something that you would find useful. After this, we can look at customizing things to provide a utility tailor-made to your personal tastes. To detach a session use C-b d, and then to re-attach to the last session you have used, the command is tmux attach. If more than one session is available, then use the sessions title like this: tmux attach -t admin. Pretty obvious, really! To list available sessions, use tmux ls. When first opened, the terminal, in the single pane window, is running your preferred shell, usually bash, and waiting for user input. In this first non-customized look around I will use the default C-b prefix, If you later decide to change this, as I intend to do, then substitute the new key combination. All of the key combinations below are the default settings -- and there are a lot to remember -- but when we get to the configuration section, you will see how to make key combinations that are easier for you to remember. Controlling window panes To make this something more than a standard terminal, we can split the current screen into panes. The split can be either horizontal or vertical. The command to make a horizontal split is C-b %. 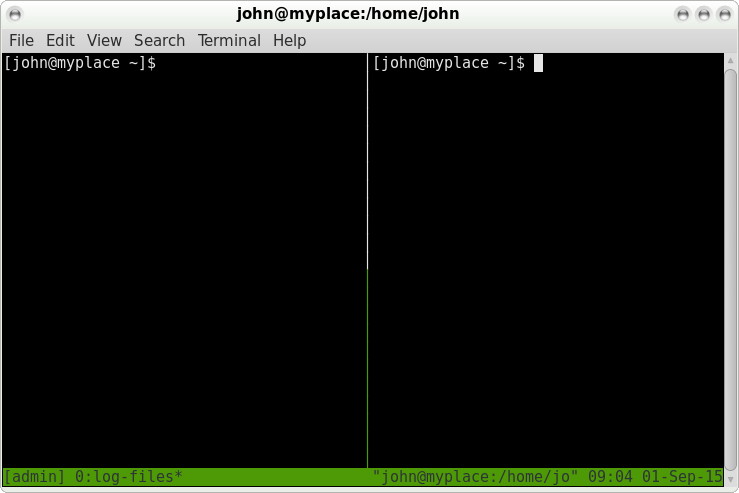 After the split is created, the cursor is placed into the new pane. If I issue the command 'top' in this pane, I can leave the top command running, and then switch back to the left hand pane to do something else. To switch between left and right panes, use the commands C-b left-arrow and C-b right-arrow. 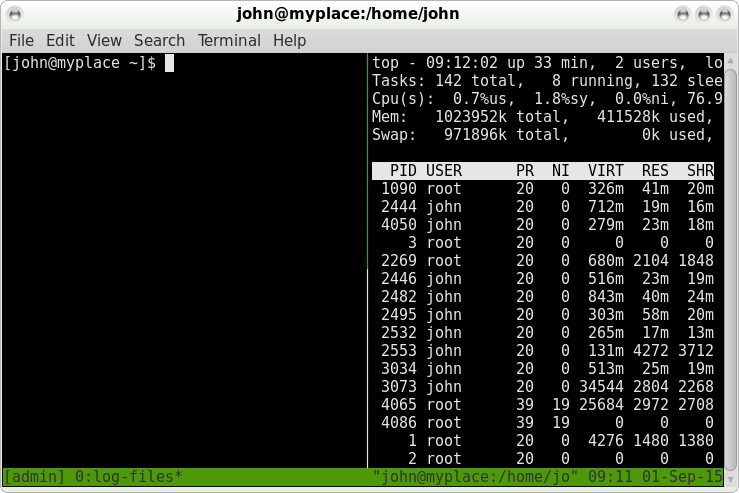 To split this pane vertically, the command is C-b ". 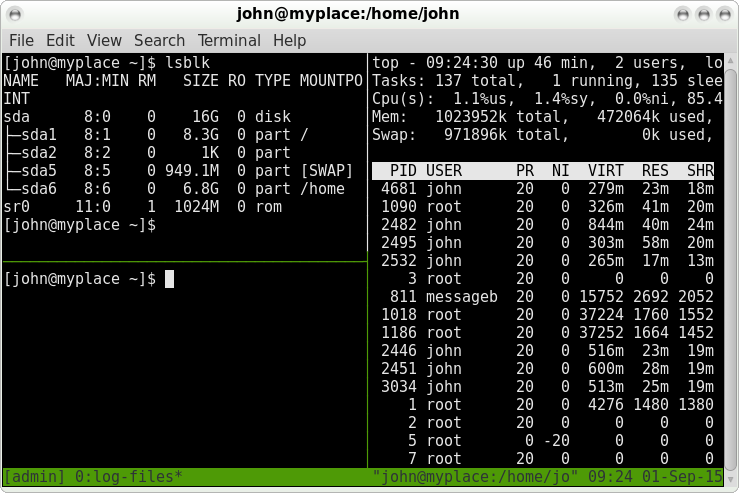 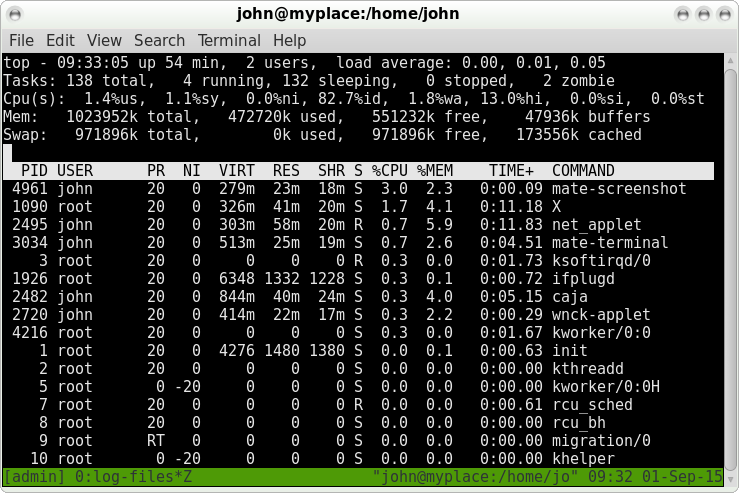 To move between vertical splits, use C-b up_arrow and C-b down-arrow. By now, the size of each pane is getting rather small; too small, in fact, to be of much practical use. To see what is really going on with top, we can zoom in on that pane with the C-b z command. Switch to the pane you want to view with C-b right-arrow then zoom in with C-b z. The status bar now shows ,b>'0:log-files*Z' to report the fact that window log-files is active (that's the asterisk), and zoomed to a single pane.  To zoom out use C-b z again. Even with the zoom facility, we soon reach the usability limit of screen splitting. We can create a new window in the current session with C-b c, and give it a name with C-b , (that's a comma). When the rename prompt appears, backspace over the default name (probably bash), and type in your new name. Press return and the status bar shows two current windows in the session with window index 1 named scripts active '*'.  You can switch between next and previous windows with C-b n and C-b p. You can chose a window by its index, e.g. C-b 0 for our log-files window, call up a prompt for the window index with C-b ' ( an apostrophe), or you can call up an interactive list of windows to select from with C-b w.  You can call up a list of command key combinations at any time with C-b ?, and remove it by pressing the enter or return key. To remove a pane, use C-b x. You will be asked for confirmation in the default settings. A window, and all its panes, can be removed with C-b &. Again, you will probably be asked for confirmation, as this is a one-way operation -- when it's gone it's gone! When splitting a pane, the result is always a 50/50 split. However, you don't need to settle for that. Panes can be resized using the commands:
C-b C-up (Control b Control up arrow) Resizing is done one character or line at a time. To increase this to five (5) characters/lines, use C-b Alt-up etc. The value of five (5) is configurable. The command C-b ! will break the current pane out of the window, creating a new window containing only that pane. The previous window panes will be resized accordingly. Tmux has its own command prompt that can be called up with C-b :. Here, you get total command of tmux. The command :list-commands, or its shorter form :lscm, will bring up a scrollable list of all available commands, although to make full use of this, I'm afraid that you really will need to read the man page. The tmux man page is in fact one of the best man pages out there, and is extremely helpful. Copying and pasting
To copy and paste text between panes, the text is first copied into a paste buffer. To paste the text, you first choose the buffer, or accept the default, which is the most recently created buffer. To enter copy mode, use the command C-b [, and then move to where you want copying to start. Press C-space (you don't need to type C-b first) to begin copying. Then, as you move around, the text is highlighted. Press Alt-w (again, no C-b) to accept the text and to copy it to a paste buffer, or press the escape key to reject it. 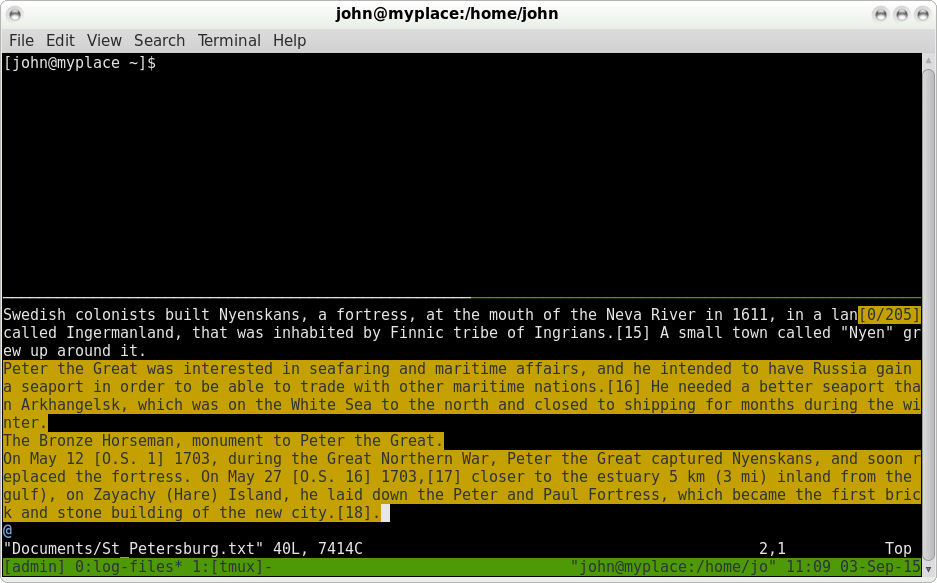 Now move to where you want to paste the text, another pane or window. Paste the text into an editor or similar. Do not paste directly to the shell prompt, as bash will attempt to execute each line with unpredictable and possibly harmful results. To paste the text type C-b ].  If you have copied more than one text selection, then each selection will be stored in its own paste buffer, and these can be displayed with the command C-b =. Use the up/down arrow keys to select the required text, and press enter to immediately paste that text. The text remains in the buffer for further use. To simply list the contents of the buffers without selecting one, use the command C-b #.  Miscellany Utilities such as tmux are often used across network connections, such as ssh (secure shell connections), where they can be detached, and then later re-attached when a new connection is established. A useful feature of tmux is the synchronize-panes command (use C-b : to get the command prompt then type in the command. This command allows you to type commands into one pane and have the same text echoed to all other panes in the window. This is ideal for comparing directory contents or execution times across computers. 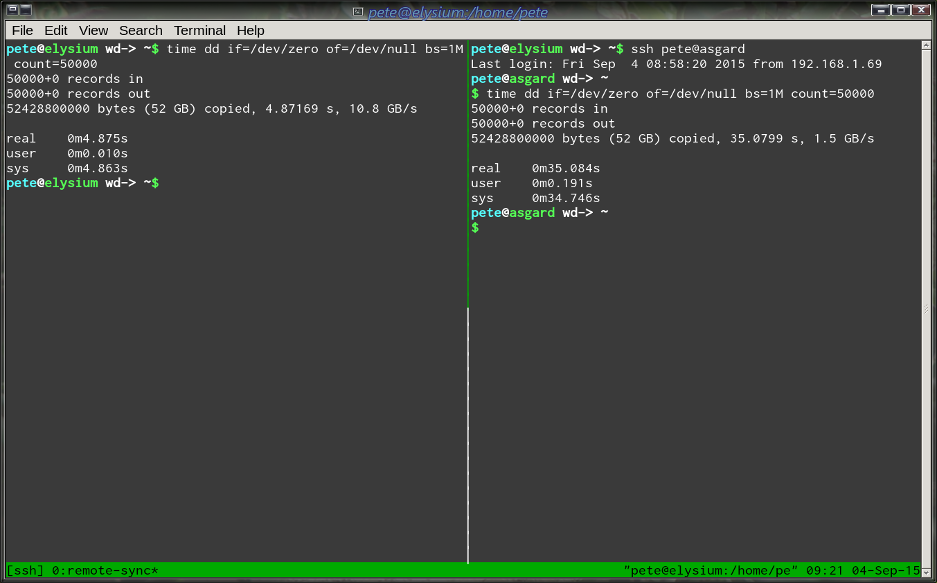
I think the remote computer is in need of an upgrade. 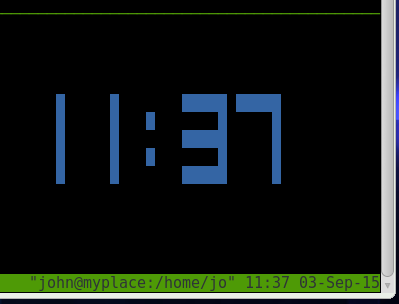 The second command displays the index of each pane in large text, the current pane in red, others in blue. This enables you to switch to a pane by simply pressing the number key corresponding to that pane - as long as the numbers are displayed. You will have to be quick, though, as the numbers are displayed for only about one second or less! 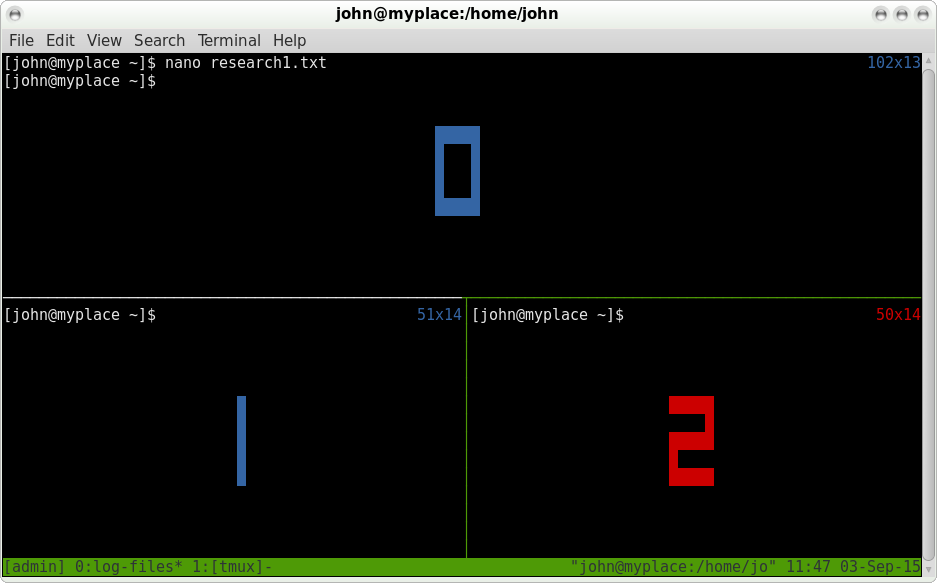 Configuring tmux
There are (at least) four types of things to configure in tmux:
If you are comfortable with vi, then use those bindings. This is particularly helpful as the vi movement commands are extremely rapid. If vi is not your favorite editor, and I can understand why that might be, then even if you have never heard of emacs, use the emacs bindings, as these are the default key bindings used by bash/readline to edit the command line: C-e to go to end of line, C-a to go to beginning of line, and so forth. However, don't concern yourself too much about this, as you do not have to learn a new language. Just set things up so that you are comfortable with them. To alter the appearance and behaviour of tmux, create a file in your home folder named .tmux.conf. Anything in here will override the tmux default behaviour. Although there are many options that can be set, most people will want to use only a few and leave the rest at the default settings. There are options for server, session and window, and these may each be global or per instance. There are also user options. If this sounds complicated, take heart, as the helpful man page has an abundance of examples and explanatory notes. There are also several examples of configuration files on the internet. To change the prefix key combination from C-b to ,b>C-a, as used by GNU screen, add set -g prefix C-a to your configuration file. The -g makes it apply globally to all sessions. To force tmux to use vi or emacs mode, add either
setw -g mode-keys vi or When a window is split into several panes, it is not always obvious which pane is active. To make this a little easier to see, I changed the default pane border to blue and the active pane border to bright yellow.
set-option -g pane-border-fg blue You can add comments to make the configuration file more readable. A comment begins with a #, and extends to the end of the line. Tmux has limited mouse support, and I set this to allow pane selection.
setw -g mode-mouse on According to the man pages, the mouse can be used for a lot more, but I didn't bother to implement other features. Hey -- this is command line stuff after all. To make splitting windows easier to remember, I changed % and " to -- and | which seems more logical to me. The lines that do this are
bind-key - split-window -v # split pane vertically If you look at the default key bindings with C-b ?, you will notice that some of the commands begin with bind-key -r. The -r means the key will repeat if held down. This is particularly useful when resizing panes. The configuration file is read when a new tmux session is started, but it would be nice if we could refresh this after we edit the file, particularly when starting out with configuration. With our new C-a prefix, this becomes possible with C-a r by adding this line: bind-key r source-file ~/.tmux.conf The status bar consists of a left hand part and a right hand part. What can be displayed here is pretty impressive, and consists mainly of plain text and the contents of some tmux variables, all of which are listed in the man page with instructions on how to use them. Some variables have an abbreviation identified with a # such as #S for the name of a session, ## displays a single #. Colors and their attributes (bold etc.) are described in #[] statements, such as #[fg=blue,bold]. The statement #[default] resets colors and attributes to the global default. Time and date formats conform to the strftime standard. The rest is common sense, sweat and swearing. This is how my configuration file finished and how it looked. I use vi/vim even though I don't particularly like it, although I do have to admit that it is good (better than good actually) -- how would you do it? 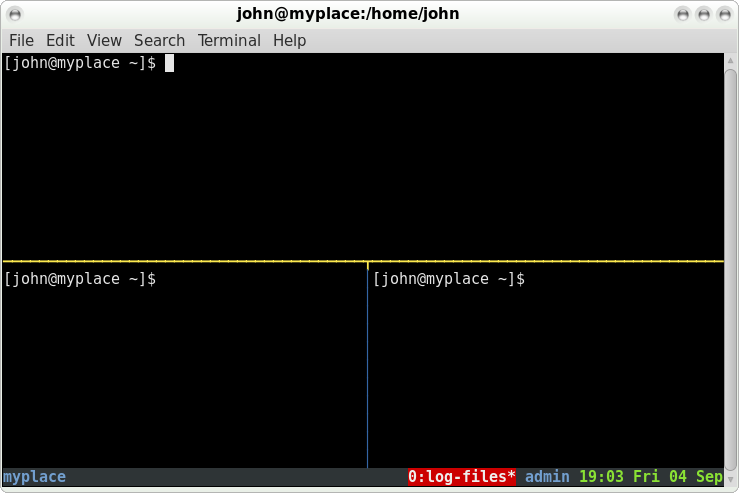 The configuration file - ~/.tmux.conf
setw -g mode-keys vi |