| Previous
Page |
PCLinuxOS
Magazine |
PCLinuxOS |
Article List |
Disclaimer |
Next Page |
Take Better Pictures With Your Smartphone |
|
by Paul Arnote (parnote) Cell phones -- particularly, smartphones -- have had a tremendous impact on our daily lives. Jumping from the realm of sci-fi (think Star Trek communicator) to what has become a necessary part of daily existence for many, many individuals, they allow us to stay connected, and not just as a phone. Today's smartphones are little portable computers that connect us to social media, on-demand videos, web searches, text messaging, and a whole host of other services that have permeated modern life. In fact, today's smartphones are more powerful than the computer that helped land the lunar module on the surface of the moon in 1969. Not only do smartphones keep us connected, they allow us to document our daily lives in ways never imagined even 20 years ago. This is largely due to the high quality, high resolution cameras that come on smartphones today. For many users, their smartphones are their camera for documenting life's events. In fact, one of the "battlegrounds" among smartphone makers in recent years has been who can put out a smartphone with the best camera. The end users are the ones who end up being the ultimate winner in that contest. I have to admit that I use the high quality/high resolution camera on my smartphone more than I ever thought I would ... and probably more than I should. Yes, I am a former award winning newspaper photographer, and I do prefer to use a "real" camera for most things. But there are times when the camera on the smartphone is just more convenient (just whip it out of my pocket and take the picture), more close at hand (sometimes the camera is at home ... and I'm not), and of sufficient quality that I find myself using it to take pictures of the kids and other family events. Plus, I never have to worry about "losing" any pictures, since all of the photos on my smartphone are automatically backed up to Google Photos, without even one ounce of intervention from me. The cameras on our smartphones, thanks to their increasing quality, are becoming everyman's cameras. For many, their smartphone's camera is the ONLY camera they have. So let's take a look on some ways to help improve the quality of images we shoot with our smartphones. Composition Just because you're using a smartphone's camera, that doesn't free you from needing to conform to the rules of basic image composition. The most basic of those rules of composition is called the "Rule of Thirds." You could have the most awesome of awesome subject matter in the frame, and if it isn't properly composed, it will turn that photo into a ho-hum one. Following the rules of good composition will impart that awesomeness of your subject to those who view your image. In fact, following the rules of good composition, you can take a ho-hum subject and turn it into an awesome photo.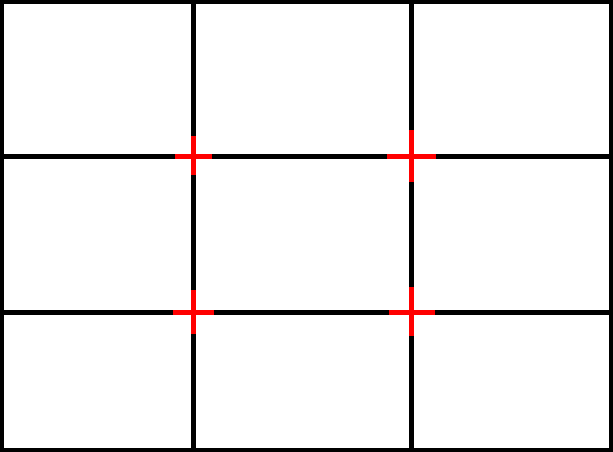 Imagine a Tic-Tac-Toe grid on your smartphone's screen, dividing the image into nine equally sized squares. Notice in the graphic above that I've highlighted the points where those lines intersect. Placing the primary subject of your photo at one of those intersecting points will improve composition. If you're shooting landscapes, place the horizon along either the top or bottom line, depending on if you're trying/wanting to emphasize the hardscape below or the sky above. If you want to learn more about the Rule of Thirds, check out this awesome explanation. Paint With Light! Ever since photography was invented, it has always been about capturing the way light falls on a subject. A poorly lit subject will nearly always result in a bad photo. Sometimes, poor light actually helps tell a story in a photo, but that is usually the exception, and not the rule. Smartphone cameras work best in natural light, and tend to struggle in poor light. Using the built-in flash always creates harsh lighting and shadows, so avoid its use unless it's just absolutely necessary.  Photographers refer to the hour after sunrise and the hour before sunset as the "golden hours." This is typically the best light for shooting outdoors, and tends to produce striking images, like the one above by Fir0002 taken at Swifts Creek, Australia (photo used under Creative Commons Attribution-Share Alike 3.0 Unported licence, via WikiCommons). If you have to shoot pictures at/near high noon, find some open shade. It will help soften the harsh shadows. Most importantly, pay attention to where your light is coming from, as well as how the shadows are falling across your subject. Those shadows will be accentuated in your photo. You can also use reflectors to bounce/reflect light into those shadows, softening them considerably. Use silver or white reflectors, if you choose to go that route. If you're taking portrait-types of photos, find a north facing window and place your subject very near that window. The light from a north facing window is more diffuse, and it will produce softer shadows and not-so-blown-out highlights, softening the overall image. Watch Your Backgrounds It's not enough to pay attention to just the Rule of Thirds and lighting. You must also pay attention to your backgrounds. Everything else could be perfect, but if you have overhead wires going through your subject's head, or a telephone pole or tree branch coming out of your subject's head, or if your subject is missing feet or is cut off at the knees (cardinal rule we learned in photojournalism is to NEVER allow the image edge to be at a joint, if you can avoid it), your image just suffered irreparable damage. Plus, clean backgrounds detract less from the subject of your image. Find THE Angle Nearly everyone takes a photograph of Mount Rushmore straight on. Since nearly everyone else has seen Mount Rushmore from that very same angle, your photo also shot straight on will not stand out, and will be forgotten in less time than it took for you to find it in your phone's photo gallery ... no matter how good you think it is. Look for a unique angle, but be aware of a couple of caveats. First, the line between unique and just plain weird is oftentimes a very thin line. Be careful to not cross it, or you'll detract from what you're trying to accomplish (which should be to convey your image in a way that's memorable and flattering). Second, don't allow your pursuit of that "unique angle" to potentially place you in harm's way. Who's going to see the image (or care about seeing the image) if you end up seriously injured or killed because you did something risky/foolish trying to obtain that unique angle? No photo is worth injury or death, regardless of the equipment used to shoot it.  When taking pictures of people, children, pets and animals, get on their level. How many times have you seen six foot tall adults shooting pictures of three foot tall children without bending or kneeling to get down on the child's level? More often than not, they end up with nice pictures ... of the top of the child's head. The child's facial expressions are most often obliterated from view, which is what will define a great child photo versus a ho-hum (or bad) child photo. I have been reminded of this many times when taking photos of my own children. The photo I envision in my head isn't looking like what's actually appearing on my smartphone's screen ... until I get down on my children's level. It's very easy to get caught up in capturing the "moment," so much so that it's easy to forget to get down on the child's level. It didn't take me long to find an example on my own smartphone. Take the image above of Laura, Lexi and Ryan carving pumpkins into Halloween Jack-O-Lanterns. Even though I was kneeling in the corner, the image would have been better if I had been able to get down even lower, shooting my image more from Lexi and Ryan's perspective plane. Similarly, if you're short (vertically challenged?), and you're taking photos of someone significantly taller than you, you have two choices. First, you can have the taller person sit down (if possible). Your second choice is to stand on something so that you're not looking up your subject's nostrils (well, that's what it appears like when shooting a picture from down below), and get more on their level. The closer you are to your subject, the more you will want to be/get on their level. Distance has a way of leveling the playing field, so to speak, but it also sacrifices that up-close and personal feeling of a much closer photo. This is one area where "real" cameras with telephoto and zoom lenses surpass the abilities of a smartphone camera, allowing you to capture that up-close and personal image despite the distance. Smart Photographers Use Smart Tools Typically, to take a photo on a smartphone, you tap the screen. However, tapping on the screen can alter or change your composition, and introduce vibration, shake and other movement. But, did you know that on most of today's smartphones, you can also take a photo by hitting/tapping the volume up or down keys on the side of the phone while in the camera function? If you have headphones that plug into the headphone jack of your phone, the volume controls of those headphones can also be used to take a photo. Thus, your headphones become a sort of remote shutter release. Couple this with tripod mounts that are available for many smartphones today, and you just gained a larger amount of control over your smartphone's camera. About those "add-on" lenses. Don't bother, for the most part. Most of them are poorly designed and/or poorly made, and will produce less than professional results. They are usually more trouble than they are worth, and can often just produce blurry pictures, due to their poor construction and design. The old maxim "a fool and his money are soon parted" truly applies here. Save your money, and just concentrate on composing a good shot with good lighting, instead. Avoid Digital Zoom If at all possible, avoid using the digital zoom feature found on many smartphone cameras. Image quality always suffers when you use digital zoom. Here's what's really happening when you use digital zoom: the central part of the image from the imaging chip is expanded or enlarged to fill your screen/photo frame, simulating optical zoom. This will cause you to lose image resolution, because there's less data to create your photo. You're only using a portion of the data from the imaging chip, versus all of the chip's capabilities. You will be much better off capturing your image while using all of the imaging chip's capabilities (shooting your photo full frame, without digital zoom), then cropping and enlarging in a post-processing tool, such as GIMP, if you still feel the need. Summary Actually, as I finished up writing this article, I realized that everything here doesn't apply only to using your smartphone camera. Everything here also applies to using any other camera. Yes, even the "real" cameras you might have. So, it doesn't matter if you have the latest, greatest dSLR camera, a point and shoot camera, or just your smartphone camera. Keep these aforementioned tips in mind, and go out and take some truly awesome photos. No matter what your camera source, anyone can take great photos by just following some of the "rules" of good photography. |