| Previous
Page |
PCLinuxOS
Magazine |
PCLinuxOS |
Article List |
Disclaimer |
Next Page |
YouTube, Part 5 |
|
by Alessandro Ebersol (Agent Smith)  In this article I will talk about two great tools for creating videos: Mednafen (multi-emulator) and Simple Screen Recorder. Mednafen Mednafen is a versatile multi-emulator for PCLinuxOS. It emulates 10 different systems, with several emulation cores, some being unique, while others have been incorporated into the project. 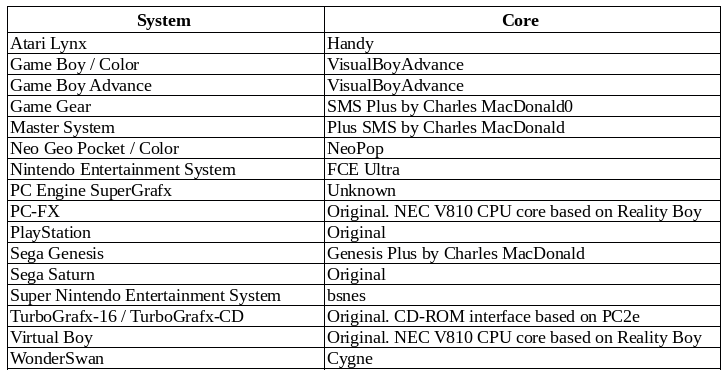 It is not, however, an ordinary emulator: Mednafen has features that make it unique:
What interests us is its ability to record gameplay movies in QuickTime format (Apple MOV). To do this, you must invoke Mednafen from the command line. So to capture a video gameplay, the following command must be entered in a terminal: $ mednafen -qtrecord video_name.mov ROM file or ISO of the game you want to record. Example:
To record a Sonic gameplay from Mega Drive, the command would be The gameplay video will be recorded in the folder where Mednafen is invoked. Some settings have to be made to adjust the recordings to the hardware you have. Open the mednafen.cfg file, which is in the .mednafen folder, in the user's /home directory, with the text editor of your choice. In the opened file, look for the line qtrecord.vcodec. This line defines the codec that will be used in the video capture. There are three possible options:
Raw: The raw format is a fast codec, computationally, but will cause a huge file size and may exceed the sustained write rate of your storage medium. CSCD - CamStudio Screen Codec: A good balance between performance and compression ratio, but it does require a very powerful machine (a Corei3 minimum), and, depending on which system will be emulated, 32-bit systems(Playstation, Saturn and Game Boy Advance) will require more processing power. As an example, a 15-minute video capture generated a 10GB file. PNG: It has a better compression rate than "cscd", but it requires a lot more CPU power, that is, you will need a much more powerful CPU. If you're out of HD space, and with a good CPU, that might be an option. The resulting video file must be processed with a converter, such as Winff (or any other video converter), to adapt the video to a usable resolution for later editing. Simple Screen Recorder (SSR) Simple Screen Recorder is a Qt-based screencasting software made for Linux operating systems, which was created as a simpler alternative for programs like ffmpeg/avconv and VLC. It is a fantastic screen recorder, much better than Record My Desktop (it is able to record OpenGL screens), and, very light in resources, so much so that it is better than some native capture methods of other programs that I have already addressed in this series of articles, which cause a certain LAG when recording, or, the resulting files are very large. SSR gets a good ratio between used resources and generated file size. Now let's focus on the SSR settings. Note: I will indicate the settings for better performance on very modest machines (as is the machine I use to capture my gameplays). SSR will be in the Video section of the PCLinuxOS menu. 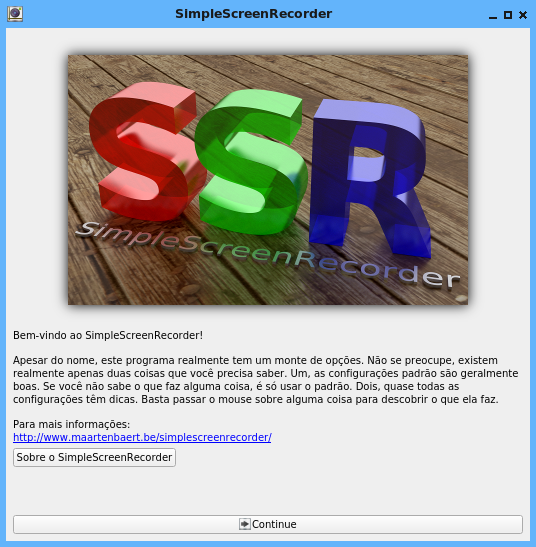 Home screen After the opening screen above, click Continue.  First screen of settings Here we begin to configure how the recordings will be. You can create a profile, with all the specific settings and save it, not having to repeat the process each time you use the program. In my case, since I do not have much variety in my recordings, I did not make a profile. First, indicate whether it will be recording a full screen, or just a part. SSR allows you to record part or all of the screen, with or without the cursor. If you want to set a resolution, you can do so in the Width/Height fields. Set the frame rate (I always put it at 30, so it's easier to generate videos later). Leave unchecked the Scale Video option. That option consumes computer processing, since each frame has to be processed individually, which generates a LAG in the process. If you want to save the cursor, enable this option. Now the audio. I think recording Gameplays, the audio is indispensable (careful with commercial songs, but, I'll come back to that later). Well, SSR allows three possible backends to capture audio: Jack, ALSA, and Pulseaudio. If you have a fairly powerful machine, enough to run the game, Pulseaudio and SSR, this is the simplest option. Just select Pulseaudio, indicate what the audio source will be, and the recording will go smoothly. DETAIL: If you are going to make a voice over narration, about the game or whatever is that you are capturing, record the audio on a separate track. Do not record on the track of the game/program you are capturing. It is very easy to run into some problem, and to jeopardize everything. When the narration is recorded separately, you can re-make, remove noises or cut parts you did not like without losing the soundtrack of the game/program that was recorded. I, for example, use my cell phone to record my voice-overs and then edit and mix it to the final video. Jack is more complicated to do, but it works very well, consumes less resources than Pulseaudio and has a very good quality. PCLinuxOS already comes with Jack2, the latest version of Jack audio, and you will also need QJackCtl, a GUI that makes it easy to control the Jack audio daemon (start/stop and settings). Now open QJackCtl and, before doing anything else, click the Settings button. Most of the default settings are fine, you just need to make a few changes: Make sure the "realtime" checkbox is checked in the parameters tab, and in the advanced tab, check that the "No Memory Lock" is unchecked. Set the rate to 44100, because that's what SimpleScreenRecorder will use. Other sample rates will still work, but it's not very useful since SimpleScreenRecorder will resize it to 44100 anyway. Set the length size to a reasonable value, for example, 512 or 1024. Lower values will decrease latency, but will increase the likelihood of you getting xruns (clicks or short interrupts in audio). The best value depends a lot on your sound hardware and the performance of the Linux drivers for that hardware. USB sound cards usually perform better here. With a special real-time kernel and the right hardware, you can reduce the latency to one millisecond, but I do not recommend doing this: it introduces a lot of overhead, it can cause xruns and you probably will not notice the difference anyway, in 10ms latencies or less. Set the number of periods to 2. If this does not work correctly, even with very large period sizes (that is, you still get xruns), try 3 or 4. 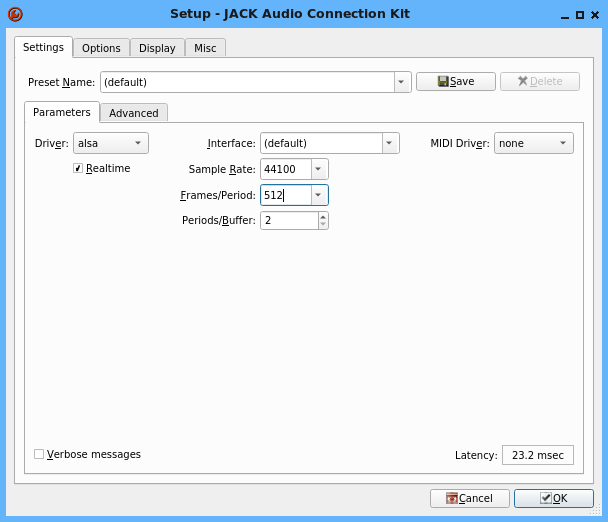 Setting up Jack Set the number of input and output channels to 2, because SimpleScreenRecorder currently only supports stereo. After choosing your settings, click the ''Start'' button and wait a few seconds. If all goes well, the status display should light up and contain only green and yellow text. If things go wrong (you get xruns), the text will turn red. You should always be sure that JACK is running before starting any application that tries to use JACK, because they may try to start JACK (in the background), which will confuse QJackCtl (if this happens you should find the process jackd and kill it manually). You can test JACK with any application that supports JACK (for example, Audacity). Most normal applications do not support JACK, so you'll need what's called an ALSA-to-JACK bridge. There are two ways to do this. The classic method uses an ALSA loop device. It always works, but it adds a lot of latency which is annoying. There is a much better solution: the JACK plugin for ALSA. To use this plugin, you need to install the lib64ALSA-plugins-jack package. This package enables the PCM Jack output, which can be used by ALSA without problems. But to use it, it is necessary to configure the .asoundrc file, in the user's /home directory, and route the audio through JACK to perform the capture. Create an .asoundrc file with the following content:
# override default
pcm.! Default {
    type plug
    slave {
        pcm "rjack"
    }
}

# ALSA-to-JACK bridge
pcm.jack {
    type plug
    slave {
        pcm "rjack"
    }
    hint {
        description "JACK bridge"
    }
}
pcm.rjack {
    type jack
    playback_ports {
        0 "system: playback_1"
        1 "system: playback_2"
    }
    capture_ports {
        0 "system: capture_1"
        1 "system: capture_2"
    }
}
This will cause the JACK plugin to be the default ALSA device. Most applications simply use the default, so this is usually all you need to do. Some applications may have a way of selecting the sound input/output within the application. In this case, you must use 'default' or manually select 'jack_system'. Now you can use SimpleScreenRecorder with the backend JACK. SimpleScreenRecorder can automatically make connections for common use cases (by recording your microphone and/or speakers), but if you need to fine tune the control, you can manually manage connections with QJackCtl by clicking the 'connect' button (not to be confused with the 'patchbay' button, which is used to automatically apply predefined connections). You can also combine SimpleScreenRecorder with several other JACK applications to apply real-time audio effects. When you are finished with JACK, first close all applications that use the sound system, delete the .asoundrc file in your personal folder (or just rename it so you can use it again later) and stop JACK via QjackCtl. Configuring with ALSA Using SSR with ALSA is the option that least overloads the system, and, is quite easy to configure. How does it work? By placing the audio input as ALSA, the SSR will capture the audio from the source defined in the Source dialog box, in the case of the figure below, [hw: 0,0] HDA Intel ALC662 Rev1 Analog. 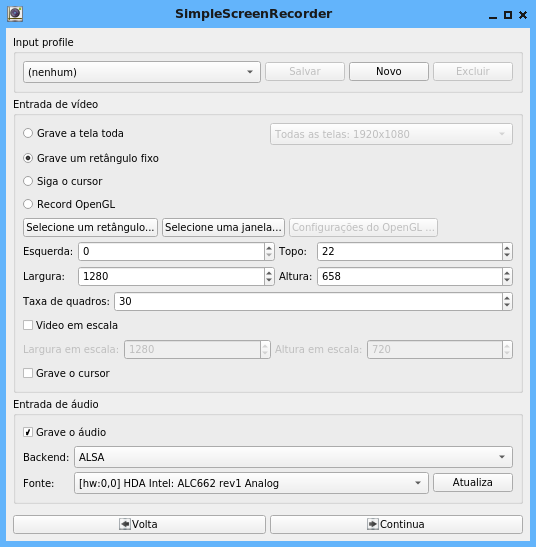 That is, the SSR will record the audio of this ALSA sound input in the gameplay video. But you will need to plug a special cable, P2 Y, to take the audio output to the external speakers / headphones, and inject the audio into the input specified in the configuration. The cable required is similar to the figure below. 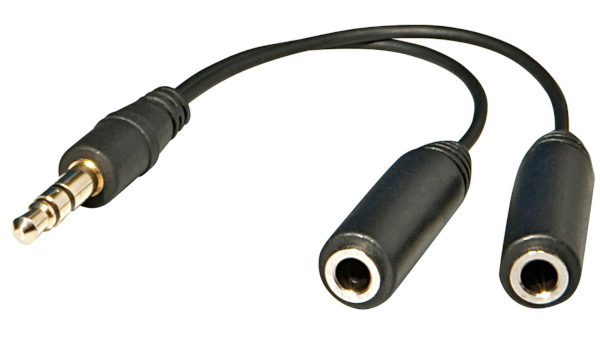 I advise you to inject the audio into the rear MIC input, which is stereo and captures the sound on two channels, and has filtering in the input. I even tried to inject the audio in the input IN of the computer, but, the noise level is very high. At the MIC input there is already capacitor filtering, which cuts the noise level to acceptable standards. Now configure the levels in ALSAmixer, press F4, capture devices, and configure them. 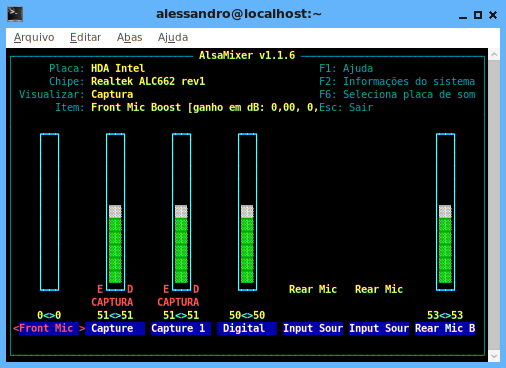 Note that this setting is specific to my setup. Yours may be different, then identifying what the MIC devices are and setting up the correct device should be done before starting the recording, otherwise the video gameplay will be mute. The volume output, in my case, I leave in 86% of the total value in the volume control. You can experiment with different values so that you do not leave the audio to low or too loud with distortions. This type of setup is the one with the least resources consumed by the computer, since only the application you want to capture and the SSR will run, unlike the other options, that involve two or more daemons, that generates a greater overhead. Now, continuing the configuration, press Continue on the SSR, and a screen like the one below should appear.  Select the YouTube profile, define the file name and where it will be recorded, check the Separate file by segment, and add timestamp boxes. Set the container (I always use MP4), the codec (h.264 is a standard) and the preset (for gameplay Superfast is the best). The audio (MP3) and bit rate (I usually leave at 160KBps). Press continue, and, the recording start screen will appear. Press Start recording and you're done. Your video will start to be recorded. 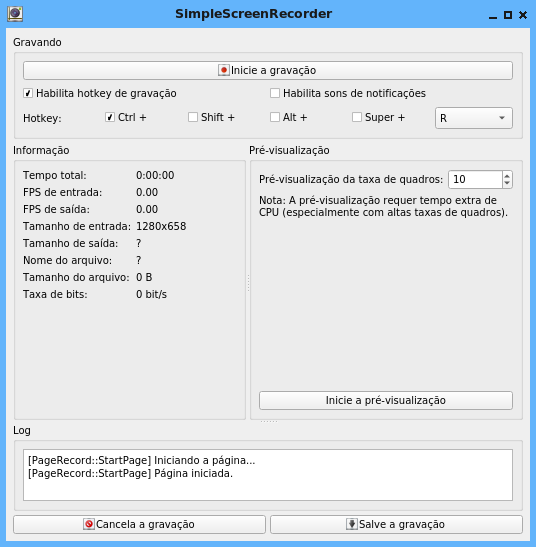 When you are finished recording, if you are satisfied with the result, press Save recording, otherwise press Cancel recording. Experiment with SSR until you find a setting you think is best for you, as it has a variety of settings, and the fine tuning between them is what produces the best results. So we finished another article in the YouTube series, and next month we will have the final chapter of this series. |