| Previous
Page |
PCLinuxOS
Magazine |
PCLinuxOS |
Article List |
Disclaimer |
Next Page |
HomeBank: How To Add New Categories And Create Split Transactions |
|
by David Pardue (kalwisti) Although I primarily use GnuCash to track my family's personal finances, I decided to try HomeBank as a secondary program. HomeBank was a pleasant surprise; it is easily configured, has a friendly interface, can generate nice charts and reports, and is accompanied by good documentation. If GnuCash seems too complex or intimidating for your needs, HomeBank just might be the alternative that hits the sweet spot. If you are brand new to HomeBank, a good starting point is Meemaw's article in the March 2012 issue of The PCLinuxOS Magazine, called "Linux Financial Apps: HomeBank". Her tutorial covers what is probably ver. 4.4 of the program. HomeBank's interface and behavior have not changed drastically since then. However, I should mention that the term "wallet" is no longer used to refer to files. When you start HomeBank ver. 5.2.8 for the first time, you will see a Welcome dialog window: 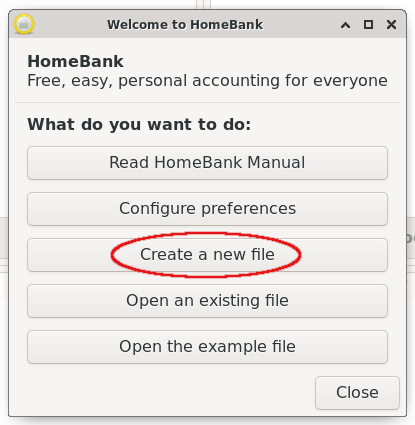 After selecting the "Create a new file" option, a wizard will guide you through the steps to create this file, beginning with a "File properties" window (Owner name, Currency type). You will next be asked to verify "Preset categories" (Language settings), as well as to fill information into a "Create an account" dialog window: Account Name, Type (Bank, Cash, Credit Card, etc.), Account Number (optional), Initial Balance, and, if desired, an "Overdrawn at" amount (if you want to designate a reserve amount of money in your account). The final screen is a confirmation window, in which you click on an "Apply" button to save this account information. I had to manually enter my data because my bank offers neither OFX or QIF exports of account activity. While manually entering four months' worth of my checkbook data, I encountered a few minor difficulties. It required some trial and error to figure out how to:
Therefore, I wrote this how-to as a supplement to Meemaw's article. I hope it will be helpful for other PCLinuxOS users who are new to HomeBank. Note: These instructions pertain to HomeBank ver. 5.2.8, which is the current version at the time of writing. Adding a New Expense Category Although HomeBank has a fairly extensive list of preconfigured expense (and income) categories, the program does not cover every financial scenario, so you will likely need to create some new categories tailored to your personal needs. Users can add new expense--or income--categories "on the fly," i.e., during the process of adding transactions. While adding a transaction, if you wait a moment and hover your mouse over the Category box, you will see the tooltip prompt below: 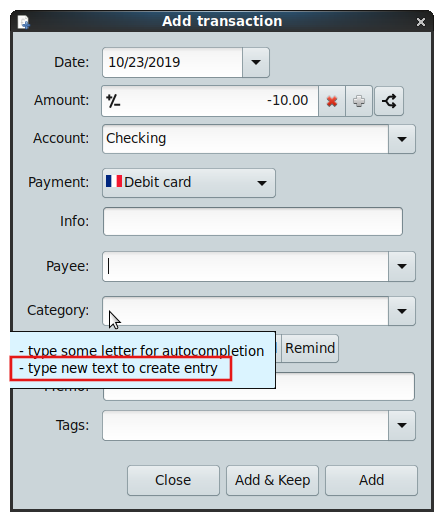 The beauty of Linux is that there is always more than one way to do something. This direct-entry method works with both expense and income categories. It allows you to create a new main/primary category, or a new subcategory. You may also simultaneously create a new main category with a subcategory, if you wish. I will show you the direct-entry method (which I've dubbed "The Short Way") and a menu-driven method that involves more pointing and clicking (which I call "The Long Way"). It is important to note that the indirect method (a.k.a. "The Long Way") means that if you are in the midst of entering transaction data, only to realize that the (sub)category you need does not exist yet, you must close your current Add transaction window. Next, you will create your desired (sub)category. Afterwards, you may open a new Add transaction window, input the appropriate data and assign it to your new (sub)category. Once you are aware of both options, choose whichever method best suits your workflow. Create an Expense Subcategory (The Short Way) Open an Add transaction window. In this example, I need to create a new expense subcategory called "Lawn-Yard," under the parent expense category of "Household." Fill in the relevant information for Date, Amount, Payment method, Payee and Memo (if desired). In the Category box, type "Household:Lawn-Yard" (with no spaces before or after the colon). 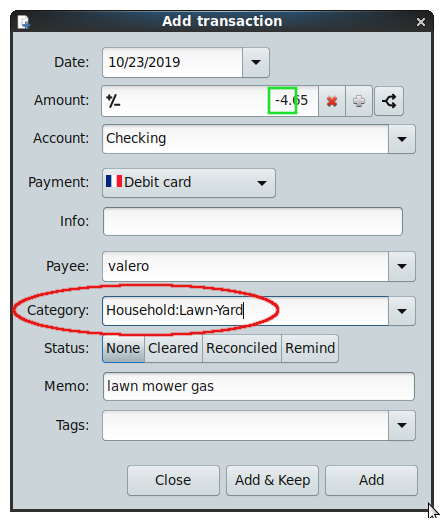 The structure above tells the program that "Household" should be treated as the parent category, and "Lawn-Yard" as the subcategory. HomeBank will detect that this transaction is a debit (since its Amount is a negative number) and automatically add it as an Expense category (rather than as an Income category). We can verify this new subcategory was created by selecting Manage > Categories from the main menu. If we look at the list of Expense categories, voilà! 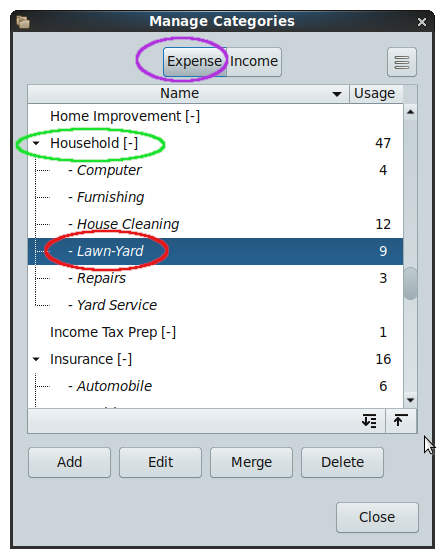 Create an Expense Subcategory (The Long Way) First, close any active Add transaction windows. On the main toolbar, click on the Configure the categories icon:  The Manage Categories window will open. Click on the Expense button to display the list of preconfigured categories:  Click on the Add button. Under the main/parent category of "Household," I want to create a new subcategory called "Lawn-Yard." Scroll down the list until you find the "Household" category, then select it by clicking on it. In the empty "new subcategory" box, type "Lawn-Yard": 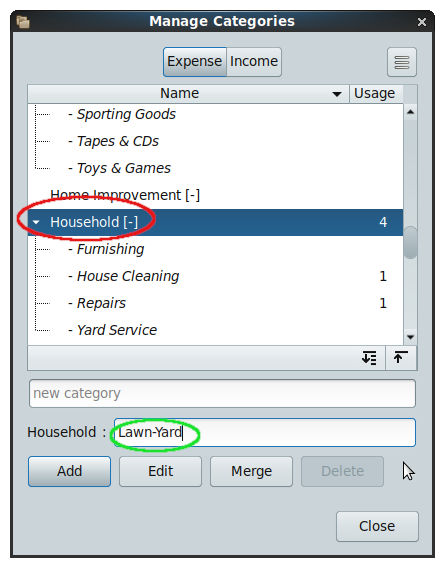 To activate this new category, press the Enter key. This is the tricky step. (I learned from several failed attempts that neither clicking on the Add button, nor clicking on the Close button will save your freshly typed category). Check the Categories list to make sure that your new subcategory was added: 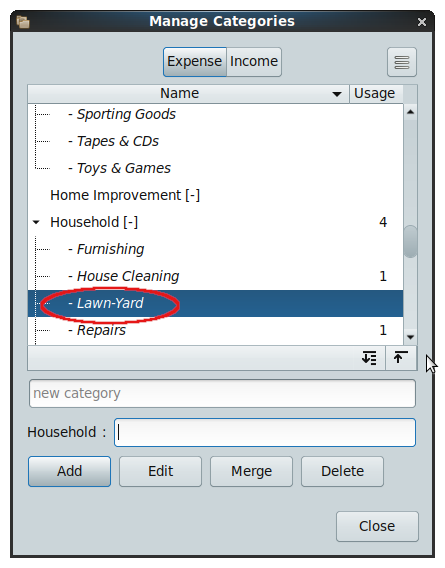 Click on the Close button to dismiss the Manage Categories window. You may now open an Add transaction window, and input the relevant data for the transaction involving the "Lawn-Yard" subcategory. Create a Main/Primary Category (The Short Way) Open an Add transaction window. In this example, I want to create a new main/primary Expense category called "Office Supplies." Fill in the relevant information for Date, Amount, Payment method, Payee and Memo (if desired). 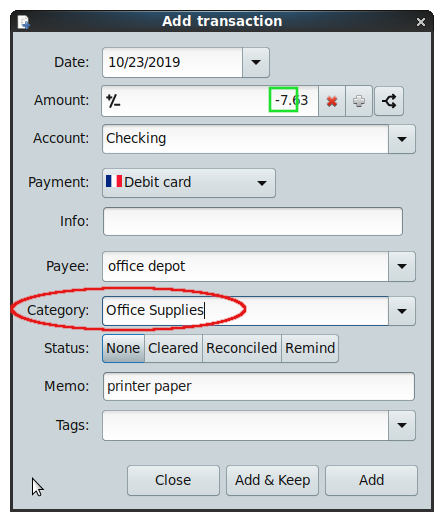 In the Category box, type "Office Supplies." HomeBank will detect that this transaction is a debit (since its Amount is a negative number) and automatically add it as an Expense category. We can verify this new primary (main) category was created by selecting Manage > Categories from the main menu. It now appears in the list of Expense categories: 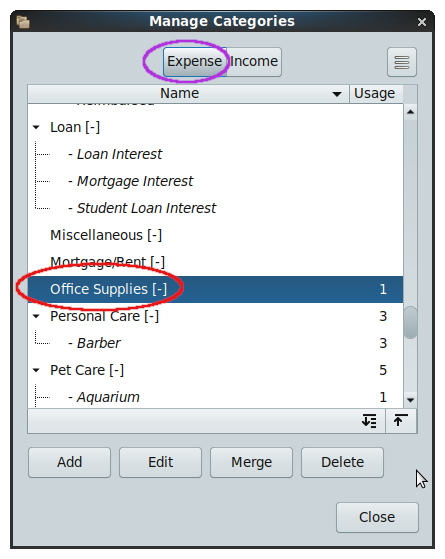 Create a Main/Primary Category (The Long Way) The process of creating a new main/primary expense category is almost identical to adding an expense subcategory. First, close any active Add transaction windows. On the main toolbar, click on the Configure the categories icon: The Manage Categories dialog window will open. Click on the Expense button to display the list of preconfigured categories. Click on the Add button. Look for the empty "new category" box: 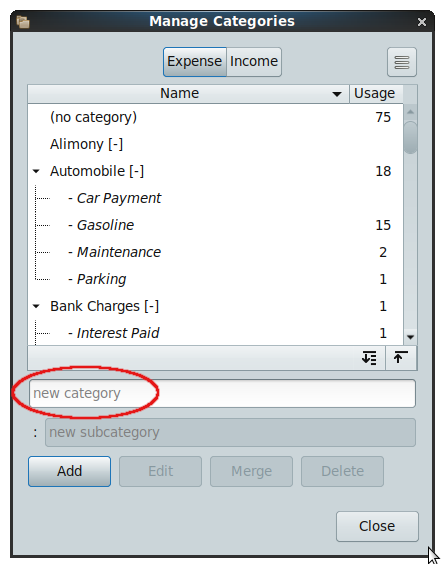 In this example, I want to create a new main/primary category called "Office Supplies". In the empty "new category" box, type "Office Supplies". 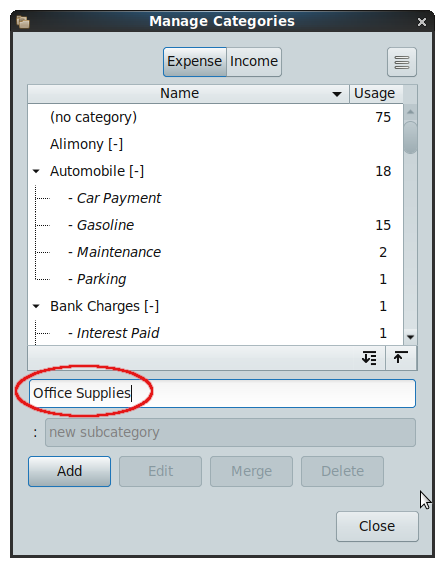 To activate this new category, press the Enter key. Check the Categories list to make sure that your new main category was added: 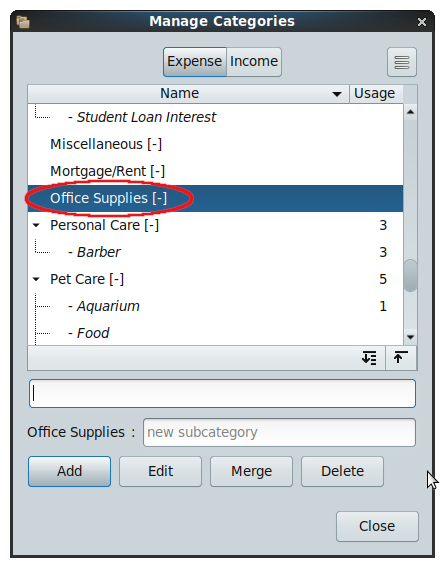 Click on the Close button to dismiss the Manage Categories window. You may now open an Add transaction window, and input the relevant data for the transaction involving the "Office Supplies" category. Adding a New Income Category (The Short Way) Open an Add transaction window. I want to create a new Income subcategory called "Garage Sale Proceeds" under the main/primary category of "Other Income". Fill in the relevant information for: Date, Amount, Payment method, Payee and Memo (if desired). 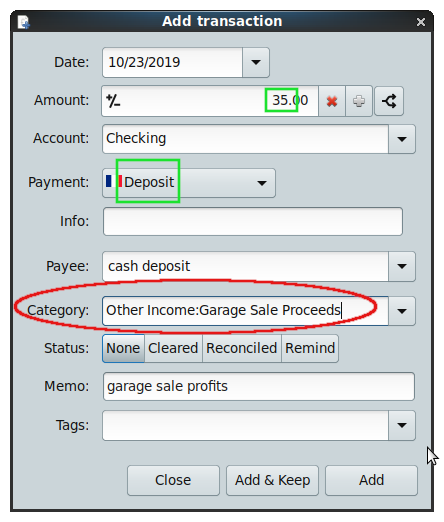 In the Category box, type "Other Income:Garage Sale Proceeds" (with no spaces before or after the colon). The structure above tells the program that "Other Income" should be treated as the parent category, and "Garage Sale Proceeds" as the subcategory. HomeBank will detect that this transaction is a credit (since its Amount is a positive number) and automatically add it as an Income category (rather than as an Expense category). We can verify this new subcategory was created by selecting Manage > Categories from the main menu. It should appear in the list of Income categories: 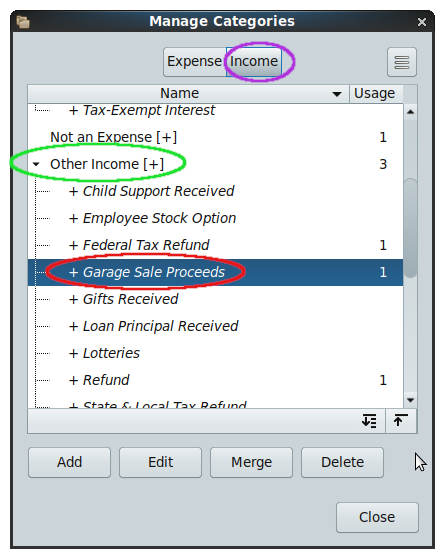
First, close any active Add transaction windows. On the main toolbar, click on the Configure the categories icon: The Manage Categories window will open. Click on the Income button to display the list of preconfigured categories. Click on the Add button: 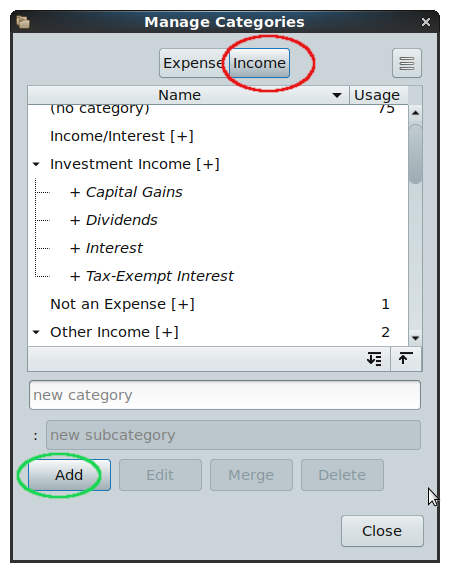 Under the main/primary category of "Other Income," let's create a new subcategory called "Garage Sale Proceeds." Scroll down the list until you find the "Other Income" category, then select it by clicking on it. In the empty "new subcategory" box, type "Garage Sale Proceeds": 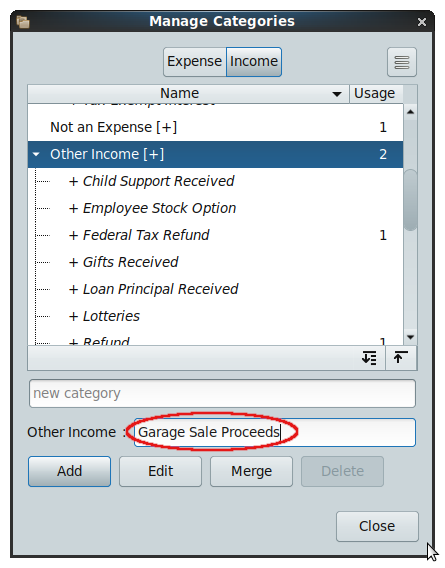 To activate this new category, press the Enter key. Check the Categories list to make sure that your new subcategory was added: 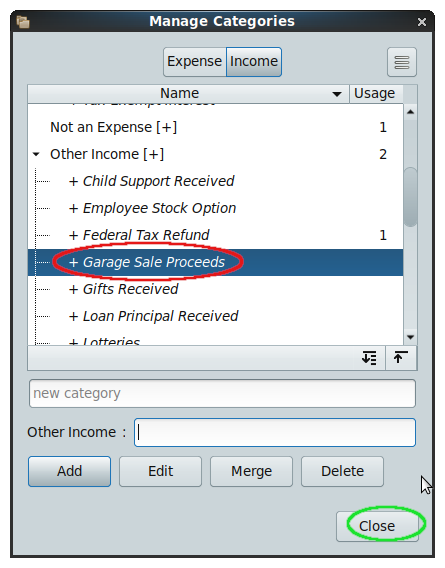 Click on the Close button to dismiss the Manage Categories window. You may now open an Add transaction window, and input the relevant data for the transaction involving the "Garage Sale Proceeds" subcategory. Simultaneously Adding a New Main Expense Category and Subcategory (The Short Way) Open an Add transaction window. I want to simultaneously create a new main/primary category of "Foo," with a new subcategory of "SubFoo." Fill in the relevant information for Date, Amount, Payment method, Payee and Memo (if desired). 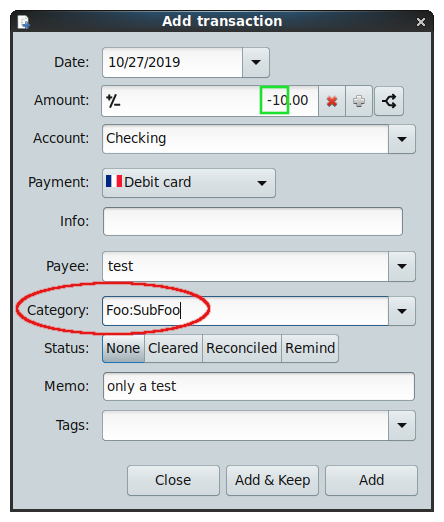 In the Category box, type "Foo:SubFoo" (with no spaces before or after the colon). The structure above tells the program that "Foo" should be treated as the parent category, and "SubFoo" as the subcategory. HomeBank will detect that this transaction is a debit (since its Amount is a negative number) and automatically add it as an Expense category. Verify these new categories were created by selecting Manage > Categories from the main menu. They will appear in the list of Expense categories: 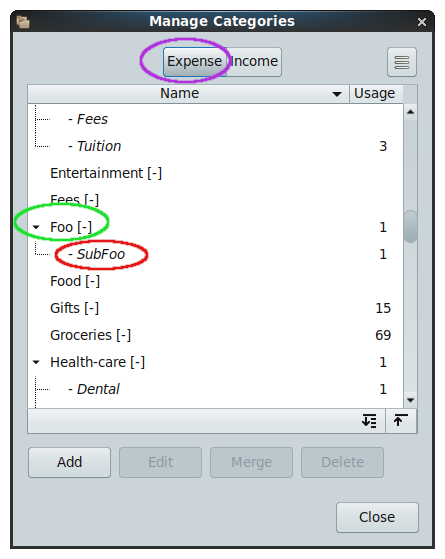 Creating Split Transactions I previously experimented with HomeBank in 2010; at that time, it lacked the split transaction feature, which was a deal-breaker for me. Maxime Doyen, HomeBank's developer, responded to users' requests by implementing a split transaction feature in ver. 4.5 of the program. A single transaction can now be split in up to 60 different categories. HomeBank's user manual briefly discusses split transactions, but it does not include any examples – nor is there one in the program's example file. (The Example file is offered as a choice when HomeBank is opened for the first time; afterwards, you can access it by selecting the Tools menu > Show welcome dialog... > Open the example file). The simple example below demonstrates how to split a single purchase between two different expense categories. Fill out the majority of your transaction in the Add transaction window as usual: Date, Account, Payment method, Payee and Memo. Include the total Amount, prior to the split. Don't forget to click on the minus sign (-) in the "Toggle amount," since this transaction is a debit. Do not select anything in the "Category" box at this time. Click on the Transaction splits button:  A new Transaction splits window will open: 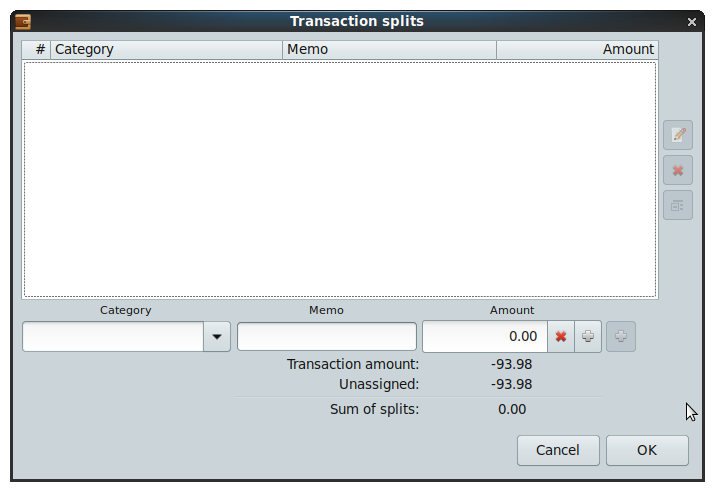 Add the information for your first Split category. (In this example, I will assign the amount of $53.98 to the expense category of "Household"). Precede the amount with a minus sign (-), since this is a debit. (You can type additional information into the Memo box, if you wish). 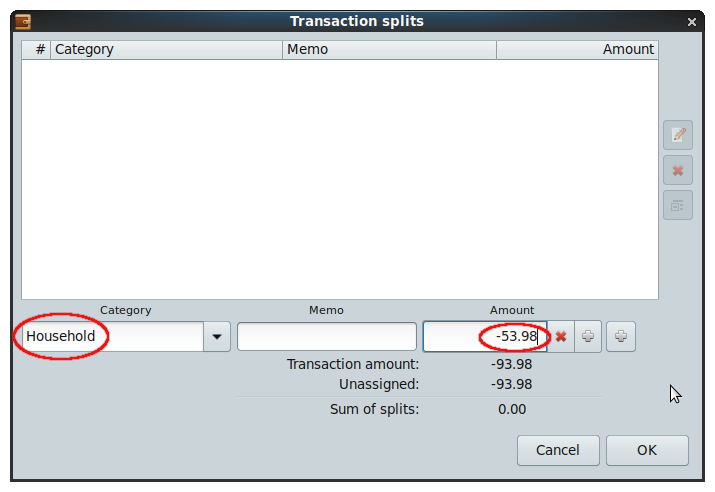 Click on the second Add (+) button, i.e., the one on the right. 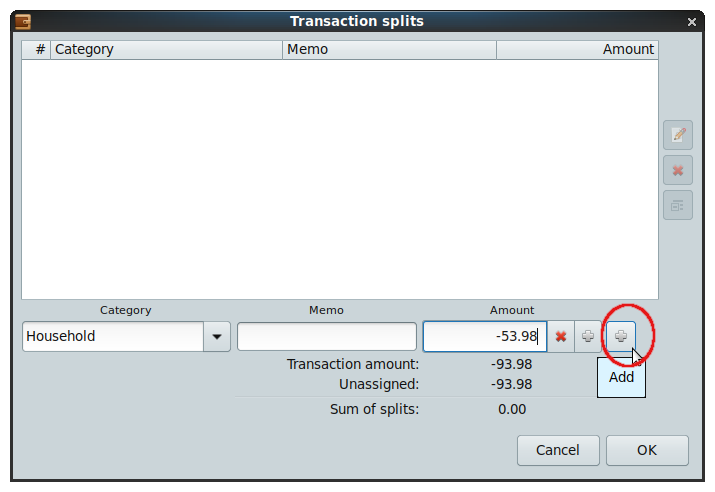 You will see this data line move up into the main window. 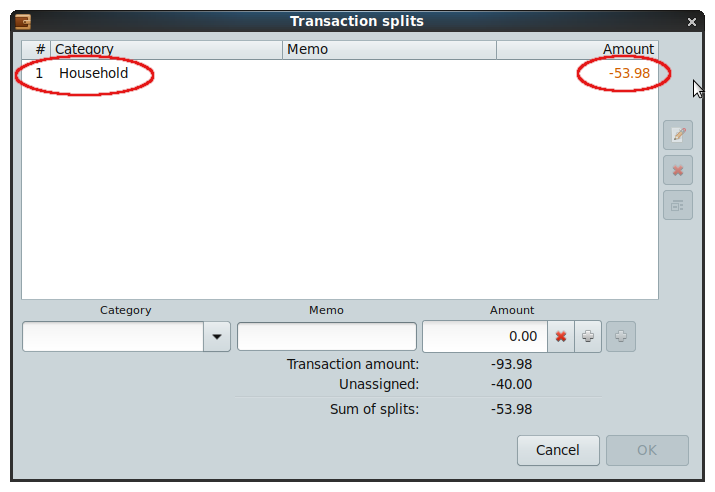 Repeat this process for your next split category. (In this case, I assigned the amount of $40.00 to the expense category of "Charitable Donations"). 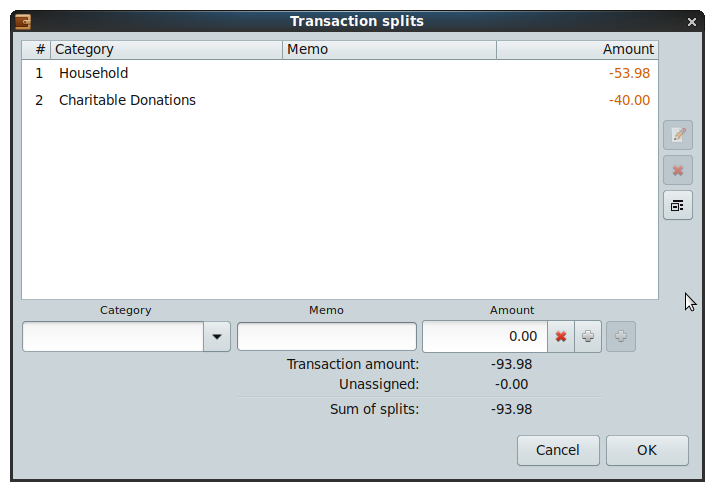 Double-check that the Unassigned amount shows as "-0.00" (Sometimes it will show as "-.--"). To close the Transaction splits window, click on the OK button.  Next, you will be returned to the Add transaction window. Click on the Add button to enter/finalize this split transaction. 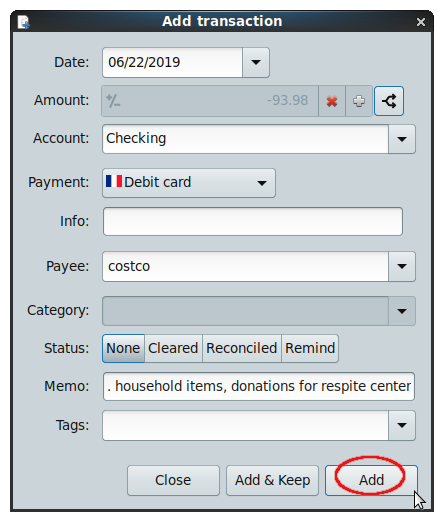 Afterwards, in the Account window, notice that the Category column will indicate "-split-".  |