| Previous
Page |
PCLinuxOS
Magazine |
PCLinuxOS |
Article List |
Disclaimer |
Next Page |
Exploring LXQt: A Basic Guide, Part 3 |
|
by David Pardue (kalwisti) In this part 3 of the series, I'll illustrate how to add a keyboard layout, use the "Custom Command" plugin, edit images and customize your panel. Add a Keyboard Layout If you are bilingual -- or just learning a new language for fun -- and need to switch back and forth between languages, you will likely have to change your keyboard layout. I should clarify that changing to a foreign-language keyboard layout will not automatically change the language of the operating system. For example, if you change to a Spanish keyboard layout, the menus and system messages will still be in English [assuming that your current locale is set to American English]. In case you want to add a fully non-English locale to your PCLinuxOS system, you may use Pinoc's clever "addlocale" script. In LXQt, you can access it under the System Tools menu > Software Center > Localization Manager. Complete instructions for using the addlocale script are posted in the "Tips and Tricks" section of the PCLinuxOS Forums. These instructions cover how to add a foreign-language keyboard layout in LXQt ver. 1.2.0. As you will see, the procedure is straightforward.
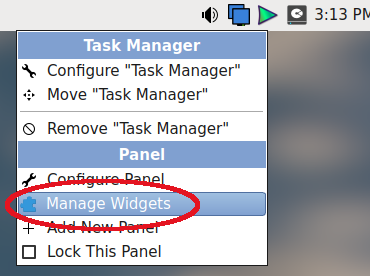
Right-click on the top panel > then choose Manage Widgets: In the "Configure Panel" pop-up dialog that appears, click on the " + " [plus] button: 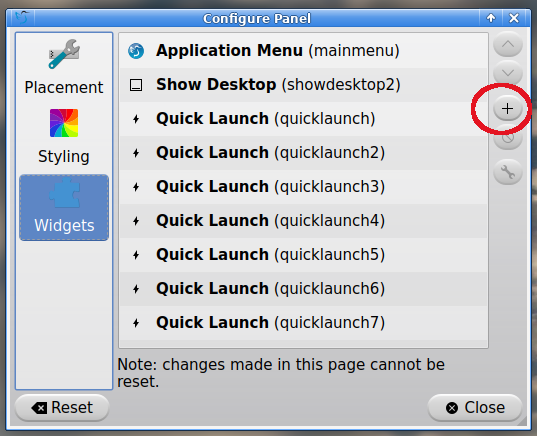 Third, an "Add Plugins" pop-up window appears. Scroll down the list and choose the "Keyboard State Indicator (kbindicator)" widget. Then, click on the "Add Widget" button to add it to your top panel: 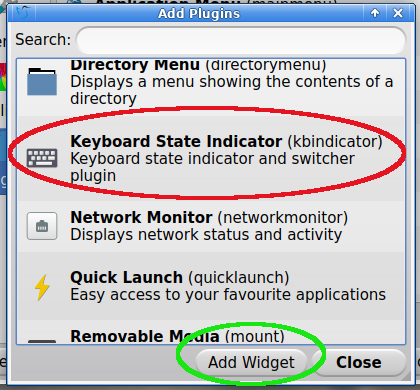 The Keyboard widget should appear at the far-right end of the panel / taskbar: 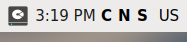 (Those three letters ("C N S") are called "Lock Indicators"; their configuration will be discussed at the end of this section). To move the Keyboard widget to a different location on the panel, right-click on the widget and choose "Manage Widgets": 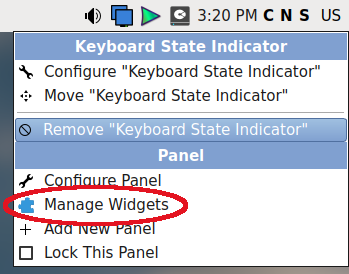 Highlight / choose the kbindicator widget by clicking on it, then use the " ^ " [up] button to incrementally move the Keyboard widget to your desired location on the panel:  In the example below, I moved the Keyboard widget to the left of the Volume widget:  Click on the "Close" button to close the "Configure Panel" pop-up window. To add a new, foreign-language keyboard layout, begin by right-clicking on the Keyboard widget and choosing the option "Configure 'Keyboard State Indicator': 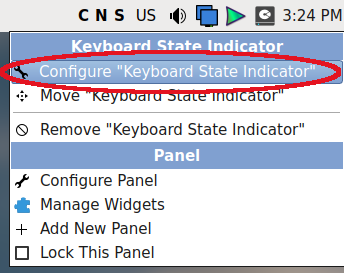 A "Keyboard state settings" pop-up dialog appears. We will first click on the "Configure layouts" button to add another language's keyboard layout: 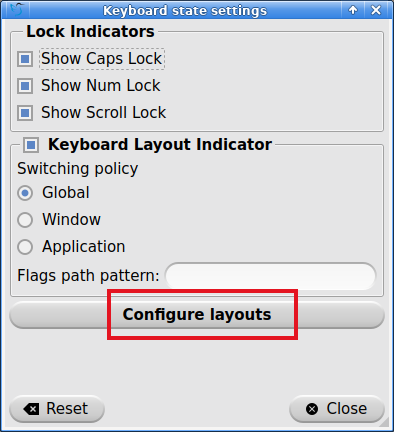 (Note: For the moment, we will not deactivate / de-select the three "Lock Indicators" options in the top section of the dialog. Those options cause the letters "C N S" to be displayed beside the two-letter abbreviation of the active keyboard layout). Now a "Keyboard Layout" pop-up window will appear. To add a new language keyboard layout, click on the "Add" button: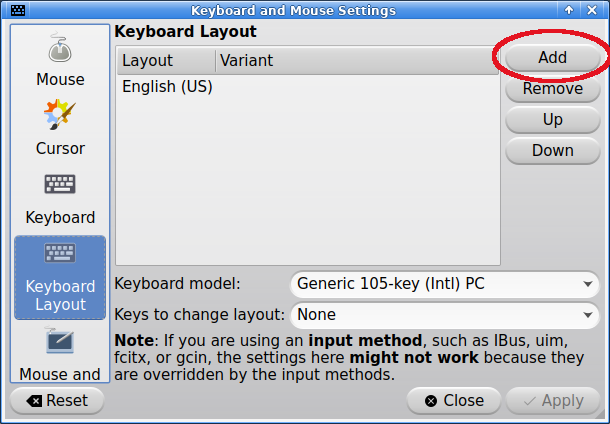 When you select the "Add" button, a new pop-up window will present an alphabetical list of keyboard layout options to choose from. 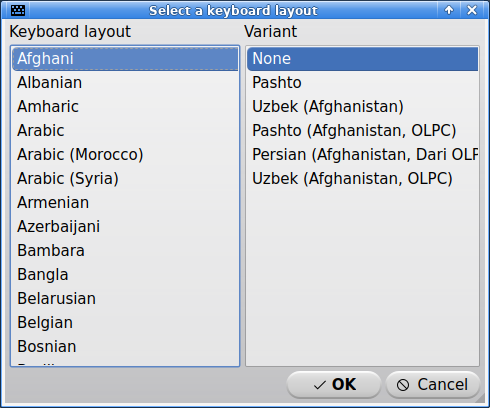 In this example, I will choose a dedicated Esperanto keyboard by highlighting it, then clicking on the "OK" button: 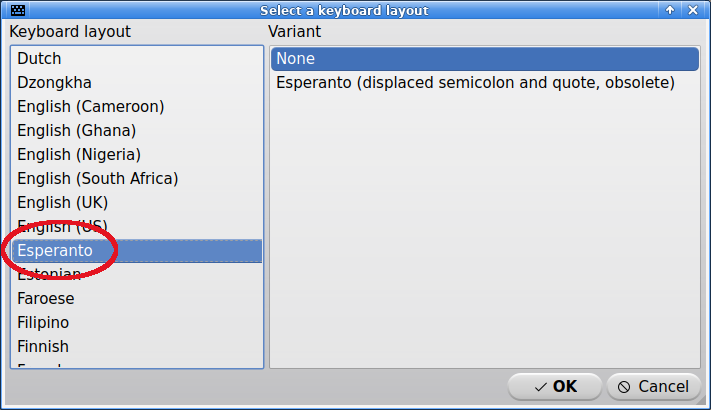 The Esperanto layout will be added to the list of installed keyboard layouts. If you wish, you may also choose a key combination that allows you to quickly switch between your installed layouts. That key combination is selected from a drop-down menu labeled "Keys to change layout": 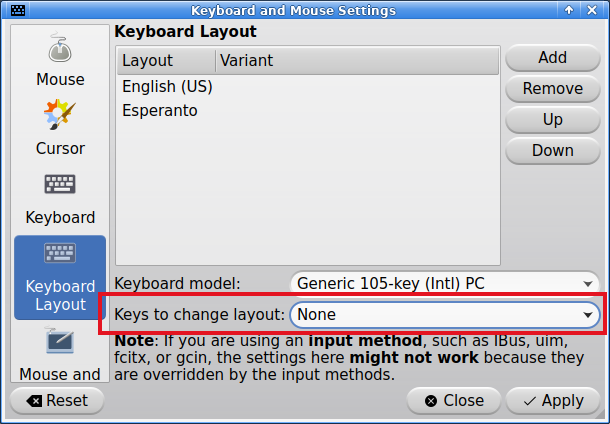
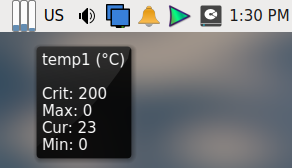
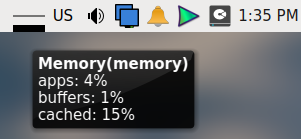
Clicking on that drop-down menu will display available key combinations: 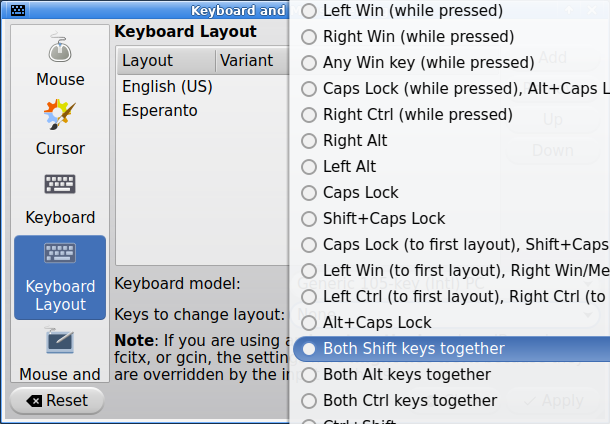 I decided on the "Win Key + Space" combination. Click on the "Apply" button to finalize your choice: 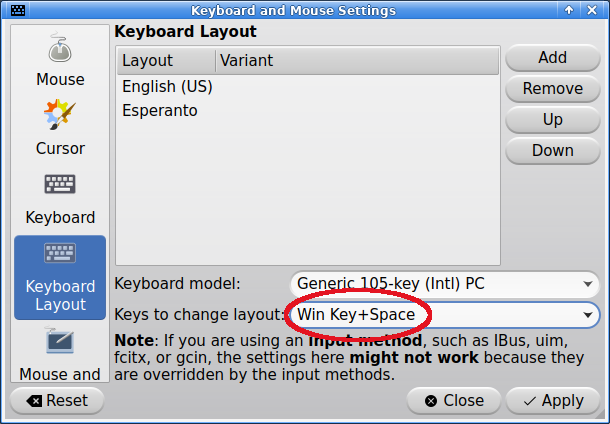 Note: You are not required to select a layout-switching key combination. If you prefer to leave it set as "None", you can switch between installed layouts by just clicking on the Keyboard widget in the top panel. Another area of personal preference involves the three Lock Indicators ("C[aps Lock] N[um Lock] S[croll Lock]") in the kbindicator widget. To use your taskbar space more efficiently, you can toggle off the Lock Indicators by unchecking (de-selecting) them in the "Keyboard state settings" pop-up dialog: 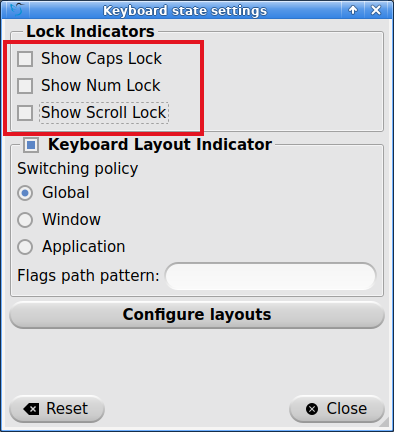 If you toggle off the Lock Indicators display, the kbindicator widget will look like this:  LXQt offers basic support for displaying country flags instead of the two-letter language codes. If you want to enable that option, right-click on the Keyboard widget in the panel > then select "Configure 'Keyboard State Indicator'." In the pop-up dialog that appears, look for the "Flags path pattern" field and type the following path into it: /usr/share/iso-flag-png/%1.png (that's the number one after the percentage sign). (The relevant country flags are located in the /usr/share/iso-flag-png directory and the "%1" will be replaced by the two-letter ISO country code). 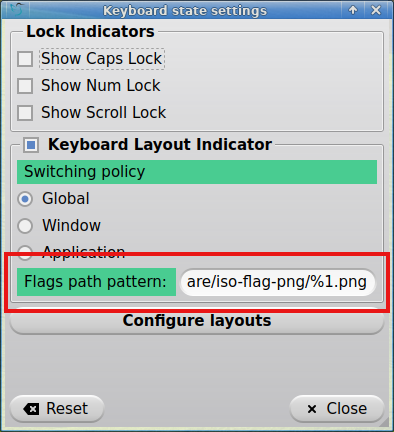 Click on the Close button. You should now see the keyboard layout display with a flag (as shown in the examples below with the US and Spanish flags):   In case the flag file does not exist, or is an image not easily shown, the Keyboard indicator will fall back to the alphabetic ISO code (as shown below with Esperanto):  If you prefer not to use flag icons, simply leave the Flags path pattern field empty and the alphabetic ISO code will be displayed. Try the "Custom Command" Panel Plugin As of version 1.0.0 (released in November 2021), LXQt Panel has a new plugin, "Custom Command" (customcommand), which displays the output of a CLI command in your panel. If you would like an idea of how to use this feature, several bash command examples have been collected on the "Discussions" section of LXQt's GitHub page: This plugin can be installed in the usual way. First, right-click on the panel. Next, choose the "Manage Widgets" option. Then in the "Configuration Panel" pop-up dialog, click on the " + " [plus] button. The "Add Plugins" pop-up window will appear. Scroll down to the "Custom Command" widget and select it: 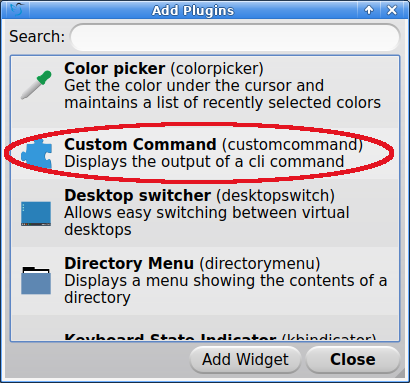 Now, click on the "Add Widget" button, then on the "Close" button. The Custom Command plugin will be added to the right-side edge of your panel. To move the plugin to a different location on your panel, right-click on the widget, then select "Manage Widgets." Move the plugin to your desired location by clicking incrementally on the "^" [up] button in the "Configure Panel" pop-up window. When you have placed the plugin where you want it, you can configure the plugin by right-clicking on it and choosing "Configure 'Custom Command'." Look for the "Command" box and delete the placeholder text (circled below in green): 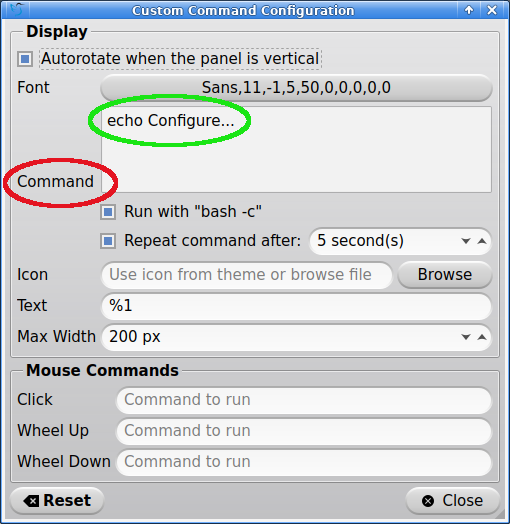 Copy and paste one of the bash command examples previously linked to on LXQt's GitHub page. In the screenshot below, I have used the command which shows the amount of free disk space in my root partition:  (Note: Although my root partition is on /dev/sda2, I discovered through trial and error that "sda2|awk [...]" did not produce any output. In order for the command to work correctly, I had to replace "sda2|awk [...]" with "root|awk [...]"). Click on the "Close" button when you are finished. The custom command above produced the following result:  I also tried the bash command to monitor my desktop PC's temperature ( cat /sys/class/thermal/thermal_zone0/temp |cut -c1,2 ) which yielded the ouptut below:  Similar Applets for Monitoring Your System To be thorough, I will also mention four of LXQt's native applets / panel plugins which can provide helpful system information:
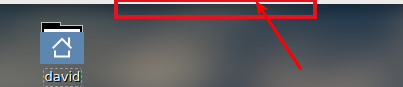
 Edit Images with LXImage-Qt I recently discovered two interesting features of LXImage-Qt, the DE's native image viewer. The application allows you to do bare-bones image editing. Although its capabilities are more limited than Shutter's edit mode, it can add these simple annotations: arrow, rectangle, circle and incrementing numbers. Open an image file with LXImage-Qt, then go to the View menu > and choose Annotations Toolbar. The Annotations tools will appear at the right edge of the toolbar:  LXImage-Qt lacks an Undo feature, so if you make a mistake, you have to click on the Reload File button (which will erase all your edits / changes): 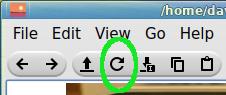 I experimented with the Annotations tools on a photo (.jpg) and saved the results to give you a demonstration of its editing capabilities. (The only color option is red): 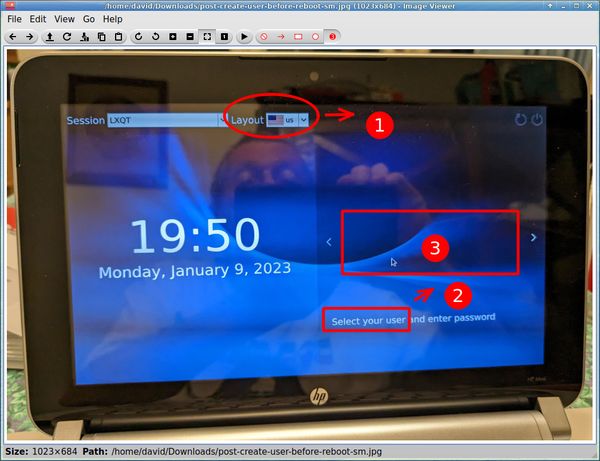 Another convenient feature of LXImage-Qt is its ability to upload the currently open image to an online service: Imgur, ImgBB or ImageShack. This function works without requiring you to log in to your personal account. From the File menu > choose Upload. An "Upload" pop-up dialog will appear. Select your desired image hosting service from the drop-down menu: 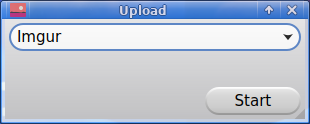 Click on the Start button. When the upload finishes, the created URL will display in the box. Click on the Copy button to share the link with someone. 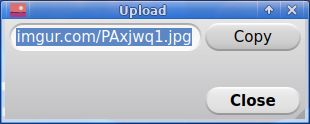 Customize Your Panel In this final section, I will limit myself to an overview because I do not usually spend much time on customizing the appearance of my DE. As with the topic of theming (discussed in my previous article), this area is highly subjective and "There are as many opinions as there are people" -- as the Roman playwright Terence said. (Terence [Publius Terentius Afer, 185 - 159 B.C.] is credited with this observation in his play Phormio (2.4). The original Latin quotation is "Quot homines tot sententiae; suus cuique mos" -- 'There are as many opinions as there are people: each has his own view'). The LXQt Panel can be customized quite a bit, to suit your taste. To change your panel settings, First right-click on an empty area of the panel > then select Pane and Configure Panel. 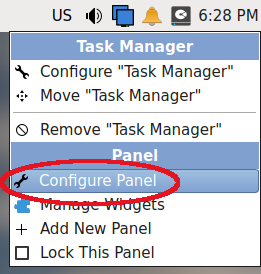 A "Configure Panel" pop-up window will appear. 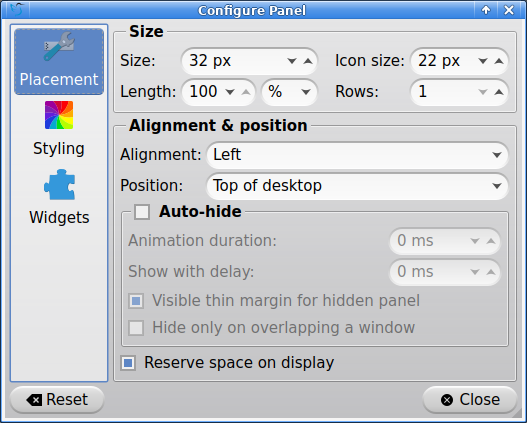 Click on the "Placement" option in the left margin of the pop-up window. From here, you can change a variety of settings, such as the size of the panel (Size), its length (Length) and the icon size (Icon size). In addition, you can change the panel's alignment (Alignment) and its position on your desktop (Position), i.e., whether you want it at the top of your desktop, the bottom or on the left. One characteristic of the Alignment setting should be noted. Changing the alignment will not have any effect if your panel occupies the entire screen (i.e., if the Size > Length value equals 100%). If you wish, you can also enable the panel's Auto-hide feature. (We will cover that in the next subsection). I should mention that there is no "correct" answer to these configuration settings. Finding the optimal setup depends on a combination of factors in your workstation environment, e.g., the height of your chair, the height of your desk and the height of your monitor(s). Linux is highly customizable, so customize your DE such that it is comfortable for you. Daniel opted to have the default panel position be "Top of desktop" for the LXQt 2022.11 .iso as well as for the 2023.01 .iso. This is a reasonable decision which has the following advantages:
While searching Linux forums for surveys and/or opinions about panel placement, I found that some users dislike a top panel because they believe it increases the chance of misclicks, i.e., clicking on the wrong browser tab, mistakenly clicking on a panel widget instead of accessing the Close or Minimize button, etc.  Link to full-resolution screenshot: http://pcloscloud.com/index.php/s/psHDwxyr2xEjbjW If you prefer to have the panel located at the bottom of your screen, choose Position: Bottom of desktop.  Link to full-resolution screenshot: http://pcloscloud.com/index.php/s/YgrKBgd2NfGFRBf A bottom panel is a sound choice; that layout has proven to be an efficient and functional UI which feels natural to people who "grew up with Microsoft Windows" and/or are new converts to Linux. A desktop should be unobtrusive -- and it is most unobtrusive when it is familiar. I also read comments pointing out that when you use a laptop, the screen is usually below eye level. Having a bottom panel means that it is out of way and occupies less prime screen space. Another option for panel placement which is less commonly used is to have a vertical panel on the left. You can accomplish this by selecting the option Placement: Left of desktop.  Link to full-resolution screenshot: http://pcloscloud.com/index.php/s/7Weq6Cc6Gia5pAw I have tried this layout infrequently; however, it is the default configuration of MX Linux's Xfce Edition. It is also somewhat reminiscent of Ubuntu's Unity environment (which I experimented with in 2012). The principal argument in favor of a left-side panel is that it maximizes vertical space for widescreen displays / monitors. The most common option today for computer monitors -- as well as TVs -- is the widescreen aspect ratio of 16:9. The "16" represents the top and bottom of the screen while the "9" represents the sides. So, the top and bottom are almost as twice as long as the sides; a widescreen monitor looks more like a rectangle than the square shape of an "old-school" standard monitor (with a 4:3 aspect ratio). With a widescreen display, therefore, vertical space is more scarce than horizontal space. Placing a vertical panel on the left edge will sacrifice only a small amount of the screen's abundant width, but none of the screen's limited height. Auto-Hiding the Panel If you are hesitant to switch to a left-panel arrangement but would like to make better use of your widescreen monitor's vertical space, a compromise solution is to auto-hide the bottom (or top) panel. This will allow you to keep all your vertical space. Checking (ticking) the Auto-hide box will allow you to select from among its various options: 
In conclusion, I hope these tips helped reduce the learning curve and made you more comfortable with LXQt, if you recently installed it -- or just took it for a spin with a Live USB or VirtualBox session. LXQt is underrated; it is one of the lightest mainstream DEs and it boasts a classic desktop design updated with modern features. Although the core development team is small, they have demonstrated a commitment to provide a solid desktop environment for LXQt's growing user base. |