| Previous
Page |
PCLinuxOS
Magazine |
PCLinuxOS |
Article List |
Disclaimer |
Next Page |
Inkscape Tutorial: Create A Text Design |
|
by Meemaw As we get closer to Christmas, I always think I will make my Christmas cards and print them myself … and then I run out of time and buy them! Oh, well… I'll do it one of these days. I looked on YouTube for an Inkscape tutorial that might help, and found this one from Davies Media Design that would let me do what I was thinking of. His video creates a logo, but the process is the same for the text. I want to put some holiday text on a circle, and fill the circle with clipart. It's pretty easy to do, and the variations are just as easy. Open your Inkscape. My default page size seems to be US Letter, but you can make this a bit bigger. The first step is to make a circle for the text to surround. I made a circle with only a stroke (mine is purple, but make it whatever color you want). I then made my top text, which will say Merry Christmas, and sized it to 64 px. Mine's red, but your color choice is your own. The font I'm using is A&S Speedway (again, use whatever font you like). Select both items. 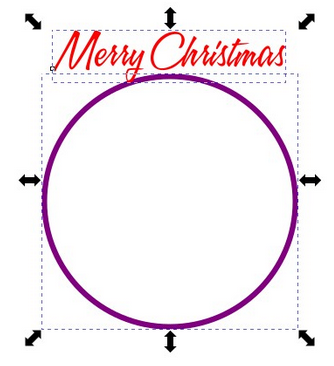 Go to Text > Put on path. Your text will be on this circle, but possibly not where you intended it to be. 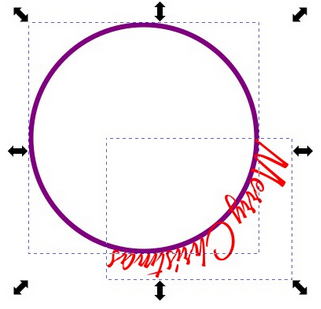 Deselect the text, or click elsewhere and then select only the circle. Click on it again to choose the rotation handles, then rotate your text around to the desired position. 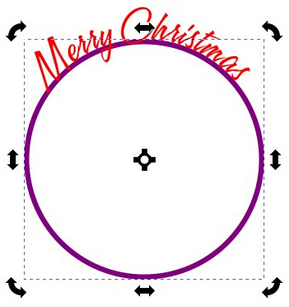 For my design, I want some text at the bottom as well. We'll have to mess with this a little more. Duplicate the circle you have, then increase its size until it is just at the top of the top text. If you press <Ctrl> and <Shift> while you are resizing, the circle will stay perfectly round (that's what <Ctrl> is for) and will increase from the center so it's more easily managed (<Shift> does that). 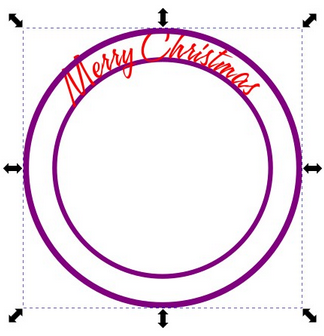 Using the Text tool, create the text you want on the bottom (I chose Happy New Year!) Select your text and your bigger circle and again select Text > Put on path. 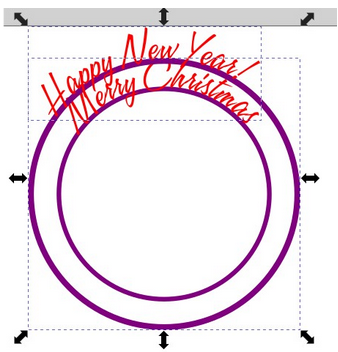 Again, it isn't where we want it, and it isn't inside the circle like we thought it would be. Go up to the toolbar, and click on Flip Vertically. This will flip the circle and the text, and (amazingly) curve the text inside the circle, as we wanted. 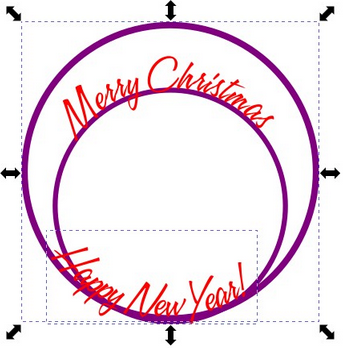 Cool! It's in the circle, but not lined up where we want it. All we have to do is move it down a bit. 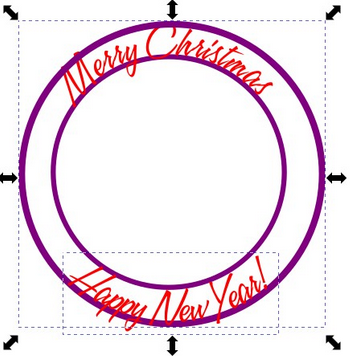 If you want the circles, that's fine. You can change the color, but if you want to move them or resize them, your text will change. To move or delete the circles, you need to separate the curve from the text it's linked to. Click on the text, and choose Path > Object to path. That will make the text a path, independent from the circle, and then you can delete the circle. I deleted the larger one, and changed the color and stroke width on the smaller one. I also imported a piece of clipart to put into the center (inside the smaller circle. I didn't put any background in, so I could put it on any color background. I also added a drop shadow to each line of text and the clipart.  So my cards could look like these. The top one has a light blue background and the bottom has a pink background, which shows through the decoration I created. Remember to export your decoration as a .png file for transparency.   Just as a note: I started doing these tutorials in 2012! I hope you've learned what you wanted to learn over the years. |